1999 NISSAN FRONTIER heater
[x] Cancel search: heaterPage 100 of 247
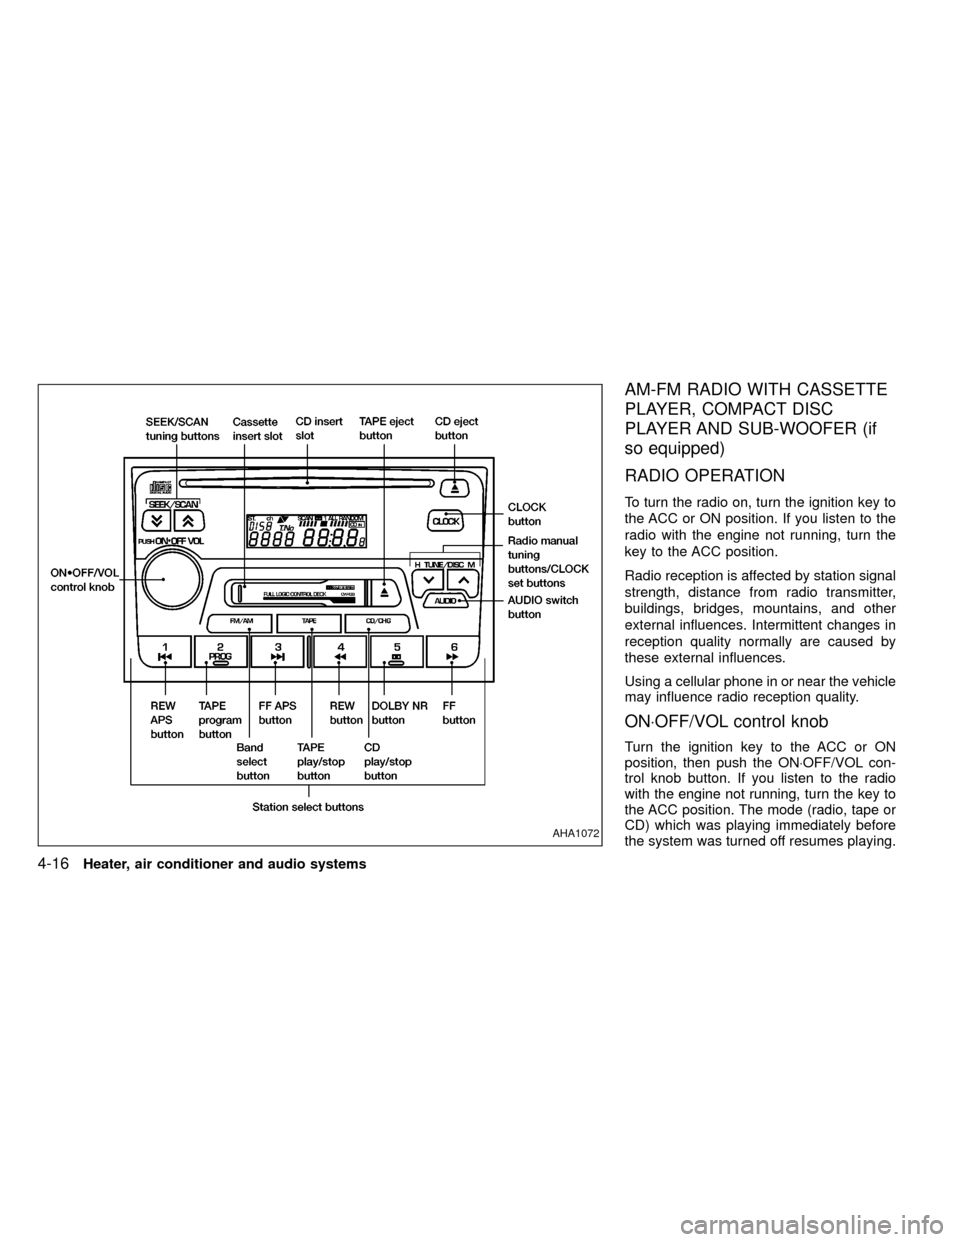
AM-FM RADIO WITH CASSETTE
PLAYER, COMPACT DISC
PLAYER AND SUB-WOOFER (if
so equipped)
RADIO OPERATION
To turn the radio on, turn the ignition key to
the ACC or ON position. If you listen to the
radio with the engine not running, turn the
key to the ACC position.
Radio reception is affected by station signal
strength, distance from radio transmitter,
buildings, bridges, mountains, and other
external influences. Intermittent changes in
reception quality normally are caused by
these external influences.
Using a cellular phone in or near the vehicle
may influence radio reception quality.
ON×OFF/VOL control knob
Turn the ignition key to the ACC or ON
position, then push the ON×OFF/VOL con-
trol knob button. If you listen to the radio
with the engine not running, turn the key to
the ACC position. The mode (radio, tape or
CD) which was playing immediately before
the system was turned off resumes playing.
AHA1072
4-16Heater, air conditioner and audio systems
ZX
Page 101 of 247
When no CD or tape is loaded, the radio
comes on. Pushing the ON×OFF/VOL con-
trol knob button again turns the system off.
Turn the ON×OFF/VOL control knob to ad-
just the volume.
Clock operation
Pressing the clock button alternates the
clock and the radio/cassette/CD player op-
tions in the display.
Clock set
Depressing the clock andbuttons to-
gether sets hours. Depressing the clock and
buttons together sets minutes.
Clock priority mode
In this mode the clock is shown in the
display. If any radio, cassette or CD func-
tions are activated, the radio, cassette or
CD display illuminates for 10 seconds then
returns to the clock mode.
NOTE:
After clock adjustment, the radio is in the
clock priority mode.
FM-AM band select button
Push thebutton to change from AM to
FM1 or FM2 reception.
The FM stereo indicator, ST, illuminates
during FM stereo reception. When the ste-
reo broadcast signal is weak, the radio
automatically changes from stereo to mon-
aural reception.
TUNE/DISC buttons
WARNING
The radio should not be tuned while
driving in order that full attention may
be given to the driving operation.
Use the
andbuttons for manual
tuning. To move quickly through the chan-
nels, hold either of the tuning buttons down.
SEEK/SCAN buttons
SEEK tuning
Push the SEEK/SCAN tuning buttonorfor less than 1.5 seconds. SEEK tuning
begins from low to high frequencies or high
to low frequencies, depending on which but-
ton is pressed, and stops at the next broad-
casting station. If using the
buttononce the highest broadcasting station is
reached, the radio continues in the SEEK
mode at the lowest broadcasting station. If
using the
button once the lowest broad-
casting station is reached, the radio contin-
ues in the SEEK mode at the highest broad-
casting station.
SCAN tuning
Push the SEEK/SCAN tuning buttonorfor more than 1.5 seconds. SCAN illu-
minates in the display window, and the radio
station blinks. SCAN tuning begins from low
to high frequencies or from high to low
frequencies, depending on which button is
pressed. SCAN tuning stops at each broad-
casting station for five seconds. Pushing the
button again during this five second period
stops SCAN tuning and the radio remains
tuned to that station.
Heater, air conditioner and audio systems4-17
ZX
Page 102 of 247
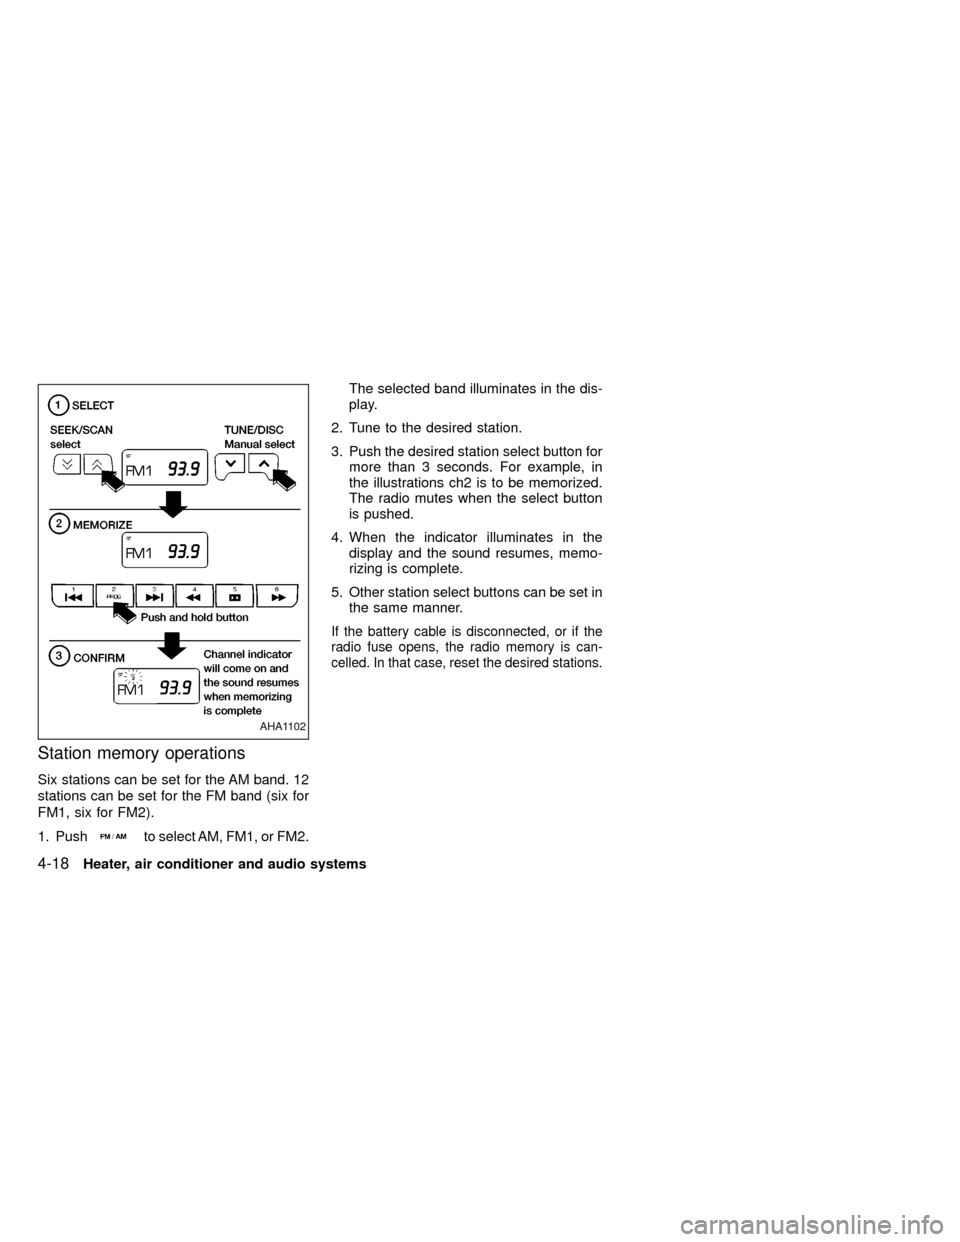
Station memory operations
Six stations can be set for the AM band. 12
stations can be set for the FM band (six for
FM1, six for FM2).
1. Push
to select AM, FM1, or FM2.The selected band illuminates in the dis-
play.
2. Tune to the desired station.
3. Push the desired station select button for
more than 3 seconds. For example, in
the illustrations ch2 is to be memorized.
The radio mutes when the select button
is pushed.
4. When the indicator illuminates in the
display and the sound resumes, memo-
rizing is complete.
5. Other station select buttons can be set in
the same manner.
If the battery cable is disconnected, or if the
radio fuse opens, the radio memory is can-
celled. In that case, reset the desired stations.
AHA1102
4-18Heater, air conditioner and audio systems
ZX
Page 103 of 247
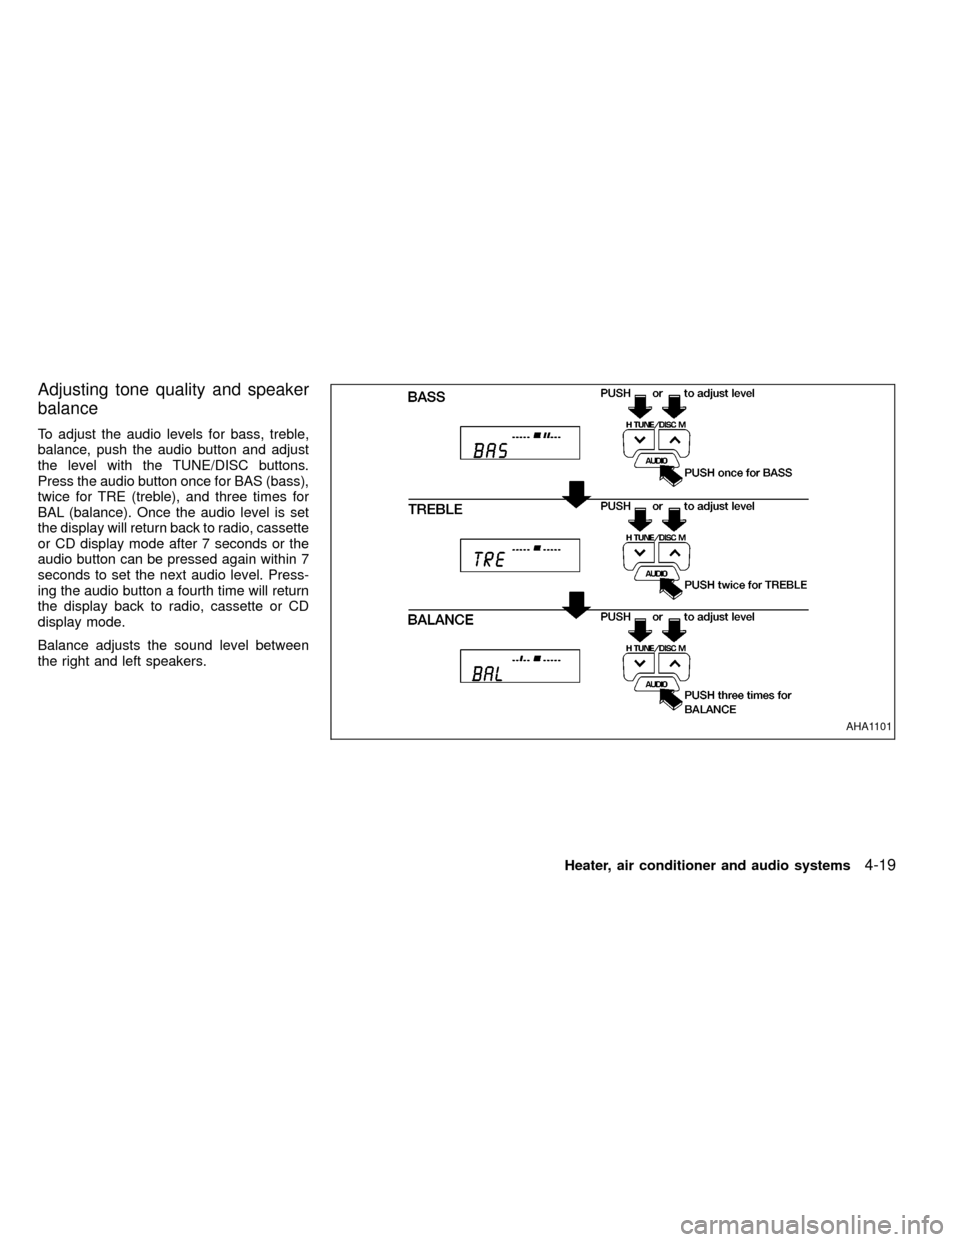
Adjusting tone quality and speaker
balance
To adjust the audio levels for bass, treble,
balance, push the audio button and adjust
the level with the TUNE/DISC buttons.
Press the audio button once for BAS (bass),
twice for TRE (treble), and three times for
BAL (balance). Once the audio level is set
the display will return back to radio, cassette
or CD display mode after 7 seconds or the
audio button can be pressed again within 7
seconds to set the next audio level. Press-
ing the audio button a fourth time will return
the display back to radio, cassette or CD
display mode.
Balance adjusts the sound level between
the right and left speakers.
AHA1101
Heater, air conditioner and audio systems4-19
ZX
Page 104 of 247
CASSETTE TAPE OPERATION
Turn the ignition key to the ACC or ON
position, and carefully insert a cassette tape
into the tape door. The cassette tape auto-
matically pulls into the player. The word
TAPE illuminates in the display.
CAUTION
Do not force the cassette tape into the
tape door. This could cause player
damage.
ITo maintain good quality sound,
NISSAN recommends using cassette
tapes of 60 minutes or shorter in
length.
ICassette tapes should be removed
from the player when not in use. Store
cassettes in their protective cases
and away from direct sunlight, heat,
dust, moisture or magnetic sources.
IDirect sunlight can cause the cassette
to become deformed. The use of de-
formed cassettes may cause the cas-
sette to jam in the player.
IDo not use cassettes that have peel-
ing or loose labels. If used, the labelcould jam in the player.
IIf a cassette has loose tape, insert a
pencil through one of the cassette
hubs and rewind the tape firmly.
Loose tape may cause jamming and
wavering sound quality.
IOver a period of time, the playback
head, capstan and pinch roller may
gather a tape coating residue as the
tape is played. This residue accumu-
lation can cause a weak or wavering
sound and should be removed peri-
odically with a head cleaning tape. If
the residue is not removed periodi-
cally, the player may need to be disas-
sembled for cleaning.
PLAY/STOP TAPE button
When thebutton is pushed with the
system turned off and a tape loaded, the
system comes on and the tape plays.
The word tape illuminates.
When the
button is pushed with either
the radio or compact disc turned on and a
tape loaded, the compact disc or the radio
turns off and the tape plays.
While the tape is playing, pushing the
button stops tape play. Pushing thebutton again resumes tape play.
FF (fast forward) and REW (rewind)
buttons
Push thebutton to fast forward the
tape. Push thebutton to rewind the
tape. Either REW or FF illuminates in the
display. To stop the FF or REW function,
press the
,,orbuttons.
Automatic Program Search (APS)
FF and REW buttons
When thebutton is pushed while the
tape is being played, the tape runs quickly,
stops, then plays the next selection from the
beginning. Push the
button several
times to skip several selections. Each time
the button is pushed, the tape fast forwards
one additional selection. This number ap-
pears in the display window. The tape can
be fast forwarded through up to nine selec-
tions. (for example: 7 in the display indi-
cates that the
button has been
pushed seven times to skip forward through
seven selections).
When the
button is pushed, the se-
lection being played starts again from the
4-20Heater, air conditioner and audio systems
ZX
Page 105 of 247
beginning. Push thebutton several
times to rewind several selections. Each
time the
button is pushed, the tape
rewinds back one additional selection. The
number of selections skipped appears in the
display window as a negative number (for
example: -7 in the display indicates that the
button has been pushed seven times
to rewind back through seven selections).
Either the FF or REW illuminates in the
display when the
orbutton is
pushed.
The system searches for the blank intervals
between selections. If there is a blank inter-
val within one selection or there is no inter-
val between selections, the system may not
stop in the desired or expected location.
PROG (Program) button
Push thebutton to change the tape
side while the tape is being played.
The cassette tape automatically changes
directions to play the other side when the
first side is complete.
Dolby NR (noise reduction)
Push thebutton for Dolby NR en-
coded tapes to reduce high frequency tapenoise. The
indicator illuminates in the
display.
Dolby NR is manufactured under license
from Dolby Laboratories Licensing Corpora-
tion. DOLBY NR and the double-D symbol
are trademarks of Dolby Laboratories Li-
censing Corporation.
Metal or chrome tape usage
The cassette player is automatically set to
high performance play when playing a metal
or chrome cassette tape.
TAPE EJECT button
Push thebutton to eject the cassette
an inserted tape.
Precautions on cassette player op-
eration
COMPACT DISC (CD) PLAYER
OPERATION
Turn the ignition key to the ACC or ON
position and carefully insert the compact
disc into the slot with the label side up. The
compact disc is automatically pulled into the
slot and starts to play.
If the radio or cassette tape is alreadyoperating, it automatically turns off and the
compact disc begins to play.
CAUTION
Do not force the compact disc into the
slot. This could damage the player.
CD button
When thebutton is pushed with the
compact disc loaded and the tape or the
radio playing, the tape or radio turns off and
compact disc starts to play.
FF (fast forward) REW (rewind)
buttons
When theorbutton is pushed
while the compact disc is playing, the com-
pact disc plays at an increased speed while
fast forwarding or rewinding. When the but-
ton is released, the compact disc returns to
normal play speed.
Automatic Program Search (APS)
APS FF, APS REW buttons
When thebutton is pushed while the
compact disc is playing, the selection fol-
Heater, air conditioner and audio systems
4-21
ZX
Page 106 of 247
lowing the present one starts to play from
the beginning. Push the
button sev-
eral times to skip several selections. Each
time the button is pushed, the CD advances
one additional selection. The number ap-
pears in the display window. (When the last
selection on the compact disc is skipped,
the first selection is played.)
When the
button is pushed, the se-
lection being played returns to the begin-
ning. Push the
button several times
to skip back several selections. Each time
the button is pushed, the CD moves back
one selection.
PROG (program) button
When thebutton is pushed while the
compact disc is playing, the play pattern
changes as follows.
1.The current selection is repeated.
RANDOM:Selections are played at ran-
dom, not following the sequence on the
compact disc. The same program may be
repeated twice.
Blank(no symbol): All selections are played
repeatedly in sequence.
When a new compact disc is inserted,the play pattern automatically changes
to ALL.
CD EJECT button
When thebutton is pushed with a com-
pact disc loaded, the compact disc ejects.
When the
button is pushed while the
compact disc is playing, the compact disc
ejects and the system turns off.
If the compact disc ejects and is not
removed within 10 seconds, it is pulled
back into the slot.
CD (DISC) indicator light
This light comes on when a compact disc is
loaded into the player.
CAUTION
IDuring cold weather or rainy days,
the player may malfunction due to
the humidity. If this occurs, remove
the CD and dehumidify or ventilate
the player completely.
IThe player may skip while driving on
rough roads.
IThe CD player sometimes cannot
function when the compartment tem-
perature is extremely high. Decrease
the temperature before use.
IDo not expose the CD to direct sun-
light.
4-22Heater, air conditioner and audio systems
ZX
Page 107 of 247
The antenna cannot be shortened, but it can
be removed. When you need to remove the
antenna, turn the antenna rod counterclock-
wise.
To install the antenna rod, turn the antenna
clockwise. Tighten the antenna rod to speci-
fication using a suitable tool such as a
open-end wrench. The antenna rod tighten-
ing specification is 3.4 - 3.6 N×m(30-32
in-lb). Do not use pliers to tighten the an-
tenna as they can leave marks on the
antenna surface. The antenna rod can not
be hand tightened to the proper specifica-
tion.
CAUTION
Always properly tighten the antenna
rod during installation or the antenna
rod may break during vehicle opera-
tion.
Microphone installed model
If equipped with a genuine NISSAN cellular
phone, your NISSAN features a non-
directional
microphone in the steering column cover, so
it is not necessary to look at or speak
directly into the microphone when calling. To
do so could detract from the driving opera-
tion and cause an accident. See the manual
for car phone operation.
Pre-wired and antenna for phone
installed model
Some models are pre-wired to accept the
genuine NISSAN cellular phone. In addition,
the same model has the phone antenna
built into the rear glass window.
When installing a CB, ham radio or car
phone in your NISSAN, be sure to observe
the following cautions, otherwise the new
equipment may adversely affect the MFI
(Multiport Fuel Injection) system and other
electronic parts.CAUTION
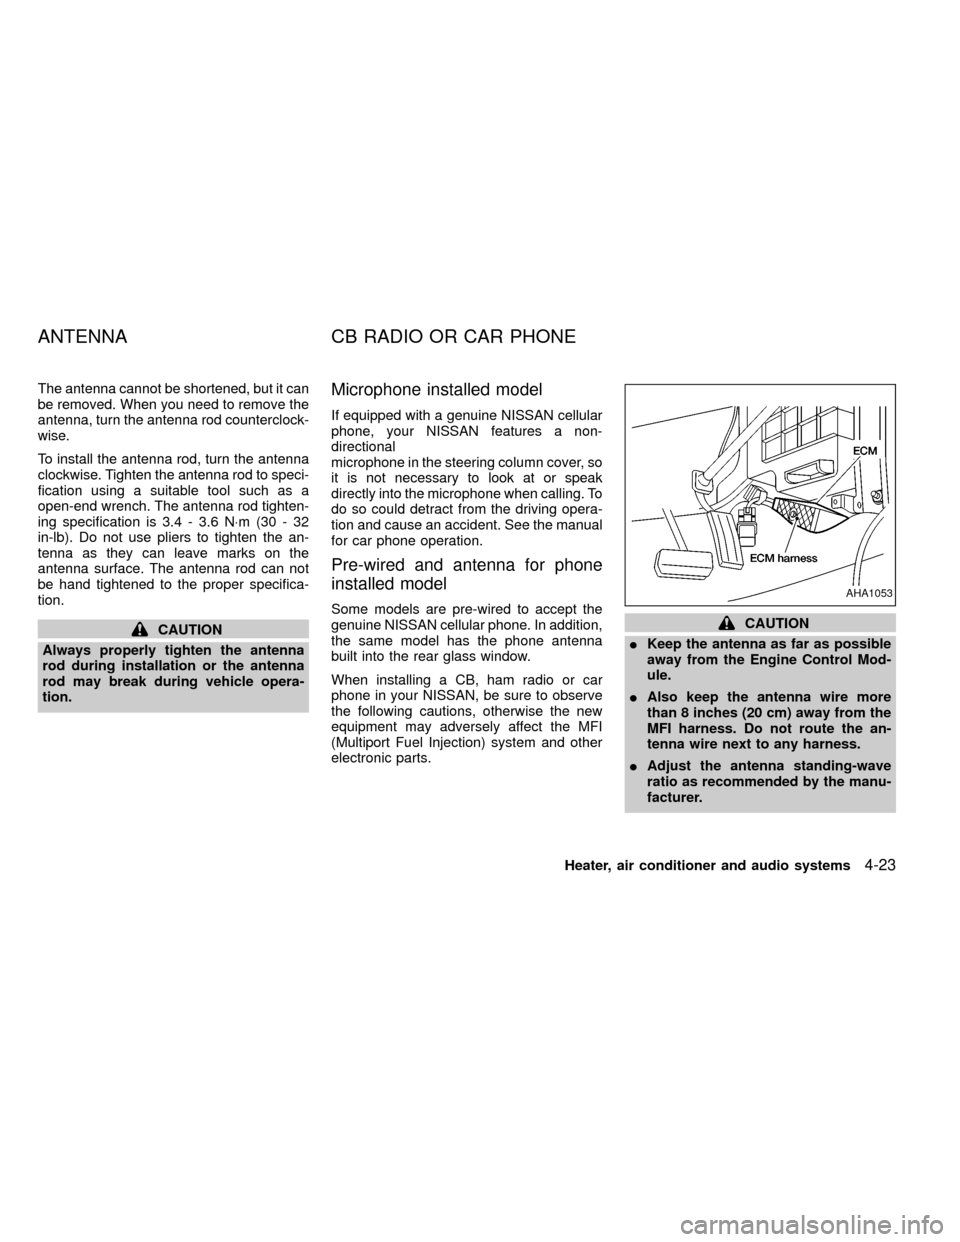
IKeep the antenna as far as possible
away from the Engine Control Mod-
ule.
IAlso keep the antenna wire more
than 8 inches (20 cm) away from the
MFI harness. Do not route the an-
tenna wire next to any harness.
IAdjust the antenna standing-wave
ratio as recommended by the manu-
facturer.
AHA1053
ANTENNA CB RADIO OR CAR PHONE
Heater, air conditioner and audio systems4-23
ZX