1999 NISSAN ALTIMA coolant level
[x] Cancel search: coolant levelPage 49 of 220

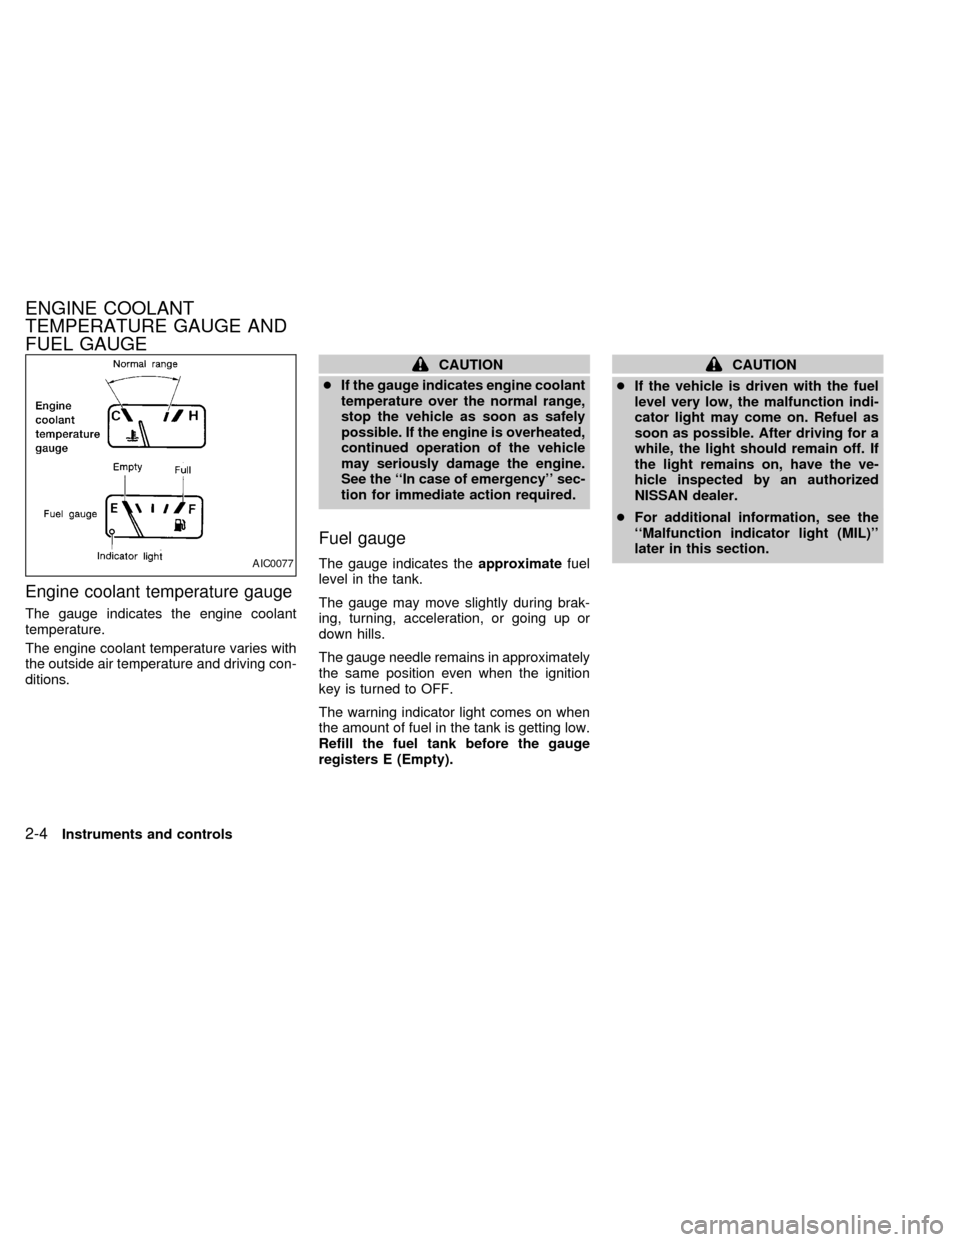
Engine coolant temperature gauge
The gauge indicates the engine coolant
temperature.
The engine coolant temperature varies with
the outside air temperature and driving con-
ditions.
CAUTION
cIf the gauge indicates engine coolant
temperature over the normal range,
stop the vehicle as soon as safely
possible. If the engine is overheated,
continued operation of the vehicle
may seriously damage the engine.
See the ``In case of emergency'' sec-
tion for immediate action required.
Fuel gauge
The gauge indicates theapproximatefuel
level in the tank.
The gauge may move slightly during brak-
ing, turning, acceleration, or going up or
down hills.
The gauge needle remains in approximately
the same position even when the ignition
key is turned to OFF.
The warning indicator light comes on when
the amount of fuel in the tank is getting low.
Refill the fuel tank before the gauge
registers E (Empty).
CAUTION
cIf the vehicle is driven with the fuel
level very low, the malfunction indi-
cator light may come on. Refuel as
soon as possible. After driving for a
while, the light should remain off. If
the light remains on, have the ve-
hicle inspected by an authorized
NISSAN dealer.
cFor additional information, see the
``Malfunction indicator light (MIL)''
later in this section.
AIC0077
ENGINE COOLANT
TEMPERATURE GAUGE AND
FUEL GAUGE
2-4Instruments and controls
ZX
Page 141 of 220

3. If engine overheating is caused by climb-
ing a long hill on a hot day, run the engine
at a fast idle (approximately 1,500 rpm)
until the temperature gauge indication
returns to normal.
4. Get out of the vehicle. Look and listen for
steam or coolant escaping from the ra-
diator before opening the hood. Wait until
no steam or coolant can be seen before
proceeding.
5. Open the engine hood.
WARNING
If steam or water is coming from the
engine, stand clear to prevent getting
burned.
6. Visually check drive belts for damage or
looseness. Also check if the cooling fan
is running. The radiator hoses and radia-
tor should not leak water. If coolant is
leaking, the water pump belt is missing or
loose, or the cooling fan does not run,
stop the engine.
WARNING
Be careful not to allow your hands, hair,
jewelry or clothing to come into contact
with, or to get caught in, the running
fan, belts, or fan motor.
The fan motor can start at any time
when the coolant temperature is high.
7. After the engine cools down, check the
coolant level in the reservoir tank with the
engine running. Add coolant to the res-
ervoir tank if necessary. Have your ve-
hicle repaired at an authorized NISSAN
dealer.When towing your vehicle, U.S. States,
Canadian Provinces and local regulations
for towing must be followed. Incorrect tow-
ing equipment could damage your vehicle.
Towing instructions are available from an
authorized NISSAN dealer. Local service
operators will generally be familiar with the
applicable laws and procedures for towing.
To assure proper towing and to prevent
accidental damage to your vehicle, NISSAN
recommends that you have a service opera-
tor tow your vehicle. It is advisable to have
the service operator carefully read the fol-
lowing precautions:
WARNING
cNever ride in a vehicle that is being
towed.
cNever get under your vehicle after it
has been lifted by a tow truck.
CAUTION
cWhen towing, make sure that the
transmission, axles, steering system
and powertrain are in working con-
dition. If any unit is damaged, dollies
must be used.
TOW TRUCK TOWING
6-10In case of emergency
ZX
Page 150 of 220

8 Do-it-yourself
Maintenance precautions .......................................8-2
Engine compartment check locations ....................8-3
Engine cooling system ...........................................8-4
Checking engine coolant level ...............................8-4
Changing engine coolant .......................................8-5
Engine oil ...............................................................8-7
Checking engine oil level .......................................8-7
Changing engine oil ...............................................8-8
Changing engine oil filter .......................................8-9
Automatic transmission fluid (ATF) ........................8-9
Temperature conditions for checking ATF ...........8-10
Power steering fluid..............................................8-11
Brake fluid ............................................................8-11
Clutch fluid............................................................8-12
Window washer fluid ............................................8-12
Battery ..................................................................8-13
Jump starting ........................................................8-14Drive belts ............................................................8-14
Spark plug replacement .......................................8-14
Air cleaner housing filter ......................................8-15
Wiper blades ........................................................8-17
Parking brake check.............................................8-18
Brake pedal ..........................................................8-18
Brake booster .......................................................8-19
Clutch pedal .........................................................8-20
Fuses and fusible links.........................................8-20
Light bulbs ............................................................8-21
Headlights ............................................................8-21
Headlight aiming adjustment ................................8-22
Adjustment after headlight assembly
replacement ..........................................................8-23
Bulb replacement .................................................8-24
Wheels and tires ..................................................8-28
ZX
Page 153 of 220

The engine cooling system is filled at the
factory with a high-quality, year-round, anti-
freeze coolant solution. The anti-freeze so-
lution contains rust and corrosion inhibitors,
therefore additional engine cooling system
additives are not necessary.
CAUTION
When adding or replacing coolant, be
sure to use only an ethelene glycol anti-
freeze with the proper mixture ratio of
50% Genuine Nissan Anti-freeze coolant
or equivalent and 50% demineralized
water or distilled water. The use of other
types of coolant solutions may damage
the engine cooling system.
Outside
temperature
down toGenuine
Nissan
Anti-freeze
coolant or
equivalentDemineral-
ized or
Distilled
water
ÉC ÉF
þ35 þ30 50% 50%
WARNING
cNever remove the radiator cap when
the engine is hot. Wait until the en-
gine and radiator cool down. Serious
burns could be caused by high pres-
sure fluid escaping from the radia-
tor. See precautions in ``If your ve-
hicle overheats,'' found in the ``In
case of emergency'' section.
c
The radiator is equipped with a pres-
sure cap. Use only a genuine NISSAN
cap when replacement is required.
CHECKING ENGINE COOLANT
LEVEL
With coolant reservoir
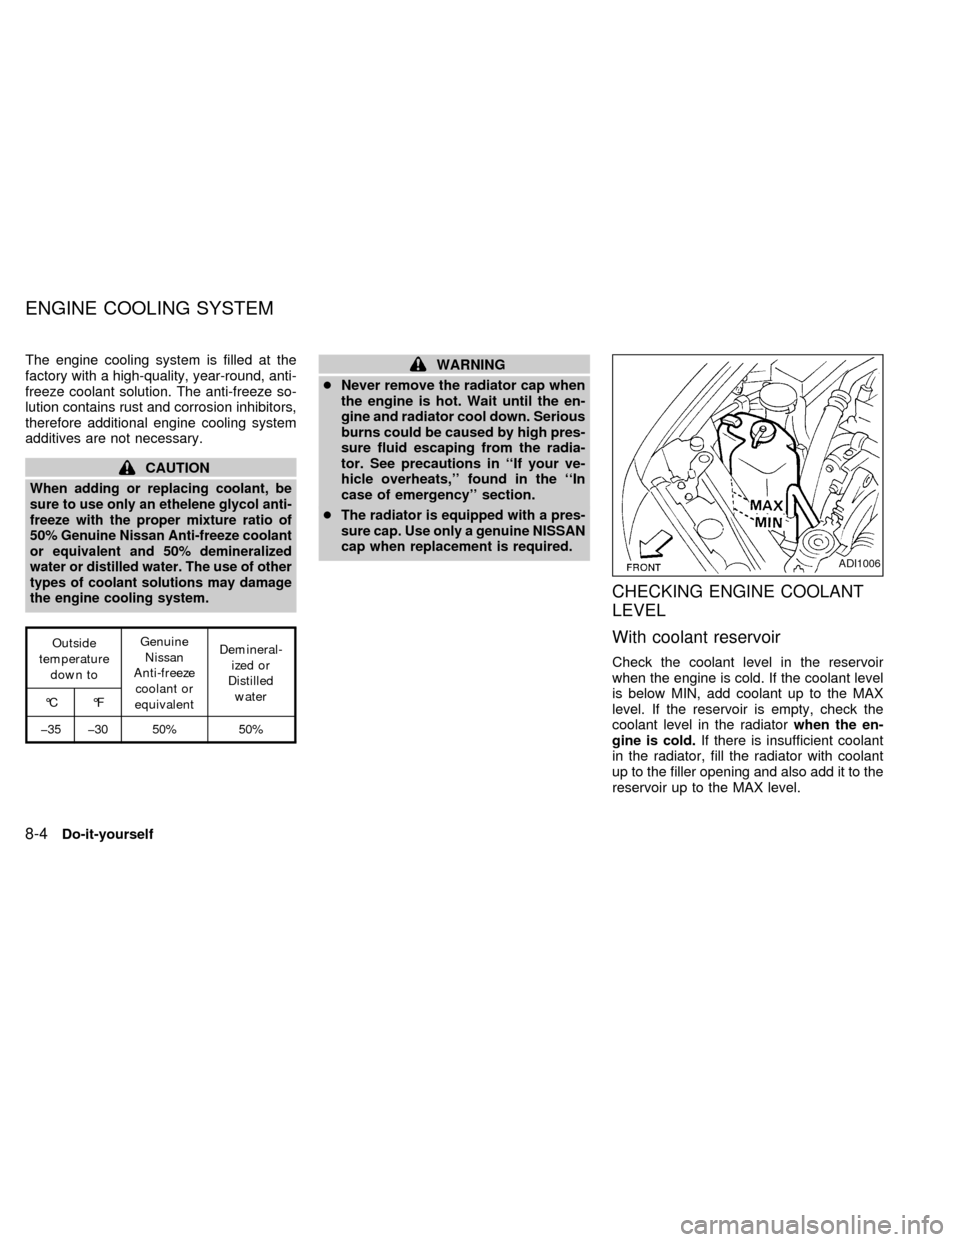
Check the coolant level in the reservoir
when the engine is cold. If the coolant level
is below MIN, add coolant up to the MAX
level. If the reservoir is empty, check the
coolant level in the radiatorwhen the en-
gine is cold.If there is insufficient coolant
in the radiator, fill the radiator with coolant
up to the filler opening and also add it to the
reservoir up to the MAX level.
ADI1006
ENGINE COOLING SYSTEM
8-4Do-it-yourself
ZX
Page 155 of 220

drain plug on the engine water pipe se-
curely.
6. See the ``Technical and consumer infor-
mation'' section for cooling system ca-
pacity. Fill the radiator slowly with the
proper mixture of coolant and water. Fill
the reservoir tank up to the MAX level.
7. Open and close the air release plug to
release air. Then fill the radiator again
and install the radiator cap.
8. Start the engine and let it idle until it
reaches normal operating temperature.
Then race the engine 2 or 3 times under
no load. Watch the engine coolant tem-
perature gauge for signs of overheating.
9. Stop the engine. After it completely cools
down, refill the radiator up to the filler
opening. Fill the reservoir tank up to the
MAX level.
10. Open and close the air release plug to
release air. Then fill the radiator again
and install the radiator cap.11. Check the radiator drain plug and the
drain plug on the engine water pipe for
any sign of leakage, tighten if neces-
sary.
AMA098DI1299
8-6Do-it-yourself
ZX
Page 172 of 220

a. Keep all of the tires inflated to the correct
pressure.
b. Place the vehicle on level ground.
c. See that the vehicle is unloaded (except
for full levels of coolant, engine oil and
fuel, and spare tire, jack, and tools).
Have the driver or an equivalent weight
placed in the driver's seat.
Low beam
1. Open the hood.
2. Adjust the vertical aim by turning the
adjusting screw with a Phillips screw-
driver.
3. Adjust the horizontal aim by turning the
adjusting screw with a Phillips screw-
driver.
ADJUSTMENT AFTER
HEADLIGHT ASSEMBLY
REPLACEMENT
If the vehicle front body has been repaired
and/or the headlight assembly has been
replaced, check aiming. Use the aiming
chart shown in the illustration.
cUpper edge and left edge of high in-
tensity zone should be within the
range shown at left. Adjust headlights
accordingly.
cDotted lines in the illustration show
center of headlights.
``H'' : Horizontial center line of headlights
``W
L'': Distance between each headlight
center
ADI1039
Do-it-yourself8-23
ZX
Page 185 of 220

Automatic transmission ``Park'' mecha-
nismÐ On a fairly steep hill check that your
vehicle is held securely with the shift selec-
tor lever in the P (Park) position without
applying any brakes.
UNDER THE HOOD AND
VEHICLE
The maintenance items listed here should
be checked periodically, such as each time
you check the engine oil or refuel.
Additional information on the items
marked with an ª*º can be found in the
ªDo-it-yourself'' section of this manual.
Windshield washer fluid*Ð Check that
there is adequate fluid in the tank.
Engine coolant level*Ð Check the cool-
ant level when the engine is cold.
Radiator and hosesÐ Check the front of
the radiator and clean off any dirt, insects,
leaves, etc., that may have accumulated.
Make sure the hoses have no cracks, de-
formation, rot or loose connections.
Brake and (if so equipped) clutch fluid
levels*Ð Make sure that the brake and
clutch fluid level are between the MIN and
MAX lines on each reservoir.Battery*Ð Check the fluid level in each
cell. It should be between the MAX and MIN
lines.
Engine drive belts*Ð Make sure the drive
belts are not frayed, worn, cracked or oily.
Engine oil level*Ð Check the level after
parking the vehicle on a level surface, with
the engine off. Wait a few minutes for the oil
to drain back into the oil pan.
Power steering fluid level* and linesÐ
Check the level when the fluid is cold and
with the engine off. Check the lines for
proper attachment, leaks, cracks, etc.
Automatic transmission fluid level*Ð
Check the level after putting the shift selec-
tor lever in P (Park) with the engine idling at
operating temperature.
Exhaust systemÐ Make sure there are no
cracks, holes, loose joints or supports. If the
sound of the exhaust seems unusual or
there is a smell of exhaust fumes, immedi-
ately have the exhaust system inspected by
a qualified individual. (See the carbon mon-
oxide warning in the ``Starting and driving''
section of this manual.)
UnderbodyÐ The underbody is frequentlyexposed to corrosive substances such as
those used on icy roads or to control dust. It
is very important to remove these sub-
stances from the underbody, otherwise rust
may form on the floor pan, frame, fuel lines
and exhaust system. At the end of winter,
the underbody should be thoroughly flushed
with plain water, especially those areas
where mud and dirt may accumulate. See
the ``Appearance and care'' section for ad-
ditional information.
Fluid leaksÐ Check under the vehicle for
fuel, oil, water or other fluid leaks after the
vehicle has been parked for a while. Water
dripping from the air conditioner after use is
normal. If you should notice any leaks or if
gasoline fumes are evident, check for the
cause and have it corrected immediately by
an authorized NISSAN dealer.
9-4Maintenance
ZX
Page 191 of 220

Additional information on the following
items marked with an ``*'' is found in the
``Do-it- yourself'' section of this manual.
Emission control system
maintenance
Drive belts*Ð Check drive belts for wear,
fraying or cracking and also for proper ten-
sion. Replace any damaged drive belts.
Air cleaner filterÐ Under normal driving
conditions, the air cleaner filter should be
replaced in accordance with the mainte-
nance schedule. However, driving the ve-
hicle in dusty areas may cause rapid clog-
ging of the element. Consequently, the
element may have to be replaced more
frequently.
Evap vapor linesÐ Check vapor lines and
connections for leaks, looseness or deterio-
ration. If leaks are found, replace them.
Fuel linesÐ Check the fuel hoses, piping
and connections for leaks, looseness or
deterioration. Replace any damaged parts.
Fuel filterÐ If the vehicle is operated under
extremely adverse weather conditions or in
areas where ambient temperatures are ei-
ther extremely low or extremely high, thefilter might become clogged. In such an
event, replace the filter immediately.
Engine coolant*Ð Drain and flush the
cooling system.
Engine oil & oil filter*Ð Under normal
driving conditions, the engine oil and oil filter
should be replaced in accordance with the
maintenance schedule. However, under se-
vere driving conditions, they may have to be
replaced more frequently.
Spark plugs*Ð Replace with new plugs
having the correct heat range.
Intake & exhaust valve clearanceÐ Check
the valve clearance if valve noise increases.
Chassis and body maintenance
Brake lines & cablesÐ Check the brake
lines and hoses (including brake booster
vacuum hoses, connections & check valve)
and parking brake cables for proper attach-
ment, leaks, cracks, chafing, abrasion, de-
terioration, etc.
Brake pads, rotors, drums & liningsÐ
Check these and the other neighboring brake
components for wear, deterioration and
leaks. Under severe driving conditions, they
may have to be inspected more frequently.
Manual & automatic transmission fluid*
Ð Check the fluid level and visually inspect
for signs of leakage.
Under severe driving conditions, the fluid
should be replaced at the specified interval.
Steering gear & linkage, axle & suspen-
sion parts, and drive shaft bootsÐ
Check for damage, looseness and leakage
of oil or grease. Under severe driving con-
ditions, inspection should be performed
more frequently.
Exhaust systemÐ Visually check the ex-
haust pipes, muffler, and hangers for proper
attachment, leaks, cracks, chafing, abra-
sion, deterioration, etc. Under severe driv-
ing conditions, inspection should be per-
formed more frequently.
Supplemental air bag systemÐ Check
the supplemental air bag system compo-
nents for proper attachment, damage, de-
formities, cracks, rust, etc. Work around and
on the supplemental air bag system should
be done by an authorized NISSAN dealer.
EXPLANATION OF
MAINTENANCE ITEMS
9-10Maintenance
ZX