1999 NISSAN ALTIMA ECO mode
[x] Cancel search: ECO modePage 102 of 220
ONzOFF/VOL control knob
Turn the ignition key to ACC or ON, then
push the ONzOFF/VOL control knob button.
The mode (radio, tape or CD) which was
playing immediately before the system was
turned off resumes playing. When no CD or
tape is loaded, the radio comes on. Pushing
the ONzOFF/VOL control knob button again
turns the system off.
Turn the ONzOFF/VOL control knob to ad-
just the volume.
Clock operation
Pressing the clock button alternates the
clock and the radio/cassette/CD player op-
tions in the display.
Clock set
Depressing the clock andbuttons to-
gether sets hours. Depressing the clock and
buttons together sets minutes.
Clock priority mode
In this mode the clock is shown in the
display. If any radio, cassette or CD func-
tions are activated, the radio, cassette or
CD display illuminates for 10 seconds then
returns to the clock mode.NOTE:
After clock adjustment, the radio is in the
clock priority mode.
FM-AM band select button
Push thebutton to change from AM to
FM reception.
The FM stereo indicator, ST, illuminates
during FM stereo reception. When the ste-
reo broadcast signal is weak, the radio
automatically changes from stereo to mon-
aural reception.
TUNE/DISC buttons
WARNING
The radio should not be tuned while
driving in order that full attention may
be given to the driving operation.
Use the
andbuttons for manual
tuning. To move quickly through the chan-
nels, hold either of the tuning buttons down.
SEEK/SCAN buttons
SEEK tuning
Push the SEEK/SCAN tuning buttonorfor less than 0.5 seconds. SEEK tuningbegins from high to low frequencies or low to
high frequencies, depending on which but-
ton is pressed, and stops at the next broad-
casting station. Once the highest broadcast-
ing station is reached, the radio continues in
the SEEK mode at the lowest broadcasting
station. If using the
button, once the
lowest broadcasting station is reached, the
radio continues in the SEEK mode at the
highest broadcasting station.
SCAN tuning
Push the SEEK/SCAN tuning buttonorfor more than 0.5 seconds. SCAN illu-
minates in the display, and the radio station
blinks. SCAN tuning begins from low to high
frequencies or high to low frequencies, de-
pending on which button is pressed. SCAN
tuning stops at each broadcasting station for
five seconds. During the SCAN function,
SCAN comes on and the radio station blinks
in the display window. Pushing the button
again during this five second period stops
SCAN tuning and the radio remains tuned to
that station.
Heater, air conditioner and audio systems4-21
ZX
Page 104 of 220

Adjusting tone quality and speaker
balance
To adjust the audio levels for bass, treble,
balance, and fader, push the audio button
and adjust the level with the TUNE/DISC
buttons. Press the audio button once for
BAS (bass), twice for TRE (treble), three
times for FAD (fader), and four times for
BAL (balance). Once the audio level is set
the display will return back to radio, cassette
or CD display mode after 7 seconds or the
audio button can be pressed again within 7
seconds to set the next audio level. Press-
ing the audio button a fifth time will also
return the display back to radio, cassette or
CD display mode.
Fader adjusts the sound level between the
front and rear speakers, balance adjusts the
sound level between the right and left
speakers.
CASSETTE TAPE OPERATION
PLAY/STOP TAPE button
When thebutton is pushed with the
system turned off and a tape loaded, the
system comes on and the tape plays. The
word TAPE illuminates in the display.
AHA1088
Heater, air conditioner and audio systems4-23
ZX
Page 108 of 220
Manual antenna
The manual antenna cannot be shortened,
but can be removed. When you need to
remove the antenna, turn the antenna rod
counterclockwise.
To install the antenna rod, turn the antenna
clockwise. Tighten the antenna rod to speci-
fication using a suitable tool such as a
open-end wrench. The antenna rod tighten-
ing specification is 3.4 - 3.6 Nzm(30-32
in-lb). Do not use pliers to tighten the an-
tenna as they can leave marks on the
antenna surface. The antenna rod can not
be hand tightened to the proper specifica-
tion.
CAUTION
Always properly tighten the antenna
rod during installation or the antenna
rod may break during vehicle opera-
tion.
Microphone installed model
If equipped with a genuine NISSAN cellular
phone, your NISSAN features a non-
directional microphone in the steering col-
umn cover, so it is not necessary to look at
or speak directly into the microphone when
calling. To do so could detract from the
driving operation and cause an accident.
See the manual for car phone operation.
Pre-wired and antenna for phone
installed model
Some models are pre-wired to accept the
genuine NISSAN cellular phone. In addition,
the same model has the phone antenna
built into the rear glass window.
When installing a CB, ham radio or car
phone in your NISSAN, be sure to observe
the following cautions, otherwise the new
equipment may adversely affect the MFI
(Multiport Fuel Injection) system and other
electronic parts.
CAUTION
cKeep the antenna as far as possible
away from the Engine Control Mod-
ule.
cAlso keep the antenna wire more
than 8 inches (20 cm) away from the
MFI harness. Do not route the an-
tenna wire next to any harness.
cAdjust the antenna standing-wave
ratio as recommended by the manu-
facturer.
cConnect the ground wire from the
CB radio chassis to the body.
cFor details, consult an authorized
NISSAN dealer.
CB RADIO OR CAR PHONE
Heater, air conditioner and audio systems4-27
ZX
Page 121 of 220
to help start the engine.
Ð In the summer, when restarting the
engine within 30 minutes after it has
been stopped, keep the accelerator
pedal fully depressed while starting.
CAUTION
Do not operate the starter for more than
15 seconds at a time. If the engine does
not
start, turn the key off and wait 10
seconds before cranking again, other-
wise the starter could be damaged.
4.Warm-up
Allow the engine to idle for at least 30
seconds after starting. Drive at moderate
speed for a short distance first, especially
in cold weather.
WARNING
cBe sure the parking brake is fully
released before driving. Failure to do
so can cause brake failure and lead
to an accident.
cDo not release the parking brake
from outside the vehicle.
cDo not use the gear shift in place of
the parking brake. When parking, be
sure the parking brake is fully en-
gaged.
c
Do not leave children unattended in a
vehicle. They could release the park-
ing brake and cause an accident.
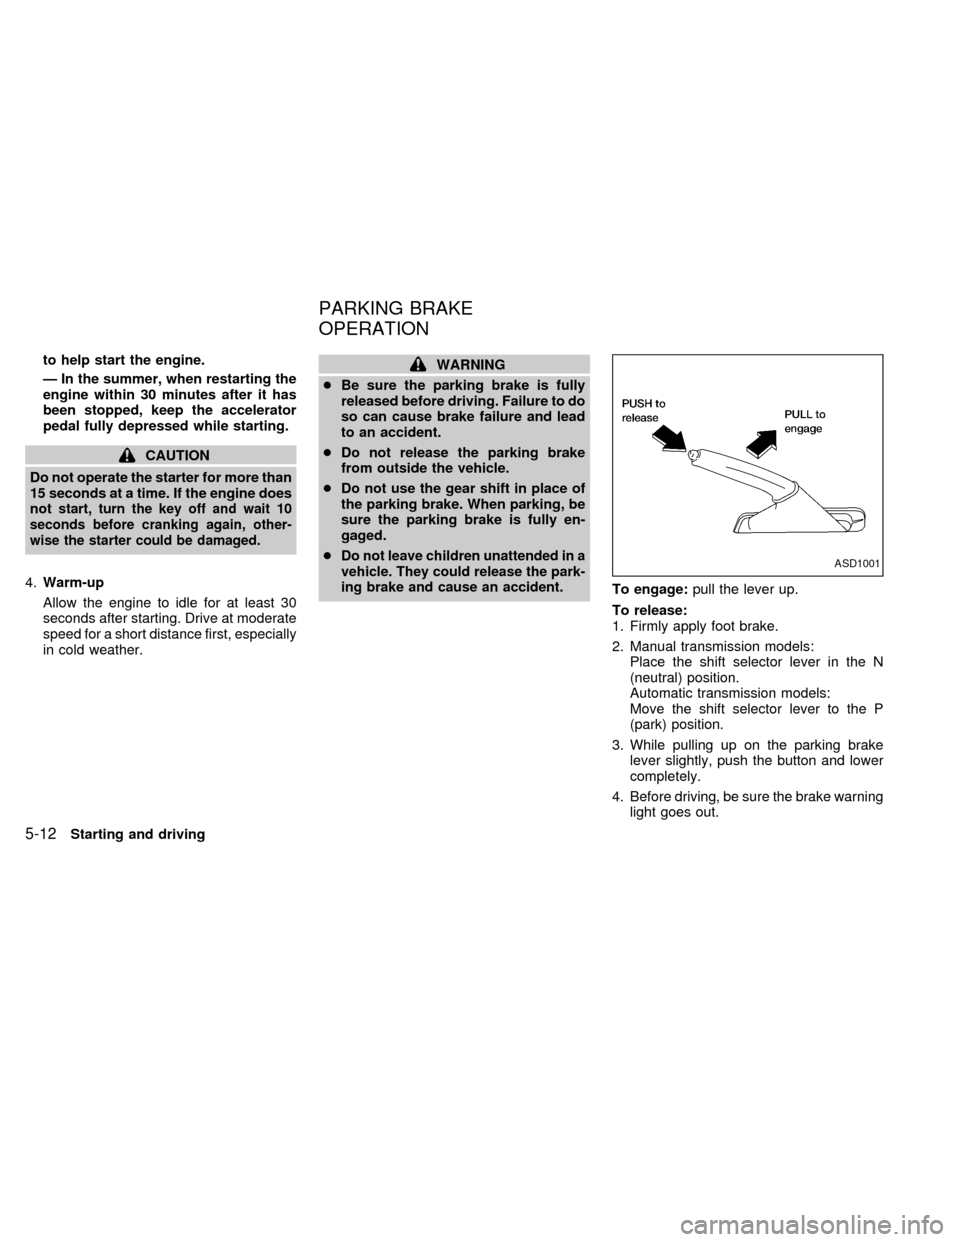
To engage:pull the lever up.
To release:
1. Firmly apply foot brake.
2. Manual transmission models:
Place the shift selector lever in the N
(neutral) position.
Automatic transmission models:
Move the shift selector lever to the P
(park) position.
3. While pulling up on the parking brake
lever slightly, push the button and lower
completely.
4. Before driving, be sure the brake warning
light goes out.
ASD1001
PARKING BRAKE
OPERATION
5-12Starting and driving
ZX
Page 124 of 220

During the first 1,000 miles (1,600 km),
follow these recommendations for the future
reliability and economy of your new vehicle.
Failure to follow these recommendations
may result in vehicle damage or shortened
engine life.
cDo not drive over 55 MPH (90 km/h) and
do not run the engine over 4,000 rpm.
Avoid driving for long periods at constant
speed, either fast or slow.
cDo not accelerate at full throttle in any
gear.
cAvoid quick starts.
cAvoid hard braking as much as possible.
cDo not tow a trailer for the first 500 miles
(800 km).cAccelerate slowly and smoothly. Main-
tain cruising speeds with a constant ac-
celerator position.
cDrive at moderate speeds on the high-
way. Driving at high speed lowers fuel
economy.
cAvoid unnecessary stopping and brak-
ing. Maintain a safe distance behind
other vehicles.
cUse a proper gear range which suits road
conditions. On level roads, shift into high
gear as soon as possible.
cAvoid unnecessary engine idling.cKeep your engine tuned up.
cFollow the recommended periodic main-
tenance schedule.
cKeep the tires inflated at the correct
pressure. Low tire pressure increases
tire wear and wastes fuel.
cKeep the front wheels in correct align-
ment. Improper alignment increases tire
wear and lowers fuel economy.
cAir conditioner operation lowers fuel
economy. Use the air conditioner only
when necessary.
cWhen cruising at highway speeds, it is
more economical to use the air condi-
tioner and leave the windows closed to
reduce drag.
SD1001M
BREAK-IN SCHEDULE INCREASING FUEL
ECONOMY
Starting and driving5-15
ZX
Page 125 of 220
WARNING
Do not park the vehicle over flammable
materials such as dry grass, waste pa-
per or rags. They may ignite and cause
a fire.
1. Firmly apply the parking brake.
2.Manual transmission models:
Place the shift lever in the R (Reverse)
position. When parking on an uphill
grade, place the shift lever in 1 (First)
gear.Automatic transmission models:
Move the selector lever to the P (Park)
position.
WARNING
cSafe parking procedures require that
both the parking brake be set and
the transmission placed into P (Park)
position (automatic) or in the appro-
priate gear (manual). Failure to do so
could cause the vehicle to move un-
expectedly or roll away and result inan accident. Make sure the shift le-
ver has beenpushed as far forward
as it can go and cannot be moved
without depressing the button at the
end of the lever.
cNever leave the engine running while
the vehicle is unattended.
cDo not leave children unattended in-
side the vehicle. They could un-
knowingly activate switches or con-
trols. Unattended children could
become involved in serious acci-
dents.
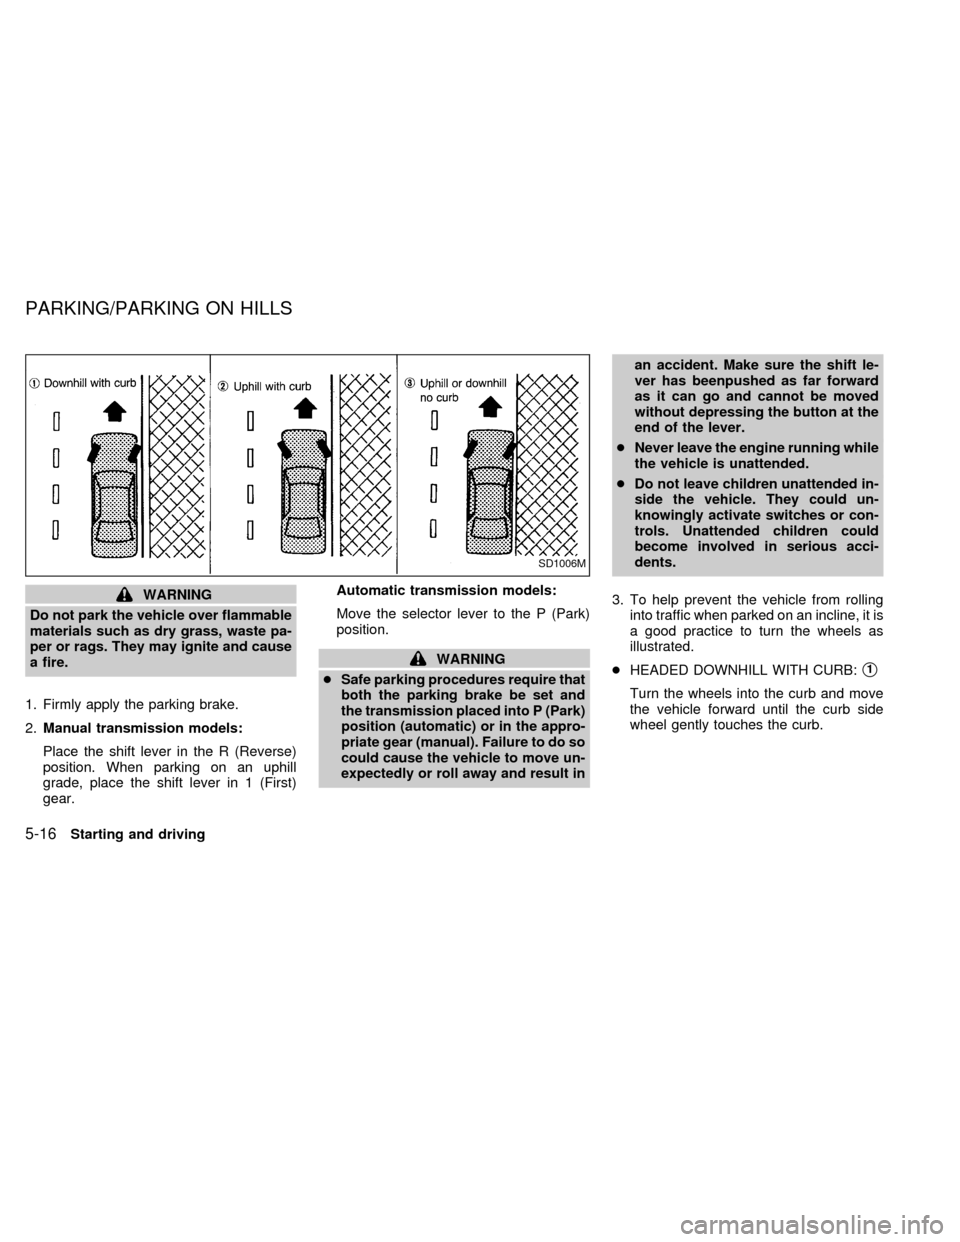
3. To help prevent the vehicle from rolling
into traffic when parked on an incline, it is
a good practice to turn the wheels as
illustrated.
cHEADED DOWNHILL WITH CURB:s1
Turn the wheels into the curb and move
the vehicle forward until the curb side
wheel gently touches the curb.
SD1006M
PARKING/PARKING ON HILLS
5-16Starting and driving
ZX
Page 140 of 220
cMake sure that cables do not touch
moving parts in the engine compart-
ment and that clamps do not contact
any other metal.
5. Start the engine of the booster vehicle
and let it run for a few minutes.
6. Keep the engine speed of the booster
vehicle at about 2,000 rpm, and start the
engine of the vehicle being jump started.
CAUTION
Do not keep starter motor engaged for
more than 10 seconds. If the engine
does not start right away, turn the key
off and wait 3 to 4 seconds before
trying again.
7. After starting the engine, carefully dis-
connect the negative cable and then the
positive cable.
8. Replace the vent caps (if so equipped).
Be sure to dispose of the cloth used to
cover the vent holes as it may be con-
taminated with corrosive acid.
CAUTION
cAutomatic transmission models can-
not be push started. This may cause
transmission damage.
cThree way catalyst equipped models
should not be started by pushing
since the three way catalyst may be
damaged.
cNever try to start the vehicle by tow-
ing it; when the engine starts, the
forward surge could cause the ve-
hicle to collide with the tow vehicle.If your vehicle is overheating (indicated by an
extremely high temperature gauge reading),
or if you feel a lack of engine power, detect
abnormal noise, etc., take the following steps.
WARNING
cDo not continue to drive if your ve-
hicle overheats. Doing so could
cause a vehicle fire.
cTo avoid the danger of being
scalded, never remove the radiator
cap while the engine is still hot.
When the radiator cap is removed,
pressurized hot water will spurt out,
possibly causing serious injury.
cDo not open the hood if steam is
coming out.
1. Move the vehicle safely off the road,
apply the parking brake and move the
shift lever to N (Neutral) (manual trans-
mission) or to P (Park) (automatic trans-
mission).
Do not stop the engine.
2. Turn off the air conditioner. Open all the
windows, move the heater or air condi-
tioner temperature control to maximum
hot and fan control to high speed.
PUSH STARTING IF YOUR VEHICLE
OVERHEATS
In case of emergency6-9
ZX
Page 142 of 220
cWhen towing manual transmission
models with the front wheels on the
ground (if you do not use towing
dollies):
Turn the ignition key to the OFF
position and secure the steering
wheel in a straight-ahead position
with a rope or similar device. Never
place the ignition key in the LOCK
position. This will result in damage
to the steering lock mechanism.
Move the gearshift lever to the Neu-
tral (N position).
c
When towing with the rear wheels on
the ground, release the parking brake.
cAttach safety chains for all towing.
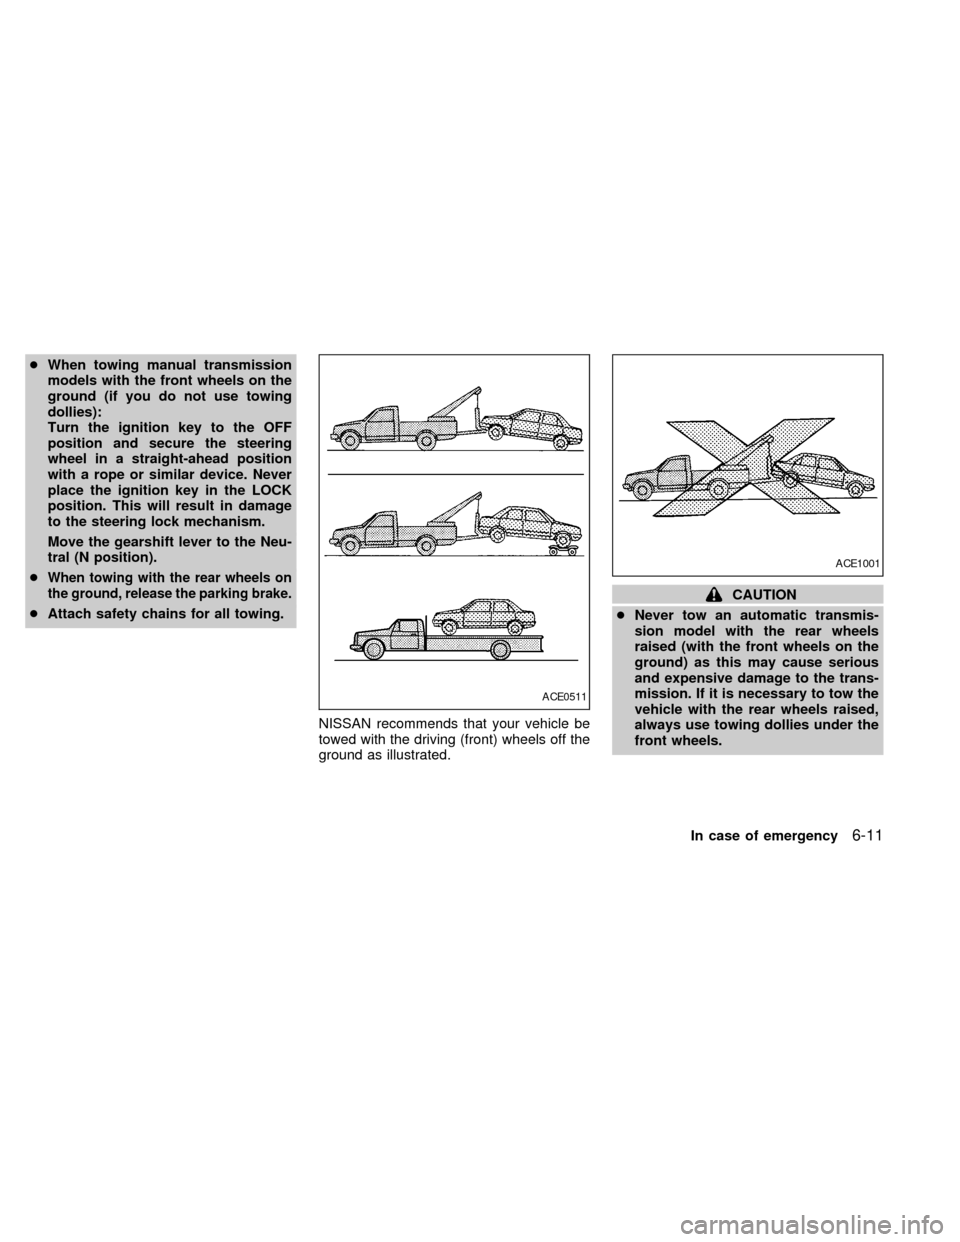
NISSAN recommends that your vehicle be
towed with the driving (front) wheels off the
ground as illustrated.
CAUTION
cNever tow an automatic transmis-
sion model with the rear wheels
raised (with the front wheels on the
ground) as this may cause serious
and expensive damage to the trans-
mission. If it is necessary to tow the
vehicle with the rear wheels raised,
always use towing dollies under the
front wheels.
ACE0511
ACE1001
In case of emergency6-11
ZX