1999 MERCEDES-BENZ C-280 low beam
[x] Cancel search: low beamPage 2 of 122

• Bulbs:
High beam: HI (55 W),
low beam: H7 (55 W),
low beam: Xenon (optional)
fog lamps: HI (55 W),
turn signal lamps, parking and standing la mps, front: 2357 NA (28.5/8.3 W/30/2.2 cp),
stop lamps: 21 W/32 cp,
backup lamps: 21 W/32 cp,
turn signal lamps, rear: 21 W/32 cp,
tail, parking, side marker and standing lamp: 5 W/4 cp,
tail and parking lamp, passenger side: 21/4 W,
tail, parking arid rear fog lamp, driver's side: 21/4W,
license plate lamps: 5 W.
• Tire Pressure:
For tire pressure, refer to tire pressure label inside the fuel filler flap.
• Air Conditioner:
R-134a refrigerant and special PAG lubricant, re fer to "Technical Data" (also see Index).
ProCarManuals.com
Page 5 of 122

Indicator Lamp Symbols
Function Indicator Lamp
High beam
Battery not being charged properly.
See Index
Warning Lamps
(should go out with the engine running unless)
Exterior lamp failure. See Index
ASR or ESP.
Adjust driving to road condition. See Index
BAS malfunction. See Index
ASR malfunction. See Index
Fluid level for windshield and headlamp
washer system low. See Index
BAS malfunction. See Index
ESP malfunction. See Index
Coolant level low. See Index
ABS malfunction. See Index
Engine oil level low. See Index Fasten seat belts. See Index
Brake pads worn down. See Index SRS malfunction. See Index
Brake fluid low (except Canada).
Parking brake engaged. See Index
Telescoping steering column not locked.
See Index
Brake fluid low (Canada only).
Parking brake engaged.
See Index
Engine malfunction indicator lamp. If the
lamp comes on when the engine is running,
it indicates a malfunction of the fuel
management system or emission control
system, or the fuel cap is not closed tight. In
all cases, we recommend that you have the
malfunction checked as soon as possible.
See Index
Additional Function Indicator Lamps in
the Instrument Cluster
Function Indicator Lamp on
the Center Console
FSS indicator (distance).
See Index
Passenger Airbag automatically switched
off. See Index
FSS indicator (days).
See Index
ProCarManuals.com
Page 45 of 122

Combination Switch
1. Low beam (exterior lamp switch position
)
2. High beam (exterior lamp switch position
)
3. High beam flasher (high beam available independent of exterior lamp switch position)
4. Turn signals, right
5. Turn signals, left
To signal minor directional changes, such as changing lanes on a highway, move combination switch to
the point of resistance only and hold it there. To operate the turn signals continuously, move the combination
switch past the point of resistance (up or down). The switch is automatically canceled when the steering wheel
is turned to a large enough degree.
6. Control for windshield wiper/washer system:
Push briefly for a single wipe without adding washer fluid (use only when windshield is wet)
Push past detent point:
• windshield washer system
• optional headlamp cleaning system (only in exterior lamp positions
or ).
When the washer system is activated, the wipers also operate for a limited time.
7. Windshield wiper
0 Wiper off
I Intermittent wiping (optional rain sensor:
One initial wipe, pauses between wipes are automatically controlled by a rain sensor
monitoring the wetness of the windshield.)
II Normal wiper speed
III Fast wiper speed
Note:
The windshield washer reservoir, hoses and nozzles are automatically heated.
ProCarManuals.com
Page 47 of 122

Exterior Lamp Switch
Off
Parking lamps (also side marker lamps, taillamps, license plate lamps, instrument panel lamps)
Canada only: When the engine is running, the low beam is additionally switched on.
Parking lamps plus low beam or high beam headlamps (combination switch pushed forward).
Standing lamps, right (turn left one stop).
Standing lamps, left (turn left two stops).
Front fog lamps (pull out one stop) with parking and/or head lamps on.
Rear fog lamp (pull out to 2nd detent) in addition to fog lamps Indicator lamp in lamp switch comes on.
Standing Lamps
When the vehicle is parked on the stre et the standing lamps (right or left side parking lamps) can be turned on,
making the vehicle more visible to passing vehicles The standing lamps cannot be operated with the key in
steering lock position 2
Note:
With the key removed and a front door open, a warnin g sounds if the vehicle's exterior lamps (except
standing lamps) are not switched off. Fog lamps will oper ate with the parking lamps and the low or high
beam headlamps Fog lamps should only be used in conjunction with low beam headlamps
Consult your State or Province Motor Vehicle Regulati ons regarding allowable lamp operation. Fog lamps are
automatically switched off when the exte rior lamp switch is turned to position
Daytime Running Lamps
Canada only
When the engine is running and the selector lever is in a driving position, the low beam (includes parking lamps, side
marker lamps, taillamps and licen se plate lamps) are automatically switched on. When shifting from a driving position
to position "N" or "P", the low beam switches off (2 seconds delay)
For nighttime driving the exterior lamp switch should be turned to position
to permit activation of the high beam
headlamps
ProCarManuals.com
Page 71 of 122

Exterior Lamp Failure Indicator Lamp
With the electronic key in steering lock position 2, an indicator lamp comes on. It should go out when the engine is
running. If the warning lamp does not go out after starting the engine, or if it comes on while driving, this lamp
indicates a failure in the parking lamp, taillamp, stop lamp, or low beam headlamp. If an exterior lamp fails, the
indicator lamp will come on only when that lamp is switched on. If a brake lamp fails, the lamp failure indicator will
come on when applying the brake and st ay on until the engine is turned off.
Note:
If additional lighting equipment is installed (e.g. auxiliary headl amps etc.) be certain to connect into the fuse before
the failure indicator monitoring unit in order to avoid damaging the system.
Brake Pad Wear Indicator Lamp
With the electronic key in steering lock position 2, the brake pad wear indicator lamp comes on for approximately 30
seconds. It goes out when the engine is running.
If the indicator lamp lights up during braking, this indica tes that the brake pads are worn down. Have the brake
system checked at your authorized Mercedes- Benz dealer as soon as possible.
Brake Warning Lamp
With the electronic key in steering lock position 2, the brake warning lamp will come on. It should go out when the
engine is running. The brake warning lamp will come on:
• when there is insufficient brake fluid in the rese rvoir (engine running and parking brake released), or
• when the parking brake is set (engine running).
Warning !
Driving with the brake warning lamp on can result in an accident. Have your brake system checked
immediately if the brake warning lamp stays on. Don't add brake fluid before checking the brake system.
Overfilling the brake fluid reservoir can result in spilling brake fluid on hot engine parts and the brake fluid
catching fire. You can be seriously burned.
If you find that the minimum mark on the brake fluid reserv oir is reached, have the brake system checked for brake
pad thickness and leaks. To test the brake warning lamp, turn electronic key in steering lock to position 2. The brake
warning lamp comes on, and should go out when the engine is running.
ProCarManuals.com
Page 90 of 122

Exterior Lamps
Headlamp Adjustment
Correct headlamp adjustment is extremely important. Check and readjust headlamps at regular intervals and
when a bulb has been replaced.
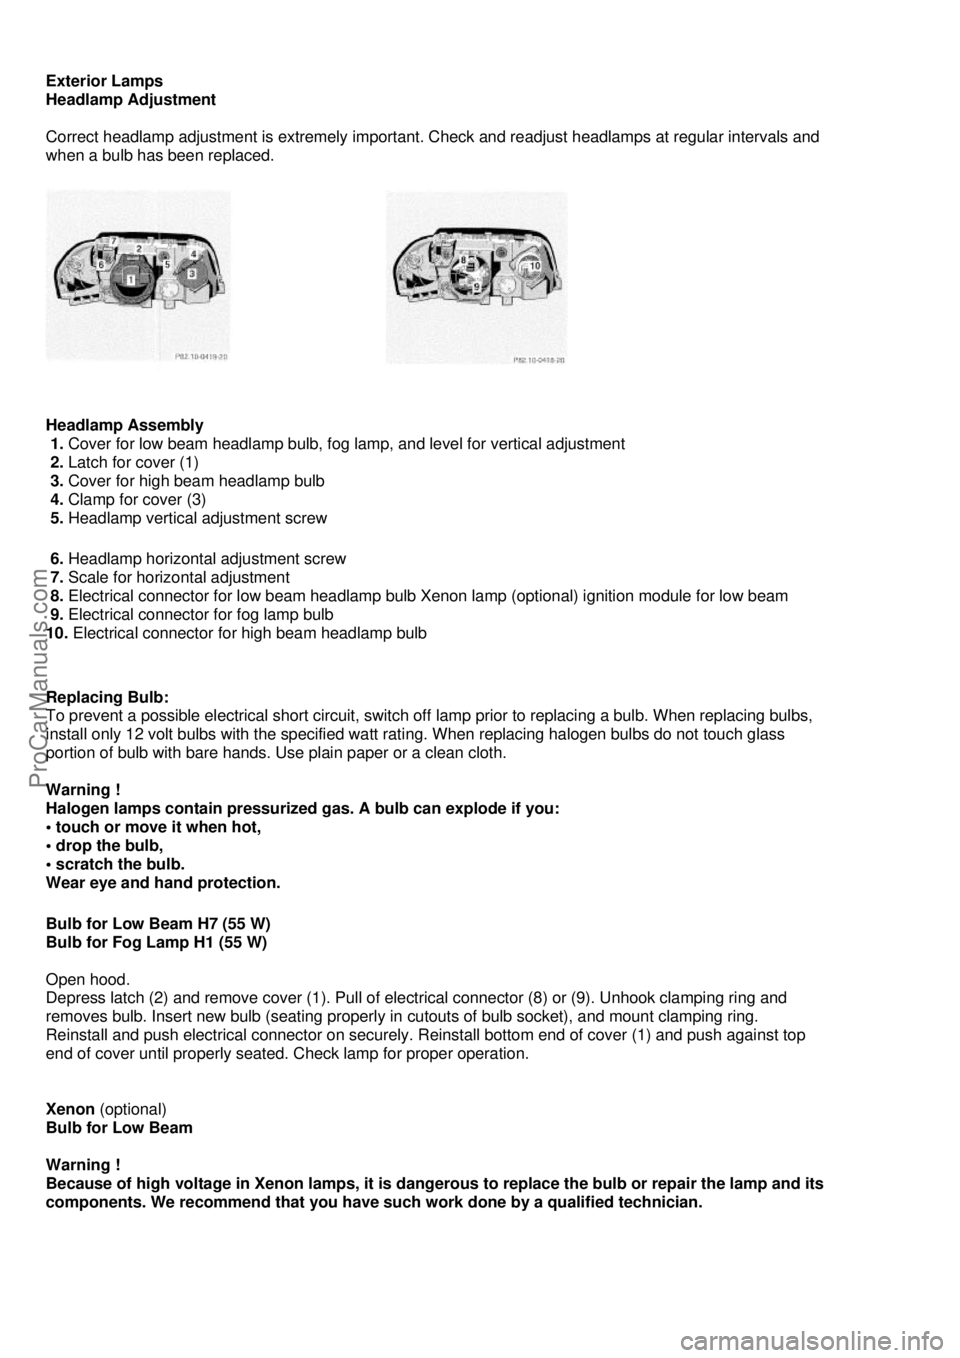
Headlamp Assembly
1. Cover for low beam headlamp bulb, fog lamp, and level for vertical adjustment
2. Latch for cover (1)
3. Cover for high beam headlamp bulb
4. Clamp for cover (3)
5. Headlamp vertical adjustment screw
6. Headlamp horizontal adjustment screw
7. Scale for horizontal adjustment
8. Electrical connector for low beam headlamp bulb Xenon lamp (optional) ignition module for low beam
9. Electrical connector for fog lamp bulb
10. Electrical connector for high beam headlamp bulb
Replacing Bulb:
To prevent a possible electrical short circuit, switch off lamp prior to replacing a bulb. When replacing bulbs,
install only 12 volt bulbs with the specified watt rati ng. When replacing halogen bulbs do not touch glass
portion of bulb with bare hands. Us e plain paper or a clean cloth.
Warning !
Halogen lamps contain pressurized gas. A bulb can explode if you:
• touch or move it when hot,
• drop the bulb,
• scratch the bulb.
Wear eye and hand protection.
Bulb for Low Beam H7 (55 W)
Bulb for Fog Lamp H1 (55 W)
Open hood.
Depress latch (2) and remove cover (1). Pull of electrical connector (8) or (9). Unhook clamping ring and
removes bulb. Insert new bulb (seating properly in cutouts of bulb socket), and mount clamping ring.
Reinstall and push electrical connector on securely. Re install bottom end of cover (1) and push against top
end of cover until properly seated. Check lamp for proper operation.
Xenon (optional)
Bulb for Low Beam
Warning !
Because of high voltage in Xenon lamps, it is dangerous to replace the bulb or repair the lamp and its
components. We recommend that you have such work done by a qualified technician.
ProCarManuals.com
Page 92 of 122

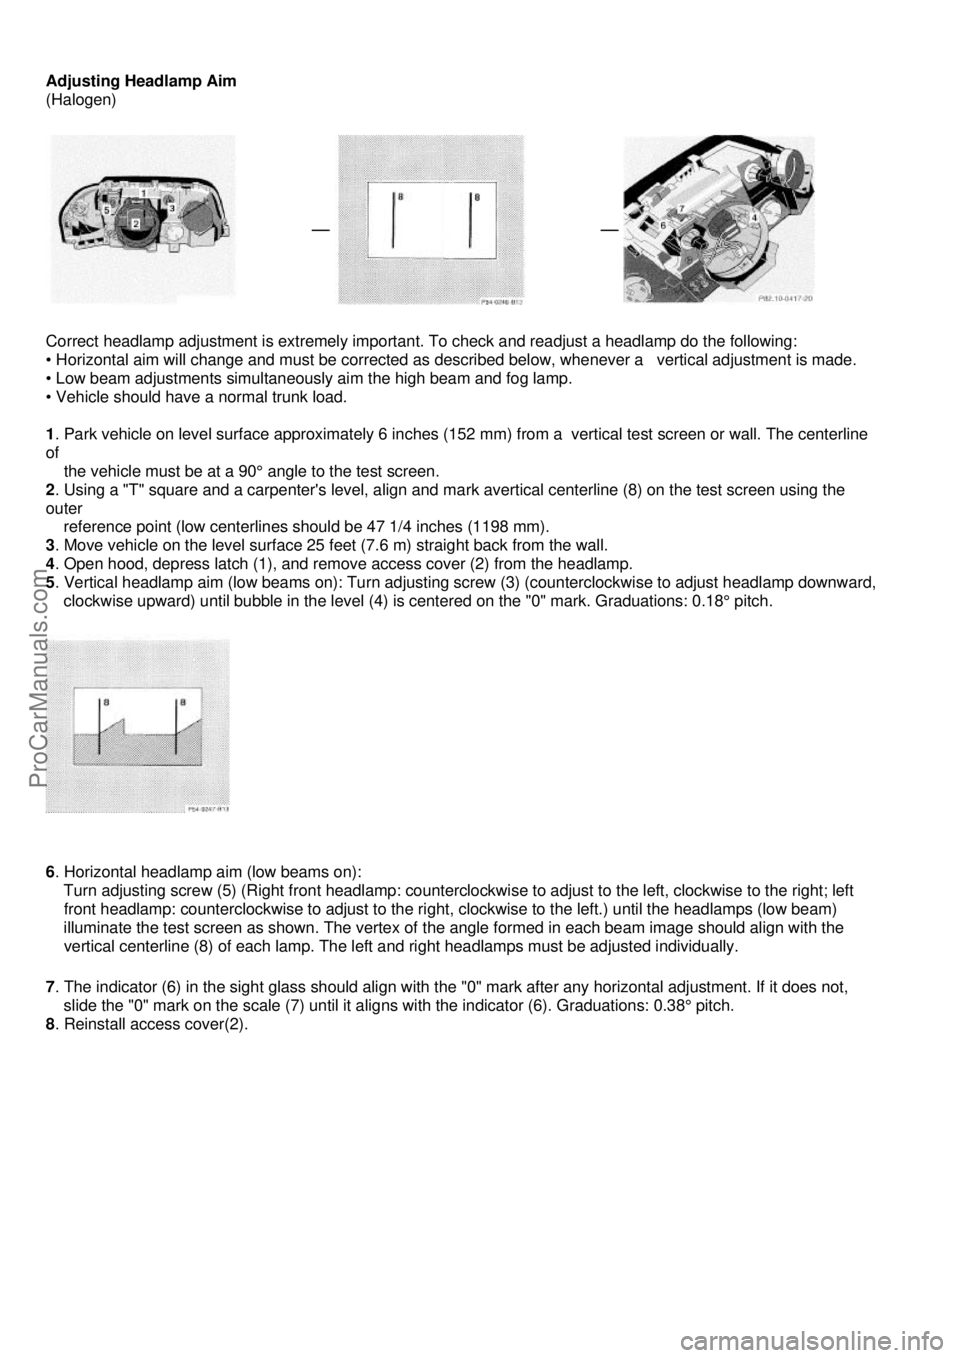
Adjusting Headlamp Aim
(Halogen)
Correct headlamp adjustment is extremely important. To check and readjust a headlamp do the following:
• Horizontal aim will change and must be corrected as descri bed below, whenever a vertical adjustment is made.
• Low beam adjustments simultaneously aim the high beam and fog lamp.
• Vehicle should have a normal trunk load.
1 . Park vehicle on level surface approximately 6 inches (152 mm ) from a vertical test screen or wall. The centerline
of
the vehicle must be at a 90° angle to the test screen.
2 . Using a "T" square and a carpenter's level, align and ma rk avertical centerline (8) on the test screen using the
outer
reference point (low centerlines should be 47 1/4 inches (1198 mm).
3 . Move vehicle on the level surface 25 feet (7.6 m) straight back from the wall.
4 . Open hood, depress latch (1), and remove access cover (2) from the headlamp.
5 . Vertical headlamp aim (low beams on): Turn adjusting screw (3) (counterclockwise to adjust headlamp downward,
clockwise upward) until bubble in the level (4) is centered on the "0" mark. Graduations: 0.18° pitch.
6 . Horizontal headlamp aim (low beams on):
Turn adjusting screw (5) (Right fr ont headlamp: counterclockwise to adjust to the left, clockwise to the right; left
front headlamp: counterclockwise to adjust to the right, clockwise to the left.) until the headlamps (low beam)
illuminate the test screen as shown. The vertex of the angle formed in each beam image should align with the
vertical centerline (8) of each lamp. The left and right headlamps must be adjusted individually.
7 . The indicator (6) in the sight glass should align with the "0" mark after any horizontal adjustment. If it does not,
slide the "0" mark on the scale (7) until it a ligns with the indicator (6). Graduations: 0.38° pitch.
8 . Reinstall access cover(2).
ProCarManuals.com
Page 93 of 122

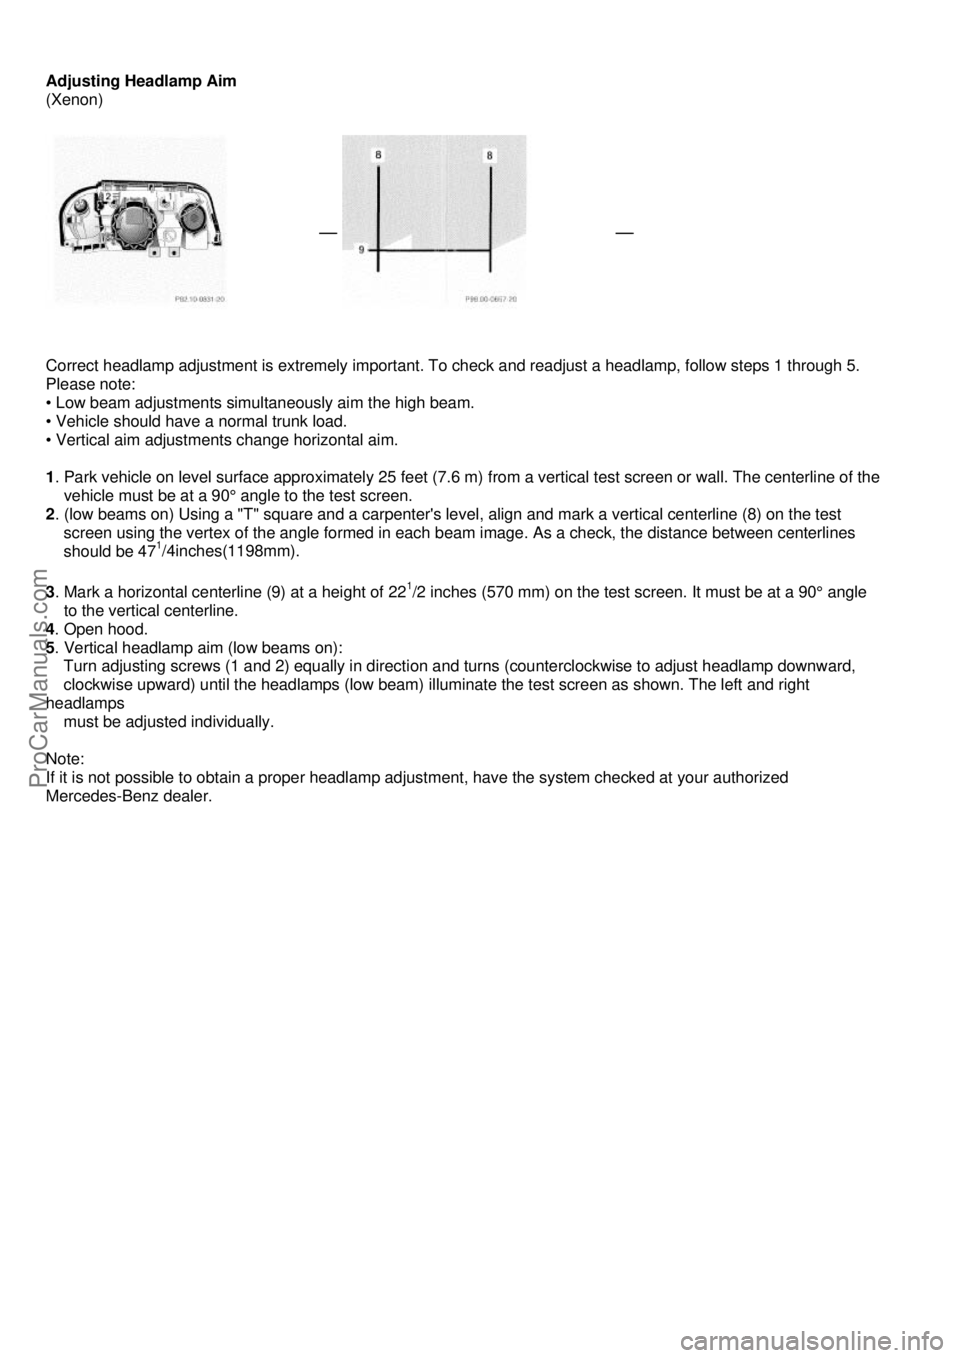
Adjusting Headlamp Aim
(Xenon)
Correct headlamp adjustment is extremely important. To ch eck and readjust a headlamp, follow steps 1 through 5.
Please note:
• Low beam adjustments simultaneously aim the high beam.
• Vehicle should have a normal trunk load.
• Vertical aim adjustments change horizontal aim.
1 . Park vehicle on level surface approximately 25 feet (7.6 m) from a vertical test screen or wall. The centerline of the
vehicle must be at a 90° angle to the test screen.
2 . (low beams on) Using a "T" square and a carpenter's leve l, align and mark a vertical centerline (8) on the test
screen using the vertex of the angle formed in each beam image. As a check, the distance between centerlines
should be 47
1/4inches(1198mm).
3 . Mark a horizontal centerline (9) at a height of 221/2 inches (570 mm) on the test screen. It must be at a 90° angle
to the vertical centerline.
4 . Open hood.
5 . Vertical headlamp aim (low beams on):
Turn adjusting screws (1 and 2) equally in direct ion and turns (counterclockwise to adjust headlamp downward,
clockwise upward) until the headlamps (low beam) illuminate the test screen as shown. The left and right
headlamps
must be adjusted individually.
Note:
If it is not possible to obtain a proper headlamp ad justment, have the system checked at your authorized
Mercedes-Benz dealer.
ProCarManuals.com