Page 50 of 122
Ashtrays
Center Console, Front
To remove ashtray:
Push sliding knob (1) toward the right to eject the insert.
To install ashtray:
Install insert into ashtray frame and push down to engage.
By touching the top of the cover light ly, the ashtray opens automatically.
Prior to removing the ashtray insert, move the gear selector lever to position "N".
Warning!
Remove front ashtray only with vehicle standing still. Wi th the gear selector lever in position "N", turn
off the engine and set the parking brake. Otherwise the vehicle might move as a result of unintended
contact with the gear selector lever.
Center Console, Rear
To remove ashtray:
Push center bar down and pull out the ashtray.
To install ashtray:
Install bottom of ashtray, push center bar down, and close ashtray.
ProCarManuals.com
Page 51 of 122
Lighter
Turn electronic key in steering lock to position 1 or 2.
Push in lighter (1); it will pop out automatically when hot.
Warning !
Never touch the heating element or sides of the lighter, they are extremely hot, hold at knob only.
Note:
The lighter socket can be used to accommodate electrical accessories up to maximum 85 W
Sun Visors
Swing sun visors down to protect against sun glare.
If sunlight enters through a side window, disengage visor from inner mounting and pivot to the side.
Illuminated Vanity Mirrors
With the visor engaged in its inner mounting, the lamp can be switched on by opening the cover.
Warning !
Do not use the vanity mirror while driving.
The lamp goes out automatically after approximately 5 minutes.
ProCarManuals.com
Page 54 of 122
Sliding/Pop-Up Roof (optional)
1. to slide roof open
2. to slide roof closed
3. to raise roof at rear
4. to lower roof at rear
Turn electronic key in steering lock to position 1 or 2. The switch is illuminated when the exterior lamps are
switched on (except standing lamps). With the roof clos ed or tilted open, a screen can be slid into the roof
opening to guard against sun rays. When sliding the roof open, the screen will also retract.
Warning !
When closing the sliding/ pop-up roof, be sure that there is no danger of anyone being harmed by
the closing procedure.
Notes:
The sliding/pop-up roof can be opened or closed manually should an electrical malfunction occur, refer to
Emergency Operation in Index. The sliding/pop-up roof can also be closed with the mechanical key or
infrared remote control while locking the vehicle door s or trunk (see Central Locking System in Index).
ProCarManuals.com
Page 55 of 122

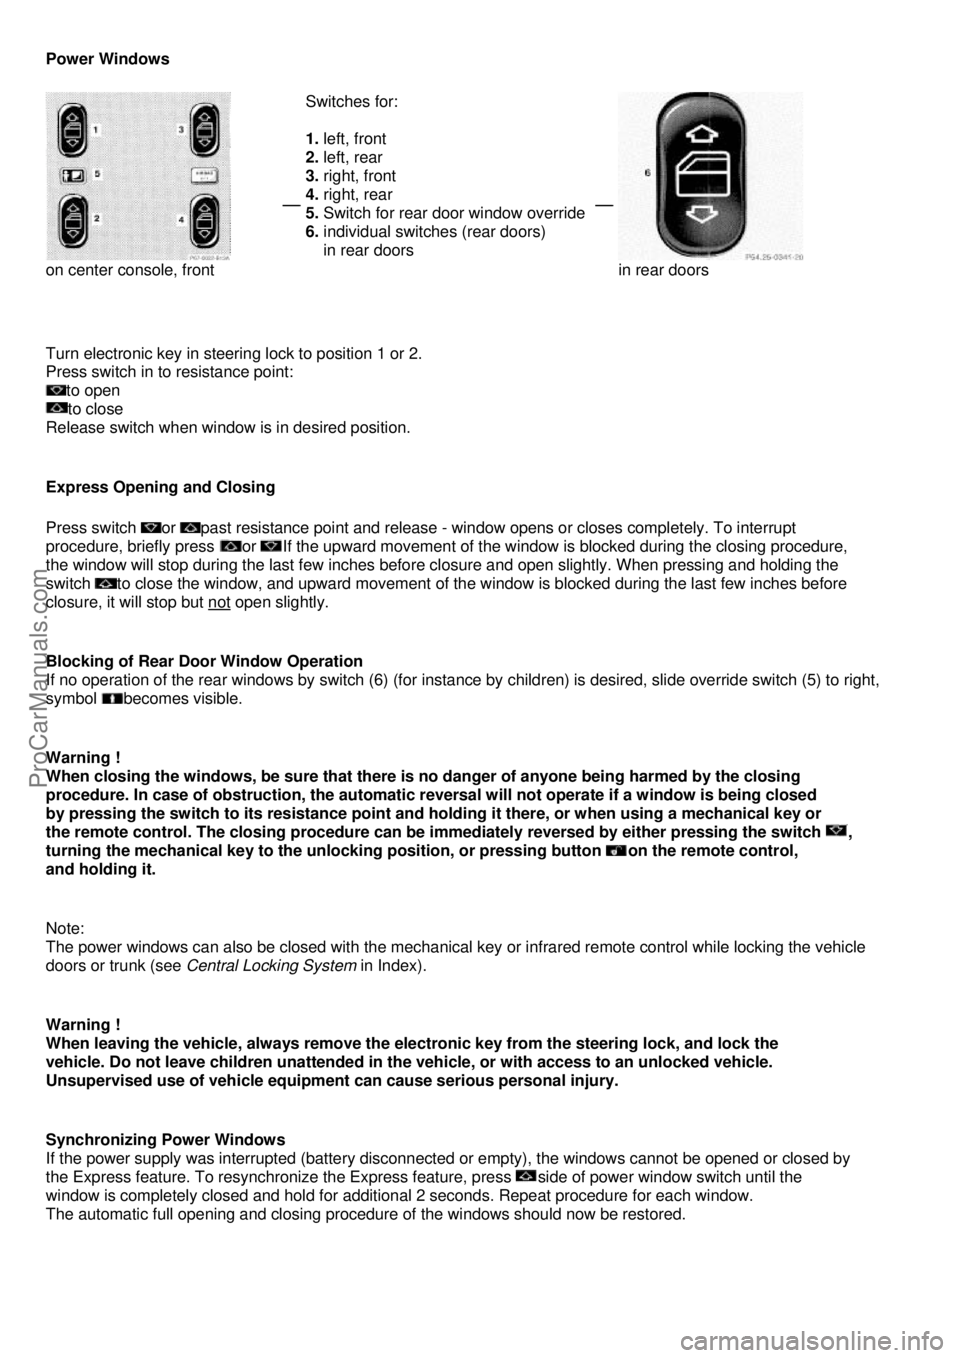
Power Windows
on center console, front
Switches for:
1.
left, front
2. left, rear
3. right, front
4. right, rear
5. Switch for rear door window override
6. individual switches (rear doors)
in rear doors
in rear doors
Turn electronic key in steering lock to position 1 or 2.
Press switch in to resistance point:
to open
to close
Release switch when window is in desired position.
Express Opening and Closing
Press switch or past resistance point and release - window opens or closes completely. To interrupt
procedure, briefly press
or If the upward movement of the window is blocked during the closing procedure,
the window will stop during the last few inches before closure and open slightly. When pressing and holding the
switch
to close the window, and upward movement of the wi ndow is blocked during the last few inches before
closure, it will stop but not
open slightly.
Blocking of Rear Door Window Operation
If no operation of the rear windows by switch (6) (for instance by children) is desired, slide override switch (5) to right,
symbol
becomes visible.
Warning !
When closing the windows, be sure that there is no danger of anyone being harmed by the closing
procedure. In case of obstruction, the automatic rever sal will not operate if a window is being closed
by pressing the switch to its resistance point and holdi ng it there, or when using a mechanical key or
the remote control. The closing procedure can be immediately reversed by either pressing the switch
,
turning the mechanical key to the unlocking position, or pressing button
on the remote control,
and holding it.
Note:
The power windows can also be closed with the mechanical ke y or infrared remote control while locking the vehicle
doors or trunk (see Central Locking System in Index).
Warning !
When leaving the vehicle, always remove the el ectronic key from the steering lock, and lock the
vehicle. Do not leave children unattended in the vehicle, or with access to an unlocked vehicle.
Unsupervised use of vehicle equipment can cause serious personal injury.
Synchronizing Power Windows
If the power supply was interrupted (battery disconnected or empty), the wi ndows cannot be opened or closed by
the Express feature. To resynchronize the Ex press feature, press
side of power window switch until the
window is completely closed and hold for additional 2 seconds. Repeat procedure for each window.
The automatic full opening and closing procedure of the windows should now be restored.
ProCarManuals.com
Page 58 of 122

Garage Door Opener
1. Remote control transmitter located on driver side sun visor
2. Portable remote control transmitter
Warning !
When programming a garage door opener, the door moves up or down. When programming or operating
the remote control make sure there is no possib ility of anyone being harmed by the moving door.
The visor remote control is capable of operati ng up to three separately controlled objects.
Notes:
Certain types of garage door openers are incompatible wi th the integrated opener. If you should experience
difficulties
with programming the transmitter, contact your authoriz ed Mercedes-Benz dealer or call Mercedes-Benz Customer
Assistance Center (in the U.S.A. only) at 1-800-FOR- MERCedes. For operation in the USA only: This devise
complies
with Part 15 of the FCC Rules. Operation is subject to the following two conditions:
(1) This device may not cause harmful interference, and (2) this device must accept any interference received,
including interference that may cause undesired operation. Any unauthorized modification to this device could void
the user's
authority to operate the equipment.
Programming or reprogramming the remote control:
1. Turn electronic key in steering lock to position 1 or 2.
2. Press and hold one button of the remote control located on the sun visor until its control light begins to flash at a
rate of about once a second. Continue holding down the button.
Note:
The light blinks immediately if the remote control is being programmed for the first time, or if its memory was
previously erased. If you are re programming a previously used button, the light will flash afte r about 20 seconds.
3. Hold end opposite to battery of portable remote contro l against the sun visor transmitter to be programmed. While
still holding down the button on the transmitter on the sun visor, press down the button on your portable remote
control, until the sun visor remote control light starts to flash rapidly. This means that the integrated remote control
has accepted the frequency and code of the portable transmitter.
4. If you wish, repeat the procedure for each remaining button.
Operation of remote control:
1. Turn electronic key in steering lock to position 1 or 2.
2. Select and press the appropriate button (1, 2 or 3) to ac tivate the remote controlled device. The remote control
transmitter continues to send the signal as long as the button is pressed - up to 20 seconds.
Erasing the remote control memory:
1. Turn electronic key in steering lock to position 1 or 2.
2. Simultaneously holding down buttons 1 and 3 for approximatel y 20 seconds, or until the control light blinks rapidly,
will erase the code s of all three channels.
ProCarManuals.com
Page 59 of 122

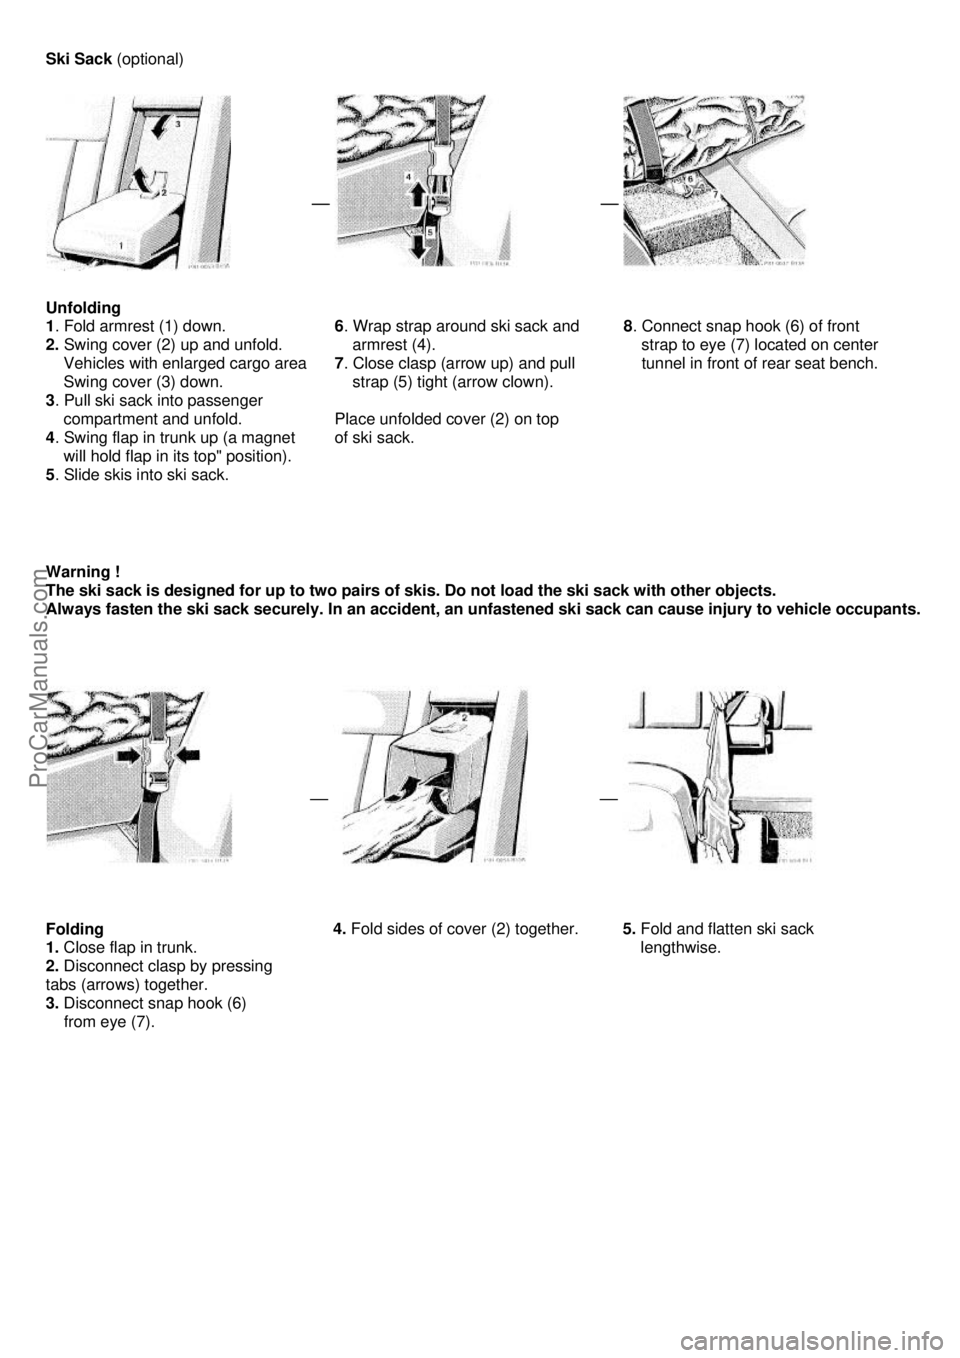
Ski Sack (optional)
Unfolding
1 . Fold armrest (1) down.
2. Swing cover (2) up and unfold.
Vehicles with enlarged cargo area
Swing cover (3) down.
3 . Pull ski sack into passenger
compartment and unfold.
4 . Swing flap in trunk up (a magnet
will hold flap in its top" position).
5 . Slide skis into ski sack.
6
. Wrap strap around ski sack and
armrest (4).
7 . Close clasp (arrow up) and pull
strap (5) tight (arrow clown).
Place unfolded cover (2) on top
of ski sack.
8
. Connect snap hook (6) of front
strap to eye (7) located on center
tunnel in front of rear seat bench.
Warning !
The ski sack is designed for up to two pairs of skis. Do not load the ski sack with other objects.
Always fasten the ski sack securely. In an accident, an unfastened ski sack can cause injury to vehicle occupants.
Folding
1. Close flap in trunk.
2. Disconnect clasp by pressing
tabs (arrows) together.
3. Disconnect snap hook (6)
from eye (7).
4.
Fold sides of cover (2) together.
5.
Fold and flatten ski sack
lengthwise.
ProCarManuals.com
Page 60 of 122
6. Wrap strap with snap hook
around ski sack.
7. Fold back the reinforced ski
sack tip (8), then continue to
roll up the ski sack tightly.
8.
Place rear strap in fold of ski
sack.
9. Place folded ski sack
insiderecess of backrest.
10.
Close ski sack compartment cover (2) respectively (3).
Removal of Ski Sack
For removal of the ski sack we recommend that you contact an authorized Mercedes-Benz dealer
Warning !
Never drive vehicle with trunk lid open while the ski sack is removed. Deadly carbon monoxide (CO)
gases may enter vehicle interior resulting in unconsciousness and death.
Note:
To prevent unauthorized persons from access to the trunk, always close the pass-through.
ProCarManuals.com
Page 61 of 122
Cellular Telephone
The vehicle is prepared for the installation of a cellular telephone. For further information and
installation contact your authorized Mercedes-Benz dealer.
Warning !
Some jurisdictions prohibit the driver from using a cellular telephone while driving a vehicle.
Whether or not prohibited by law, for safety reasons, the driver should not use the cellular
telephone while the vehicle is in motion. Stop the vehicle in a safe location before answering
or placing a call.
ProCarManuals.com