1999 LINCOLN CONTINENTAL change time
[x] Cancel search: change timePage 3 of 208

WARNINGS
Warnings provide information which may reduce the risk of personal
injury and prevent possible damage to others, your vehicle and its
equipment.
BREAKING-IN YOUR VEHICLE
There are no particular breaking-in rules for your vehicle. During the
first 1 600 km (1 000 miles) of driving, vary speeds frequently. This is
necessary to give the moving parts a chance to break in.
INFORMATION ABOUT THIS GUIDE
The information found in this guide was in effect at the time of printing.
Ford may change the contents without notice and without incurring
obligation.
Introduction
3
Page 16 of 208

E/M (if equipped)
Press this control to switch the
odometer and the message center
display from metric (kilometers) to
English (miles) units, and to change
the temperature indication on the climate control unit.
DRIVER ID (if equipped)
Press this control to set vehicle
comfort settings for up to two
drivers. Seat and mirror position and
vehicle handling characteristics can
be set with this control.
RESET
Press this control to reset:
²warnings
²average fuel economy
²trip odometers
The other selectable features are unaffected by pressing RESET.
DISPLAY
Press this control to turn the
message center display off. Press it
again to turn the display on.
Warnings override an off display and
must be reset for the display to be off again.
VEHICLE HANDLING
Press this control once to adjust
RIDE CONTROL SETTINGS
(if equipped) between NORMAL,
PLUSH and FIRM. This feature
cannot be adjusted on vehicles not
equipped with the Memory Profile with Driver Select System.
Press this control a second time to adjust the STEERING EFFORT
SETTINGS between NORMAL, LOW and HIGH.
E/M
DRIVER ID
RESET
DISPLAY
VEHICLE HANDLING
Instrumentation
16
Page 27 of 208

If unusual conditions exist (i.e.-window fogging, etc.), the manual
override controls allow you to select airflow locations and the fan control
allows you to adjust fan speed as necessary.
Temperature selection
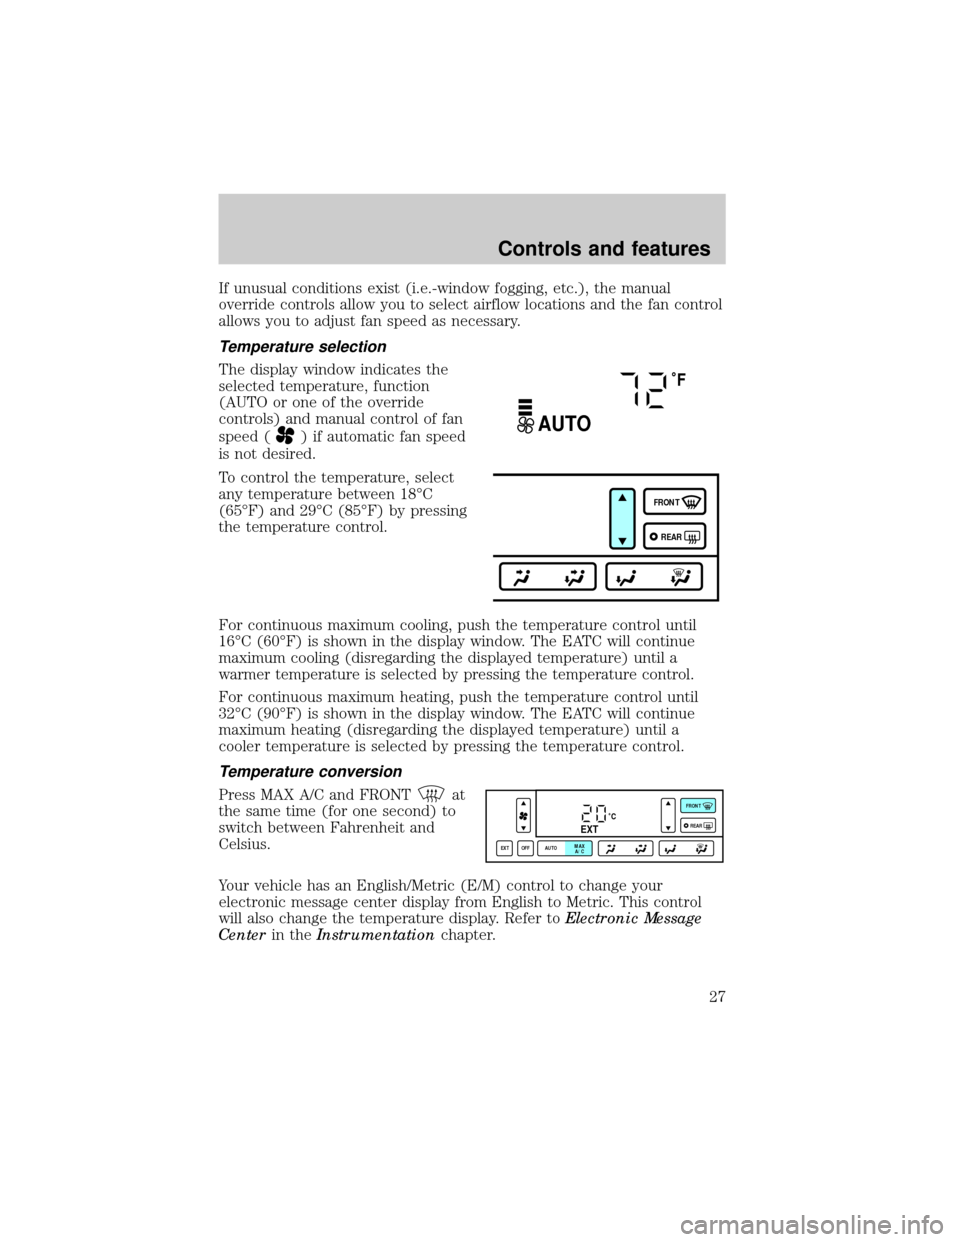
The display window indicates the
selected temperature, function
(AUTO or one of the override
controls) and manual control of fan
speed (
) if automatic fan speed
is not desired.
To control the temperature, select
any temperature between 18ÉC
(65ÉF) and 29ÉC (85ÉF) by pressing
the temperature control.
For continuous maximum cooling, push the temperature control until
16ÉC (60ÉF) is shown in the display window. The EATC will continue
maximum cooling (disregarding the displayed temperature) until a
warmer temperature is selected by pressing the temperature control.
For continuous maximum heating, push the temperature control until
32ÉC (90ÉF) is shown in the display window. The EATC will continue
maximum heating (disregarding the displayed temperature) until a
cooler temperature is selected by pressing the temperature control.
Temperature conversion
Press MAX A/C and FRONTat
the same time (for one second) to
switch between Fahrenheit and
Celsius.
Your vehicle has an English/Metric (E/M) control to change your
electronic message center display from English to Metric. This control
will also change the temperature display. Refer toElectronic Message
Centerin theInstrumentationchapter.
˚F
AUTO
FRONT
REAR
˚CEXT
EXT OFF AUTOMAX
A/CFRONT
REAR
Controls and features
27
Page 46 of 208

CD and CD changer care
²Handle discs by their edges only. Never touch the playing surface.
²Do not expose discs to direct sunlight or heat sources for extended
periods of time.
²Do not insert more than one disc into each slot of the CD changer
magazine.
Cleaning cassette player
Clean the tape player head with a cassette cleaning cartridge after ten to
twelve hours of play in order to maintain the best sound and operation.
Cassette and cassette player care
²Use only cassettes that are 90 minutes long or less.
²Do not expose tapes to direct sunlight, high humidity, extreme heat or
extreme cold. Allow tapes that may have been exposed to extreme
temperatures to reach a moderate temperature before playing.
²Tighten very loose tapes by inserting a finger or pencil into the hole
and turning the hub.
²Remove loose labels before inserting tapes.
²Do not leave tapes in the cassette player for a long time when not
being played.
Radio frequency information
The Federal Communications Commission (FCC) and the Canadian Radio
and Telecommunications Communications (CRTC) establish the
frequencies AM and FM stations may use for their broadcasts. Allowable
frequencies are:
AM 530, 540±1600, 1610 kHz
FM 87.9, 88.1±107.1, 107.9 MHz
Not all frequencies are used in a given area.
Controls and features
46
Page 85 of 208

Press the control once to unlock the
driver's door and move the memory
features to the corresponding
memory position, just as if you had
pressed the memory control in the
vehicle.
²transmitter #1 will recall memory
profile position #1.
²transmitter #2 will recall memory
profile position #2.
²If a third or fourth transmitter is added, it will not recall a memory
position.
Memory seat positions can be changed at any time. Transmitter #1 will
always move the memory features to position #1.
The system can be deactivated by
switching the transmitter to OFF.
KEYLESS ENTRY SYSTEM
With the keyless entry keypad, you
can:
²lock or unlock the vehicle doors
without using the key.
²arm and disarm the perimeter alarm system (if equipped)
²reprogram remote entry transmitters.
See alsoRemote entry systemandPerimeter alarm systemin this
chapter for more information.
ON OFF
123
45678
90
Controls and features
85
Page 159 of 208

If the engine coolant has not been checked at the recommended interval,
the engine coolant reservoir may become empty. If this occurs, a LOW
ENGINE COOLANT warning will illuminate in the message center and
you will need to add engine coolant to the coolant reservoir. For more
information on engine coolant maintenance, refer toAdding engine
coolantin this chapter.
Automotive fluids are not interchangeable; do not use engine coolant,
antifreeze or windshield washer fluid outside of its specified function and
vehicle location.
Adding engine coolant
Do not put engine coolant in the container for the windshield
washer fluid.
Do not mix conventional green coolant, orange coolant or
recycled coolants together in your vehicle. Use only the type of
coolant that your vehicle was originally equipped with. If you are
unsure which type of coolant your vehicle requires, contact your
local dealer.
If sprayed on the windshield, engine coolant could make it difficult to see
through the windshield.
When the engine is cool, add a 50/50 mixture of engine coolant and
water to the engine coolant reservoir-DO NOT ADD DIRECTLY TO THE
RADIATOR. Add straight water only in an emergency, but you should
replace it with a 50/50 mixture of coolant and distilled water as soon as
possible.
Check the coolant level in the coolant reservoir the next few times you
drive the vehicle. If necessary, add enough of a 50/50 mixture of coolant
and water to bring the liquid level to the fill line on the reservoir.
Never remove the coolant reservoir cap while the engine is
running or hot.
If you must remove the coolant reservoir cap, follow these steps to avoid
personal injury:
1. Before you remove the cap, turn the engine off and let it cool.
2. When the engine is cool, wrap a thick cloth around the cap. Slowly
turn cap counterclockwise until pressure begins to release.
Maintenance and care
159
Page 160 of 208

3. Step back while the pressure releases.
4. When you are sure that all the pressure has been released, use the
cloth to turn it counterclockwise and remove the cap.
Change your engine coolant according to the appropriate schedule listed
in the Scheduled Maintenance Guide.
Before adding engine coolant, check the color of the coolant in your
vehicle.
For vehicles with green coolant,use Ford Premium Cooling System
Fluid E2FZ-19549±AA (in Canada, Motorcraft CXC-8±B) or an equivalent
premium engine coolant that meets Ford specification ESE-M97B44±A.
Do not add orange coolant or recycled coolant to your vehicle
originally equipped with conventional green coolant.
For vehicles with orange coolant,use Ford Extended Life Engine
Coolant F6AZ-19544±AA or a DEX-COOLtequivalent that meets Ford
specification WSS-M97B44±D.
Do not add conventional green coolant or recycled coolant to
your vehicle originally equipped with orange coolant.
Do not use alcohol or methanol antifreeze or any engine coolants mixed
with alcohol or methanol antifreeze. Do not use supplemental coolant
additives in your vehicle. These additives may harm your engine cooling
system. The use of an improper coolant may void your warranty of your
vehicle's engine cooling system.
Recycled engine coolant
Ford Motor Company recommends that Ford and Lincoln-Mercury
dealers use recycled engine coolant produced by Ford-approved
processes.
For vehicles with green coolant,not all coolant recycling processes
produce coolant which meets Ford specification ESE-M97B44±A, and use
of such coolant may harm engine and cooling system components.
For vehicles with orange coolant,no recycling process has been
approved at this time and use of such coolant may harm engine and
cooling system components.
Always dispose of used automotive fluids in a responsible manner.
Follow your community's regulations and standards for recycling and
disposing of automotive fluids.
Maintenance and care
160
Page 162 of 208

4. Check the fluid level in the
reservoir. It should be between the
MIN and MAX lines. Do not add
fluid if the level is in this range.
5. If the fluid is low, add fluid in small amounts, continuously checking
the level until it reaches the range between the MIN and MAX lines. Be
sure to put the cap back on the reservoir.
TRANSMISSION FLUID
Checking automatic transmission fluid
Refer to your Scheduled Maintenance Guide for scheduled intervals for
fluid checks and changes. Your transaxle does not consume fluid.
However, the fluid level should be checked if the transaxle is not working
properly, i.e., if the transaxle slips or shifts slowly or if you notice some
sign of fluid leakage.
Automatic transmission fluid expands when warmed. To obtain an
accurate fluid check, drive the vehicle until it is warmed up
(approximately 30 km [20 miles]). If your vehicle has been
operated for an extended period at high speeds, in city traffic
during hot weather or pulling a trailer, the vehicle should be
turned off for about 30 minutes to allow fluid to cool before
checking.
1. Drive the vehicle 30 km (20 miles) or until it reaches normal operating
temperature.
2. Park the vehicle on a level surface and engage the parking brake.
3. With the parking brake engaged and your foot on the brake pedal,
start the engine and move the gearshift lever through all of the gear
ranges. Allow sufficient time for each gear to engage.
4. Latch the gearshift lever in P (Park) and leave the engine running.
5. Remove the dipstick, wiping it clean with a clean, dry lint free rag.
6. Install the dipstick making sure it is fully seated in the filler tube.
Maintenance and care
162