Page 145 of 208

9. Remove the jack and fully tighten
the lug nuts in the order shown.
10. Put flat tire, jack and lug wrench
away.
11. If using a mini-spare tire, turn
off the traction control switch.
12. Turn on the air suspension
switch.
Anti-theft lug nuts (if equipped)
If your vehicle is equipped with this
feature, one of the lug nuts on each
wheel must be removed and
replaced with a special key. The key
and registration card are attached to
the lug wrench and stored with the spare tire. If you lose the key, send
the registration card to the manufacturer (not the dealer) to get a
replacement key. If the lug wrench/lug nut key assembly is lost, see your
nearest Ford or Lincoln/Mercury dealer who has access to the master set
of keys.Do not use an impact wrench with the anti-theft key.
Removing the anti-theft lug nut
1. Insert the key over the locking lug nut. Make sure you hold the key
square to the lug nut. If you hold the key at an angle, you could damage
the key and the lug nut.
2. Place the lug nut wrench over the lug nut key and apply pressure on
the key with the wrench.
3. Turn the wrench in a counterclockwise direction to remove the lug
nut.
Reinstalling the anti-theft lug nut
1. Insert the key over the locking lug nut.
2. Place the lug nut wrench over the lug nut key and apply pressure on
the key with the wrench.
3. Install the lug nut.
1
4 3
52
Roadside emergencies
145
Page 159 of 208

If the engine coolant has not been checked at the recommended interval,
the engine coolant reservoir may become empty. If this occurs, a LOW
ENGINE COOLANT warning will illuminate in the message center and
you will need to add engine coolant to the coolant reservoir. For more
information on engine coolant maintenance, refer toAdding engine
coolantin this chapter.
Automotive fluids are not interchangeable; do not use engine coolant,
antifreeze or windshield washer fluid outside of its specified function and
vehicle location.
Adding engine coolant
Do not put engine coolant in the container for the windshield
washer fluid.
Do not mix conventional green coolant, orange coolant or
recycled coolants together in your vehicle. Use only the type of
coolant that your vehicle was originally equipped with. If you are
unsure which type of coolant your vehicle requires, contact your
local dealer.
If sprayed on the windshield, engine coolant could make it difficult to see
through the windshield.
When the engine is cool, add a 50/50 mixture of engine coolant and
water to the engine coolant reservoir-DO NOT ADD DIRECTLY TO THE
RADIATOR. Add straight water only in an emergency, but you should
replace it with a 50/50 mixture of coolant and distilled water as soon as
possible.
Check the coolant level in the coolant reservoir the next few times you
drive the vehicle. If necessary, add enough of a 50/50 mixture of coolant
and water to bring the liquid level to the fill line on the reservoir.
Never remove the coolant reservoir cap while the engine is
running or hot.
If you must remove the coolant reservoir cap, follow these steps to avoid
personal injury:
1. Before you remove the cap, turn the engine off and let it cool.
2. When the engine is cool, wrap a thick cloth around the cap. Slowly
turn cap counterclockwise until pressure begins to release.
Maintenance and care
159
Page 160 of 208

3. Step back while the pressure releases.
4. When you are sure that all the pressure has been released, use the
cloth to turn it counterclockwise and remove the cap.
Change your engine coolant according to the appropriate schedule listed
in the Scheduled Maintenance Guide.
Before adding engine coolant, check the color of the coolant in your
vehicle.
For vehicles with green coolant,use Ford Premium Cooling System
Fluid E2FZ-19549±AA (in Canada, Motorcraft CXC-8±B) or an equivalent
premium engine coolant that meets Ford specification ESE-M97B44±A.
Do not add orange coolant or recycled coolant to your vehicle
originally equipped with conventional green coolant.
For vehicles with orange coolant,use Ford Extended Life Engine
Coolant F6AZ-19544±AA or a DEX-COOLtequivalent that meets Ford
specification WSS-M97B44±D.
Do not add conventional green coolant or recycled coolant to
your vehicle originally equipped with orange coolant.
Do not use alcohol or methanol antifreeze or any engine coolants mixed
with alcohol or methanol antifreeze. Do not use supplemental coolant
additives in your vehicle. These additives may harm your engine cooling
system. The use of an improper coolant may void your warranty of your
vehicle's engine cooling system.
Recycled engine coolant
Ford Motor Company recommends that Ford and Lincoln-Mercury
dealers use recycled engine coolant produced by Ford-approved
processes.
For vehicles with green coolant,not all coolant recycling processes
produce coolant which meets Ford specification ESE-M97B44±A, and use
of such coolant may harm engine and cooling system components.
For vehicles with orange coolant,no recycling process has been
approved at this time and use of such coolant may harm engine and
cooling system components.
Always dispose of used automotive fluids in a responsible manner.
Follow your community's regulations and standards for recycling and
disposing of automotive fluids.
Maintenance and care
160
Page 166 of 208
If the battery has been disconnected or a new battery has been installed,
the clock and the preset radio stations must be reset once the battery is
reconnected.
²Always dispose of automotive
batteries in a responsible manner.
Follow your local authorized
standards for disposal. Call your
local authorized recycling center
to find out more about recycling
automotive batteries.
CABIN AIR FILTER
The cabin air filter restricts the entry of airborne dust and pollen
particles. The filter is located just in front of the windshield under the
cowl vent screen on the passenger side of the vehicle.
To replace the filter, perform the following procedure:
1. In order to gain better access to the filter, turn the ignition key to ON,
then turn the wipers on. When the wipers reach the middle of the
windshield (wipers in straight up position), turn the ignition to OFF.
LEAD
RETURN
RECYCLE
Maintenance and care
166
Page 176 of 208

Fuel Filler Cap
Your fuel tank filler cap has an indexed design with a one-eighth turn
on/off feature.
When fueling your vehicle:
1. Turn the engine off.
2. Carefully turn the filler cap counterclockwise 1/8 of a turn until it
stops.
3. Pull to remove the cap from the fuel filler pipe.
4. To install the cap, align the tabs on the cap with the notches on the
filler pipe.
5. Turn the filler cap clockwise 1/8 of a turn until it stops.
If the ªService Engine Soon/Check Engine ª indicator comes on and stays
on when you start the engine, the fuel filler cap may not be properly
installed. Turn off the engine, remove the fuel filler cap and reinstall it
being careful to align the cap properly.
If you must replace the fuel filler cap, replace it with a genuine
Ford or Motorcraft part. The customer warranty may be void for
any damage to the fuel tank or fuel system if a genuine Ford or
Motorcraft fuel filler cap is not used.
The fuel system may be under pressure. If the fuel filler cap is
venting vapor or if you hear a hissing sound, wait until it stops
before completely removing the fuel filler cap. Otherwise, fuel may
spray out and injure you or others.
If you do not use the proper fuel filler cap, the pressure in the
fuel tank can damage the fuel system or cause it to work
improperly in a collision.
Choosing the right fuel
Use only UNLEADED FUEL. The use of leaded fuel is prohibited by law
and could damage your vehicle.
Do not use gasolines containing methanol. It can damage critical fuel
systems components.
Maintenance and care
176
Page 184 of 208

²Backup lamps
²License plate lamp
Do not remove lamp bulbs unless they will be replaced immediately. If a
bulb is removed for an extended period of time, contaminants may enter
the lamp housings and affect performance.
Replacing headlamp bulbs
Handle a halogen headlamp bulb carefully and keep out of
children's reach. Grasp the bulb only by its plastic base and do
not touch the glass. The oil from your hand could cause the bulb to
break the next time the headlamps are operated.
To remove the headlamp bulb:
1. Make sure headlamp switch is in OFF position.
2. Lift the hood and remove the protective cover from the top of the
headlamps by lifting up on the rear corners and release the velcro
attachments. Lift the cover and pull towards the windshield.
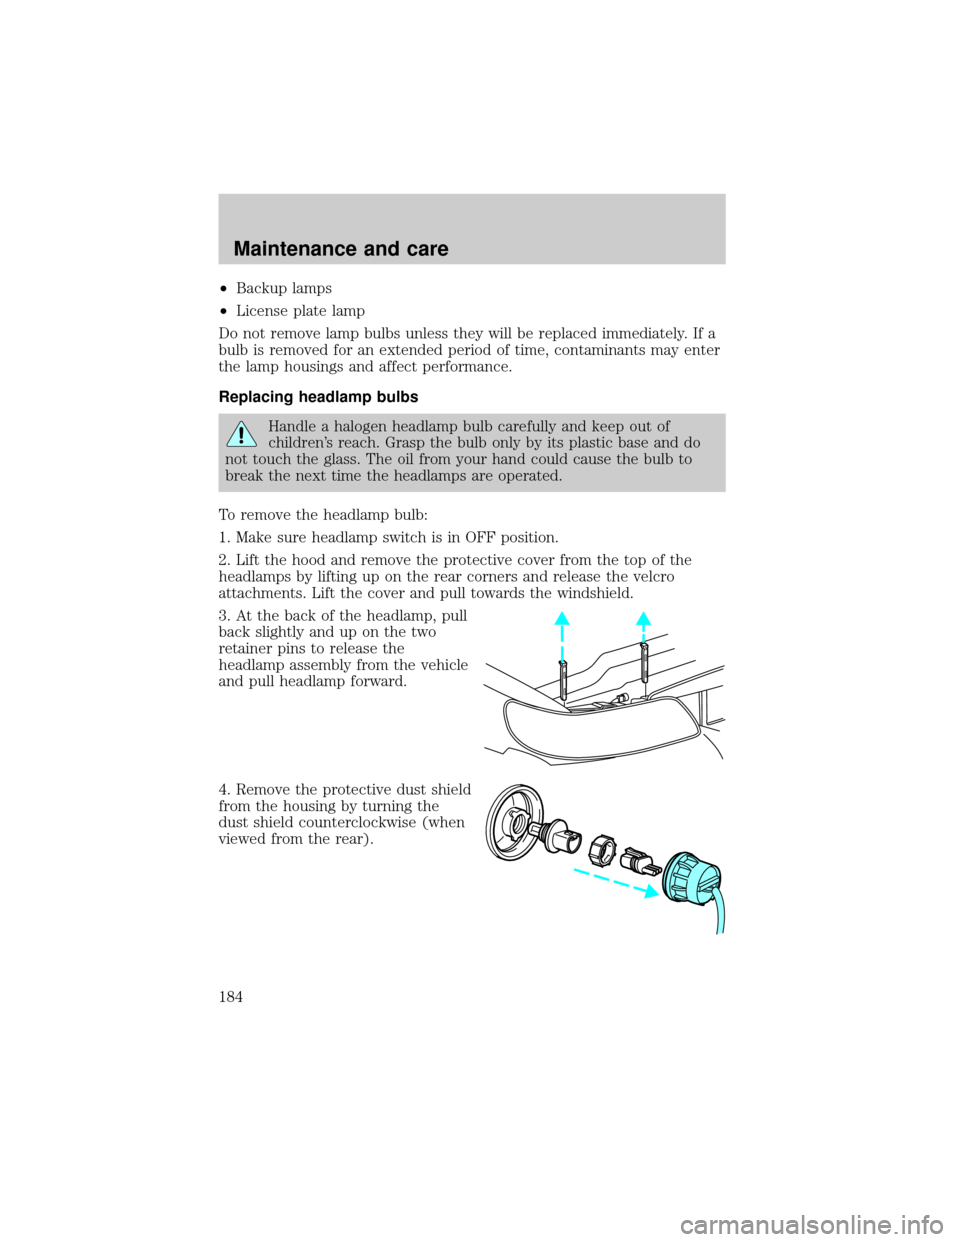
3. At the back of the headlamp, pull
back slightly and up on the two
retainer pins to release the
headlamp assembly from the vehicle
and pull headlamp forward.
4. Remove the protective dust shield
from the housing by turning the
dust shield counterclockwise (when
viewed from the rear).
Maintenance and care
184
Page 185 of 208
5. Release clip and disconnect the
electrical connector from the bulb.
6. Remove the bulb retaining ring by
rotating it counterclockwise.
7. Remove the old bulb from the
lamp assembly by pulling it straight
out of the lamp assembly.
To install the new bulb:
1. Install the new bulb in lamp assembly by pushing straight in with the
bulb's plastic base facing upward. You may need to turn the bulb slightly
to align the grooves in the plastic base with the tabs in the lamp
assembly.
2. Install the bulb retaining ring over the plastic base and lock the ring
by rotating clockwise until it snaps into place.
3. Connect the electrical connector to the bulb.
4. Install the protective dust shield and lock the shield by rotating it
clockwise until it locks into position.
Maintenance and care
185
Page 186 of 208

5. Carefully position the headlamp assembly onto the vehicle making sure
the alignment pins are inserted into the proper holes.
6. Hold the headlamp assembly snugly against the vehicle and push down
on the retainer pins to lock the lamp into place.
7. Before reinstalling the protective cover, make sure the cover tabs are
fully seated under the grille molding.
8. Turn the headlamps on and make sure they work properly. If the
headlamp was correctly aligned before you changed the bulb, you should
not need to align it again.
Replacing front parking lamp/turn signal/cornering lamp bulbs
1. Make sure the headlamp control is in the OFF position.
2. Open the hood and remove the protective cover from the top of the
headlamps by lifting up on the rear corners and release the velcro
attachments. Lift the cover and pull towards the windshield.
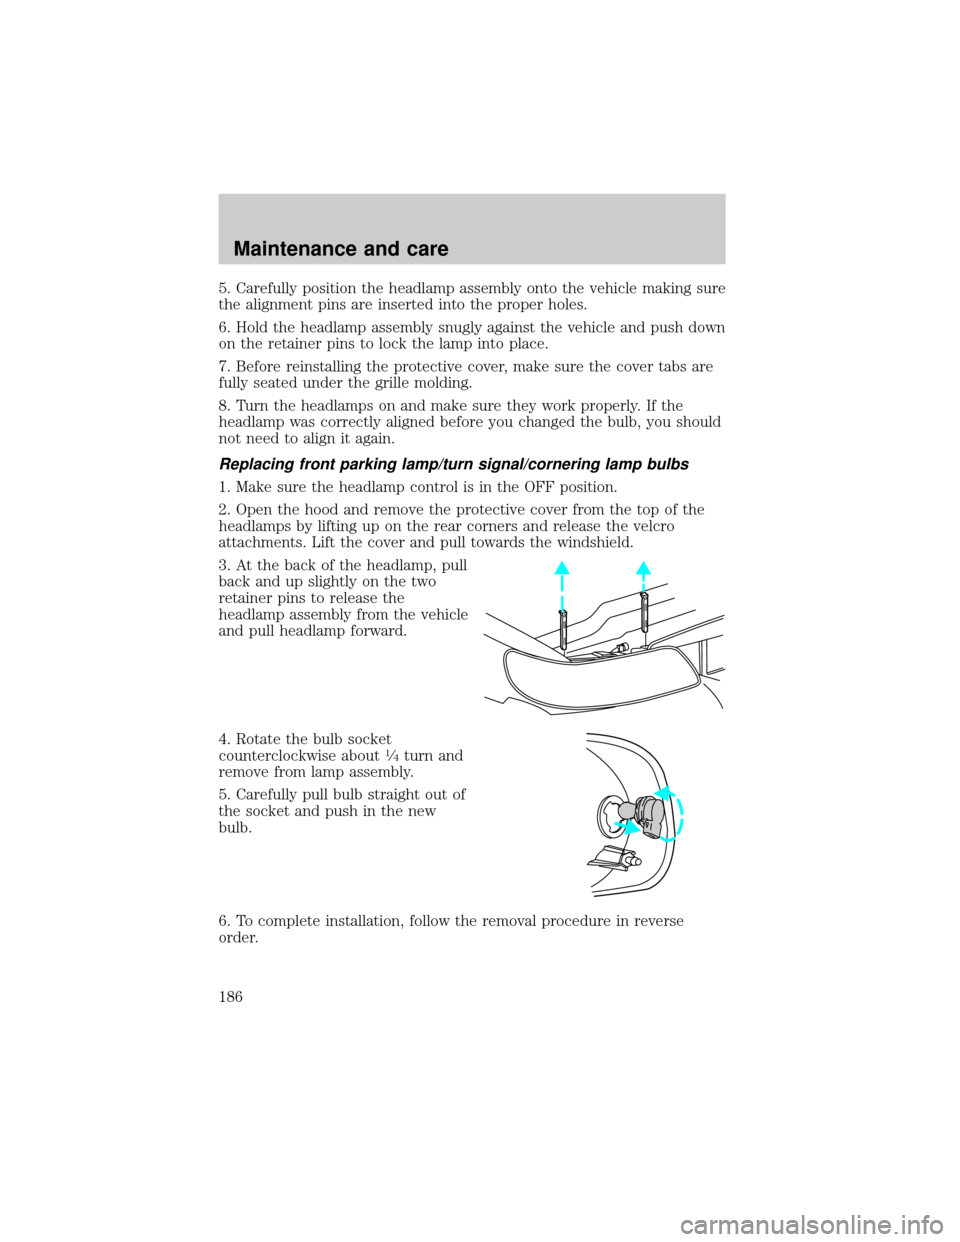
3. At the back of the headlamp, pull
back and up slightly on the two
retainer pins to release the
headlamp assembly from the vehicle
and pull headlamp forward.
4. Rotate the bulb socket
counterclockwise about
1¤4turn and
remove from lamp assembly.
5. Carefully pull bulb straight out of
the socket and push in the new
bulb.
6. To complete installation, follow the removal procedure in reverse
order.
Maintenance and care
186