1999 LAND ROVER DISCOVERY length
[x] Cancel search: lengthPage 815 of 1529

REAR SUSPENSION
64-6 DESCRIPTION AND OPERATION
Description
General
The rear suspension comprises two dampers, two radius arms, a Watts linkage and an anti-roll bar assembly. On
vehicles without Self Levelling Suspension (SLS) coil springs are used. On vehicles with SLS air springs are used.
The anti-roll bar is an essential part of the rear suspension. On vehicles without ACE, a conventional 'passive' anti-
roll bar is fitted. On vehicles fitted with the ACE system, a thicker diameter anti-roll bar, known as a torsion bar, is used
with an actuator at one end.
+ FRONT SUSPENSION, DESCRIPTION AND OPERATION, Description - ACE.
The hydraulic dampers and springs provide springing for each rear wheel. The long travel dampers, springs and
radius arms provide maximum axle articulation and wheel travel for off-road driving. The rear axle is controlled
longitudinally by two forged steel radius arms and transversely by a Watts linkage.
Radius arms
Each radius arm is manufactured from forged steel. Two bushes are pressed into the rear of the radius arm. The rear
of the radius arm is located between a fabricated bracket on the axle and secured through the bushes with two bolts
and nuts. A bush is pressed into the forward end of the radius arm which is located in a fabricated bracket on each
chassis longitudinal and secured through the bush with a bolt and nut. Each radius arm is similar in its construction
to the front radius arms. The rear radius arms are shorter than the front and have a lug for attachment of the SLS
height sensor (when fitted).
The radius arms prevent longitudinal movement of the rear axle and because of their length allow maximum axle
articulation. The stiffness of the bushes in each radius arm also contributes to the vehicle roll stiffness.
Each radius arm has a notch on its lower edge which provides location for the vehicle jack.
Dampers
Two conventional telescopic dampers are used to control body/axle movement. The upper damper mounting is fitted
with a bush which locates in a bracket on the chassis longitudinal. The damper is secured with a bolt which screws
into a captive nut on the bracket. The lower damper mounting is also fitted with a bush and locates in a fabricated
bracket attached to the rear axle. The lower mounting is secured with a bolt which screws into a captive nut on the
bracket. The upper and lower bushes are replaceable items.
Air springs (vehicles with SLS)
On vehicles with SLS fitted, air springs are fitted between the rear axle and the chassis. Each spring is located at its
base on a fabricated platform on the rear axle. The top of the spring locates in a fabricated bracket attached to the
outside of each chassis longitudinal.
The plastic base of the air spring has two lugs which locate in a slotted hole in the rear axle platform. The spring is
secured by rotating the spring through 90°, locating the lug in the platform. The plastic top of the air spring has two
grooved pins which locate in holes in the bracket on the chassis. Two spring clips locate on the grooved pins and
retain the top of the spring in position.
Each air spring comprises a top plate assembly, an air bag and a base piston. The air bag is attached to the top plate
and the piston with a crimped ring. The air bag is made from a flexible rubber material which allows the bag to expand
with air pressure and deform under load. The top plate assembly comprises the plastic top plate with two bonded
grooved pins on its top face. In the centre of the top face is a female connector which allows for the attachment of the
air hose from the SLS compressor. The piston is made from plastic and is shaped to allow the air bag to roll over its
outer diameter. The base of the piston is recessed with a boss moulded in the centre. The boss has two lugs which
provide attachment to the axle platform.
Coil springs (vehicles without SLS)
On vehicles without SLS fitted, coil springs are fitted between the rear axle and the chassis in place of the SLS air
springs. Each spring is located at its base by the lower spring seat which is secured to a fabricated platform on the
rear axle with two bolts. The top of each spring is located in the upper spring seat. The upper spring seat comprises
a pressed metal plate with an outer coating of natural rubber bonded to the plate. The upper spring seat is retained
in position by the compression of the spring.
Page 816 of 1529

REAR SUSPENSION
DESCRIPTION AND OPERATION 64-7
Coil Spring Specifications – Models up to 03 Model Year
The rear coil springs are of the variable rate type and are manufactured from silicon manganese 16.5 mm (0.65 in.)
diameter bar. Each spring has 9 coils and a free length of 385 mm (15.1 in.). The variable rate of the spring is achieved
by the active coils at one end being closer together. The rear coil spring is identified by a purple stripe painted on a
number of coils.
Coil Spring Specifications – Models From 03 Model Year
The introduction of the 03MY vehicle introduced a range of additional rear coil spring fitments. These were introduced
as a package to optimise vehicle trim heights.
The coil springs are manufactured from silicon manganese 16.35 mm (0.64 in.) diameter bar for springs on five seater
models and 16.57 mm (0.65 in.) diameter bar on seven seater models. The following spring data table shows the
colour codes, number of coils and spring free length.
Spring Data
The following table shows spring fitment applicability.
Spring Fitment Applicability
Watts linkage
A Watts linkage is used to ensure that the rear axle remains centrally located. The Watts linkage comprises two
transverse links and a pivot housing. The transverse links and pivot housing allow the rear axle to move vertically
without any transverse movement.
The transverse links are made from fabricated and welded steel. Each transverse link has a bush press fitted into a
housing at one end. The opposite end has a forked bracket with two cross holes.
The pivot housing is made from cast iron. Three bushes are press fitted in the housing, one in the centre and one at
each end.
The pivot housing is located in a fabricated bracket centrally located on the rear of the axle. The central bush of the
pivot housing is secured in the bracket with a bolt and locknut. Fabricated brackets on each chassis longitudinal
provide for the attachment of each transverse link. Each link is secured through its bush with a bolt and locknut. The
forked end of each link locates over the bushes at each end of the pivot housing and is secured with a bolt and locknut.
The attachment bolts for each link are coated with a clear, dry wax which reduces friction on the bolt and allows the
correct torque to be applied to the clamping of the bushes. The bolts can be re-used, but if bolt replacement is
necessary the correct bolt with the wax coating must be used.
Colour Code Total No. of Coils Free Length Model
Brown/Orange 8.73 384.7 mm (15.14 in) 5 Seat
Grey/Orange 8.73 392 mm (15.43 in) 5 Seat
Yellow/Grey 8.73 376.6 mm (14.82 in) 5 Seat
Pink/Grey 8.73 400.3 mm (15.75 in) 5 Seat
Blue/Grey 9.10 387.8 mm (15.26 in) 7 Seat
Green/Grey 9.10 395.2 mm (15.55 in) 7 Seat
White/Grey 9.10 380.6 mm (14.98 in) 7 Seat
Left Hand Drive Right Hand Drive
Both Sides RH Side LH Side
Brown/Orange Grey/Orange Yellow/Grey
Grey Orange Pink/Grey Brown/Orange
Blue/Grey Green/Grey White/Grey
Page 837 of 1529
REAR SUSPENSION
64-28 REPAIRS
10.Position the wheel hub and drive shaft on a
press, place supports beneath the wheel studs
and press the drive shaft from the wheel hub.
Refit
1.Clean drive shaft splines, wheel hub and axle
mating faces, ABS sensor and sensor recess.
2.Fit drive shaft to axle casing.
3.Lubricate new bearing hub 'O' ring with clean
differential oil.
+ CAPACITIES, FLUIDS,
LUBRICANTS AND SEALANTS,
Lubrication.
4.Fit 'O' ring to wheel hub.
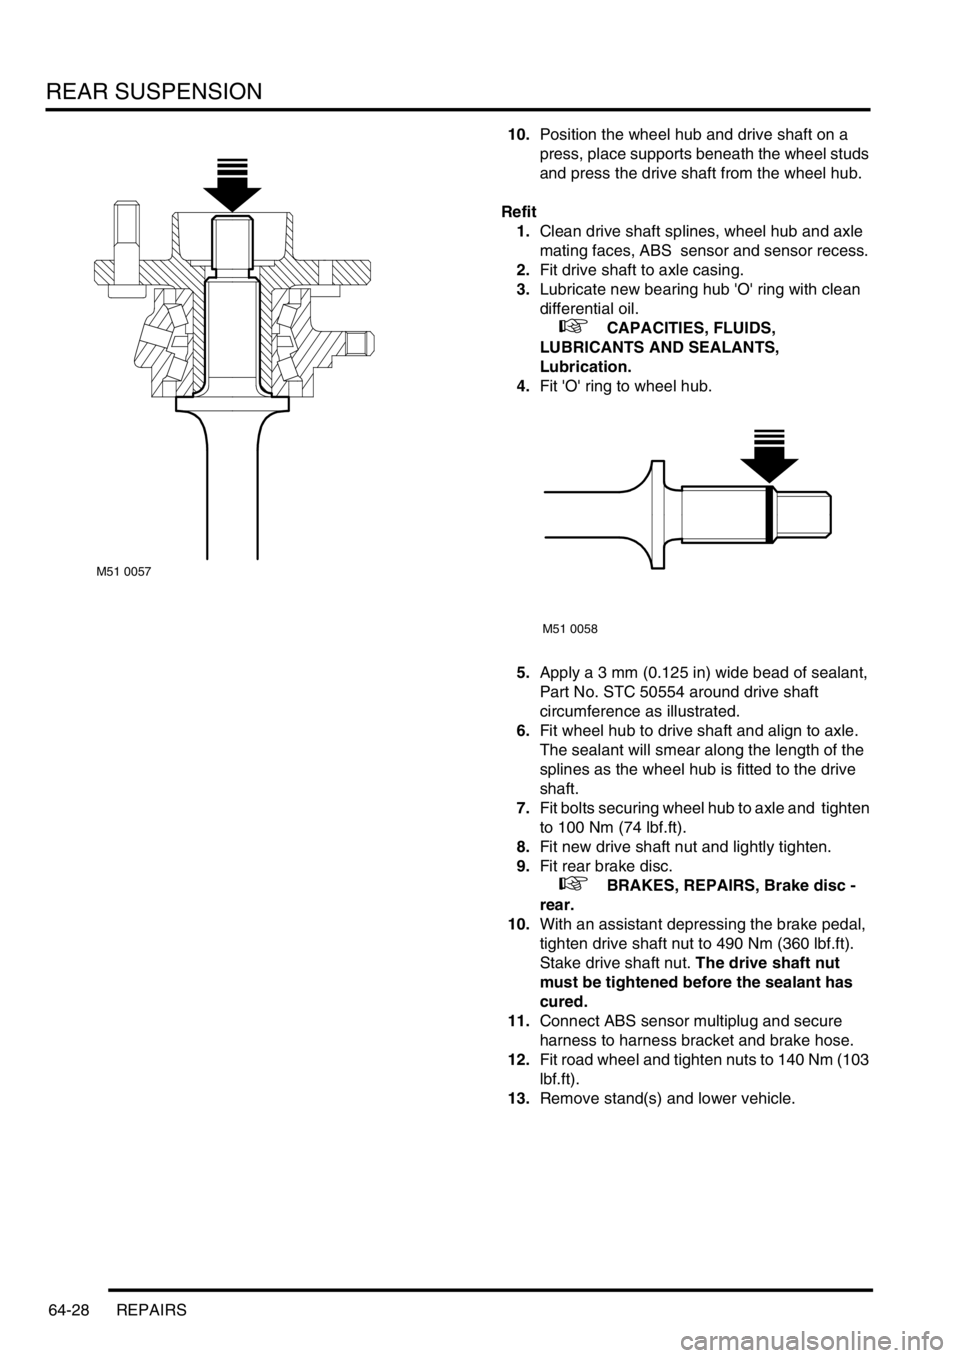
5.Apply a 3 mm (0.125 in) wide bead of sealant,
Part No. STC 50554 around drive shaft
circumference as illustrated.
6.Fit wheel hub to drive shaft and align to axle.
The sealant will smear along the length of the
splines as the wheel hub is fitted to the drive
shaft.
7.Fit bolts securing wheel hub to axle and tighten
to 100 Nm (74 lbf.ft).
8.Fit new drive shaft nut and lightly tighten.
9.Fit rear brake disc.
+ BRAKES, REPAIRS, Brake disc -
rear.
10.With an assistant depressing the brake pedal,
tighten drive shaft nut to 490 Nm (360 lbf.ft).
Stake drive shaft nut. The drive shaft nut
must be tightened before the sealant has
cured.
11.Connect ABS sensor multiplug and secure
harness to harness bracket and brake hose.
12.Fit road wheel and tighten nuts to 140 Nm (103
lbf.ft).
13.Remove stand(s) and lower vehicle.
M51 0057
M51 0058
Page 879 of 1529

BRAKES
70-26 DESCRIPTION AND OPERATION
Description
General
The handbrake consists of a drum brake, installed on the rear of the transfer box, operated by a cable connected to
a handbrake lever between the front seats.
Handbrake lever
The handbrake lever is mounted on a base plate which attaches to the transmission tunnel. A conventional ratchet
and thumb operated release button are incorporated for locking and unlocking the lever. A warning switch on the base
of the lever operates the brake warning lamp in the instrument pack. While the handbrake is applied the warning
switch connects an earth to the instrument pack which, if the ignition is on, illuminates the brake warning lamp. In
some markets, the instrument pack performs a bulb check of the brake warning lamp each time the ignition is switched
on.
Cable
The handbrake cable consists of inner and outer cables installed between the handbrake lever and the drum brake.
A protective sleeve is installed on the cable to protect the cable from heat from the exhaust system. Handbrake
adjustment is provided by a threaded sleeve installed on the outer cable where it locates in the handbrake lever.
Turning an adjuster wheel, which is keyed to the threaded sleeve and secured by a 'C' clip, alters the effective length
of the outer sleeve and consequently changes the handbrake lever movement needed to apply the drum brake.
Page 1056 of 1529
CHASSIS AND BODY DIMENSIONS
BODY DIMENSIONS 77-1-5
BODY DIMENSIONS
Body Dimensions
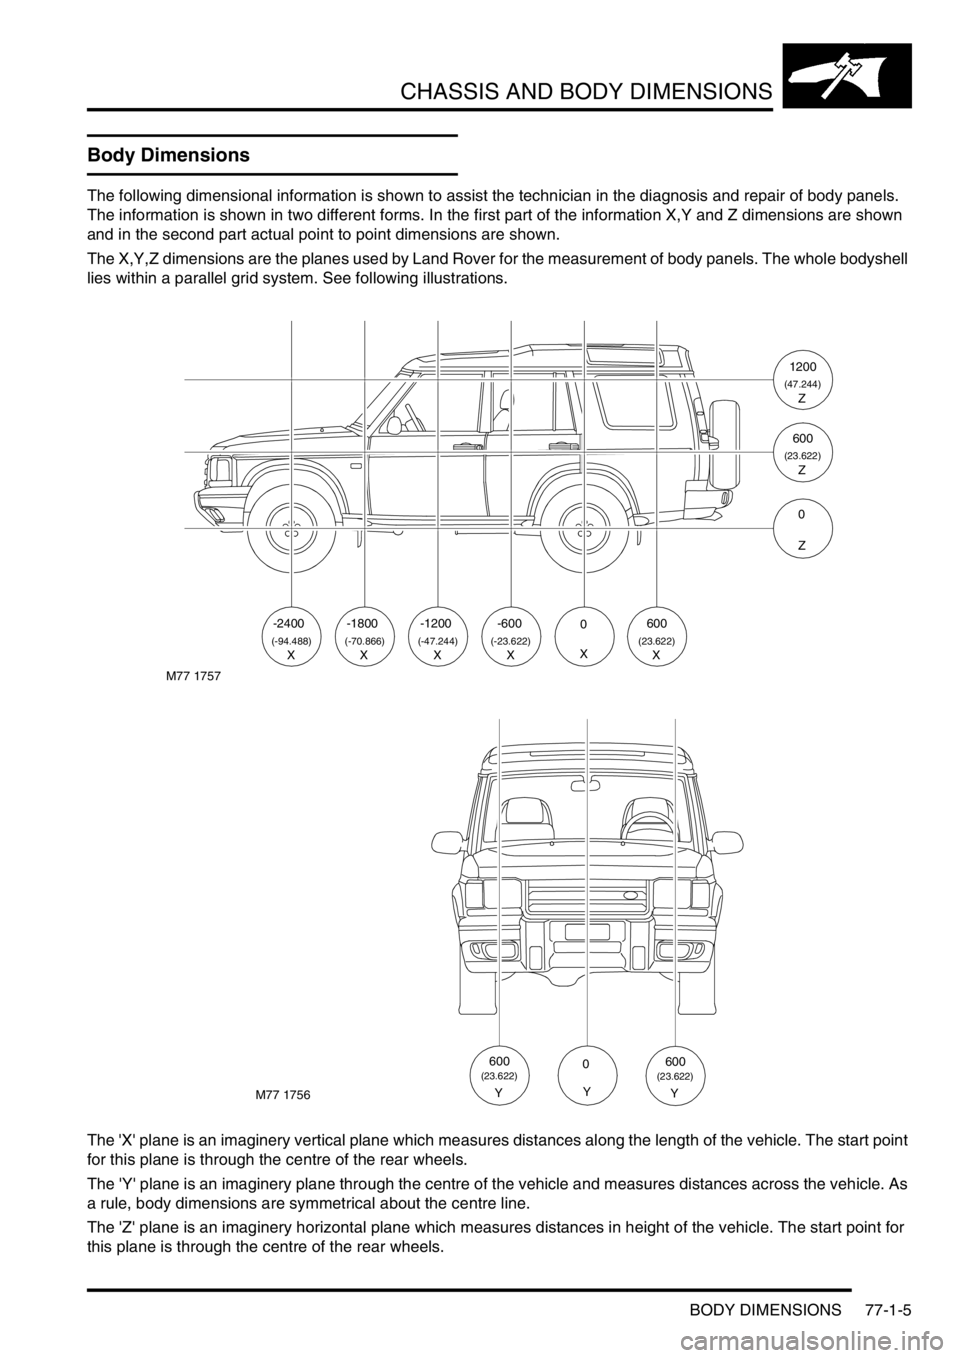
The following dimensional information is shown to assist the technician in the diagnosis and repair of body panels.
The information is shown in two different forms. In the first part of the information X,Y and Z dimensions are shown
and in the second part actual point to point dimensions are shown.
The X,Y,Z dimensions are the planes used by Land Rover for the measurement of body panels. The whole bodyshell
lies within a parallel grid system. See following illustrations.
The 'X' plane is an imaginery vertical plane which measures distances along the length of the vehicle. The start point
for this plane is through the centre of the rear wheels.
The 'Y' plane is an imaginery plane through the centre of the vehicle and measures distances across the vehicle. As
a rule, body dimensions are symmetrical about the centre line.
The 'Z' plane is an imaginery horizontal plane which measures distances in height of the vehicle. The start point for
this plane is through the centre of the rear wheels.
M77 1757
-2400
(-94.488)X
-1800
(-70.866)
-1200-6000600
(-47.244)(-23.622)(23.622)XXXXX
1200
(47.244)Z
600
(23.622)Z
0
Z
M77 1756
0
Y
600(23.622)
Y
600(23.622)
Y
Page 1060 of 1529
CHASSIS AND BODY DIMENSIONS
BODY DIMENSIONS 77-1-9
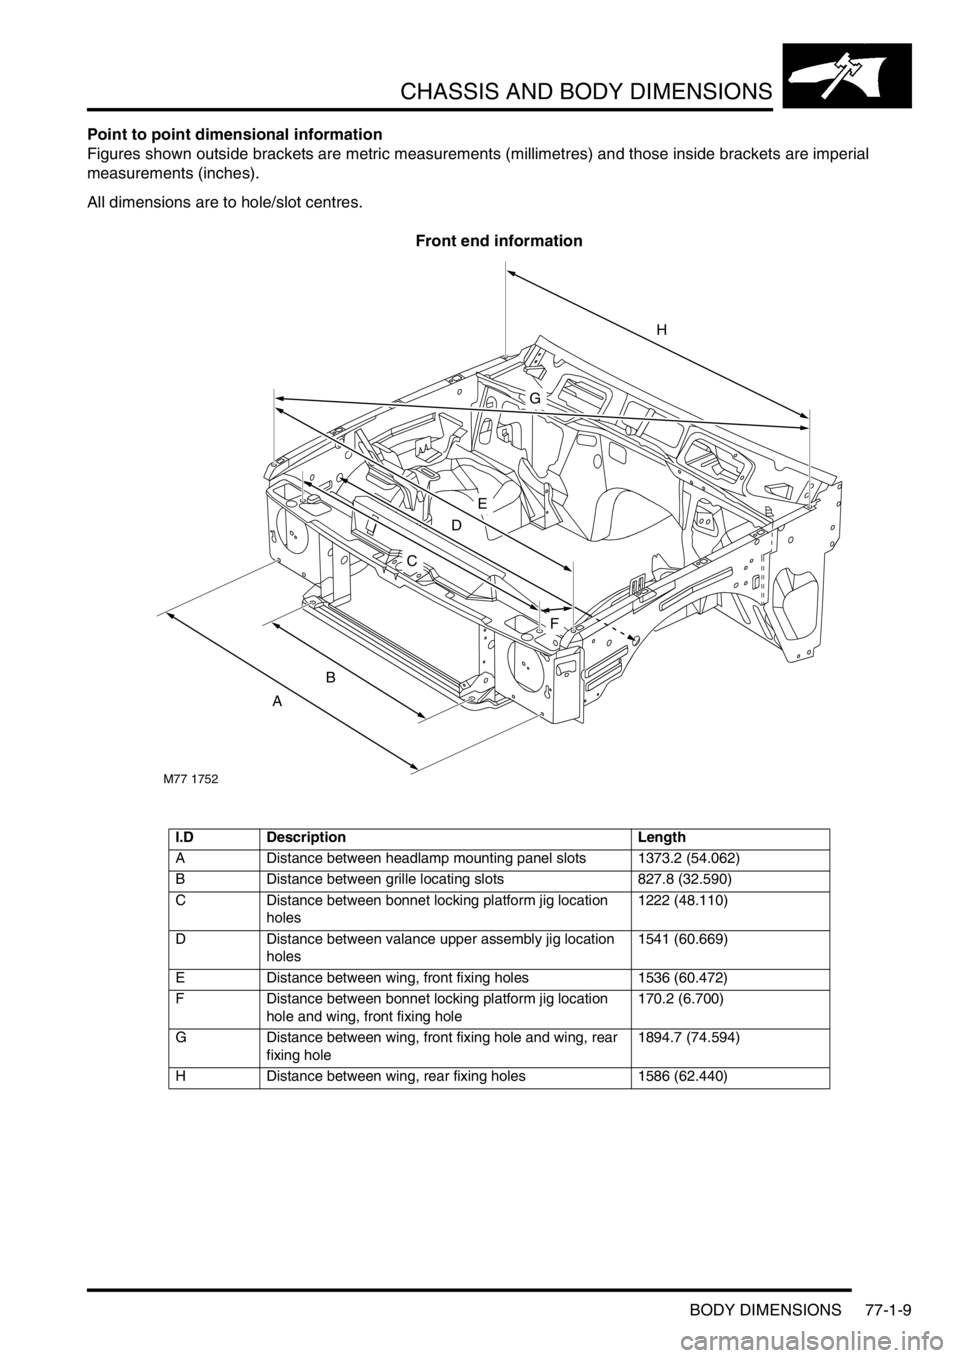
Point to point dimensional information
Figures shown outside brackets are metric measurements (millimetres) and those inside brackets are imperial
measurements (inches).
All dimensions are to hole/slot centres.
Front end information
I.D Description Length
A Distance between headlamp mounting panel slots 1373.2 (54.062)
B Distance between grille locating slots 827.8 (32.590)
C Distance between bonnet locking platform jig location
holes1222 (48.110)
D Distance between valance upper assembly jig location
holes1541 (60.669)
E Distance between wing, front fixing holes 1536 (60.472)
F Distance between bonnet locking platform jig location
hole and wing, front fixing hole170.2 (6.700)
G Distance between wing, front fixing hole and wing, rear
fixing hole1894.7 (74.594)
H Distance between wing, rear fixing holes 1586 (62.440)
M77 1752
A
B
C
D
E
F
G
H
Page 1061 of 1529
CHASSIS AND BODY DIMENSIONS
77-1-10 BODY DIMENSIONS
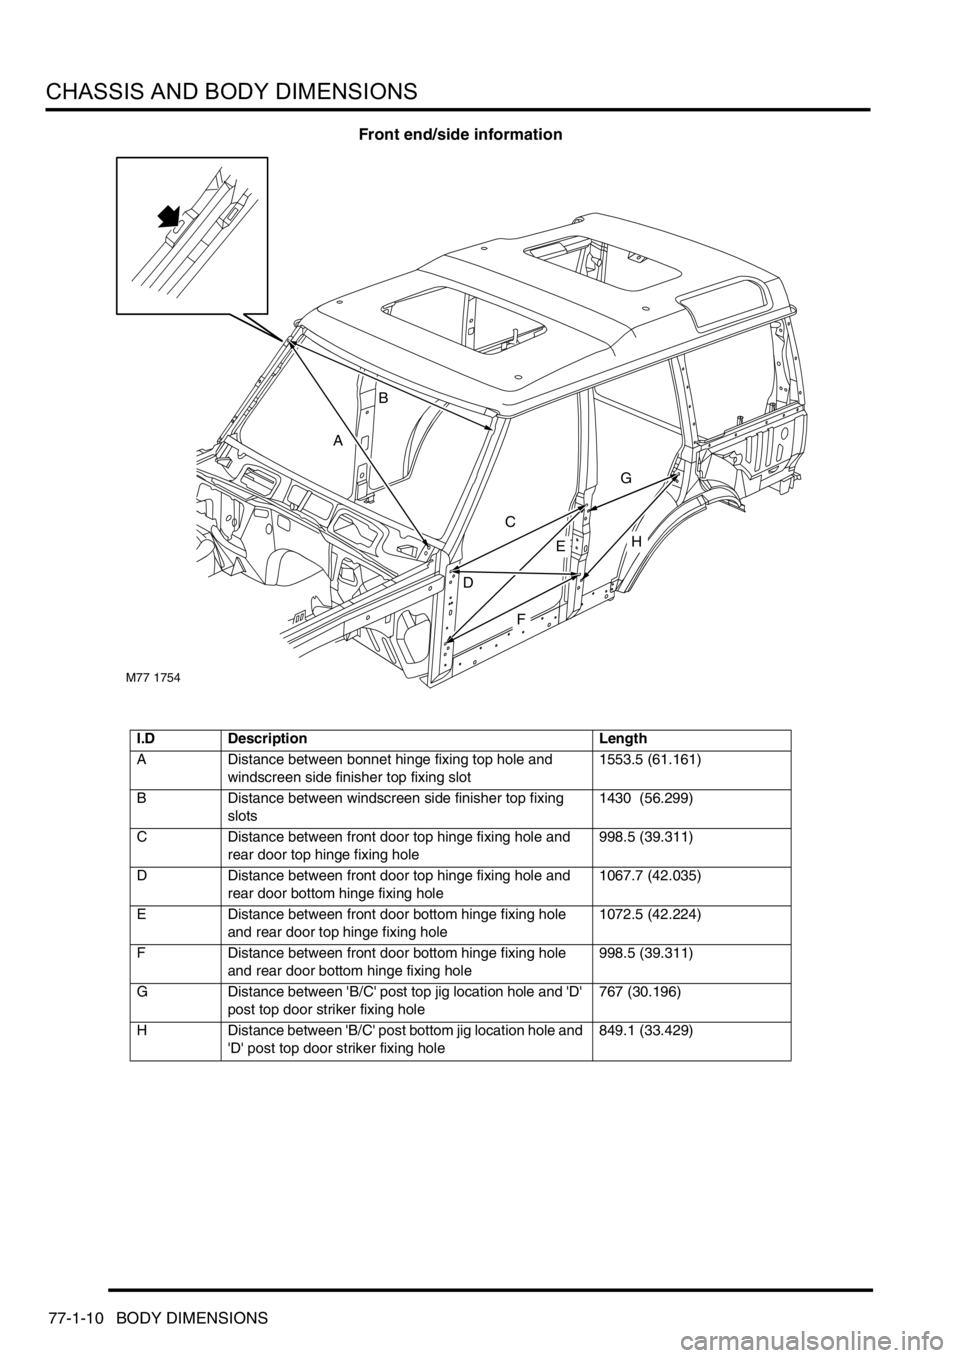
Front end/side information
I.D Description Length
A Distance between bonnet hinge fixing top hole and
windscreen side finisher top fixing slot1553.5 (61.161)
B Distance between windscreen side finisher top fixing
slots1430 (56.299)
C Distance between front door top hinge fixing hole and
rear door top hinge fixing hole998.5 (39.311)
D Distance between front door top hinge fixing hole and
rear door bottom hinge fixing hole1067.7 (42.035)
E Distance between front door bottom hinge fixing hole
and rear door top hinge fixing hole1072.5 (42.224)
F Distance between front door bottom hinge fixing hole
and rear door bottom hinge fixing hole998.5 (39.311)
G Distance between 'B/C' post top jig location hole and 'D'
post top door striker fixing hole767 (30.196)
H Distance between 'B/C' post bottom jig location hole and
'D' post top door striker fixing hole849.1 (33.429)
M77 1754
A
B
C
D
G
E
F
H
Page 1062 of 1529
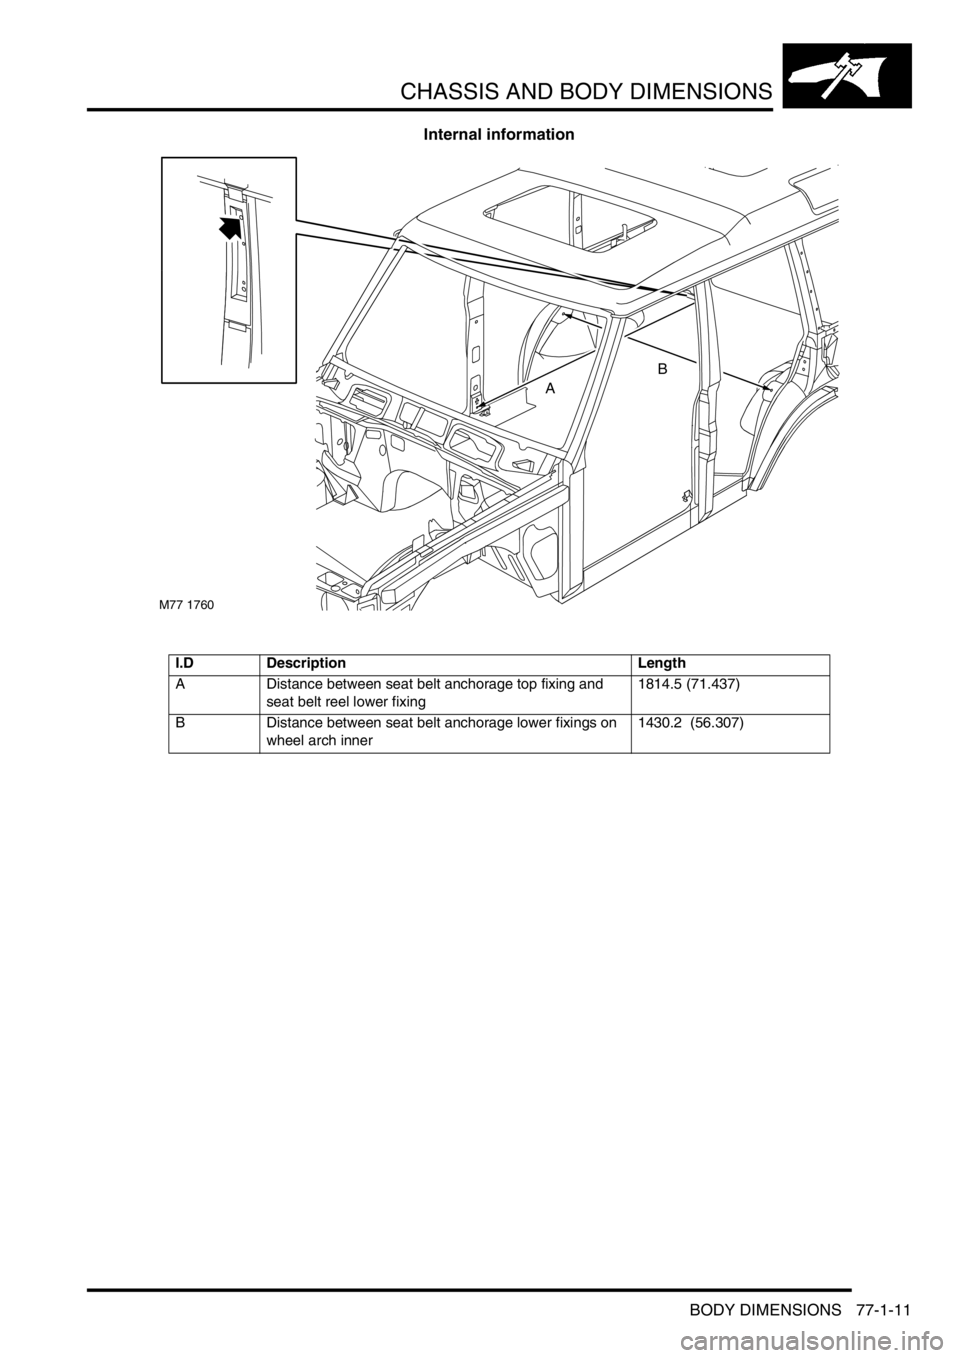
CHASSIS AND BODY DIMENSIONS
BODY DIMENSIONS 77-1-11
Internal information
I.D Description Length
A Distance between seat belt anchorage top fixing and
seat belt reel lower fixing1814.5 (71.437)
B Distance between seat belt anchorage lower fixings on
wheel arch inner1430.2 (56.307)
M77 1760
A
B