Page 1382 of 1529
IN CAR ENTERTAINMENT
DESCRIPTION AND OPERATION 86-6-15
1Overhead console assembly
2CD autochanger
3Radio head unit
4Fuse 15 (20A) – Auxiliary power supply
5Fuse 27 (15A) – Permanent battery supply
6Passenger compartment fusebox
7CD Switch box
8Noise filter
Page 1383 of 1529

IN CAR ENTERTAINMENT
86-6-16 DESCRIPTION AND OPERATION
Description
General
The DVD entertainment system can be fitted by Land Rover Special Vehicles as an original equipment system on the
Adventurer model or can be supplied as an accessory for fitment by the dealer. The system can be fitted to all
Discovery Series II models.
NOTE: The DVD system cannot be fitted to vehicles fitted with a Visteon single slot CD head unit.
The fitment of the system to vehicles manufactured before 2002 model year requires a different wiring harness and
connector plugs to vehicles from 2002 model year. Full details of components required for specific vehicles is
contained in the DVD System Accessory fitting instructions (Part No. STC 61947/61946).
The system comprises a main wiring harness, a lower wiring harness, CD switch box with integral noise filter, CD
switch harness, remote control handset and an overhead console containing the Liquid Crystal Display (LCD) monitor
and Digital Versatile Disc (DVD) player.
The system can play DVD films and display them on the LCD screen. The DVD audio can be played over the vehicle
audio speaker system or on headphones connected directly to the overhead console. The system can also function
as a second CD player. Rear seat occupants can listen to a CD in the overhead console via headphones, whilst the
remaining vehicle occupants can listen to CD's played from the CD autochanger in the normal way.
Page 1390 of 1529
IN CAR ENTERTAINMENT
DESCRIPTION AND OPERATION 86-6-23
Connector C07
Connector C07 is located on the CD switch and transmits signals between the CD switch and the CD autochanger
and the audio head unit.
Pin No. Description Input/Output
1 Not used–
2 I Bus data connection between CD switch and head unit Input/Output
3 Audio left + from CD switch to head unit Output
4 Audio left – from CD switch to head unit Output
5 Audio right + from CD switch to head unit Output
6 Audio right – from CD switch to head unit Output
7 I Bus data connection between CD switch and CD autochanger Input/Output
8 Audio left + from CD autochanger to CD switch Output
9 Audio left – from CD autochanger to CD switch Output
10 Audio right + from CD autochanger to CD switch Output
11 Audio right – from CD autochanger to CD switch Output
12 – 13 Not used–
14 Power ground from passenger compartment fusebox to CD switch Input
Page 1391 of 1529
IN CAR ENTERTAINMENT
86-6-24 DESCRIPTION AND OPERATION
Connector C08
Connector C08 is located in the harness from the CD autochanger to the CD switch.
Pin No. Description Input/Output
1 Audio right + from CD autochanger to CD switch Input
2 Audio right – from CD autochanger to CD switch Input
3 – 4 Not used–
5 I Bus data connection between CD autochanger and CD switch Input/Output
6 Audio left + from CD autochanger to CD switch Input
7 Audio left – from CD autochanger to CD switch Input
8 Power ground from head unit to CD autochanger Input
9 Not used–
10 Battery power from head unit to CD autochanger Input
Page 1392 of 1529
IN CAR ENTERTAINMENT
DESCRIPTION AND OPERATION 86-6-25
Connector C09
Connector C09 is located in the harness from the audio head unit to the CD switch.
Pin No. Description Input/Output
1 Audio right + from CD switch to head unit Input
2 Audio right – from CD switch to head unit Input
3 – 4 Not used–
5 I Bus data connection between CD switch and head unit Input/Output
6 Audio left + from CD switch to head unit Input
7 Audio left – from CD switch to head unit Input
8 Power ground from head unit to CD autochanger Input
9 Not used–
10 Battery power from head unit to CD autochanger Input
Page 1394 of 1529

IN CAR ENTERTAINMENT
DESCRIPTION AND OPERATION 86-6-27
Operation
DVD Player Functionality
The following defines the functionality of the unit. Further details of system operation can found in the DVD System
Owner's Manual, Publication Part No. LRL0482, supplied with the system.
DVD Region Selection
The DVD player is capable of playing discs from any region. The DVD can only be set to play discs of one region at
a time. A code is entered using the remote control handset to set the unit to the required region. The unit is set to the
correct region on production and therefore this will not be required by either the dealer or the customer.
If the unit region is required to be changed for any reason, Land Rover Special Vehicles must be contacted for the
required code and procedure.
NOTE: The unit can be re-configured for region up to five times. After the fifth attempt to re-configure the region, the
unit will be locked in the fifth region that was programmed. This will require the unit to be returned to the manufacturer
to be reset. The manufacturer will charge a fee for this service.
DVD Player CD Audio Function
The DVD player can play audio CD's through the vehicle audio system. This allows the user to play additional CD's
without having to remove the CD autochanger cartridge.
The overhead console LCD monitor must be open to play audio CD's.. Normal audio CD functionality such as repeat,
random and track select etc. can be accessed using the remote control handset.
The DVD player in the overhead console will also function independently of the vehicle audio system, and operate as
an additional CD player. The rear seat passengers can listen to audio CD's via the three headphone sockets on the
overhead console and via the two radio/headphone amplifier units (if fitted), while the front seat passengers
simultaneously listen to CD's played on the vehicle audio system and CD autochanger.
DVD/CD Output using the Vehicle Audio System
To play the DVD/CD audio output from the overhead console through the vehicle audio speakers, the speaker button
on the overhead console or remote control handset must be pressed. 'Speaker On' appears on the LCD monitor and
the head unit CD functionality is suspended. The audio output from the overhead console will now be played from the
vehicle speaker system. The head unit volume control, tone control, Navigation announcements and mobile phone (if
fitted) will function as normal and override the DVD output. A second press of the speaker button will switch the audio
output back to the head unit. 'Speaker Off' will be displayed on the LCD monitor.
The overhead console will remember the selected speaker condition if the overhead console is switched off by closing
the monitor, the console switched off using the handset or accessory power removed from the overhead console.
Power Up Conditions
On application of accessory power, the overhead console will perform the following:
lIf no disc is in the DVD player, the LCD monitor will display a blue screen and enter 'AUX' input mode.
When a DVD or CD is inserted in the DVD player, the system will change to DVD input mode. The disc will
attempt to play but may be limited by the disc media. Some discs will play automatically, some will display a menu
and others require the user to start playback.
lIf a disc was in the DVD player and the system was in 'Play', 'Pause', 'FF' or 'Rew' when powered down, playback
will start when power is re-applied.
lIf a disc was in the DVD player and the system was in 'Stop' when powered down, the system will enter DVD
mode and a blue screen will be displayed on the LCD monitor.
lSpeaker selection will remain in the same state as when the accessory power was removed.
Engine Cranking
If the unit is playing a DVD or CD when the ignition switch is moved to position III (engine crank), the system will stop
playing while the engine is cranking. Playback will resume at the point the playback was stopped when the ignition
switch is returned to position I or II.
Page 1396 of 1529

IN CAR ENTERTAINMENT
DESCRIPTION AND OPERATION 86-6-29
Audio through headphones
but not through vehicle
speakersFaulty connections a CD switch
boxCheck DVD harnesses and connectors into and out of
the CD switch box
CD switch box internal switches
incorrectly setCheck internal switches on CD switch box for correct
settings for vehicle audio head unit
Faulty CD autochanger (if fitted) Check and if necessary replace CD autochanger
Faulty CD switch box Check and replace CD switch box
Audio CD autochanger does
not operateMissing or blown fuse Check both fuses in passenger compartment fusebox
DVD system speaker setting
incorrectPress speaker button on overhead console or remote
control handset to switch from DVD audio to head unit
CD audio
Faulty audio connections Check all connectors from the audio head unit to the CD
autochanger
Faulty CD autochanger Replace CD autochanger
Faulty CD switch box connections Check CD switch box connectors for security and
correct location of pins
Faulty CD switch box Replace CD switch box
Faulty main DVD harness Check main DVD harness for damage and repair or
replace as necessary
Faulty overhead console Replace overhead console
Overhead console DVD
player will not accept discsMissing or blown fuse Check both fuses in passenger compartment fusebox
Faulty or damaged disc check disc and try a known operational disc
Faulty overhead console Replace overhead console
Page 1403 of 1529

IN CAR ENTERTAINMENT
86-6-36 REPAIRS
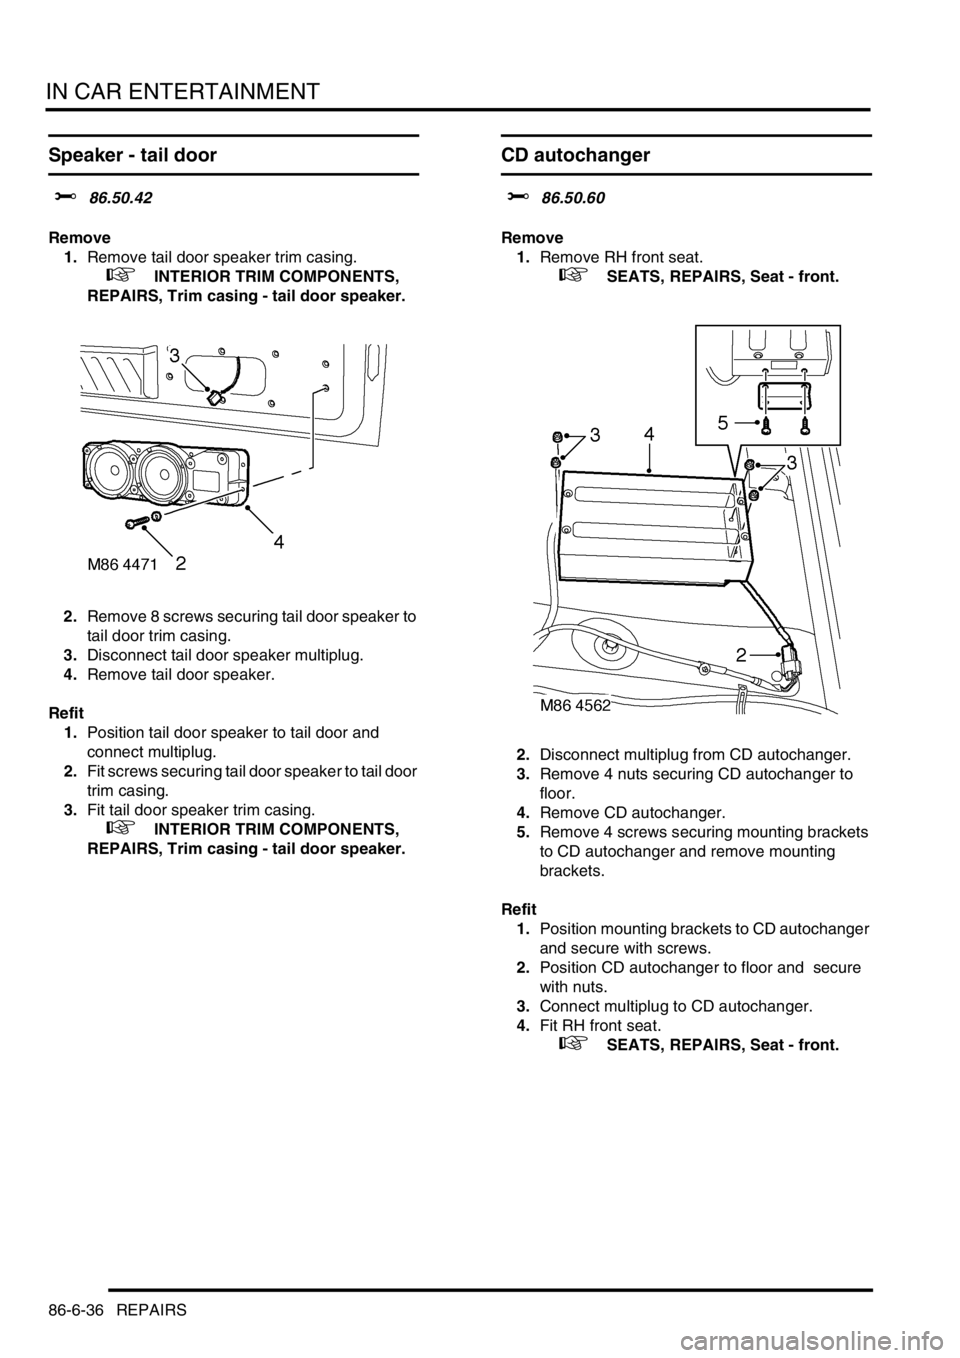
Speaker - tail door
$% 86.50.42
Remove
1.Remove tail door speaker trim casing.
+ INTERIOR TRIM COMPONENTS,
REPAIRS, Trim casing - tail door speaker.
2.Remove 8 screws securing tail door speaker to
tail door trim casing.
3.Disconnect tail door speaker multiplug.
4.Remove tail door speaker.
Refit
1.Position tail door speaker to tail door and
connect multiplug.
2.Fit screws securing tail door speaker to tail door
trim casing.
3.Fit tail door speaker trim casing.
+ INTERIOR TRIM COMPONENTS,
REPAIRS, Trim casing - tail door speaker.
CD autochanger
$% 86.50.60
Remove
1.Remove RH front seat.
+ SEATS, REPAIRS, Seat - front.
2.Disconnect multiplug from CD autochanger.
3.Remove 4 nuts securing CD autochanger to
floor.
4.Remove CD autochanger.
5.Remove 4 screws securing mounting brackets
to CD autochanger and remove mounting
brackets.
Refit
1.Position mounting brackets to CD autochanger
and secure with screws.
2.Position CD autochanger to floor and secure
with nuts.
3.Connect multiplug to CD autochanger.
4.Fit RH front seat.
+ SEATS, REPAIRS, Seat - front.