1999 LAND ROVER DISCOVERY air filter
[x] Cancel search: air filterPage 860 of 1529

BRAKES
DESCRIPTION AND OPERATION 70-7
Section through brake servo assembly - brakes off
1Non return valve
2Housing
3Diaphragms
4Minor diaphragm
5Tie bolt
6Valve body
7Valve
8Valve spring
9Input rod spring
10Input push rod
11Filter
12Gaiter13Piston
14Ratio disc
15Reaction disc
16Central plate
17Master cylinder
18Return spring
19Guide tube
20Output push rod
21Bush
22Air pressures
aPartial vacuum
bAmbient
Page 861 of 1529

BRAKES
70-8 DESCRIPTION AND OPERATION
Brakes on
When the brake pedal is pressed, the input push rod and the piston initially move forward in the valve body. The valve
body and output rod then move with the input rod, against resistance from the return spring, to transmit the brake
pedal force to the master cylinder assembly.
During the initial movement of the piston, the valve, assisted by the valve spring, moves with the piston and closes
the vacuum port to isolate the chambers at the rear of the diaphragms from the vacuum source. Further movement
of the input push rod causes the piston to move away from the valve and open the air inlet port. This allows a restricted
flow of filtered ambient air through the air inlet port, which creates a servo pressure in the chambers at the rear of the
diaphragms. Force from the resultant pressure differential across the diaphragms is transmitted through the valve
body to the output push rod, augmenting the pressure being applied by the brake pedal. The force produced by the
diaphragms, in proportion to the input force, i.e. the boost ratio, is 5.6 : 1. The boost ratio remains constant, as the
input force from the brake pedal increases, until the limit of assistance is reached when servo pressure is equal to
ambient pressure.
Brakes held on
When the brake pedal effort is constant, opposing pressures cause the reaction disc to extrude onto the ratio disc,
which moves the piston against the valve to close the air inlet port. This prevents any further increase in servo
pressure and maintains a constant output force to the master cylinder assembly.
Brakes released
When the brake pedal is released, the input rod spring moves the input rod and piston rearwards within the valve body
to close the air inlet port and open the vacuum port. The air from the chambers at the rear of the diaphragms is then
evacuated, through the vacuum port and the chambers at the front of the diaphragms, to restore a partial vacuum in
all four chambers. Simultaneously, the return spring moves the valve body, diaphragms, output rod and input rod
rearwards to return them to their brakes off position.
Page 862 of 1529

BRAKES
DESCRIPTION AND OPERATION 70-9
Section through brake servo assembly - brakes on
1Non return valve
2Housing
3Diaphragms
4Minor diaphragm
5Tie bolt
6Valve body
7Valve
8Valve spring
9Input rod spring
10Input push rod
11Filter
12Gaiter
13Piston14Ratio disc
15Reaction disc
16Central plate
17Master cylinder
18Return spring
19Guide tube
20Output push rod
21Bush
22Air pressures
aPartial vacuum
bAmbient
cServo
Page 1088 of 1529
PANEL REPAIRS
REPAIRS 77-2-21
REPAIRS
Front bulkhead assembly
Remove
1.Disconnect both battery leads, negative lead
first.
2.Disconnect leads/multiplug from alternator.
3.Remove front wing.
+ EXTERIOR FITTINGS, REPAIRS,
Wing - front - up to 03MY.
4.Remove washer reservoir.
+ WIPERS AND WASHERS, REPAIRS,
Reservoir - washer - up to 03MY.
5. Models with A/C: Remove condensor.
+ AIR CONDITIONING, REPAIRS,
Condenser.
6. Diesel models: Remove gearbox fluid cooler.
7.Remove RH and LH headlamps.
+ LIGHTING, REPAIRS, Headlamp - up
to 03MY.
8.Release headlamp levelling motors and
position aside.
9.Release headlamp wiring and position aside.
10.Remove battery.
+ CHARGING AND STARTING,
REPAIRS, Battery.
11.Remove battery tray.
12.Remove air filter assembly.
+ ENGINE MANAGEMENT SYSTEM -
Td5, REPAIRS, Air filter assembly.
+ ENGINE MANAGEMENT SYSTEM -
V8, REPAIRS, Air cleaner assembly.
13.Remove 2 earth leads from LH of front
bulkhead.
14.Remove RH horn.
+ ALARM SYSTEM AND HORN,
REPAIR, Vehicle horn.
15. Models with A/C: Release and remove A/C
pipes.
16.Remove RH and LH crush cans.
17.Remove bonnet release cable.
18.Support bonnet in open position
19.Remove bonnet locking mechanism.
20.Remove VIN plate.
21.Remove 2 bolts securing front bulkhead
assembly to chassis.
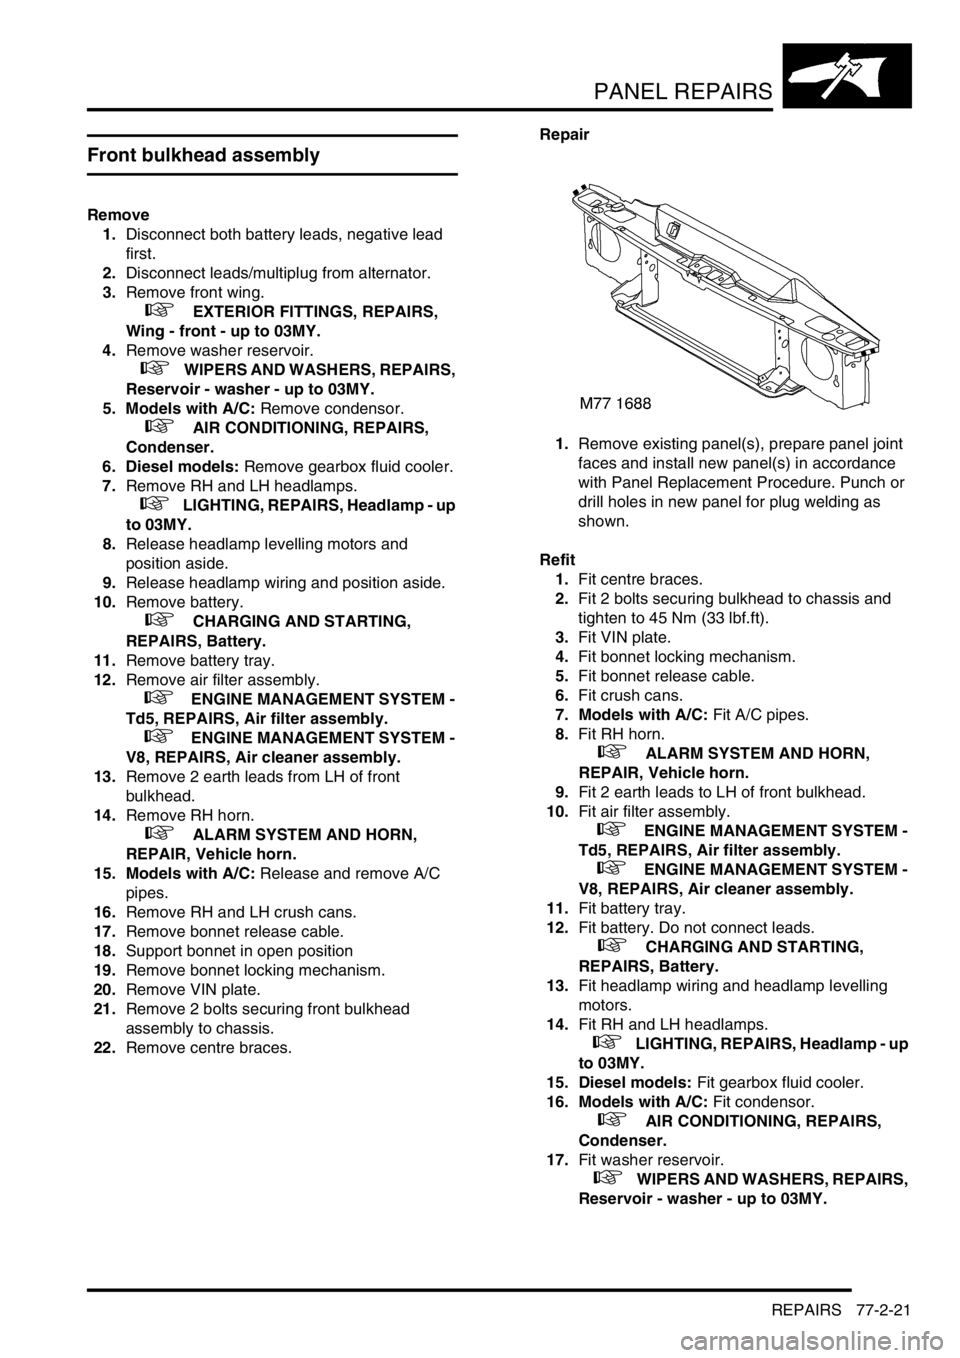
22.Remove centre braces.Repair
1.Remove existing panel(s), prepare panel joint
faces and install new panel(s) in accordance
with Panel Replacement Procedure. Punch or
drill holes in new panel for plug welding as
shown.
Refit
1.Fit centre braces.
2.Fit 2 bolts securing bulkhead to chassis and
tighten to 45 Nm (33 lbf.ft).
3.Fit VIN plate.
4.Fit bonnet locking mechanism.
5.Fit bonnet release cable.
6.Fit crush cans.
7. Models with A/C: Fit A/C pipes.
8.Fit RH horn.
+ ALARM SYSTEM AND HORN,
REPAIR, Vehicle horn.
9.Fit 2 earth leads to LH of front bulkhead.
10.Fit air filter assembly.
+ ENGINE MANAGEMENT SYSTEM -
Td5, REPAIRS, Air filter assembly.
+ ENGINE MANAGEMENT SYSTEM -
V8, REPAIRS, Air cleaner assembly.
11.Fit battery tray.
12.Fit battery. Do not connect leads.
+ CHARGING AND STARTING,
REPAIRS, Battery.
13.Fit headlamp wiring and headlamp levelling
motors.
14.Fit RH and LH headlamps.
+ LIGHTING, REPAIRS, Headlamp - up
to 03MY.
15. Diesel models: Fit gearbox fluid cooler.
16. Models with A/C: Fit condensor.
+ AIR CONDITIONING, REPAIRS,
Condenser.
17.Fit washer reservoir.
+ WIPERS AND WASHERS, REPAIRS,
Reservoir - washer - up to 03MY.
Page 1090 of 1529
PANEL REPAIRS
REPAIRS 77-2-23
Bonnet locking platform
Remove
1.Disconnect both battery leads, negative lead
first.
2.Disconnect leads/multiplug from alternator.
3.Remove front bumper assembly.
+ EXTERIOR FITTINGS, REPAIRS,
Bumper assembly - front.
4. Models with A/C: Remove condensor.
+ AIR CONDITIONING, REPAIRS,
Condenser.
5. Diesel models: Remove gearbox fluid cooler.
6.Remove RH and LH headlamps.
+ LIGHTING, REPAIRS, Headlamp - up
to 03MY.
7.Remove RH and LH repeater lamps.
+ LIGHTING, REPAIRS, Lamp - front
repeater - up to 03MY.
8.Release headlamp wiring and position aside.
9.Remove battery.
+ CHARGING AND STARTING,
REPAIRS, Battery.
10.Remove battery tray.
11.Remove air filter assembly.
+ ENGINE MANAGEMENT SYSTEM -
Td5, REPAIRS, Air filter assembly.
+ ENGINE MANAGEMENT SYSTEM -
V8, REPAIRS, Air cleaner assembly.
12.Remove RH horn.
+ ALARM SYSTEM AND HORN,
REPAIR, Vehicle horn.
13.Remove bonnet release cable.
14.Support bonnet in open position
15.Remove bonnet locking mechanism.
16.Remove VIN plate.
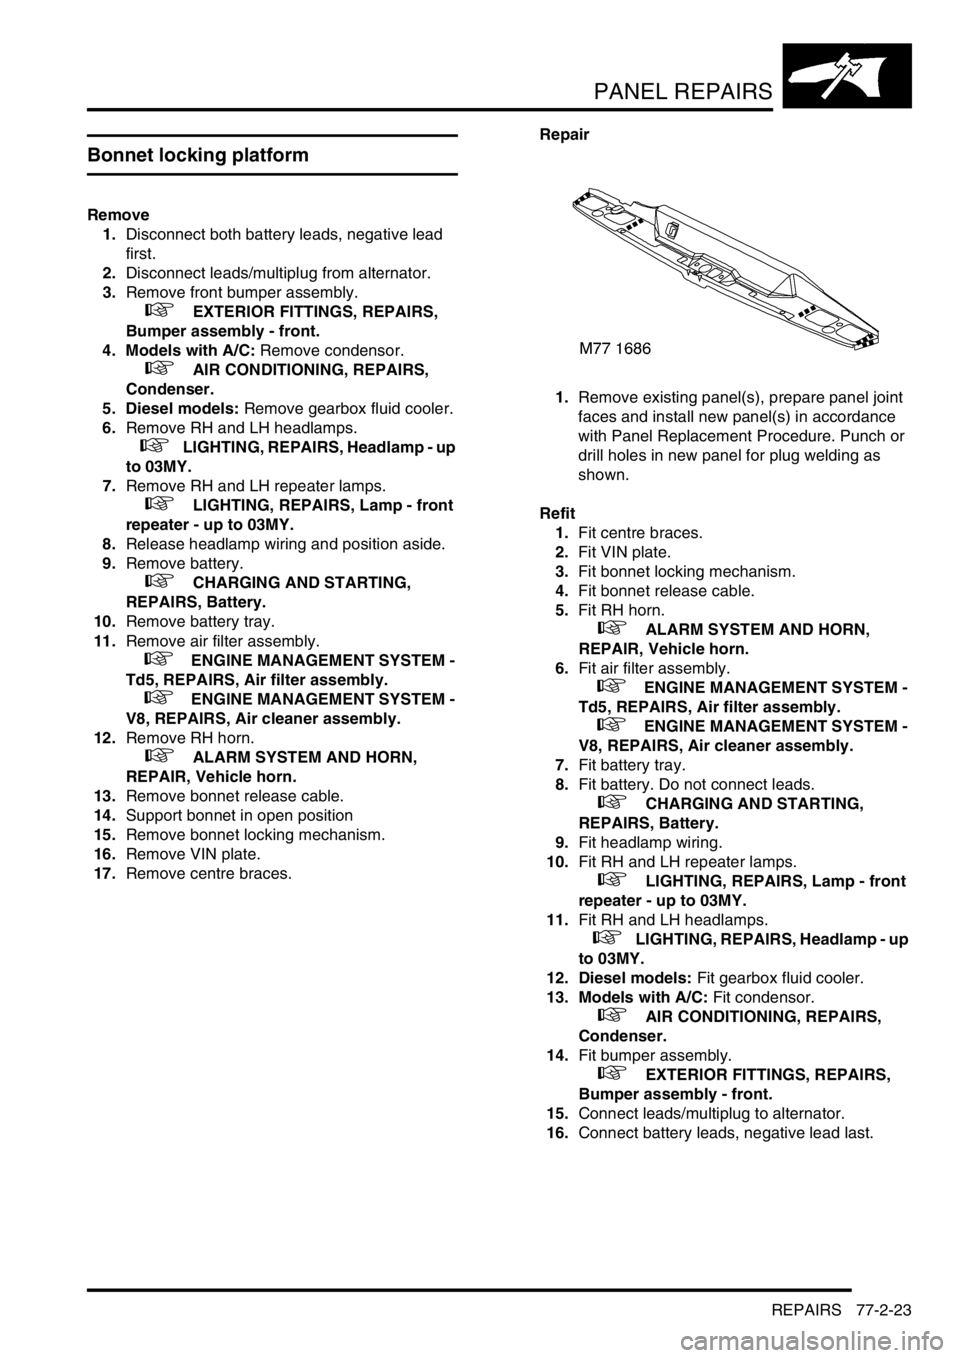
17.Remove centre braces.Repair
1.Remove existing panel(s), prepare panel joint
faces and install new panel(s) in accordance
with Panel Replacement Procedure. Punch or
drill holes in new panel for plug welding as
shown.
Refit
1.Fit centre braces.
2.Fit VIN plate.
3.Fit bonnet locking mechanism.
4.Fit bonnet release cable.
5.Fit RH horn.
+ ALARM SYSTEM AND HORN,
REPAIR, Vehicle horn.
6.Fit air filter assembly.
+ ENGINE MANAGEMENT SYSTEM -
Td5, REPAIRS, Air filter assembly.
+ ENGINE MANAGEMENT SYSTEM -
V8, REPAIRS, Air cleaner assembly.
7.Fit battery tray.
8.Fit battery. Do not connect leads.
+ CHARGING AND STARTING,
REPAIRS, Battery.
9.Fit headlamp wiring.
10.Fit RH and LH repeater lamps.
+ LIGHTING, REPAIRS, Lamp - front
repeater - up to 03MY.
11.Fit RH and LH headlamps.
+ LIGHTING, REPAIRS, Headlamp - up
to 03MY.
12. Diesel models: Fit gearbox fluid cooler.
13. Models with A/C: Fit condensor.
+ AIR CONDITIONING, REPAIRS,
Condenser.
14.Fit bumper assembly.
+ EXTERIOR FITTINGS, REPAIRS,
Bumper assembly - front.
15.Connect leads/multiplug to alternator.
16.Connect battery leads, negative lead last.
Page 1093 of 1529
PANEL REPAIRS
77-2-26 REPAIRS
9.Fit headlamp.
+ LIGHTING, REPAIRS, Headlamp - up
to 03MY.
10. Diesel models: Fit gearbox fluid cooler.
11. Models with A/C: Fit condensor.
+ AIR CONDITIONING, REPAIRS,
Condenser.
12.Fit bumper assembly.
+ EXTERIOR FITTINGS, REPAIRS,
Bumper assembly - front.
13.Connect leads/multiplug to alternator.
14.Connect battery leads, negative lead last.
Headlamp mounting panel - LH
Remove
1.Disconnect both battery leads, negative lead
first.
2.Disconnect leads/multiplug from alternator.
3.Remove washer reservoir.
+ WIPERS AND WASHERS, REPAIRS,
Reservoir - washer - up to 03MY.
4. Models with A/C: Remove condensor.
+ AIR CONDITIONING, REPAIRS,
Condenser.
5. Diesel models: Remove gearbox fluid cooler.
6.Remove headlamp.
+ LIGHTING, REPAIRS, Headlamp - up
to 03MY.
7.Remove repeater lamp.
+ LIGHTING, REPAIRS, Lamp - front
repeater - up to 03MY.
8.Release headlamp levelling motor and position
aside.
9.Release headlamp wiring and position aside.
10.Remove air filter assembly.
+ ENGINE MANAGEMENT SYSTEM -
Td5, REPAIRS, Air filter assembly.
+ ENGINE MANAGEMENT SYSTEM -
V8, REPAIRS, Air cleaner assembly.
11.Remove 2 earth leads from LH of front
bulkhead.
12.Release and remove A/C pipes.
13.Remove crush can.
14.Remove bonnet release cable.
15.Remove 2 bolts securing front bulkhead
assembly to chassis.
16.Remove centre brace.
Page 1094 of 1529
PANEL REPAIRS
REPAIRS 77-2-27
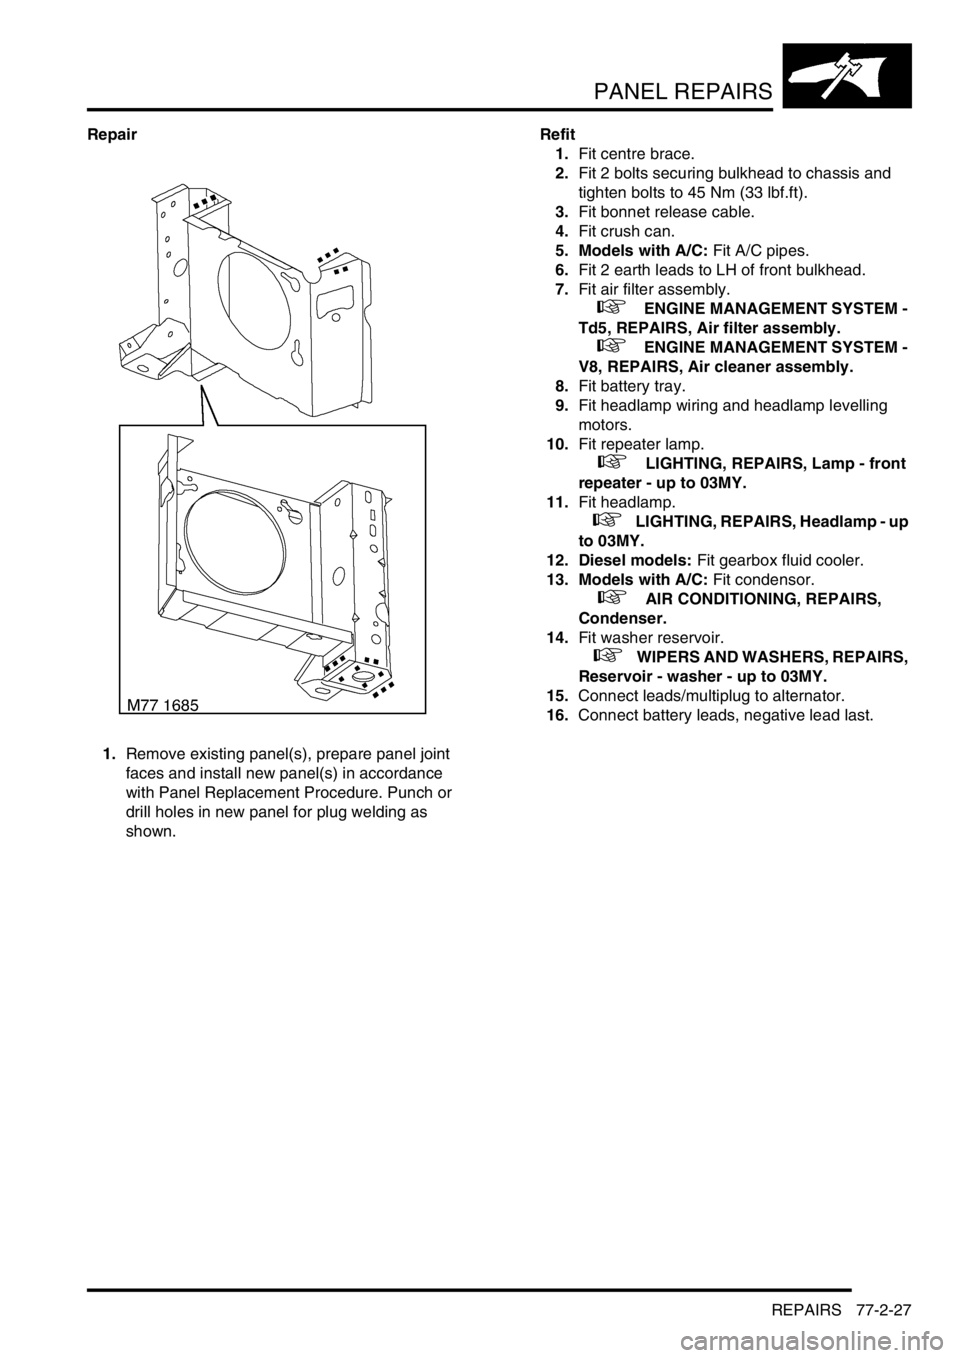
Repair
1.Remove existing panel(s), prepare panel joint
faces and install new panel(s) in accordance
with Panel Replacement Procedure. Punch or
drill holes in new panel for plug welding as
shown.Refit
1.Fit centre brace.
2.Fit 2 bolts securing bulkhead to chassis and
tighten bolts to 45 Nm (33 lbf.ft).
3.Fit bonnet release cable.
4.Fit crush can.
5. Models with A/C: Fit A/C pipes.
6.Fit 2 earth leads to LH of front bulkhead.
7.Fit air filter assembly.
+ ENGINE MANAGEMENT SYSTEM -
Td5, REPAIRS, Air filter assembly.
+ ENGINE MANAGEMENT SYSTEM -
V8, REPAIRS, Air cleaner assembly.
8.Fit battery tray.
9.Fit headlamp wiring and headlamp levelling
motors.
10.Fit repeater lamp.
+ LIGHTING, REPAIRS, Lamp - front
repeater - up to 03MY.
11.Fit headlamp.
+ LIGHTING, REPAIRS, Headlamp - up
to 03MY.
12. Diesel models: Fit gearbox fluid cooler.
13. Models with A/C: Fit condensor.
+ AIR CONDITIONING, REPAIRS,
Condenser.
14.Fit washer reservoir.
+ WIPERS AND WASHERS, REPAIRS,
Reservoir - washer - up to 03MY.
15.Connect leads/multiplug to alternator.
16.Connect battery leads, negative lead last.
Page 1095 of 1529
PANEL REPAIRS
77-2-28 REPAIRS
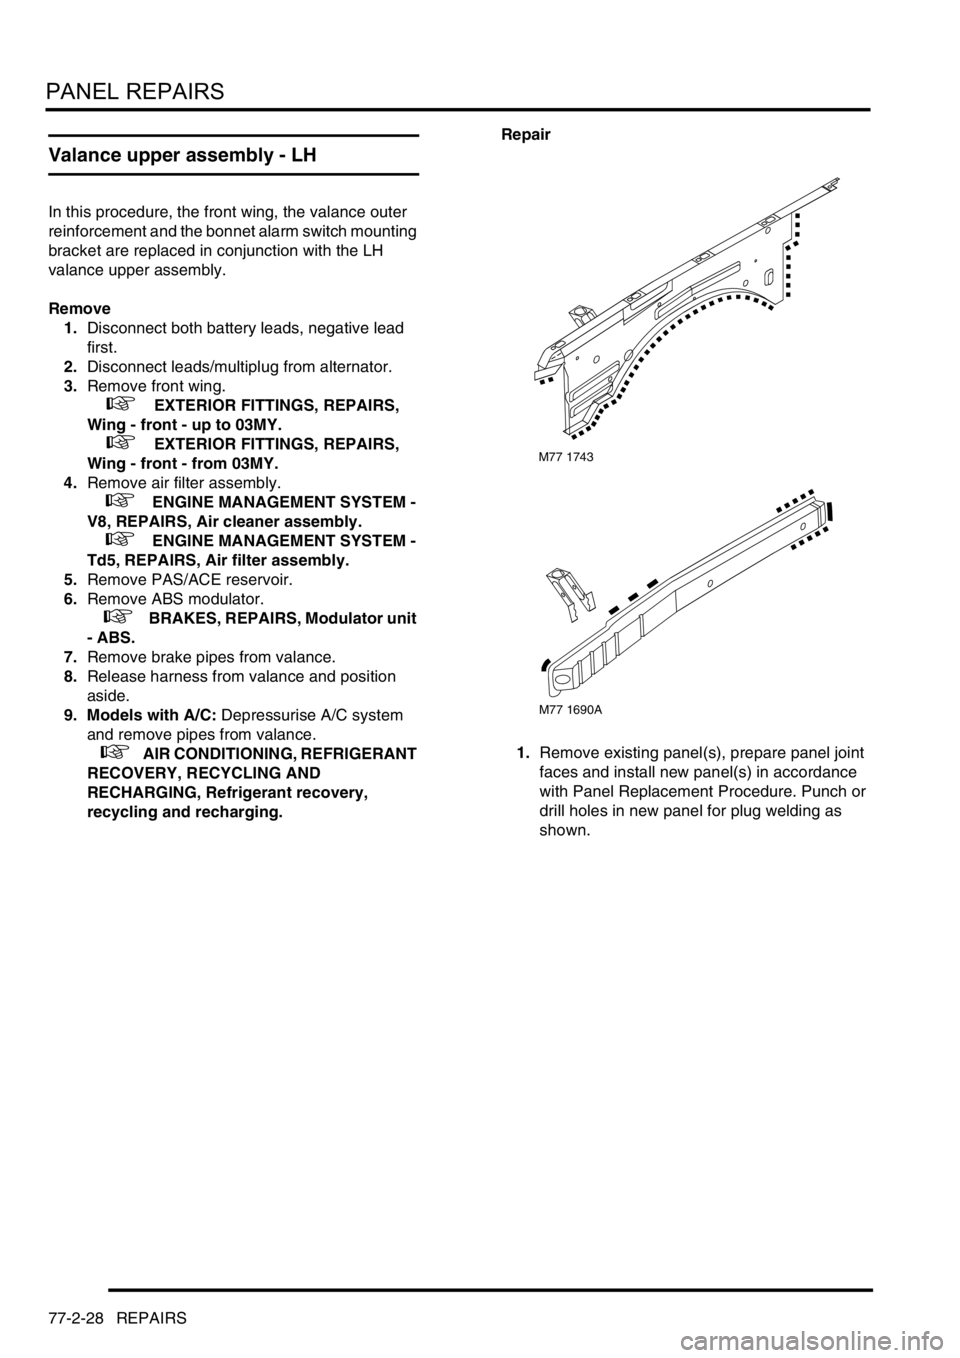
Valance upper assembly - LH
In this procedure, the front wing, the valance outer
reinforcement and the bonnet alarm switch mounting
bracket are replaced in conjunction with the LH
valance upper assembly.
Remove
1.Disconnect both battery leads, negative lead
first.
2.Disconnect leads/multiplug from alternator.
3.Remove front wing.
+ EXTERIOR FITTINGS, REPAIRS,
Wing - front - up to 03MY.
+ EXTERIOR FITTINGS, REPAIRS,
Wing - front - from 03MY.
4.Remove air filter assembly.
+ ENGINE MANAGEMENT SYSTEM -
V8, REPAIRS, Air cleaner assembly.
+ ENGINE MANAGEMENT SYSTEM -
Td5, REPAIRS, Air filter assembly.
5.Remove PAS/ACE reservoir.
6.Remove ABS modulator.
+ BRAKES, REPAIRS, Modulator unit
- ABS.
7.Remove brake pipes from valance.
8.Release harness from valance and position
aside.
9. Models with A/C: Depressurise A/C system
and remove pipes from valance.
+ AIR CONDITIONING, REFRIGERANT
RECOVERY, RECYCLING AND
RECHARGING, Refrigerant recovery,
recycling and recharging.Repair
1.Remove existing panel(s), prepare panel joint
faces and install new panel(s) in accordance
with Panel Replacement Procedure. Punch or
drill holes in new panel for plug welding as
shown.
M77 1743
M77 1690A