1999 HONDA ODYSSEY flat tire
[x] Cancel search: flat tirePage 291 of 343
Changing a Flat Tire
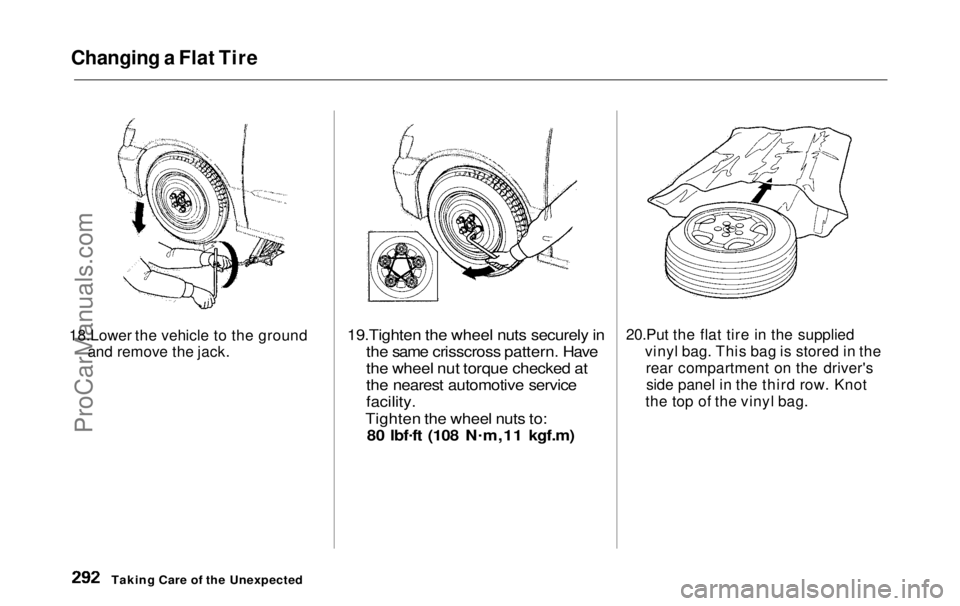
18.Lower the vehicle to the ground and remove the jack.
19.Tighten the wheel nuts securely in
the same crisscross pattern. Have
the wheel nut torque checked at
the nearest automotive service
facility.
Tighten the wheel nuts to: 80 lbf .
ft (108 N .
m,11 kgf.m)
20.Put the flat tire in the supplied
vinyl bag. This bag is stored in therear compartment on the driver'sside panel in the third row. Knot
the top of the vinyl bag.
Taking Care of the UnexpectedProCarManuals.comMain Menu Table of Contents s t
Page 292 of 343
Changing a Flat Tire
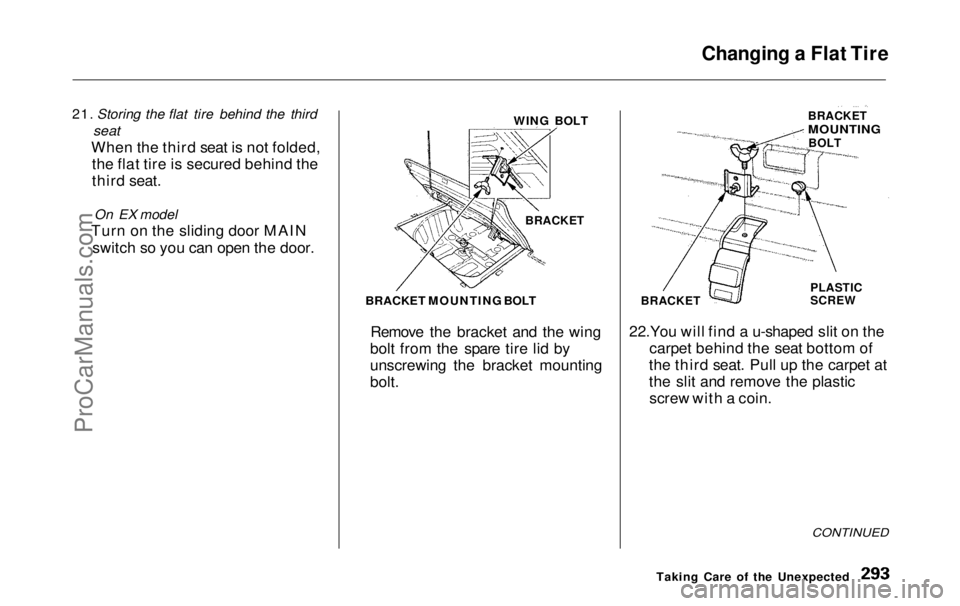
21. Storing the flat tire behind the third
seat
When the third seat is not folded, the flat tire is secured behind the
third seat.
On EX model
Turn on the sliding door MAIN
switch so you can open the door. WING BOLT
BRACKET
BRACKET MOUNTING BOLT Remove the bracket and the wing
bolt from the spare tire lid by
unscrewing the bracket mounting
bolt.
BRACKET
PLASTIC
SCREW
22.You will find a u-shaped slit on the carpet behind the seat bottom of
the third seat. Pull up the carpet at
the slit and remove the plastic screw with a coin.
CONTINUED
Taking Care of the Unexpected
BRACKET
MOUNTING
BOLTProCarManuals.comMain Menu Table of Contents s t
Page 293 of 343
Changing a Flat Tire
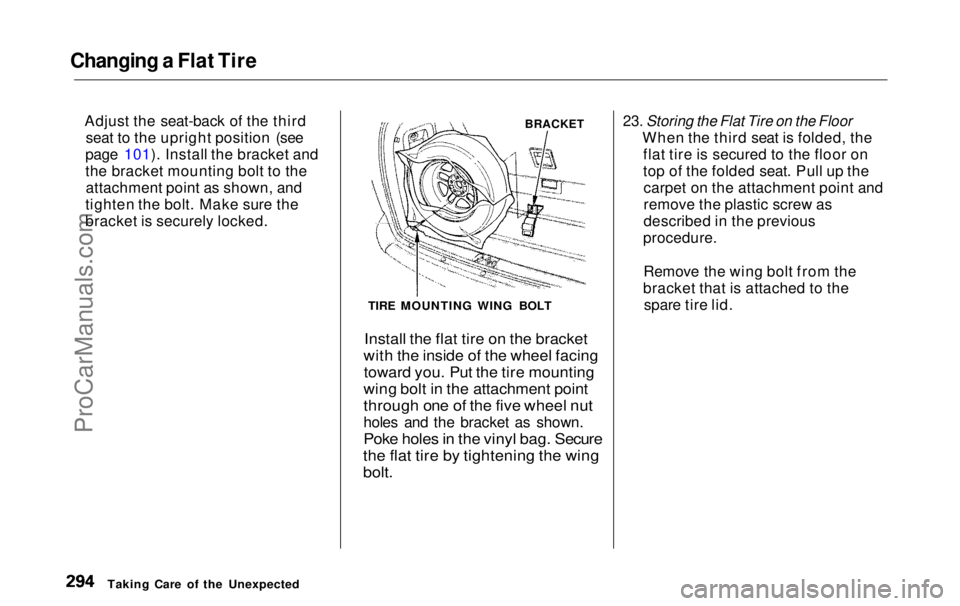
Adjust the seat-back of the thirdseat to the upright position (see
page 101). Install the bracket and
the bracket mounting bolt to the attachment point as shown, and
tighten the bolt. Make sure the
bracket is securely locked.
BRACKET
TIRE MOUNTING WING BOLT
Install the flat tire on the bracket
with the inside of the wheel facing toward you. Put the tire mounting
wing bolt in the attachment point
through one of the five wheel nut
holes and the bracket as shown.
Poke holes in the vinyl bag. Secure
the flat tire by tightening the wing
bolt.
23. Storing the Flat Tire on the Floor
When the third seat is folded, theflat tire is secured to the floor on
top of the folded seat. Pull up thecarpet on the attachment point and
remove the plastic screw as
described in the previous
procedure.
Remove the wing bolt from the
bracket that is attached to the spare tire lid.
Taking Care of the UnexpectedProCarManuals.comMain Menu Table of Contents s t
Page 294 of 343
Changing a Flat Tire
TIRE MOUNTING WING BOLT
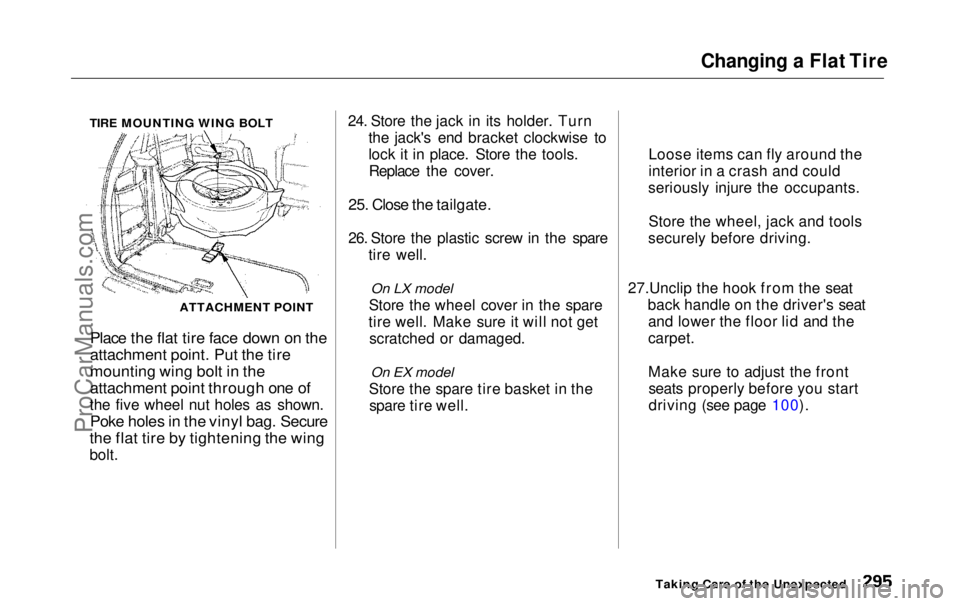
Place the flat tire face down on the
attachment point. Put the tire
mounting wing bolt in the
attachment point through one of
the five wheel nut holes as shown.
Poke holes in the vinyl bag. Secure
the flat tire by tightening the wing
bolt. 24. Store the jack in its holder. Turn
the jack's end bracket clockwise to
lock it in place. Store the tools.Replace the cover.
25. Close the tailgate.
26. Store the plastic screw in the spare tire well.
On LX model
Store the wheel cover in the spare
tire well. Make sure it will not get scratched or damaged.
On EX model
Store the spare tire basket in the spare tire well. 27.Unclip the hook from the seat
back handle on the driver's seatand lower the floor lid and the
carpet.
Make sure to adjust the frontseats properly before you start
driving (see page 100).
Taking Care of the Unexpected
ATTACHMENT POINT
Loose items can fly around the
interior in a crash and could
seriously injure the occupants.
Store the wheel, jack and tools
securely before driving.ProCarManuals.comMain Menu Table of Contents s t
Page 310 of 343
Emergency Towing
If your vehicle needs to be towed,
call a professional towing service or,
if you belong to one, an organization
that provides roadside assistance.
Never tow your vehicle behind another vehicle with just, a rope or
chain. It is very dangerous.
There are three popular types of professional equipment.
Flat-bed Equipment — The operator
loads your vehicle on the back of a
truck. This is the best way to trans-
port your Honda.
Wheel-Lift Equipment — The tow
truck uses two pivoting arms that go under the tires (front or rear) and lift
them off the ground. The other two
tires remain on the ground. This is an acceptable way to tow your
Honda.
Sling-type Equipment — The tow
truck uses metal cables with hooks on the ends. These hooks go around
parts of the frame or suspension and
the cables lift that end of the vehicle off the ground. Your vehicle's sus-
pension and body can be seriously damaged. This method of towing
is unacceptable.
If your Honda cannot be transported
by flat-bed, it should be towed by
wheel-lift equipment with the front
wheels off the ground. If, due to damage, your vehicle must be towed
with the front wheels on the ground, do the following.
Release the parking brake.
Start the engine.
Shift to D 4, then to N.
Turn off the engine.
Improper towing preparation will
damage the transmission. Follow the
above procedure exactly. If you cannot
shift the transmission or start the
engine, your vehicle must he trans-
ported with the front wheels off the
ground.
With the front wheels on the ground, it is best to tow the vehicle no farther
than 50 miles (80 km), and keep thespeed below 35 mph (55 km/h).
CONTINUED
Taking Care of the Unexpected
NOTICEProCarManuals.comMain Menu Table of Contents s t
Page 319 of 343
Tire Information
Temperature
The temperature grades are A (the highest), B, and C, representing the
tire's resistance to the generation of
heat and its ability to dissipate heat
when tested under controlledconditions on a specified indoor
laboratory test wheel. Sustained high
temperature can cause the material of the tire to degenerate and reduce
tire life, and excessive temperature can lead to sudden tire failure. The
grade C corresponds to a level of
performance which all passenger car
tires must meet under the Federal Motor Vehicle Safety Standard No. 109. Grades B and A represent
higher levels of performance on the laboratory test wheel than the
minimum required by law. Warning: The temperature grade for
this tire is established for a tire thatis properly inflated and not over-
loaded. Excessive speed, underinfla-
tion, or excessive loading either separately or in combination, can
cause heat build-up and possible tire
failure.
Technical InformationProCarManuals.comMain Menu Table of Contents s t
Page 334 of 343

Index
Battery
Charging SystemIndicator............................ 58, 302
Jump Starting............................. 297 Maintenance............................... 251
Specifications............................. 317
Before Driving............................... 181
Belts, Seat..................................... 8, 45
Beverage Holder............................ 118
Body Repair.................................... 283
Brakes Anti-lock System (ABS)............ 205Break-in, New Linings .............. 182
Fluid............................................ 244
Light, Burned-out...................... 268
Parking........................................ 116
System Indicator.................. 58, 304
Wear Indicators......................... 204
Brakes, ABS Operation.................................... 205
System Indicator.................. 59, 206
Braking System.............................. 204
Break-in, New Vehicle .................. 182
Brightness Control, Instruments... 67 Brights, Headlights......................... 66
Bulb Replacement
Back-up Lights........................... 269
Brake Lights............................... 268Cargo Area Light....................... 272
Front Parking Lights................. 267
Front Side Marker Lights......... 267 Headlights.................................. 266
High-mount Brake Light.......... 270
Individual Map Lights............... 272 License Plate Light.................... 271
Rear Bulbs.......................... 268, 269
Specifications............................. 317
Turn Signal Lights..................... 267
Bulbs, Halogen............................... 266
Cables, Jump Starting With.......... 298
Cancel Button................................... 75
Capacities Chart............................. 316
Carbon Monoxide Hazard.............. 53
Cargo Area Light........................... 127
Cargo Net....................................... 194
Carrying Cargo.............................. 191
Cassette Player
Care............................................. 178
Operation........................... 154, 175
CAUTION, Explanation of.............. ii
CD Changer...........................157, 171 CD Player ...............................157, 169
Center Pocket................................ 122
Center Table................................... 117
Certification Label......................... 314
Chains............................................. 263 Change Oil How to.........................................235
When to....................................... 224
Changing a Flat Tire..................... 287
Changing Engine Coolant............. 239
Charging System Indicator .... 58, 302
Checking Automatic Transmission
Fluid........................................ 243
Battery Condition...................... 251
Brake Fluid................................. 244Drive Belts.................................. 256
Engine Coolant........................... 187
Engine Oil................................... 186
Fuses........................................... 306
Power Steering Fluid................. 245ProCarManuals.comMain Menu s t
Page 336 of 343

Index
Emergencies on the Road Brake System Indicator............ 304
Changing a Flat Tire................. 287
Charging System Indicator...... 302
Checking the Fuses................... 305
Low Oil Pressure Indicator...... 301
Malfunction Indicator Lamp.... 303 Overheated Engine................... 299
Emergency Brake.......................... 116
Emergency Flashers....................... 70
Emergency Towing....................... 311
Emissions Controls........................ 323
Engine
Coolant Temperature Gauge ..... 63
Drive Belts.................................. 256
Malfunction Indicator
Lamp............................... 58, 303
Oil Pressure Indicator........58, 301
Oil, What Kind to Use...............
233
Overheating................................
299
Specifications.............................
317
Ethanol i n
Gasoline .......................
321
Evaporative Emission
s
Controls..
323
Exhaust Fumes...............................
.
53
Exhaust Gas Recirculation System......................................... 324 Expectant Mothers, Use of Seat
Belts by......................................... 20
Exterior, Cleaning the................... 278
Fabric, Cleaning............................. 280
Fan, Interior...........................130, 142 Features, Comfort and Convenience............................... 129
Filling the Fuel Tank..................... 183
Filters
Air................................................246
Air Conditioning........................ 256
Oil................................................ 235
First Gear Position......................... 201
Flashers, Hazard Warning.............. 70
Flat Tire, Changing a.................... 287
Fluids
Automatic Transmission...........
243
Brake...........................................244
Powe r
Steering........................... 245
Windshield Washer................... 242
FM Stereo Radio Reception............................150, 162
Folding the Third Seat..................110
Foreign Countries, Driving in...... 322
Four-way Flashers........................... 70
Front End, Towing by Emergency
Wrecker...................................... 311
Fuel..................................................182
Fill Door and Cap....................... 183
Gauge............................................ 63
Octane Requirement................. 182
Oxygenated................................ 321
Reserve Indicator......................... 61
Tank, Filling the......................... 183
Fuses, Checking the...................... 306
Gas Mileage, Improving................ 188
Gasohol........................................... 321
Gasoline.......................................... 182
Fuel Reserve Indicator................ 61
Gauge............................................ 63
Octane Requirement................. 182
Tank, Filling the......................... 183
Gas Station Procedures................. 183
Gauges
Engine Coolant Temperature .... 63
Fuel................................................63ProCarManuals.comMain Menu s t