1999 HONDA CR-V battery
[x] Cancel search: batteryPage 1329 of 1395
Troubleshooting
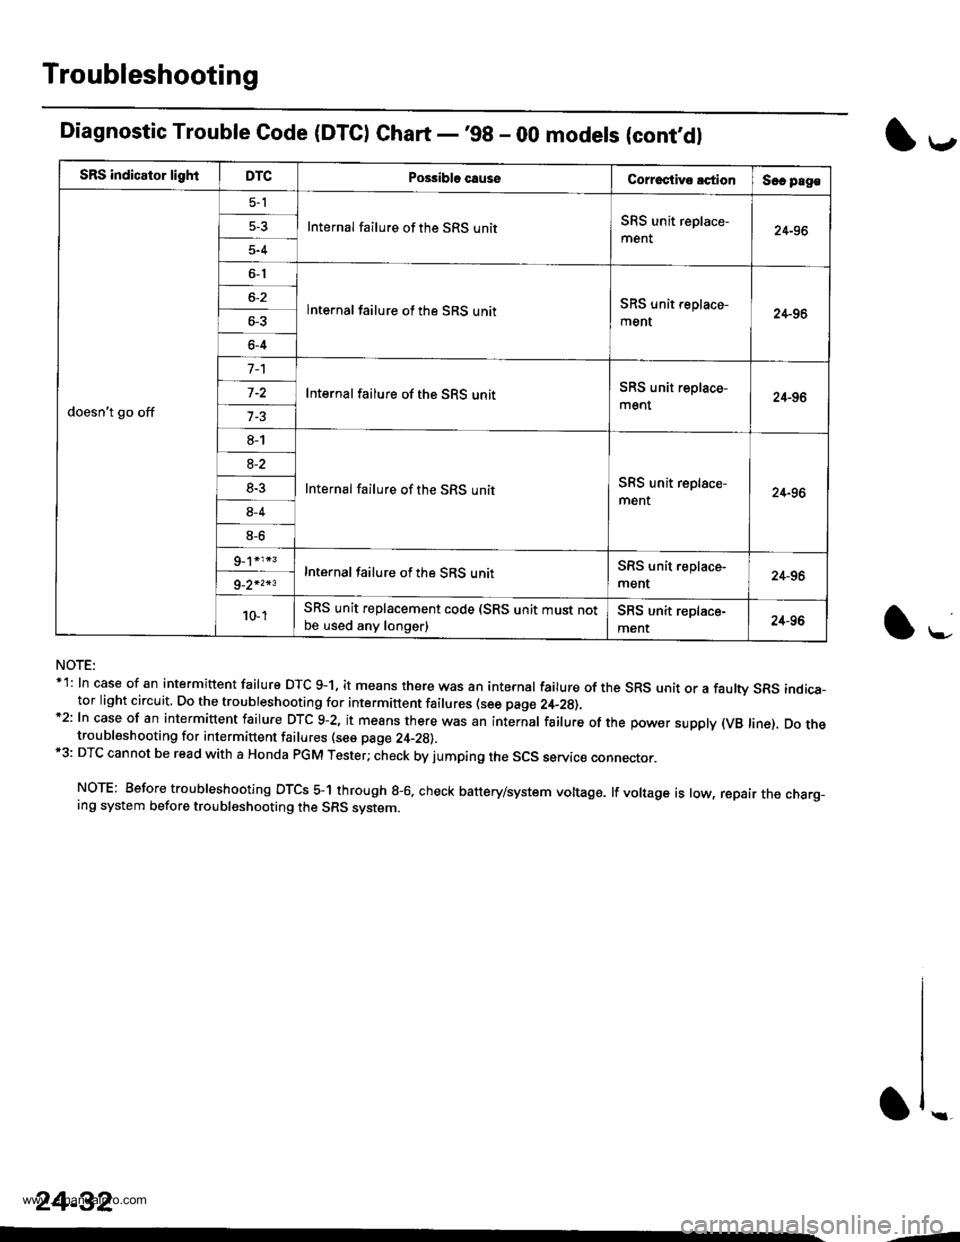
SRS indicator lightDTCPo$ibla causeCorroctive lctionSec pag€
doesn't go off
5-l
Internal failure of the SRS unitSRS unit replace-
ment24-96
5-4
6-1
lnternal failure of the SRS unitSRS unit replace-
ment24-966-3
6-4
Internal failure of the SRS unitSRS unit replace-
ment24-96
8-1
Internal failure of the SRS unitSRS unit replace-
ment24-96
8-2
8-3
8-4
8-6
Internal failure of the SRS unitSRS unit.eplace-
ment24-969_2*2*3
10- 1SRS unit replacement code (SRS unit must notbe used any longer)SRS unit replace-
ment24-96
Diagnostic Trouble Code (DTC) Chart -'98 - 00 modets (cont,dl
NOTE:*1: In case of an intermittent failure DTC g-1, it means there was an internal failure of the SRS unit or a faulw SRS indica-tor light circuit. Do the troubleshooting for intermittent failures (see page 2,+_2g),*2: In case of an intermiuent fairure DTc 9-2, it means there was an internar fairure of the power suppry (vB rine). Do thetroubleshooting for intermittent failures (see page 24-29).*3: DTC cannot be read with a Honda PGM Tester; check by jumping the SCS servic€ connector.
NOTE: Before troubleshooting DTCS 5-1 through g-6. check battery/system voltage. lf voltage is low, repair the charg_ing system before troubleshooting the SRS system.
l*-
1,.-
\f ..
24-32
--
www.emanualpro.com
Page 1333 of 1395
Troubleshooting
From page 24-35
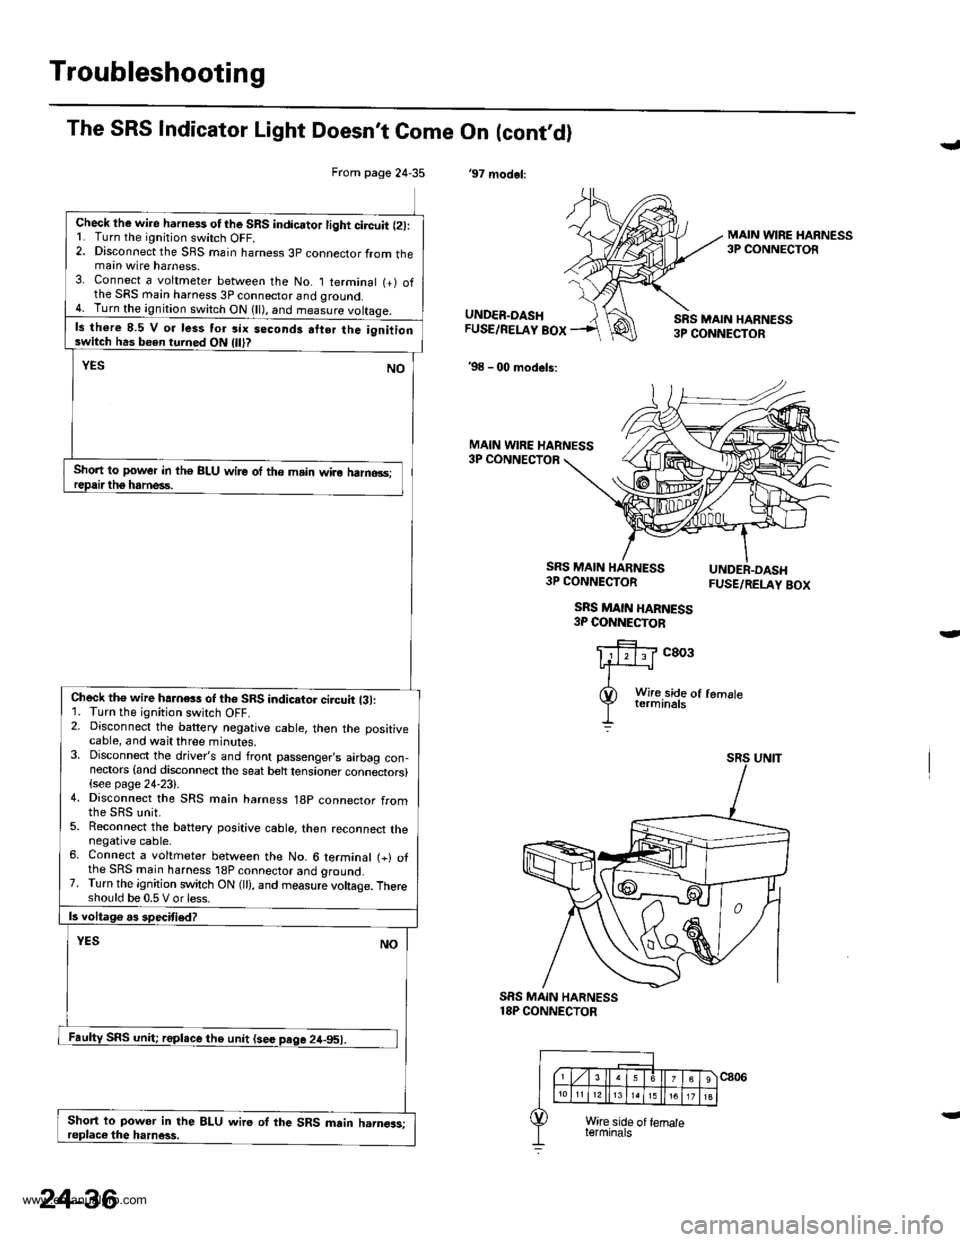
Check lhe wire harness otthe SRS indicator light circuit l2l:L Turn the ignitjon switch OFF.2. Disconnect the SRS main harness 3p connector from themain wire harness.3. Connect a voltmeter between the No. I terminal (+) ofthe SRS main harness 3P connector and qround.4. Turn the ignition switch ON (ll), and measure voltaqe.
ls there 8.5 V o. less tor six seconds atter the ignitionswitch has been turned ON
Short to power in th€ BLU wire of the main wiro halno3s;
Check th€ wire hahess of th6 SRS indicator ci.cuit {31:1. Turn the ignition switch OFF.2. Disconnect the battery negative cable, then the positivecable, and wait three minutes.3. Disconnect the driver's and front passenger,s airbag con-nectors {and disconnect the seat belt tensioner connectors}(see page 24-23).4. Disconnect the SRS main harness 18p connector from
5. Reconnect the battery positive cable, then reconnect thenegative cable.6. Connect a voltmeter between the No. 6 terminal (+) ofthe SRS main harness 'l8P connector and ground.7. Turn the ignition switch ON (ll), and measure voltage. Thereshould be 0.5 V or less.
Short to power in the BLU wire oI the SRS main harngas;
The SRS Indicator Light Doesn't Come On (cont,dl
'97 modol:
J
MAIN WIRE HARNESS3P CONNECTOR
UNDER.DASHFUSE/RELAY BOX
'98 - 00 models:
SRS MAIN HARN€SS3P CONNECTOR
MAIN WIRE HARNESS3P CONNECTOR
SRS MAIN HARNESS3P CONNECTOR
SRS MAIN HARNESS3P COI{NECTOB
FUSE/RELAY BOX
c803
SRS MAIN HARNESS18P CONNECTOR
24-36
www.emanualpro.com
Page 1334 of 1395
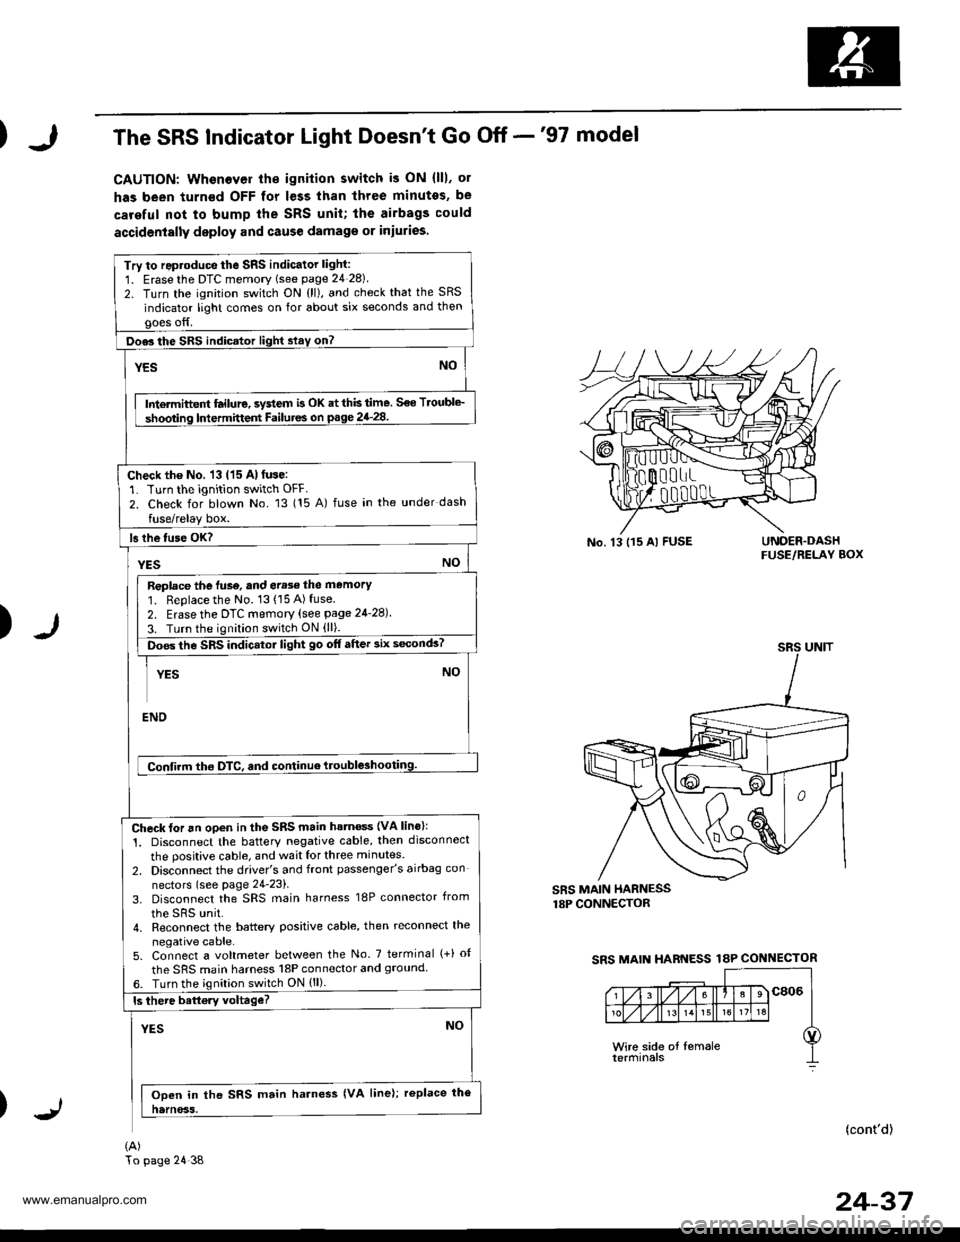
The SRS Indicator Light Doesn't Go Off -'97 model
CAUTION: Whenever th€ ignilion switch i3 ON (lll, ol
has been turn€d OFF for less than three minutes, be
careful not to bump the SRS unit; the airbags could
accidenially deploy and cause damag€ or iniuries.
Try to reproduce the sRs indicator light:
1. Erasethe DTC memory (see page 24 28)
2. Turn the ignition switch ON {ll), and check that the SRS
indicator light comes on for about six seconds and thengoes off.
Doe3 the SRS indicator light slay on?
YESNO
Intermiftent ftilure, system is OK at this time. S€o Troubl€_
shooting Intermittent Failutes on p.ge 24_28.
Check the No. 13 (15 Al fuse:'L Turn the ignition switch OFF.
2. Check for blown No. 13 (15 A) fuse in the under dash
fuse/relay box.
ls lhe tuse OK?
YESNO
Replace the luse, and err3e the memory'1. Replace the No. 13(15A)fuse2. Erase the DTc memory (see page 24-28).
3. Turn the ignition switch ON (ll).
ioes the SRS indicatol light go off after 3ix s6conds?
YESNO
ENO
Confirm tho OTC, and continue ttouble3hooting.
Check for an open in the SRS main hatn€ss {VA lins}:
1. Disconnect the batterY negative cable, then disconnect
the positive cable, and wait for three minutes.
2. Disconnect the driver's and front passenger's airbag con
nectors (see page 24-23).
3. Disconnect the SRS main harness 18P connector from
the sRs unit.4. Reconnect the battery positive cable, then reconnect the
negative cable.5. Connect a voltmeter between the No. 7 terminal (+) ot
the SRS main harness l8P connector and 9rouncl6. Turn the ignilion switch ON {ll).
ls there battory voltage?
YESNO
Ooen in the SRS main harness {VA line); replace the
natnoss.
(A)
No. 13 115 Al FUSEUNOER.DASHFUSE/RELAY BOX
)
SRS MAIN HARNESSr8P CONNECTOR
SRS MAIN HARNESS 18P CONNECTOR
(cont'd)
24-37
SRS UNIT
To page 24 38
www.emanualpro.com
Page 1339 of 1395
Troubleshooting
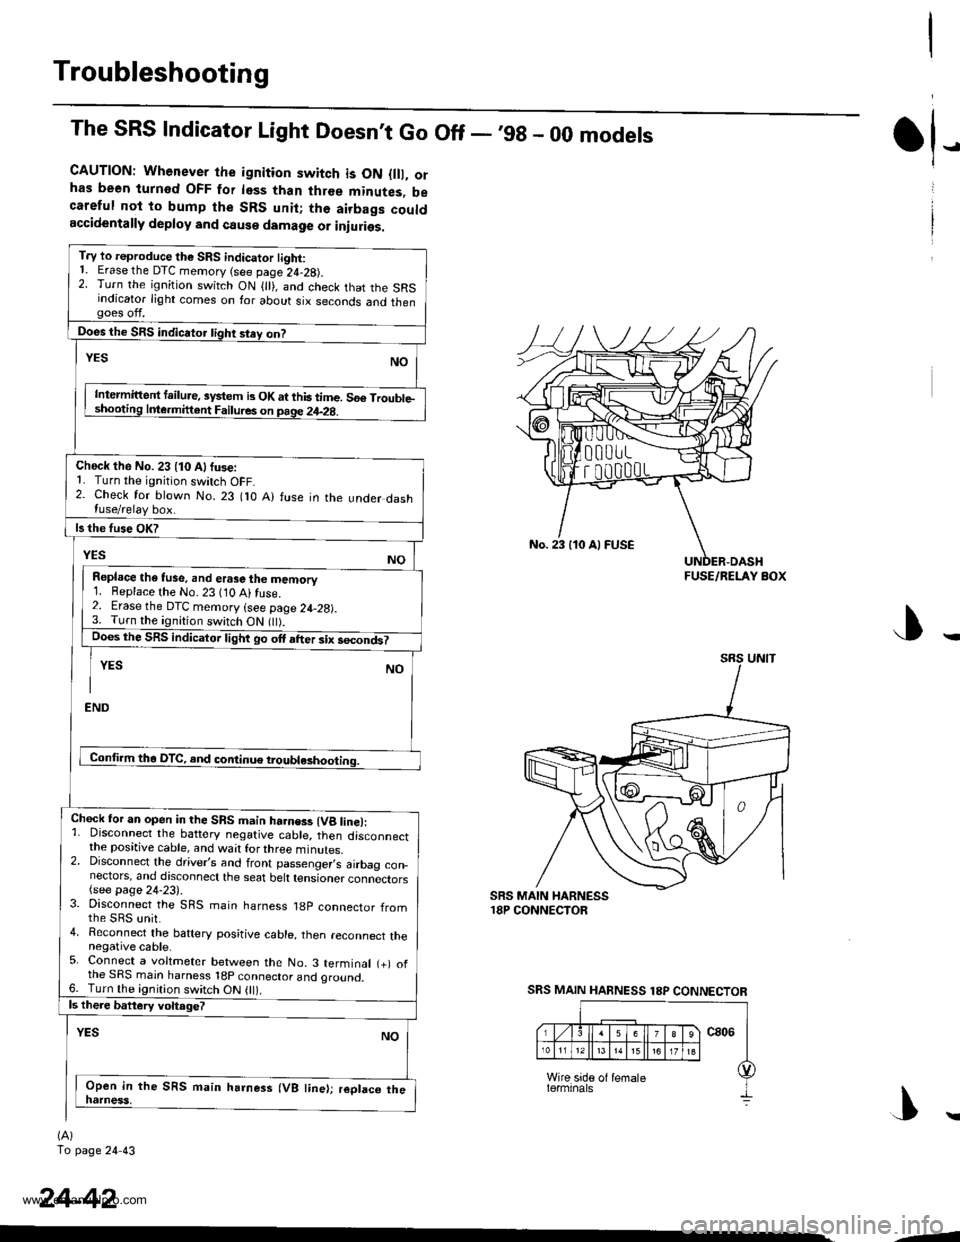
The SRS Indicator Light Doesnt Go Off - ,99 - 00 models
CAUTION: Whenever the ignition switch is ON {lll, orhas been turnod OFF for less than three minutes, becareful not to bump the SRS unit; the airbags couldaccidentally deploy and cause damage or iniuries.
T.y to reproduce the SRS indicator tight:1. Erase the DTC memory (see page 24-28).2. Turn the ignition switch ON { }, and check that the SRSindicator light comes on for about six seconds and thengoes off.
Does the SRS indicator tight stey on?
NOYES
Intermittent failure, system b OK at this time. 56€ Trouble-shooting Inle.mittent Failures on page 24-2g.
Check the No. 23 (10 Alfuse:1. Turn the ignition switch OFF.2. Check for blown No. 23 flO A) fuse in the under dashluse/relay box.
ls the fuse OK?
YESNO
Repl.ce the tuse, and erase the memory1. Beplace the No. 23 (10 Ai fuse.2. Erase the DTC memory (see page 24-28).3. Turn the ignition switch ON flt).Does the SRS indicator light go ott after six secondt
YES NO
I
END
Conti.m tha DTC, and continue troubl*hooting.
Chock for an open in the SRS main harness (Vg line):1. Disconnect the battery negative cable, then disconnectthe positive cable, and wait for three minutes.2. Disconnect the driver,s and front passenger,s airbag con_nectors, and discoonect the seat belt tensioner connectors(see page 24-23).3. Disconnect the SRS main harness 18p connector fromthe sRs unit.4. Reconnect the baftery positive cable, then reconnect thenegative cable.5. Connect a voltmeter between the No. 3 terminal (+) ofthe SRS main harness 18p connector and oround.6. Turn the ignition switch ON 0l).ls there battery voltage?
YESNO
Open in the SRS main harness (VB line); replaco thenatness,
(A)
To page 24 43
tl-
24-42
No. 23 110 Al FUSE
FUSE/RELAY BOX
SRS MAIN HARNESS 18P CONNECTOR
|\
-1
www.emanualpro.com
Page 1344 of 1395
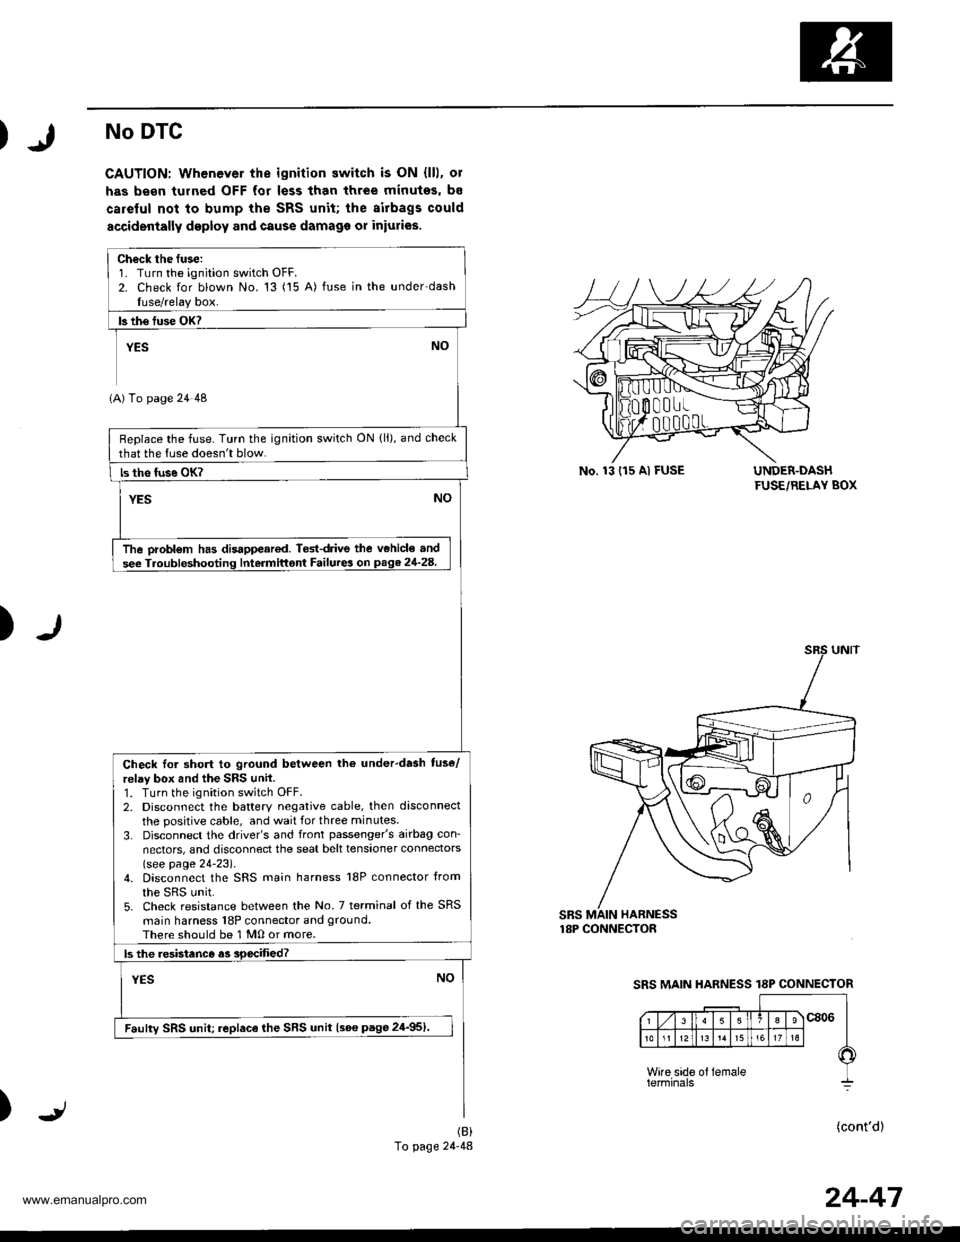
No DTC
CAUTION: Whenever the ignition switch is ON {lll, ol
has been tulned OFF for less than three minutes, bs
careful not to bump the SRS unit; the airbags could
accidenially deploy and cause damago or iniuries.
UNDER-DASHFUSE/RELAY BOX
)
SBS MAIN HARNESS18P CONNECTOR
)(cont'd)(B)
To page 24-48
Ch€ck the fuse:1. Turn the ignition switch OFF.2. Check for blown No. 13 ('15 A) fuse in the under-dashIuse/relay box.
b th€ fuse OK?
YEs NO
1A) To page 24 48
Replace the fuse. Turn the ignition switch ON {ll), and check
that the luse doesn't blow.
ls the fuse OK?
YESNO
The probl€m has disappeared. Ted{rive the v€hicle and
see Troubfeshooting Intermittont Failurea on page 21-28.
Check Ior short to ground between tho underdash tuse/
relay box and the SRS unil.1. Turn the ignition switch OFF.2. Disconnect the battery negative cable, then disconnect
the positive cable, and wait for three min utes.
3. Disconnect the driver's and front passenger's airbag con-
nectors, and disconnect the seat belt tensioner connectors(see page 24-23).4. Disconnect the SRS main harness l8P connector from
the sRs unit.5. Check resistance between the No. 7 terminal of the SRS
main harness 18P connector and ground.
There should be 1 M0 or more.
ls the .esistanco as soecified?
YESNO
Faulty SRS unit; replace lhe SRS unit {see page 24-951.
No. 13 (r5 Al FUSE
SRS MAIN HARNESS 18P CONNECTOR
24-47
www.emanualpro.com
Page 1345 of 1395
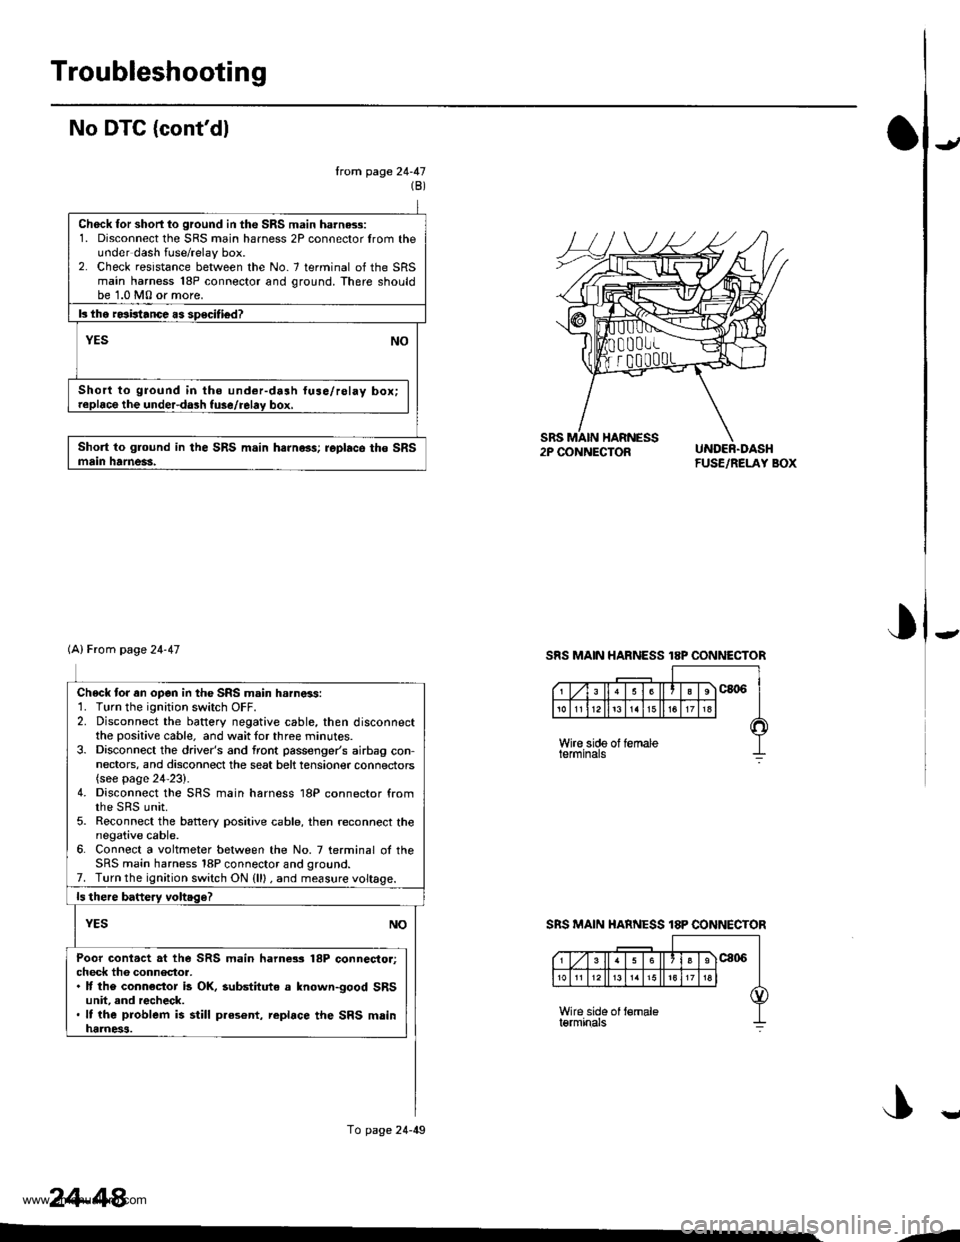
Troubleshooting
No DTC (cont'dl
ltofi page 24-47(B)
Chock for short to ground in the SRS main harne3s:1. Disconnect the SRS main harness 2P connector lrom theunder dash fuse/relay box.2. Check resrstance betwoen the No.7 terminal of the SRSmain harness 18P connector and ground. There shouldbe 1.0 M0 or more.
k the ro3irtancc as specifi€d?
YESNO
Short to ground in tho under-da3h lus6/rolay box;replace the under-dash fuse/relav box,
Short to glound in the SRS m.in hernoss; roplace tho SRSmain hatnei3.FUSE/RELAY BOX
Check tor an op€n in the SRS main harness:1. Turn the ignition switch OFF.2. Disconnect the battery negative cable, then disconnectthe positive cable. and wait for th ree minutes.3. Disconnect the driver's and front passenge/s airbag con,nectors, and disconnect the seat belt tension€r connectors{see page 24-23}.4. Disconnect the SRS main harness 18P connector fromthe SRS unit.5. Reconnect the battery positive cable, then reconnect thenegative cable.6. Connect a voltmeter between the No. 7 terminal oI theSRS main harness 18P connector and ground.7. Turn the ignition switch ON (lll , and measure voltage.
Poor conlact .t the SRS main harness l8P connesto.:check th6 connector,. It the connector is OK, substitute a known-good SRSunit, and rgcheck.. It lhe problem ii still p.es6nt, rcplace the SRS mlinhamess.
(A) From page 24-47
To page 24-49
SRS MAIN HARNESS 18P CONNECTOR
SRS MAIN HARNESS 18P CONNECTOR
J3
24-48
-a
1
J
www.emanualpro.com
Page 1347 of 1395
Troubleshooting
DTC 1-1 and DTC 1-2
CAUTION: Whenever the ignition switch is ON {ll}, or
has been turned OFF for less than three minutes, be
careful not to bump the SRS unit; the airbags could
accidentally deploy and cause damage o1 iniuries.
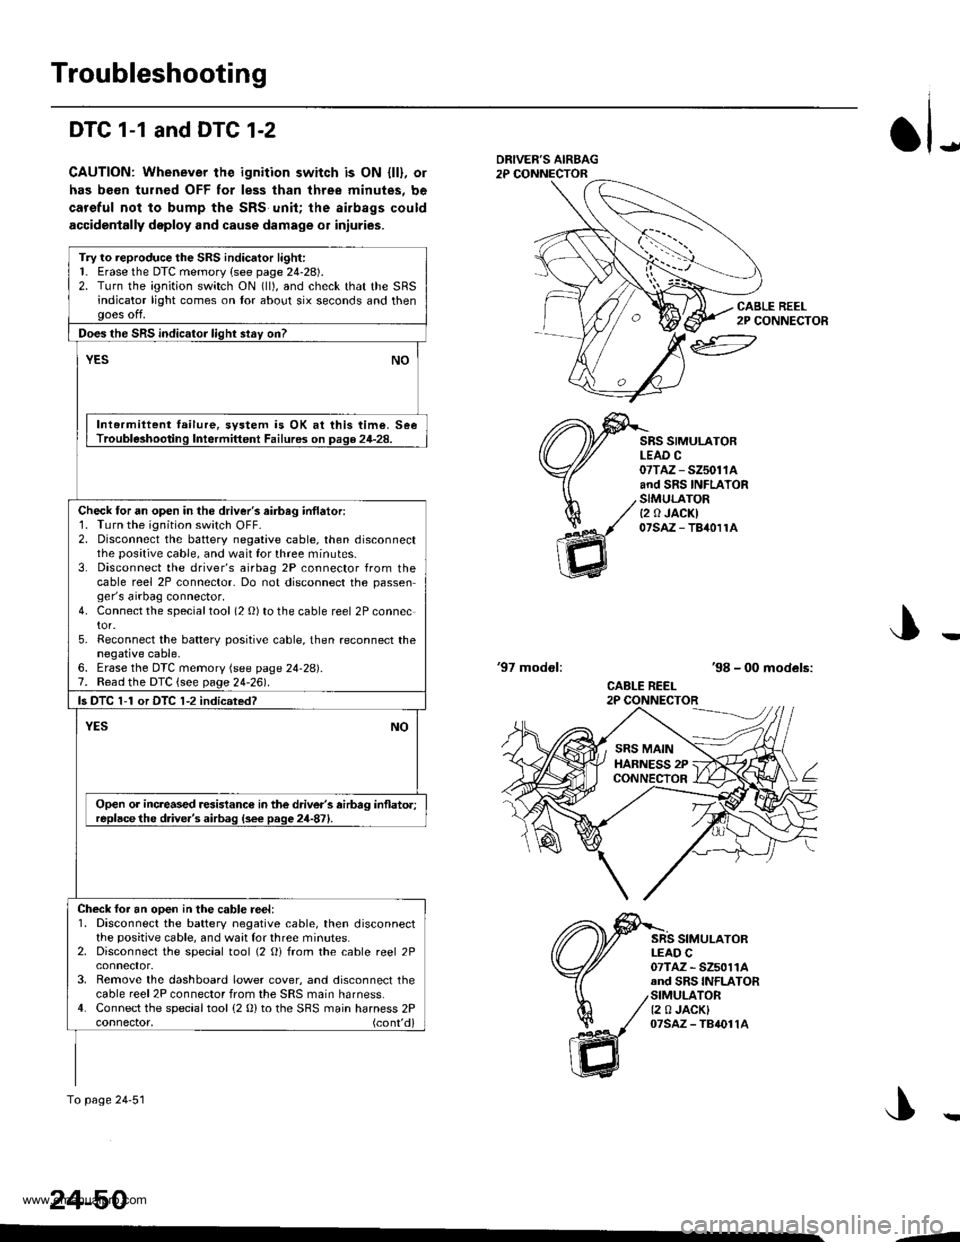
JDRIVEF'S AIRBAG2P CONNECTOR
CABLE REEL2P CONNECTOR
SRS SIMULATORLEAD C07TAZ - SZ5011Aand SRS INFLATORSIMULATORt2 0 JACKI07saz - TB40r1A
'97 modol:'98 - 00 models:
CABLE REEL2P CONNECTOR
SRS SIMULATORLEAD C07TAZ - SZ5011Aand SRS INFLATORSIMULATOR12 0 JACKI07sAz - TB4011A
J
24-50
Try to reproduce the SRS indicator light:1. Erase the DTC memory (see page 24-28).2. Turn the ignition switch ON (ll), and check that the SRSindicator light comes on tor about six seconds and thenooes off.
Does the SRS indicator liqht stav on?
YESNO
Intermiltent failure, svstem is OK at this time. SeeTrouble3hooting Intermittent Failures on page 24-28.
Check tor an open in the driver's airbag inflatori1. Turn the ignition switch OFF-2. Disconnect the battery negative cable, then disconnectthe positive cable, and wait for three minutes.3. Disconnect the driver's airbag 2P connector from thecable reel 2P connector- Do not disconnect the passenger's airbag connector.4. Connect the specialtool (2 O) to the cable reel 2P connector.5. Reconnect the batterv positive cable, then reconnect thenegative cable,6. Erase the DTC memory (see page 24-28).7. Read the DTC {see page 24-261.
ls DTC 1-1 or DTC 1-2 indicsted?
NOYES
Open or increased resistance in the driver's airbag inflato.;replacethe d.ive.'s airbag (s6e page 24-871.
Check foi an ooen in the cable reel:1. Disconnect the battery negative cable, then disconnectthe positive cable, and waat for three minutes.2. Disconnect the special tool (2 Oi from the cable reel 2P
3. Remove the dashboard lower cover, and disconnect thecable reel 2P connector from the SRS main harness.4. Connect the special tool (2 0) to the SBS main harness 2Pconnector, (cont'd)
To page 24'51
SRS MAINHARNESS 2PCONNECTOR
--
www.emanualpro.com
Page 1348 of 1395
)
)
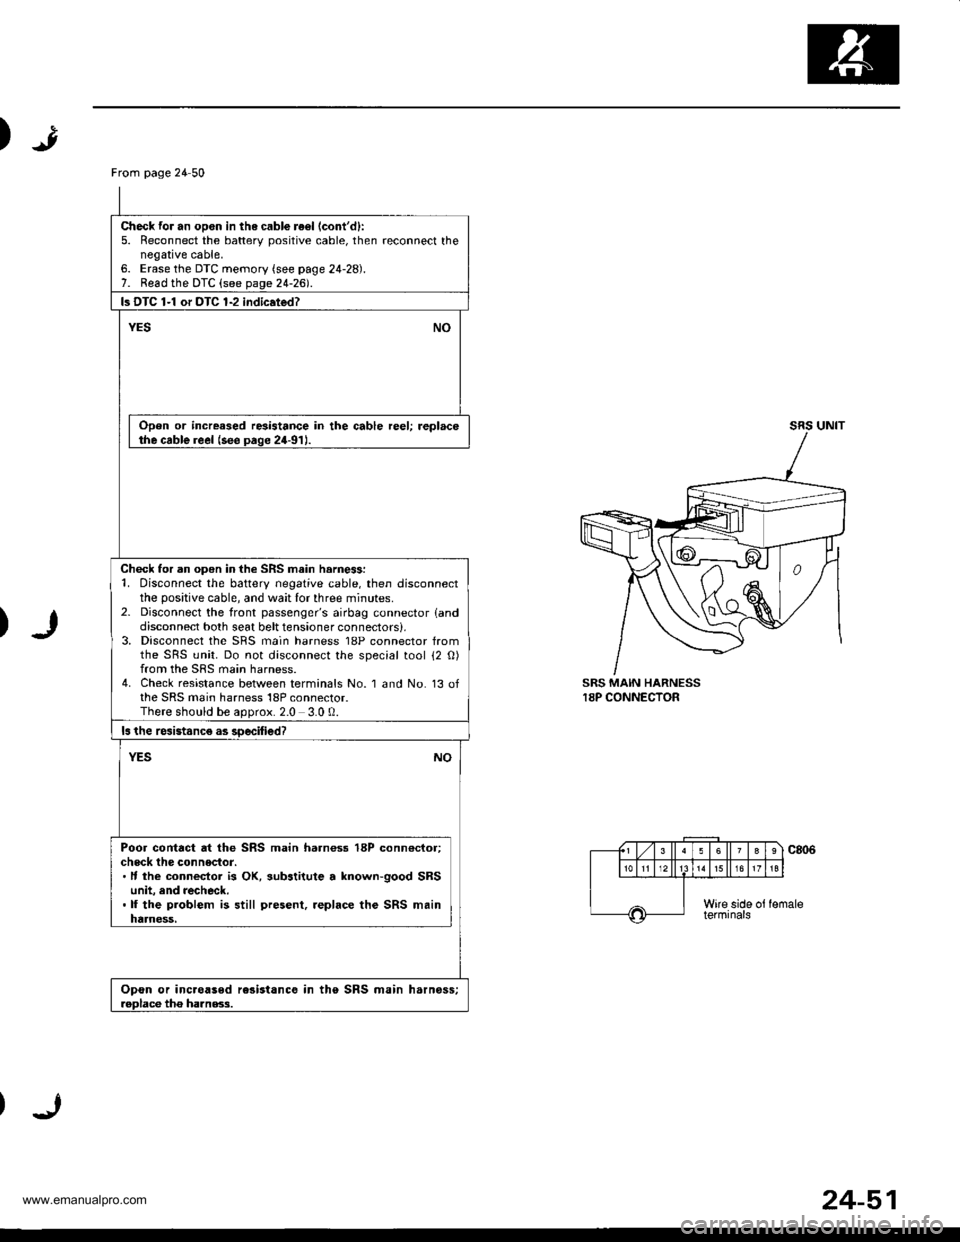
SRS MAIN HARNESS18P CONNECTOR
From page 24 50
Check for an opon in the cabl€ re€l (cont'd):
5. Reconnect the batterv positive cable, then reconnect thenegative cable,6. Erase the DTC memory (see page 24-28).7. Read the DTC (see page 24-2d.
ls DTC 1-1 or DTC 1-2 indic.ted?
YESNO
Open or increased resistance in the cable reel; replacethe cable reel (see paqe 24-91J.
Check for an open in the SRS main harne$:1. Disconnect the battery negative cable, then disconnectthe positive cable, and wait lor three minutes.2- Disconnect the front passenger's airbag connector landdisconnect both seat belt tensioner connectors),3, Disconnect the SRS main harness 18P connector fromthe SRS unit. Do not disconnect the special tool 12 O)from the SRS main harness.4. Check resistance between terminals No. 1 and No. 13 ofthe SRS main harness 18P connector.There should be aoorox.2.0 3.0 0.
ls the rcsistanc€ as soecified?
NOYES
Poor contact at the SRS main harnoss 18P conn€ctor;check the connector.. It the connecior is OK, substitute a lnown-good SRSunit, and recheck..lf the problem is still present, .eplace the SRS mainharness,
Opon or inc.oased rc3istance in the SRS main harnoss;roDlace tho ha]nss.3.
24-51
www.emanualpro.com