1999 HONDA CIVIC fuse
[x] Cancel search: fusePage 2018 of 2189
Power Windows (contd)
- How the Circuit Works
CAUTION: You could iniure your arms, hands, or
fingers if you unintentionally switch the driver's
window to "automatic down" while working in
that door with the power on. Disconnect the
window switch conneclot or the battery when
working in the driver's door.
System Description
The operation of the power windows is controlled by
the main switch in the power window master switch.
When the main switch is in OFF, only the driver's door
window can be opened or closed. With the main
switch ON, all windows can be ooened or closed
either by swtches in the master panel, or swttches in
the doors. The driver's window switch also has an
automatic down mode which is tumed on by pushing
the switch down to its second oosition.
The power windows are driven by reversible motors.
Each motor is protect€d by a built-in circuit breaker.
lf the window switch is held on too long (with the
window obstructed, or after the window is fully up or
down), the circuit breaker opens the circuit. The
circuit breaker resets automaticallv as it cools.
Driver's Window
With the ignition switch in ON, voltage is provided to
the coil of the power window relay through fus€ 24.
The contacts of the power window relay close, and
voltage is applied to the driver's switch. When you
push the power window master switch to UP, voltage
is applied to the driver's window motor. (The motor's
ground path is back through the master power
window switch.) The driver's window motor then
drives the window up. When you push the switch to
DOWN, voltage is applied in the opposite direction
and the motor drives the window down.
Automatic Down (Driver's Window)
With the ignition switch in ON or START, voltage is
applied to the coil of the power window relay. The
contacts of the power window relay close and
voltage is applied lo the power window master
switch. When you push the driveas switch to the
AUTO DOWN position, voltage is applied through
the driver's switch to the driver's window motor. The
control unit receives pulses at the pulser input while
the motor is running. When the window is fully
down, the motor stops, and pulses are no longer
generated by the pulser. This is sensed by the
control unit at the pulser input, and voltage is no
longer applied to the driver's window motor.
Passenger Windows
With the ignition switch in ON, voltage is applied to
the coil of the power window relay through fuse 24.
The contacts of the power window relay then close,
applying voltage to the individual window switches
and the power window master switch. With the
master panel main switch ON, the passenger
windows can be ooerated from the individual
window switches or from tho master panel switches.
When you push the front passengsr's window
switch to UP, voltage is applied to the f ront
passenger's window motor. (The motor is grounded
through the contacts in the front passenger's
window switch and the oower window master
switch.) The window moves up as long as you hold
the switch in the UP position. lf you push the switch
to DOWN, voltage is applied in th€ opposite
direction to the front passenger's window motor, and
the window movss down as long as you hold the
switch in the DOWN Dosition. The window switches
in the other doors operate similarly.
When you push the front passenger's switch in the
master panel to UP, voltage is applied through the
front passenger's window switch contacts to the
front passengefs window motor. (The motor is
grounded through the contacts in the front
passenger's window switch and the power window
master switch.) The window moves up as long as
you hold the switch in the UP position. lf you push
the switch to DOWN, voltage is applied in the
opposite direction to lhe front passenger's window
motor, and the window moves down as long as you
hold the switch in the DOWN position. The other
passenger window switches in the master panel
operate similarly.
Refer to the Service Manual (Section 23, Electrical)
for specific tests or troubleshooting procedures.
120-4
Page 2019 of 2189
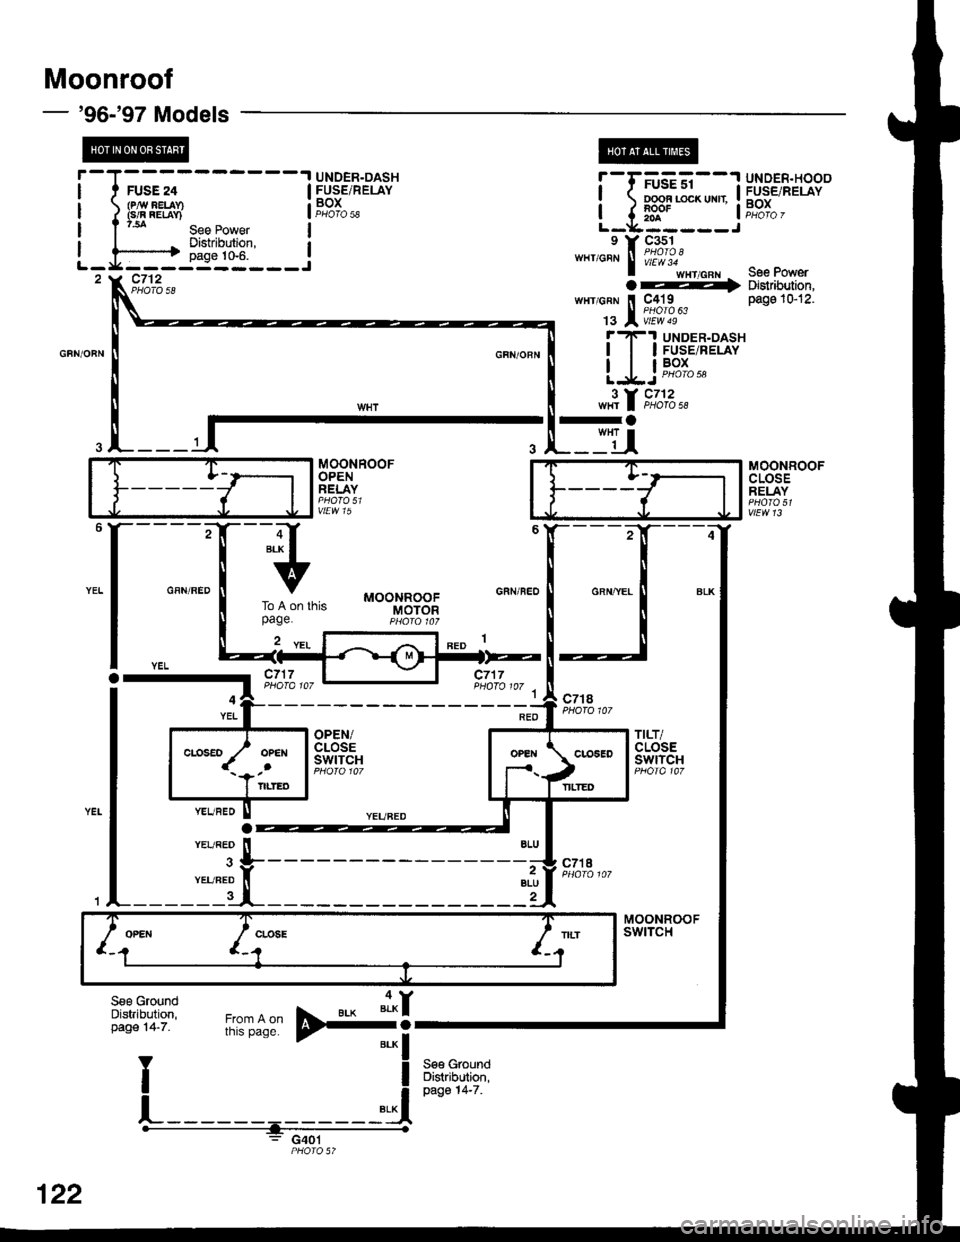
Moonroof
'96-'97 Models
@---1 UNDER.DASHFUSE 24(PAV AELAY}(slF FEraY)
GFN/OFN
i-tffil**l ii3-.',BJi9g"
I J lff' liffio,L-*------J9 Y C3s1
""tio"nr ! ffo"tfl,I wxt cnl See PowerOF' Dr$nouton.wHr cRN
C4l9 Page 10-12.
B lii:;?"u'l.-F'I UNDER.DASH! | | ruserneuv
I | | "B-gt..L-*..J " "'�'""
":.,1 Fl:,""*
IFUSE/RELAY
i""3Io,,
MOONROOFOPENRELAY
vtEw 15
-a
__tu
c7't8
MOONROOFCLOSERELAY
vtEw 13
GFN/BED
'+
To A on thispage.
2 veL
GFN/FEO
c717PHOTO 107 1
MOONROOFMOTOR
OPEN/CLOSEswtTcH
TILT/CLOSEswtTcH
MOONROOFswtTcH
2BLU2
S€e GroundDistributiofl,page 14-7.
OPENcrosETILT
122
Page 2020 of 2189
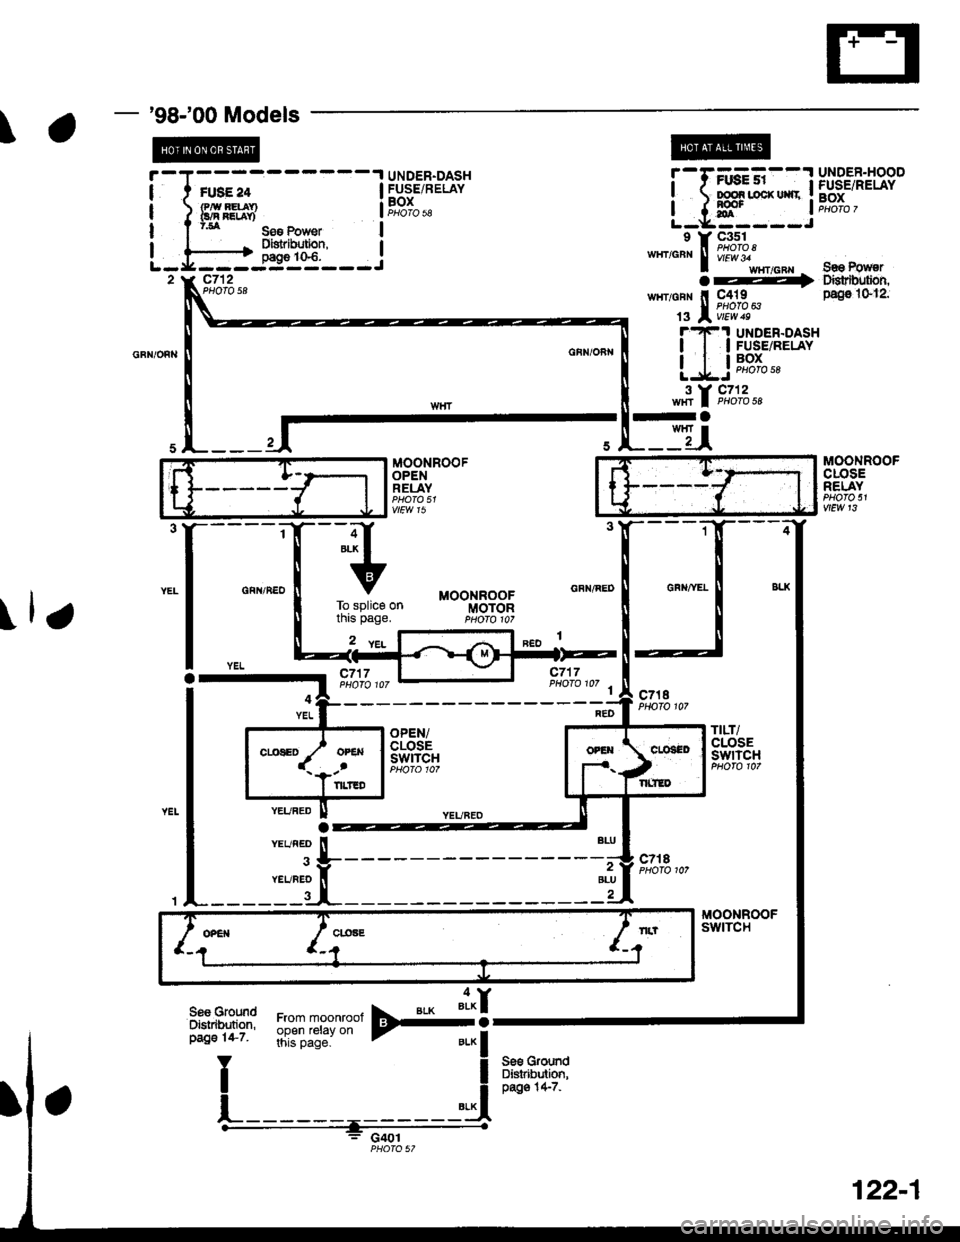
'98-'00 Models
@
\
I
I
I
I
---1 UNDER.DASH
c7'12PHOfO s8
trr-ii--'lH$3.'A.|39"
ffi**'iF,?T",-----J
MOONROOFOPENRELAY
MOONROOFclosERELAYPHO|O 51vtEw 13
I Y C3s1
""t,cntr ! fflo"tL'I wrricnl So€ Powsra-> DsrrDul'on
wuicnr ll C419
't" l',i'!,11"*
pag€ t&12.
UTIDER.DASHFUSE/RELAYBOXPHOTO 58
,al ,cl:,z,,
-a
_iu
\lr
-
4s
To splice ontnrs page.
c717
c718
OPEN/CLOSEswrTcH
TILT/CLOSEswficH
MOONROOFswtrcH
29LU
c7t8
o*irCLOAElltl
Sa€ Grolx|dDistribution,pag€ 1+7-
122-1
Page 2022 of 2189
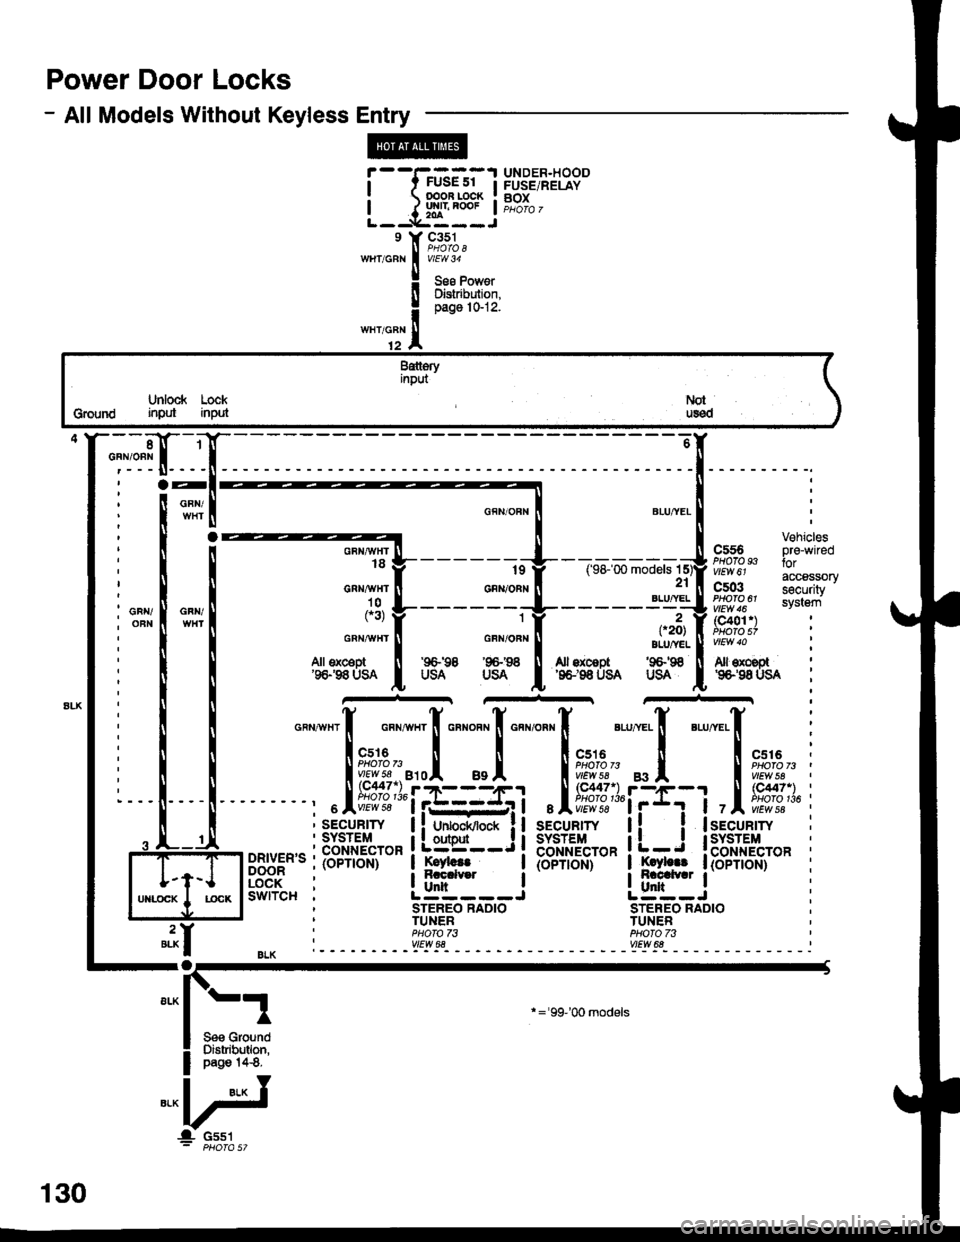
Power Door Locks
- All Models Without Keyless Entry
G551
[t.dE-l=
- ---- --:[
l'!fi:i- ".",.1
l'! l-------- r I
li I I
*"I!'k------#-r*.*rq;,pft?is,,,flr::fi
| : I I c"u,',", i c"",o"" i 21 i cs03 security'
I i"x[v*fl
i$k------+-----=#f;ffi svseni
I i t I ou*."jJ*"'l '** '"*J"l ^,,**0, #'#[""j,% i
I i ! I &H'E5o I ,ig^* d$n* |
.e&.s8usA usA ; 'o'"rto it,Ii
lrr!
-"ll'**n*ru;X,*#",XHm,
i
lil I
| :.--!---i
| .L-J iiriioflil", iffffliii F$fl,H"- itJ !F$$,i$", iI l-T;1-li"3g5"= iioriibl-r'-" 1 iffi !
I lunr.ocx I rccK IswrrcH : Lunl----i L!flJI l"'*^1 *-l- - i sreREo RADro srEREo RADro
t --t , ,--- ",r*- :
UNDER.HOODFUSE/RELAYBOXi--r?Grs;-'ir oooF Locx I
L__{g:":l9 Y C3sl
'n',o"n I iE?Loo'
I see PowerIl Distribution.I ^r^a llr-i,
"*,:TI
Bdt6rynpur
Unlock LockGround input input
130
'='99-'00 models
Page 2024 of 2189
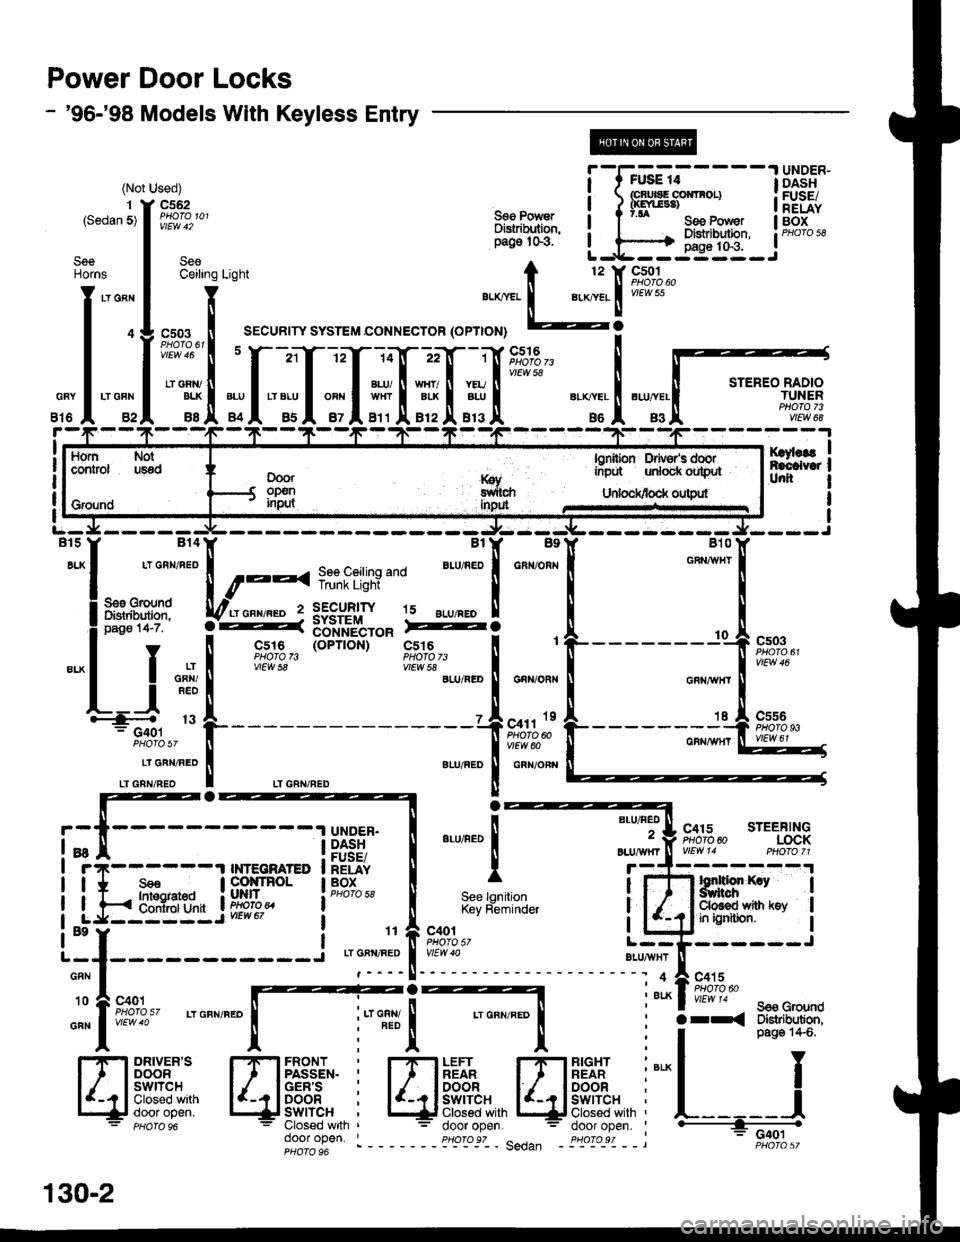
Power Door Locks
- '96-'98 Models With Keyless Entry
(NotUsed)
c562(Ssdan 5)
lOY,laEntcalYatrt oil
SeeCeiling
"*. IPHaTo 611
""#!
__ It
Seenorns
,J:l
ffi
!l*1'*
Rf,Ltr: a ?'* seePower IU6il'
il"d!rui' i.^h::Eii:,_J"'"'ou
t 12 't( 9_s!-1 .
",.*.*,.
1 ".*..1 i#??'o
sYsrEM coNNEcroR (oPTroN) -?
1 UNDER-FUAE 14I t rusE r4: Grul8E COirIFOL)I / 0(Enr38)See Power i ? 7.1 c.. o.Di8tributlon. ! | X;i*:
I DASHI FUSE/I RELAY
STEREO RADIOTUNERPHOTO 73vlEW 68
cs03
css6
;f,;z3,'9,*-
14n 22
BLU/ N WHT/ II YEUWHTI ALK I ALU
B11l'B12l.B13
'I tF;?,'
-xlru
c5l6
86 |' 83
''tl
*, **
t"
[ro**:"[fi*'
""i,
;: I;"il"."'Y' o-ft 3[tnlt$ro" Fi:a
I "* |
F,%',3,, (o"''on)
ir?rt,:*,"." I """,,":
See lgnitionKey Reminder
door ooen. ' pHoro s7 .------- Sa.lan -
f - | csre iofiib$'-" "c,s;rg,_ !
'
| ! "* I
"i3tr9"" 'LU,RED I GnNioR,.
!=4 ,. L----- --,1"n,,'.
-'-l i
i*-i---- ll}gii I
*,*"1
I r7r------'t TNTEGMTED I RELAY I Irrlll,l.I INTECru$ED I RELAY| * s€€ | cotlrRol lBox
LJaBIEIIL i9,Fis," ieHo'osa
BLU/HEO
2
Btu/,|\mr
C415 STEERINGPHOTO 60LOCK
I
I
I
BLUAIIXT
Hffirp;,ruml*-*i E;ffi*,ru
4
ALK
-- ---- J
c415
YtEw 14 sss G,g{rndarr< Olstrlhdion,
RIGHTREARDOORswrTcHClosed withdoor open.
""L___J
G401
130-2
Page 2025 of 2189
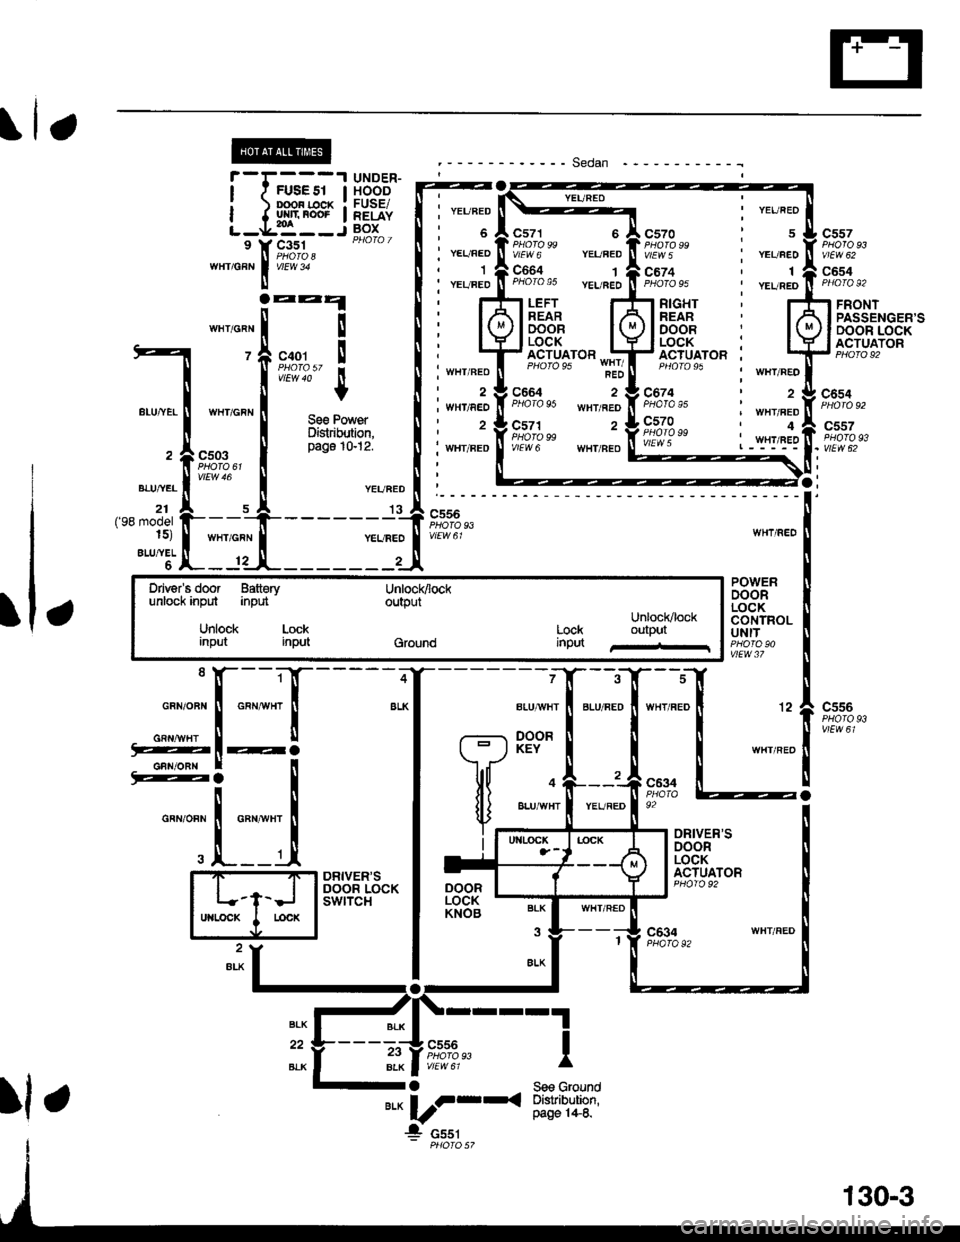
rl
lt,
I vevneo
I veuneo.1I YEUFED
UNDER-HOODFUSE/RELAYBOXi-iffiri
""',;Xftf*',I.'
c557
vtEw 62
c654
FRONT
;l
I
see Power iDistribution. I**t"t:.""."
I
------*-,7
OE
n"r,n"n I
il.",":['
".,"-fifiT""' I
-:iii[::f
PASSENGER'SDOOR LOCKACTUATOR
c554
c557
. VIEW 62
cs56
vtEw61WHT/REO
POWERDOORLOCKCONTROLUNIT
GRN/OBN
tu
GFI{/OBN:
GRN/OFN
ALUAViIT
DOORKEY
4
BLUAVHT
c556PHOfO93vtEw 61
BLU/NED
c634
92YEURED
DRIVER'SDOORLOCKACTUATORDOORLOCKKNOB
DRIVER'SDOOR LOCKswlTcH
WHT/FED
1
I
BLK
22
BLK
I-
c556
vtEw61BLK
YEUFEO=__- , YEUFEO
c5zo : sPHO|O 99 ,VIEW 5 - YEUFEO
C674 ' 1PHO|O95
PHOTO 95 I WHI/REO
C674PHOTO9sI WHT/FEDc570PHOTO ggvtEw 5 . _ryHi/!E9
ACTUATOR .-.:PHO|O 95FED
c664 2PHA|A9S wxf/FED
c571 2
VIEW6 WHT/BEO
Driver'sdoor Batt€ryunlock input input
Unlock Lockanput input
Unlock/loc*ouIpur
Ground
Unlock/lockLock outputinput
[-:I
l_l
t fl!@Klocx
eLxlrat-{ 3'i#i:T:'
!- cssr
Il r
S€s Ground
130-3
Page 2028 of 2189
Power Door Locks (cont'd)
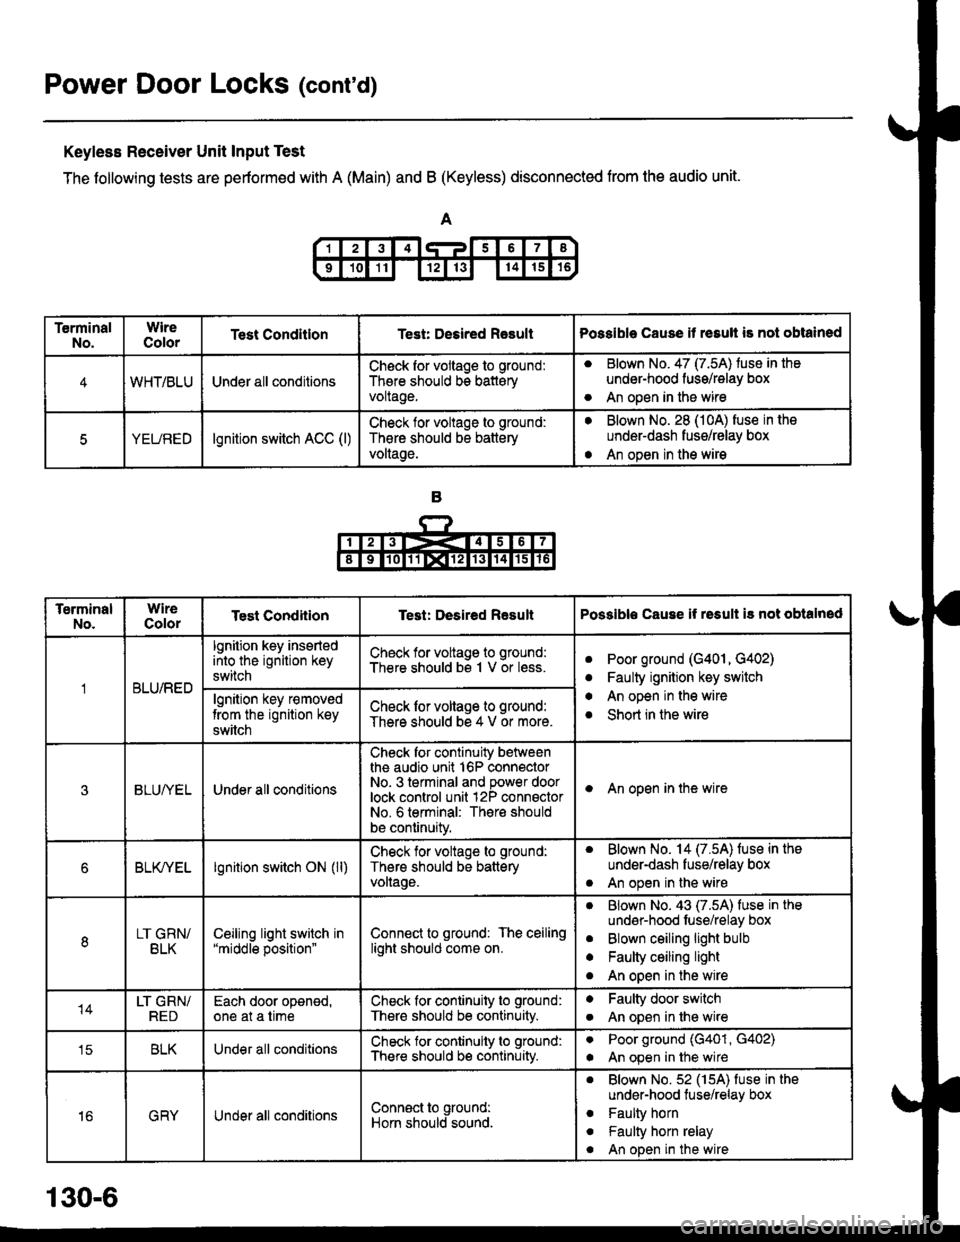
Keyless Receiver Unit Input Test
The following tests are pertormed with A (Main) and B (Keyless) disconnected from the audio unit.
TerminalNo.WireColorTest ConditlonTest: Desired RasultPossible Cause it resull is not obtained
4WHT/BLUUnder all conditionsCheck for vollage to ground:
There should bs batteryvoltage.
aBlown No. 47 (7.5A) tuse in the
under-hood fuss/relay box
An open in the wireo
5YEUREDlgnition switch ACC (l)Check lor voltage to ground:
Th€re should be battery
voltage.
aBlown No. 28 (10A) fuse in the
underdash fusg/relay box
An open in the wirea
TerminalNo.WireColorTest CondiiionTest: Desired ResultPossible Cause if rssult i3 not obtalned
BLU/RED
lgnition key insertedinto the ignition key
switch
Check for voltage to ground:
There should bs 1 V or less.aPoor ground (G401, G402)
Faulty ignition key switch
An open in the wire
Short in the wire
a
a
algnition key r€moved
trom the ignition key
switch
Check lor voltage to ground:
There should be 4 V or more.
3BLUI/ELUnder all conditions
Check for continuity betweenthe audio unit 16P connectorNo- 3 terminal and power doorlock control unit 12P connsctorNo. 6 terminal: There should
be continuity.
I An open in the wire
6BLK/YELlgnition switch ON (ll)Check for voltage to ground:
Thers should be batteryvollage.
. Blown No. 14 (7.5A) fuse in the
under-dash fuse/relay box
. An open in the wire
8LT GRN/BLKCeiljng light switch in"middle position"Connect to ground: The ceilinglight should come on.
aBlown No. 43 (7.5A) fuse in the
undsr-hood fuse/relay box
Blown ceiling light bulb
Faulty ceiling light
An open in the wire
a
a
o
14LT GRN/REDEach door oponed,one at a timeCheck for continuity to ground:
There should be continuity.
aFaulty door switch
An open in lhe wirea
tcBLKUnder all conditionsCheck for continuity to ground:
There should b€ continuity.
aPoor ground (G401, G402)
An open in the wirea
16GRYUnder all conditionsConn€ct to ground:
Horn should sound.
. Blown No.52 (15A) fuse in the
under-hood tuse/relay box
. Faulty horn
. Faulty horn relay
. An open in the wire
130-6
Page 2030 of 2189
Power Door Locks (cont'd)
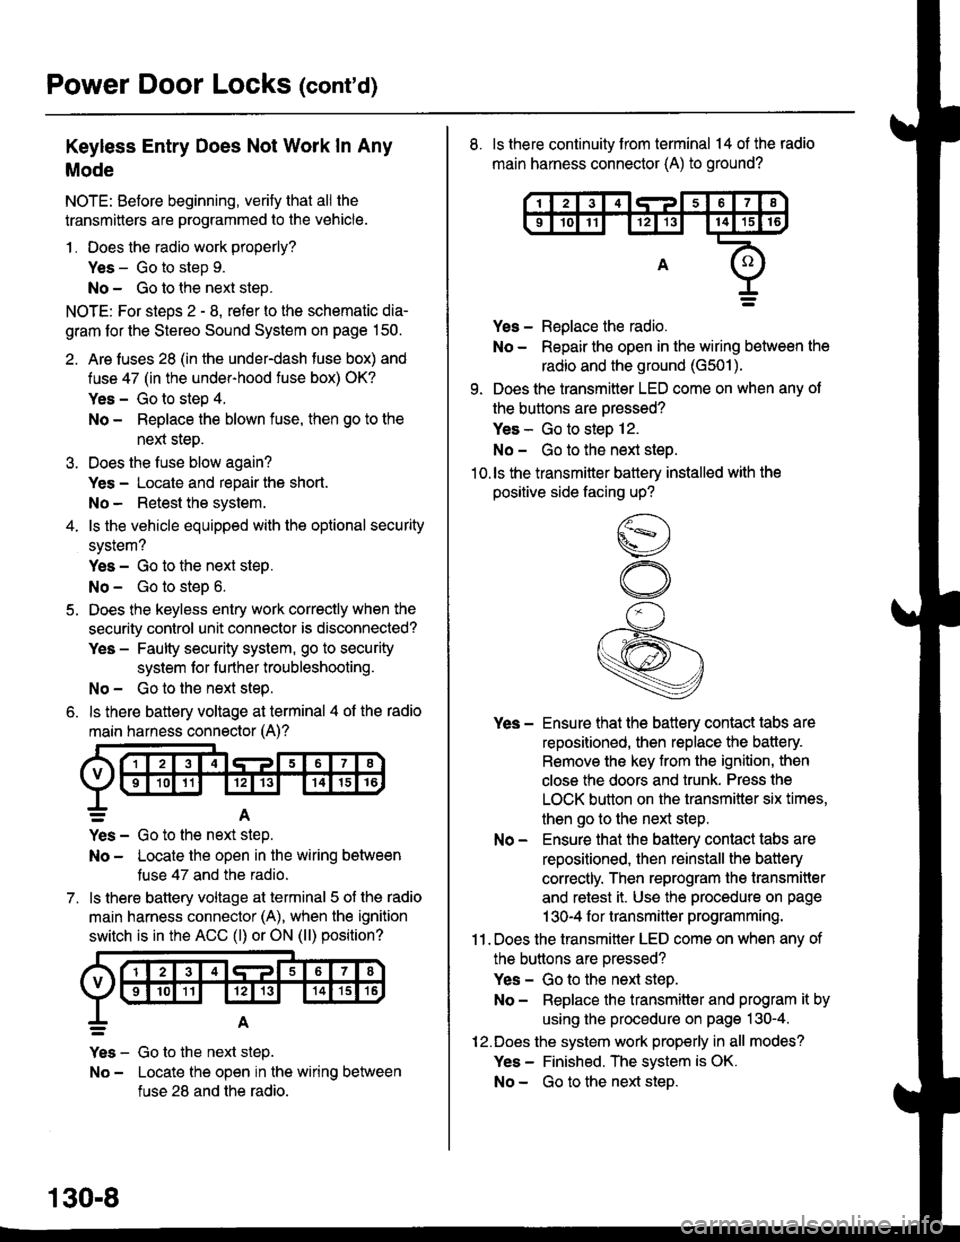
Keyless Entry Does Not Work In Any
Mode
NOTE: Before beginning, verify that all the
transmitters are programmed to the vehicle.
1 . Does the radio work properly?
Yes - Go to step 9.
No - Go to the neld step.
NOTE: For steos 2 - 8. refer to the schematic dia-
gram for the Stereo Sound System on page 150.
2. Are fuses 28 (in the under-dash fuse box) and
fuse 47 (in the under-hood fuse box) OK?
Yes - Go to step 4.
No - Replace the blown fuse, then go to the
nen steo.
3. Does the fuse blow again?
Yes - Locate and repair the short.
No- Retest the system.
4. ls the vehicle equipped with the optional security
system?
Yes - Go to the next steP.
No - Go to steD 6.
5. Does the keyless entry work correctly when the
security control unit connector is disconnected?
Yes - Faulty security system, go to security
system for f urther troubleshooting.
No - Go to the next step.
6. ls there battery voltage at terminal 4 of the radio
main harness connector (A)?
7.
=A
Yes - Go to the nen step.
No - Locate the open in the wiring between
tuse 47 and the radio.
ls there battery voltage at terminal 5 of the radio
main harness connector (A), when the ignition
switch is in the ACC (l) or ON (ll) position?
Yes - Go to the next step.
No - Locate the open in the wiring between
fuse 28 and the radio.
130-8
8. ls there continuity from terminal 14 of the radio
main harness connector (A) to ground?
Yes - Replace the radio.
No - Repair the open in the wiring between the
radio and the ground (G501).
9. Does the transmitter LED come on when any ot
the buttons are oressed?
Yes - Go to steo 12.
No - Go to the next steo.'10.ls the transmitter battery installed with the
positive side facing up?
Yes - Ensure that the battery contact tabs are
repositioned, then replace the battery.
Remove the key from the ignition, then
close the doors and trunk. Press the
LOCK button on the transmitter six times,
then go to the next step.
No - Ensure that the baftery contact tabs are
repositioned, then reinstall the batlery
correctly. Then reprogram the transmitter
and retest it. Use the procedure on page
1 30-4 f or transmitter programming.
11 . Does the transmitter LED come on when any of
the buttons are oressed?
Yes - Go to the next step.
No - Replace the transmitter and program it by
using the procedure on page 130-4.
12.Does the system work properly in all modes?
Yes - Finished. The system is OK.
No - Go to the next steD.