1999 HONDA CIVIC COUPE maintenance
[x] Cancel search: maintenancePage 208 of 269
Lights
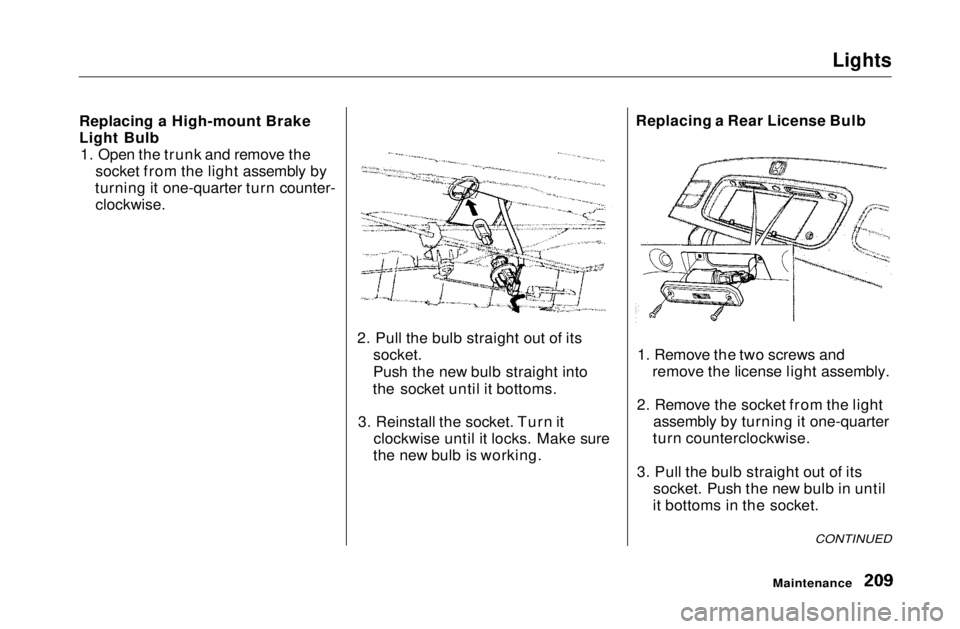
Replacing a High-mount Brake
Light Bulb 1. Open the trunk and remove the socket from the light assembly by
turning it one-quarter turn counter-
clockwise.
2. Pull the bulb straight out of itssocket.
Push the new bulb straight into
the socket until it bottoms.
3. Reinstall the socket. Turn it clockwise until it locks. Make sure
the new bulb is working. Replacing a Rear License Bulb
1. Remove the two screws and remove the license light assembly.
2. Remove the socket from the light assembly by turning it one-quarter
turn counterclockwise.
3. Pull the bulb straight out of its socket. Push the new bulb in until
it bottoms in the socket.
CONTINUED
MaintenanceMain Menu Table of Contents s t
Page 209 of 269
Lights
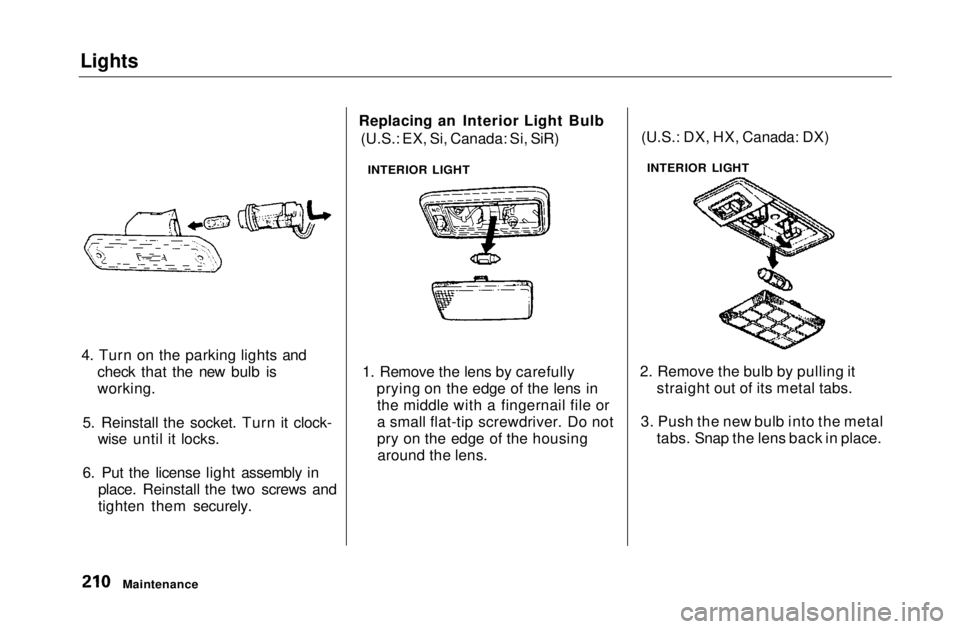
4. Turn on the parking lights and check that the new bulb is
working.
5. Reinstall the socket. Turn it clock- wise until it locks.
6. Put the license light assembly in place. Reinstall the two screws and
tighten them securely. Replacing an Interior Light Bulb
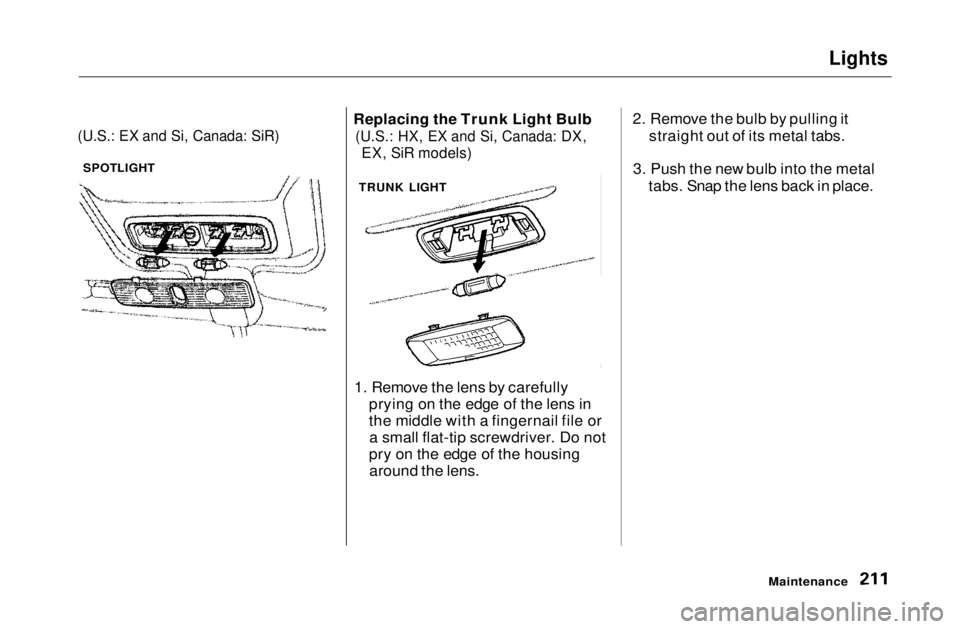
(U.S.: EX, Si, Canada: Si, SiR)
1. Remove the lens by carefully prying on the edge of the lens inthe middle with a fingernail file or
a small flat-tip screwdriver. Do not
pry on the edge of the housingaround the lens. (U.S.: DX, HX, Canada: DX)
2. Remove the bulb by pulling it straight out of its metal tabs.
3. Push the new bulb into the metal tabs. Snap the lens back in place.
Maintenance INTERIOR LIGHT
INTERIOR LIGHTMain Menu Table of Contents s t
Page 210 of 269
Lights
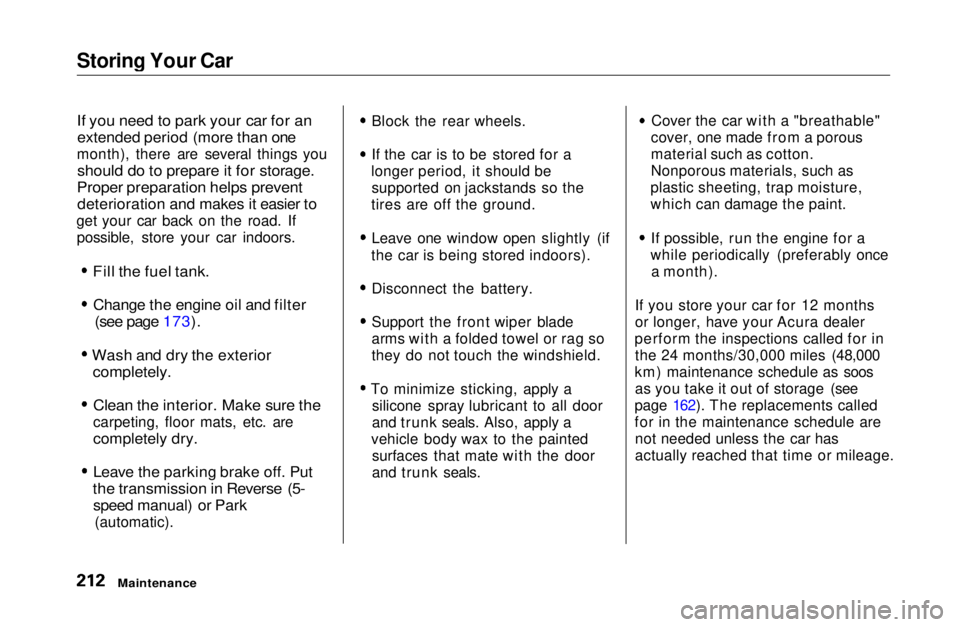
(U.S.: EX and Si, Canada: SiR)
Replacing the Trunk Light Bulb
(U.S.: HX, EX and Si, Canada: DX,
EX, SiR models)
1. Remove the lens by carefully prying on the edge of the lens in
the middle with a fingernail file ora small flat-tip screwdriver. Do not
pry on the edge of the housing around the lens. 2. Remove the bulb by pulling it
straight out of its metal tabs.
3. Push the new bulb into the metal tabs. Snap the lens back in place.
Maintenance
SPOTLIGHT
TRUNK LIGHTMain Menu Table of Contents s t
Page 211 of 269
Storing Your Car
If you need to park your car for an
extended period (more than one
month), there are several things you
should do to prepare it for storage.
Proper preparation helps prevent
deterioration and makes it easier to
get your car back on the road. If possible, store your car indoors.
Fill the fuel tank.
Change the engine oil and filter
(see page 173).
Wash and dry the exterior
completely.
Clean the interior. Make sure the
carpeting, floor mats, etc. are
completely dry.
Leave the parking brake off. Put
the transmission in Reverse (5-
speed manual) or Park
(automatic). Block the rear wheels.
If the car is to be stored for a
longer period, it should be supported on jackstands so the
tires are off the ground.
Leave one window open slightly (if
the car is being stored indoors).
Disconnect the battery.
Support the front wiper blade
arms with a folded towel or rag so
they do not touch the windshield.
To minimize sticking, apply a silicone spray lubricant to all door
and trunk seals. Also, apply a
vehicle body wax to the painted surfaces that mate with the door
and trunk seals. Cover the car with a "breathable"
cover, one made from a porous
material such as cotton.
Nonporous materials, such as
plastic sheeting, trap moisture,
which can damage the paint.
If possible, run the engine for a
while periodically (preferably once a month).
If you store your car for 12 months
or longer, have your Acura dealer
perform the inspections called for in the 24 months/30,000 miles (48,000
km) maintenance schedule as soos as you take it out of storage (see
page 162). The replacements called
for in the maintenance schedule are not needed unless the car has
actually reached that time or mileage.
MaintenanceMain Menu Table of Contents s t
Page 216 of 269
Interior Care, Corrosion Protection
Windows
Clean the windows, inside and out,
with a commercially-available glass
cleaner. You can also use a mixture
of one part white vinegar to ten parts
water. This will remove the haze that builds up on the inside of the
windows. Use a soft cloth or paper towels to clean all glass and clear
plastic surfaces.
The rear window defogger wires are
bonded to the inside of the glass. Wiping vigorously up-and-down can
dislodge and break the defogger wires. When cleaning the rear window, use
gentle pressure and wipe side-to-side. Air Fresheners
If you want to use an air freshener/deodorizer in the interior of your car,
it is best to use a solid type. Some
liquid air fresheners contain chemi- cals that may cause parts of the
interior trim and fabric to crack ordiscolor.
If you use a liquid air freshener,
make sure you fasten it securely so it does not spill as you drive.
Corrosion Protection
Two factors normally contribute to causing corrosion in your car:
1. Moisture trapped in body cavities. Dirt and road salt that collects in
hollows on the underside of thecar stays damp, promoting
corrosion in that area.
2. Removal of paint and protective coatings from the exterior and
underside of the car.
Many corrosion-preventive measures are built into your Honda. You can
help keep your car from corroding by performing some simple periodic
maintenance:
Repair chips and scratches in the
paint as soon as you discover them.
CONTINUED
Appearance Care
NOTICEMain Menu Table of Contents s t
Page 253 of 269
Emissions Controls
The burning of gasoline in your car's engine produces several byproducts.Some of these are carbon monoxide (CO), oxides of nitrogen (NOx) and
hydrocarbons (HC). Gasoline evaporating from the tank also
produces hydrocarbons. Controlling
the production of NOx, CO, and HC
is important to the environment.Under certain conditions of sunlight
and climate, NOx and HC react to
form photochemical "smog." Carbon monoxide does not contribute tosmog creation, but it is a poisonous
gas.
The Clean Air Act
The United States Clean Air Act* sets standards for automobile
emissions. It also requires that
automobile manufacturers explain to
owners how their emissions controls
work and what to do to maintain them. This section summarizes how
the emissions controls work.
Scheduled maintenance is on page 160.
* In Canada, Honda vehicles comply
with the Canadian Motor Vehicle Safety Standards (CMVSS) for
Emissions valid at the time they are
manufactured.
Crankcase Emissions Control
System
Your car has a Positive Crankcase
Ventilation System. This keeps gasses that build up in the engine'scrankcase from going into the
atmosphere. The Positive Crankcase
Ventilation valve routes them from the crankcase back to the intake
manifold. They are then drawn into
the engine and burned. Evaporative Emissions Control
System
As gasoline evaporates in the fuel tank, an evaporative emissionscontrol canister filled with charcoal
adsorbs the vapor. It is stored in this
canister while the engine is off. After
the engine is started and warmed up,
the vapor is drawn into the engineand burned during driving.
Onboard Refueling Vapor
Recovery
The Onboard Refueling Vapor Recovery (ORVR) system captures
the fuel vapors during refueling. The
vapors are adsorbed in a canister
filled with activated carbon. While driving, the fuel vapors are drawn
into the engine and burned off.
Technical InformationMain Menu Table of Contents s t
Page 260 of 269

Index
Accessories and Modifications.... 130 Accessories................................. 130Additional Safety Precaution.... 131 Modifications............................. 131
ACCESSORY (Ignition Key Position)........................................ 70
Accessory Power Socket................ 85
Adding Automatic Transmission
Fluid........................................ 180
Brake Fluid................................. 183 Clutch Fluid................................ 183
Engine Coolant........................... 175
Engine Oil................................... 171
Manual Transmission Fluid..... 182
Power Steering Fluid................. 184
Windshield Washer Fluid......... 180
Additional Information About Your Seat Belts........................ 42
Lap Belt......................................... 43
Lap/Shoulder Belt....................... 42
Seat Belt Maintenance................ 44
Seat Belt System Components... 42 Additional Information About
Your SRS................................... 45
Additional Safety Precautions.... 48 How Your Airbags Work............ 45
How Your SRS Indicator
Works........................................ 47
SRS Components......................... 45
Additives, Engine Oil..................... 171
Adjustments
Head Restraints........................... 77
Mirrors.......................................... 81
Seats.............................................. 76
Steering Wheel............................ 65
Airbag (SRS)...................................... 9
Air Cleaner Element...................... 185 Air Conditioning............................... 88 Maintenance............................... 193
Usage............................................. 90
Air Outlets (Vents).......................... 90
Air Pressure, Tires........................ 196 High Speed Driving................... 250
Normal Driving.......................... 196
Alcohol in Gasoline........................ 252
Antifreeze....................................... 175
Anti-lock Brakes (ABS) Indicator Light.................... 55, 153
Operation.................................... 152
Anti-theft Steering Column
Lock............................................... 70
Appearance Care........................... 213
Ashtrays (Optional)......................... 85
Audio System................................... 96
Automatic Speed Control................ 66
Automatic Transmission............... 140
Capacity, Fluid........................... 247
Checking Fluid Level................ 180
Shifting........................................ 141
Shift Lever Position Indicator.. 140
Shift Lever Positions................. 141
Shift Lock Release..................... 144
Battery Charging SystemIndicator............................ 55, 232
Jump Starting............................. 227 Maintenance............................... 189
Specifications............................. 248
CONTINUEDMain Menu s t
Page 264 of 269
Index
Heating and Cooling........................ 88
High Altitude, Starting at.............. 137
High-Low Beam Switch.................. 61
High-mount Brake Light............... 209
Hood, Opening the........................ 126
Horn................................................... 60
Hot Coolant, Warning about........ 175
Hydraulic Clutch............................ 183
Hydroplaning.................................. 154
Identification Number, Vehicle.... 244
If Your Car Has to be Towed....... 241
Ignition
Keys............................................... 69
Switch............................................ 69
Timing Control System............. 255
Important Safety Precautions.......... 6
Indicator Lights, Instrument
Panel.............................................. 53
Infant Restraint................................ 29
Inflation, Proper Tire .................... 195
High Speed Driving................... 250
Normal Driving.......................... 195
Inside Mirror.................................... 81
Inspection, Tire.............................. 197
Instrument Panel............................. 52
Instrument Panel Brightness......... 62
Interior Cleaning............................ 216
Interior Light.................................... 86
Introduction......................................... i
Jacking up the Car......................... 221
Jack, Tire........................................ 221
Jump Starting................................. 227
Keys................................................... 69
Label, Certification........................ 244
Lane Change, Signaling.................. 62
Lap Belt............................................. 43
Lap/Shoulder Belts......................... 42
Leaking of Exhaust into Car.......... 49
Lights
Bulb Replacement..................... 204
Indicator........................................ 53
Parking.......................................... 64
Turn Signal................................... 62
LOCK (Ignition Key Position)....... 70
Locks
Anti-theft Steering Column........ 70Fuel Fill Door............................. 125
Power Door.................................. 71
Trunk............................................ 75
Low Coolant Level......................... 128 Low Fuel Indicator.......................... 58
Lower Gear, Downshifting to a.... 138
Low Oil Pressure Indicator.... 55, 231
Lubricant Specifications Chart.... 247
Luggage.......................................... 132
CONTINUED
Maintenance................................... 157
Owner Maintenance Checks.... 169
Record.................................. 167-168
Required Indicator....................... 59Main Menu s t