Page 55 of 269

Indicator Lights
* Differences in the indicators for Canadian models are noted in the text. Seat Belt Reminder Light
This indicator lights when you turn the ignition switch ON (II). It is a
reminder to you and your passengers
to protect yourselves by fastening the seat belts. A beeper also sounds
if you have not fastened your seat
belt.
If you do not fasten your seat belt,
the beeper will stop after a few seconds but the light stays on until
you do. Both the light and the beeper stay off if you fasten your seat belt
before turning on the ignition.
Supplemental Restraint
System Indicator
This indicator lights when you turn the ignition switch ON (II). If itcomes on at any other time, it
indicates a problem in thesupplemental restraint system. For
complete information, see page 47.
Instruments and Controls
U.S.: DX, Canada: LX
HIGH BEAM INDICATOR
CHARGING SYSTEM
INDICATOR
LOW OIL
PRESSURE
INDICATOR
PARKING BRAKE AND BRAKE
SYSTEM INDICATOR'
TRUNK-OPENINDICATOR
LOW FUEL INDICATOR
SEAT BELT
REMINDER LIGHT
ANTI-LOCK BRAKE SYSTEM INDICATOR
(Canadian LX model)
MALFUNCTION
INDICATOR LAMP
SUPPLEMENTAL RESTRAINT
SYSTEM INDICATOR
SRSMain Menu Table of Contents s t
Page 84 of 269
Parking Brake, Glove Box
PARKING BRAKE LEVER
To apply the parking brake, pull the lever up fully. To release it, pull upslightly, push the button, and lower
the lever. The parking brake light on
the instrument panel should go out
when the parking brake is fully released (see page 55).
Driving the car with the parking brake
applied can damage the rear brakes
and axles.
Open the glove box by pulling the
handle. Close it with a firm push.
Instruments and Controls
GLOVE BOX
Glove Box
An open glove box can cause
serious injury to your passengerin a crash, even if thepassenger is wearing the seat
belt.
Always keep the glove box
closed while driving.
NOTICE
Parking BrakeMain Menu Table of Contents s t
Page 136 of 269

Preparing to Drive
You should do the following checks and adjustments every day before
you drive your car.
1. Make sure all windows, mirrors, and outside lights are clean and
unobstructed. Remove frost, snow,or ice.
2. Check that the hood and trunk are fully closed.
3. Visually check the tires. If a tire looks low, use a gauge to check its
pressure. 4. Check that any items you may be
carrying with you inside are stored
properly or fastened downsecurely.
5. Check the adjustment of the seat (see page 76).
6. Check the adjustment of the inside and outside mirrors (see
page 81).
7. Check the adjustment of the steering wheel (see page 65).
8. Make sure the doors are securely closed and locked. 9. Fasten your seat belt. Check that
your passengers have fastenedtheir seat belts (see page 8).
10.Turn the ignition switch ON (II). Check the indicator lights in the
instrument panel.
11.Start the engine (see page 137).
12. Check the gauges and indicator lights in the instrument panel (see
page 53).
DrivingMain Menu Table of Contents s t
Page 156 of 269

Maintenance
This section explains why it is important to keep your car wellmaintained and to follow basic
maintenance safety precautions.
This section also includes Maintenance Schedules for normal
driving and severe driving conditions,
a Maintenance Record, and instruc-
tions for simple maintenance tasks
you may want to take care of yourself.
If you have the skills and tools to per-form more complex maintenance
tasks on your Honda, you may want
to purchase the Service Manual. See
page 263 for information on how to obtain a copy, or see your Honda
dealer.
Maintenance Safety....................... 158
Important Safety Precautions.. 159
Maintenance Schedule.................. 160
Maintenance Record..................... 167 Owner Maintenance Checks........ 169
Fluid Locations............................... 170
Engine Oil....................................... 171
Adding Oil................................... 171
Recommended Oil..................... 171Synthetic Oil............................... 172
Additives..................................... 172
Changing the Oil and Filter...... 173
Cooling System.............................. 175
Adding Engine Coolant............. 175Replacing Engine Coolant........ 177
Windshield Washers..................... 180
Transmission Fluid........................ 180
Automatic
Transmission.......................... 180
5-speed Manual
Transmission.......................... 182
Brake and Clutch Fluid................. 182
Brake System............................. 183
Clutch System............................ 183
Power Steering............................... 184
Air Cleaner Element...................... 185 Hood Latch..................................... 186
Spark Plugs..................................... 187
Replacement............................... 187
Specifications............................. 188
Battery............................................ 189
Wiper Blades.................................. 191
Air Conditioning System............... 193 Drive Belts...................................... 194
Timing Belt..................................... 194
Tires................................................ 195 Inflation....................................... 195
Recommended Tire Pressures
for Normal Driving............ 196
Inspection................................... 197
Maintenance............................... 197
Tire Rotation.............................. 198
Replacing Tires and Wheels .... 199
Wheels and Tires....................... 200
Winter Driving........................... 200
Snow Tires.............................. 200
Tire Chains............................. 201
Lights.............................................. 202 Replacing Bulbs......................... 204
Storing Your Car............................ 212
MaintenanceMain Menu s t
Page 162 of 269
Maintenance Schedule for Normal Conditions (listed by distance/time)
Service at the indicated distance or time, whichever comes first. Do the items in A, B, C as required for each distance/time interval. Follow this
schedule if the severe driving conditions described in the Severe Conditions Schedule on the next page do not apply.
Canadian owners: Follow the schedule for Severe Conditions.
# : See information on maintenance and emissions warranty, lastcolumn, page 161.
* : See Timing Belt on page 194 to determine need for replacement.
Maintenance
* 1 : U.S.: Si model, Canada: SiR model
page 198
page 181Main Menu Table of Contents s t
Page 165 of 269
Maintenance Schedule for Severe Conditions (listed by distance/time)
Maintenance
*
1 : U.S.: Si model, Canada: SiR model
#: See information on maintenance and emissions warranty, last
column, page 261.
* : See Timing Belt on page 194 to determine need for replacement.Main Menu Table of Contents s t
Page 193 of 269

Drive Belts, Timing Belt
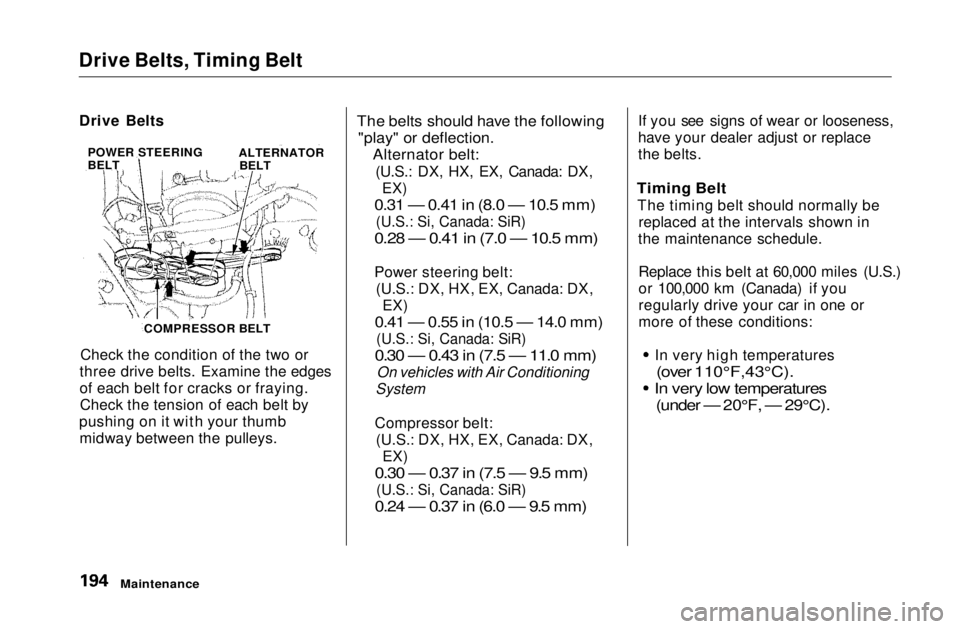
Check the condition of the two or
three drive belts. Examine the edges
of each belt for cracks or fraying. Check the tension of each belt by
pushing on it with your thumb midway between the pulleys.
The belts should have the following
"play" or deflection.
Alternator belt:
(U.S.: DX, HX, EX, Canada: DX,
EX)
0.31 — 0.41 in (8.0 — 10.5 mm)
(U.S.: Si, Canada: SiR)
0.28 — 0.41 in (7.0 — 10.5 mm)
Power steering belt: (U.S.: DX, HX, EX, Canada: DX, EX)
0.41 — 0.55 in (10.5 — 14.0 mm)
(U.S.: Si, Canada: SiR)
0.30 — 0.43 in (7.5 — 11.0 mm)
On vehicles with Air Conditioning
System
Compressor belt: (U.S.: DX, HX, EX, Canada: DX,
EX)
0.30 — 0.37 in (7.5 — 9.5 mm)
(U.S.: Si, Canada: SiR)
0.24 — 0.37 in (6.0 — 9.5 mm)
If you see signs of wear or looseness,
have your dealer adjust or replace
the belts.
Timing Belt
The timing belt should normally be replaced at the intervals shown in
the maintenance schedule.
Replace this belt at 60,000 miles (U.S.)
or 100,000 km (Canada) if you
regularly drive your car in one or
more of these conditions:
In very high temperatures
(over 110°F,43°C).
In very low temperatures
(under — 20°F, — 29°C).
Maintenance
Drive Belts
POWER STEERING
BELT ALTERNATOR
BELT
COMPRESSOR BELTMain Menu Table of Contents s t
Page 212 of 269

Appearance Care
Regular cleaning and polishing of
your Honda helps to keep it "new" looking. This section gives you hintson how to clean your car and
preserve its appearance: the paint,
brightwork, wheels and interior. Also included are several things you can
do to help prevent corrosion.
Exterior Care.................................. 214 Washing...................................... 214
Waxing........................................ 214
Aluminum Wheels..................... 215Paint Touch-up........................... 215
Interior Care................................... 216 Carpeting.................................... 216
Fabric.......................................... 216
Vinyl............................................ 216
Seat Belts.................................... 216
Windows..................................... 217
Air Fresheners........................... 217
Corrosion Protection..................... 217
Body Repairs..................................218
Appearance CareMain Menu s t