1999 HONDA CIVIC COUPE brake light
[x] Cancel search: brake lightPage 168 of 269
Owner Maintenance Checks
You should check the following items at the specified intervals. If
you are unsure of how to perform any check, turn to the page given. Engine oil level — Check every
time you fill the fuel tank. See
page 111. Engine coolant level — Check the
radiator reserve tank every time
you fill the fuel tank. See page 127. Windshield washer fluid — Check
the level in the reservoir monthly.If weather conditions cause you to
use the washers frequently, check
the reservoir each time you stop
for fuel. See page 180. Automatic transmission — Check
the fluid level monthly. See page
180.
Brakes — Check the fluid level
monthly. See page 183.Tires — Check the tire pressure
monthly. Examine the tread for
wear and foreign objects. See page 196. Lights — Check the operation of
the headlights, parking lights,
taillights, high-mount brake light,
turn signals, brake lights, and
license plate lights monthly. See
page 202.
MaintenanceMain Menu Table of Contents s t
Page 202 of 269
Lights
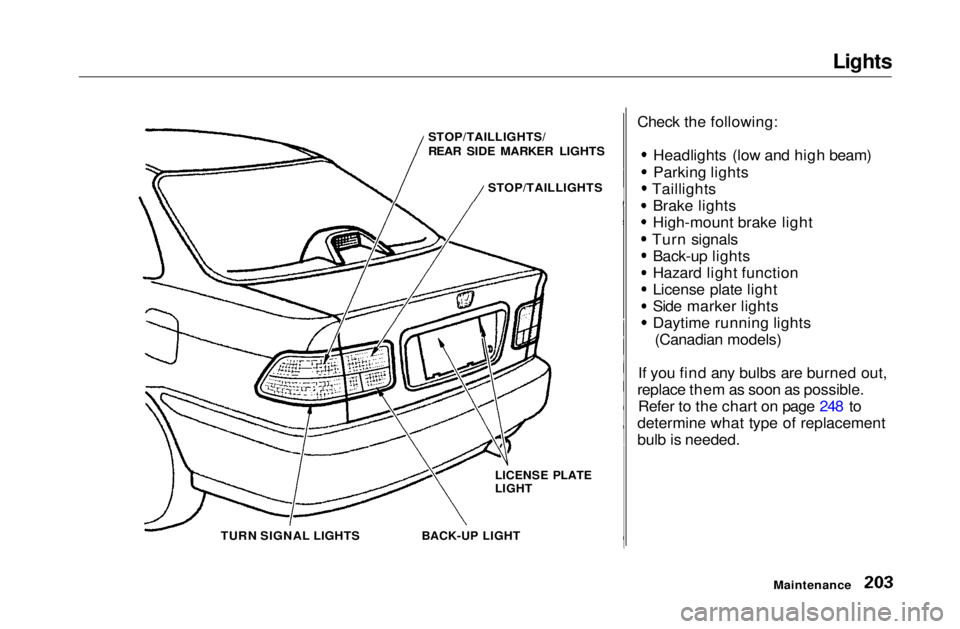
Check the following: Headlights (low and high beam)
Parking lights
Taillights Brake lights
High-mount brake light
Turn signals Back-up lights
Hazard light function
License plate light
Side marker lights
Daytime running lights (Canadian models)
If you find any bulbs are burned out,
replace them as soon as possible. Refer to the chart on page 248 to
determine what type of replacement
bulb is needed.
Maintenance
STOP/TAILLIGHTS/
REAR SIDE MARKER LIGHTS
STOP/TAILLIGHTS
LICENSE PLATE
LIGHT
BACK-UP LIGHT
TURN SIGNAL LIGHTSMain Menu Table of Contents s t
Page 208 of 269
Lights
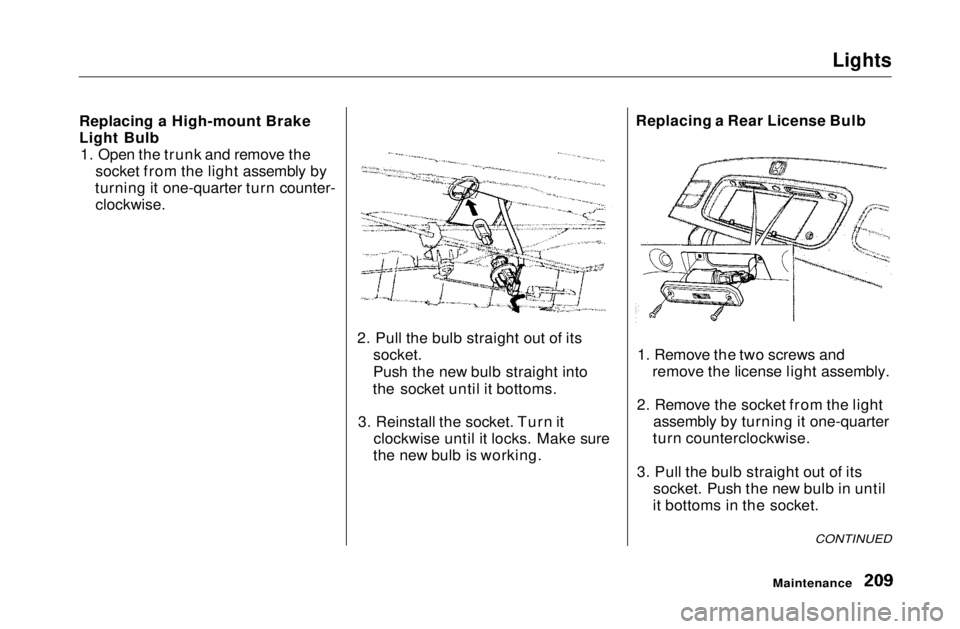
Replacing a High-mount Brake
Light Bulb 1. Open the trunk and remove the socket from the light assembly by
turning it one-quarter turn counter-
clockwise.
2. Pull the bulb straight out of itssocket.
Push the new bulb straight into
the socket until it bottoms.
3. Reinstall the socket. Turn it clockwise until it locks. Make sure
the new bulb is working. Replacing a Rear License Bulb
1. Remove the two screws and remove the license light assembly.
2. Remove the socket from the light assembly by turning it one-quarter
turn counterclockwise.
3. Pull the bulb straight out of its socket. Push the new bulb in until
it bottoms in the socket.
CONTINUED
MaintenanceMain Menu Table of Contents s t
Page 211 of 269
Storing Your Car
If you need to park your car for an
extended period (more than one
month), there are several things you
should do to prepare it for storage.
Proper preparation helps prevent
deterioration and makes it easier to
get your car back on the road. If possible, store your car indoors.
Fill the fuel tank.
Change the engine oil and filter
(see page 173).
Wash and dry the exterior
completely.
Clean the interior. Make sure the
carpeting, floor mats, etc. are
completely dry.
Leave the parking brake off. Put
the transmission in Reverse (5-
speed manual) or Park
(automatic). Block the rear wheels.
If the car is to be stored for a
longer period, it should be supported on jackstands so the
tires are off the ground.
Leave one window open slightly (if
the car is being stored indoors).
Disconnect the battery.
Support the front wiper blade
arms with a folded towel or rag so
they do not touch the windshield.
To minimize sticking, apply a silicone spray lubricant to all door
and trunk seals. Also, apply a
vehicle body wax to the painted surfaces that mate with the door
and trunk seals. Cover the car with a "breathable"
cover, one made from a porous
material such as cotton.
Nonporous materials, such as
plastic sheeting, trap moisture,
which can damage the paint.
If possible, run the engine for a
while periodically (preferably once a month).
If you store your car for 12 months
or longer, have your Acura dealer
perform the inspections called for in the 24 months/30,000 miles (48,000
km) maintenance schedule as soos as you take it out of storage (see
page 162). The replacements called
for in the maintenance schedule are not needed unless the car has
actually reached that time or mileage.
MaintenanceMain Menu Table of Contents s t
Page 220 of 269
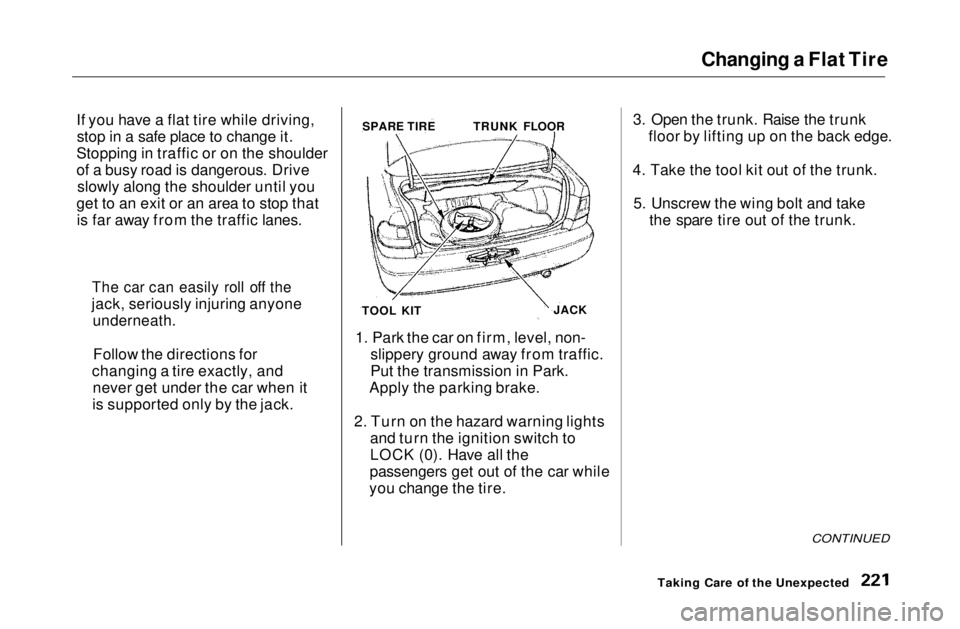
Changing a Flat Tire
If you have a flat tire while driving, stop in a safe place to change it.
Stopping in traffic or on the shoulder
of a busy road is dangerous. Drive slowly along the shoulder until you
get to an exit or an area to stop that is far away from the traffic lanes.
1. Park the car on firm, level, non-slippery ground away from traffic.
Put the transmission in Park.
Apply the parking brake.
2. Turn on the hazard warning lights and turn the ignition switch to
LOCK (0). Have all the
passengers get out of the car while
you change the tire. 3. Open the trunk. Raise the trunk
floor by lifting up on the back edge.
4. Take the tool kit out of the trunk. 5. Unscrew the wing bolt and take the spare tire out of the trunk.
CONTINUED
Taking Care of the Unexpected
SPARE TIRE
TRUNK FLOOR
JACK
TOOL KIT
The car can easily roll off the
jack, seriously injuring anyone
underneath.
Follow the directions for
changing a tire exactly, and never get under the car when it
is supported only by the jack.Main Menu Table of Contents s t
Page 226 of 269
If Your Engine Won't Start, Jump Starting
The Starter Operates Normally In this case, the starter motor's
speed sounds normal, or even faster
than normal, when you turn the ignition switch to START (III), but
the engine does not run.
Are you using the proper startingprocedure? Refer to Starting the
Engine on page 137.Do you have fuel? Turn the
ignition switch to ON (II) for a
minute and watch the fuel gauge.
The low fuel level warning light may not be working, so you were
not reminded to fill the tank.
There may be an electrical problem, such as no power to the
fuel pump. Check all the fuses (see page 237).
If you find nothing wrong, you will
need a qualified technician to find
the problem. See Emergency
Towing on page 241. Jump Starting
If your car's battery has run down,
you may be able to start the engine by using a booster battery. Although
this seems like a simple procedure,
you should take several precautions.
You cannot start a Honda with an automatic transmission by pushingor pulling it. To jump start your car, follow these
directions closely:
1. Open the hood and check the physical condition of the battery(see page 189). In very cold
weather, check the condition of the electrolyte. If it seems slushyor like ice, do not try jump starting
until it thaws.
If a battery sits in extreme cold, the
electrolyte inside can freeze.
Attempting to jump start with a frozen
battery can cause it to rupture.
2. Turn off all the electrical acces-
sories: heater, A/C, stereo system,
lights, etc.
Put the transmission in Neutral or
Park and set the parking brake.
CONTINUED
Taking Care of the Unexpected
A battery can explode if you do
not follow the correct procedure,
seriously injuring anyone nearby.
Keep all sparks, open flames,
and smoking materials away
from the battery.
NOTICEMain Menu Table of Contents s t
Page 233 of 269
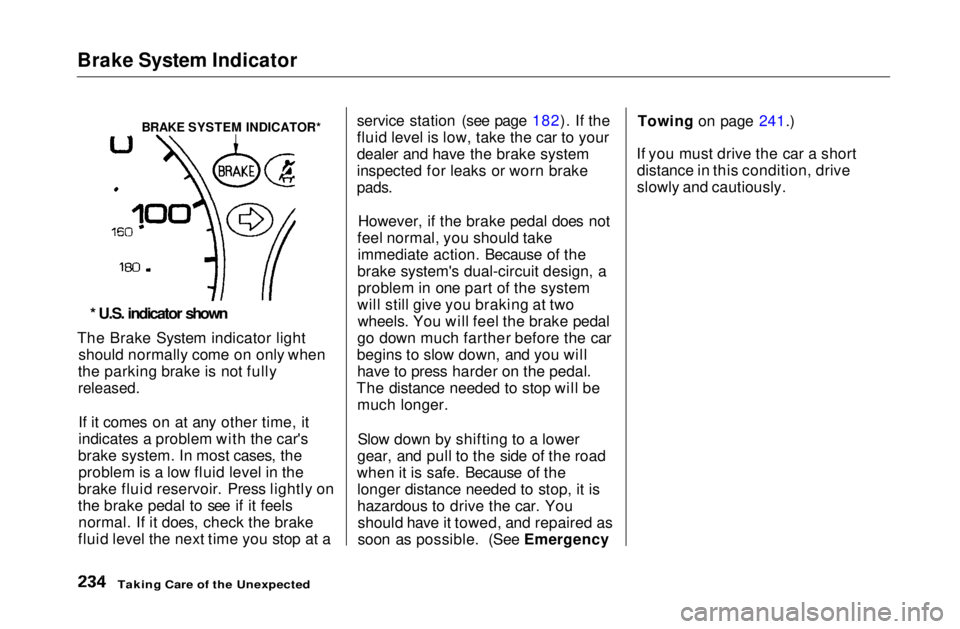
Brake System Indicator
The Brake System indicator light
should normally come on only when
the parking brake is not fully
released.
If it comes on at any other time, it
indicates a problem with the car's
brake system. In most cases, the problem is a low fluid level in the
brake fluid reservoir. Press lightly on
the brake pedal to see if it feels normal. If it does, check the brake
fluid level the next time you stop at a service station (see page 182). If the
fluid level is low, take the car to your
dealer and have the brake system
inspected for leaks or worn brake
pads.
However, if the brake pedal does not
feel normal, you should take immediate action. Because of the
brake system's dual-circuit design, a problem in one part of the system
will still give you braking at two wheels. You will feel the brake pedal
go down much farther before the car
begins to slow down, and you will have to press harder on the pedal.
The distance needed to stop will be much longer.
Slow down by shifting to a lower
gear, and pull to the side of the road
when it is safe. Because of the longer distance needed to stop, it is
hazardous to drive the car. Youshould have it towed, and repaired as
soon as possible. (See Emergency Towing on page 241.)
If you must drive the car a short distance in this condition, drive
slowly and cautiously.
Taking Care of the Unexpected
BRAKE SYSTEM INDICATOR*
* U.S. indicator shownMain Menu Table of Contents s t
Page 260 of 269

Index
Accessories and Modifications.... 130 Accessories................................. 130Additional Safety Precaution.... 131 Modifications............................. 131
ACCESSORY (Ignition Key Position)........................................ 70
Accessory Power Socket................ 85
Adding Automatic Transmission
Fluid........................................ 180
Brake Fluid................................. 183 Clutch Fluid................................ 183
Engine Coolant........................... 175
Engine Oil................................... 171
Manual Transmission Fluid..... 182
Power Steering Fluid................. 184
Windshield Washer Fluid......... 180
Additional Information About Your Seat Belts........................ 42
Lap Belt......................................... 43
Lap/Shoulder Belt....................... 42
Seat Belt Maintenance................ 44
Seat Belt System Components... 42 Additional Information About
Your SRS................................... 45
Additional Safety Precautions.... 48 How Your Airbags Work............ 45
How Your SRS Indicator
Works........................................ 47
SRS Components......................... 45
Additives, Engine Oil..................... 171
Adjustments
Head Restraints........................... 77
Mirrors.......................................... 81
Seats.............................................. 76
Steering Wheel............................ 65
Airbag (SRS)...................................... 9
Air Cleaner Element...................... 185 Air Conditioning............................... 88 Maintenance............................... 193
Usage............................................. 90
Air Outlets (Vents).......................... 90
Air Pressure, Tires........................ 196 High Speed Driving................... 250
Normal Driving.......................... 196
Alcohol in Gasoline........................ 252
Antifreeze....................................... 175
Anti-lock Brakes (ABS) Indicator Light.................... 55, 153
Operation.................................... 152
Anti-theft Steering Column
Lock............................................... 70
Appearance Care........................... 213
Ashtrays (Optional)......................... 85
Audio System................................... 96
Automatic Speed Control................ 66
Automatic Transmission............... 140
Capacity, Fluid........................... 247
Checking Fluid Level................ 180
Shifting........................................ 141
Shift Lever Position Indicator.. 140
Shift Lever Positions................. 141
Shift Lock Release..................... 144
Battery Charging SystemIndicator............................ 55, 232
Jump Starting............................. 227 Maintenance............................... 189
Specifications............................. 248
CONTINUEDMain Menu s t