Page 111 of 400

yellowblue
2-47 Automatic Headlamp System
When it is dark enough outside, your automatic
headlamp system will turn on your headlamps at the
normal brightness along with other lamps such as the
taillamps, sidemarker, parking lamps and the instrument
panel lights.
To idle your vehicle with the automatic headlamp
system off, set the parking brake while the ignition is
off. Then start the vehicle. The automatic headlamp
system will stay off until you release the parking brake.
The headlamp switch can always be used to turn on the
regular lamps. As with any vehicle, you should turn on
the regular headlamp system when you need it.
Headlamps-On Reminder
A chime will sound when your headlamps are turned on
and your ignition is in OFF, LOCK or ACCESSORY.
Daytime Running Lamps
Daytime Running Lamps (DRL) can make it easier for
others to see the front of your vehicle during the day.
DRL can be helpful in many different driving
conditions, but they can be especially helpful in the
short periods after dawn and before sunset.The DRL system will make your headlamps come on at
a reduced brightness when:
�the ignition is on,
�the headlamp switch is off,
�the parking brake is released and
�it is bright enough outside and the automatic
headlamps are off.
When the DRL are on, only your headlamps will be on.
The taillamps, sidemarker and other lamps won't be on.
Your instrument panel won't be lit up either.
When it begins to get dark, your DRL will turn off. Your
headlamps will come on automatically.
When it begins to get bright, the regular lamps will go
off, and your headlamps will change to the reduced
brightness of DRL.
To idle your vehicle with the DRL off, set the parking
brake. The DRL will stay off until you release the
parking brake.
As with any vehicle, you should turn on the regular
headlamp system when you need it.
Page 112 of 400

yellowblue
2-48 Fog Lamps
Your vehicle has fog lamps. Use them for better vision
in foggy or misty conditions. Your parking lamps and/or
low
-beam headlamps must be on for your fog lamps
to work.
The fog lamp switch is
located to the right of the
instrument panel cluster.
Press the ribbed top part of the switch to turn the fog
lamps on. Press the bottom of the switch to turn them
off. An indicator light will illuminate in the switch when
the fog lamps are on.
Remember, fog lamps alone will not give off as much
light as your headlamps. Never use your fog lamps in
the dark without turning on your headlamps.Fog lamps will go off whenever your high
-beam
headlamps come on. When the high
-beams are off, the
fog lamps will come on again.
Headlamp Delay
Your vehicle is equipped with a headlamp delay feature
that holds the headlamps on for a short period of time
after the ignition is turned off.
The HEADLAMP DELAY button is located on the
lower left side of the inside rearview mirror.
Page 113 of 400

yellowblue
2-49
The length of time that the headlamps stay on after the
ignition is turned off can be adjusted by pressing and
holding the HEADLAMP DELAY button. The
delay can be varied in five steps (0, 15, 30, 60 and
90 seconds). When the HEADLAMP DELAY button is
held in, the Light Emitting Diode (LED) on the mirror
will show five step changes in brightness. When the
LED is at its brightest the headlamp delay will be
90 seconds, and when it is most dim the delay will be
zero seconds.
Interior Lamps
Instrument Panel Intensity Control
The instrument panel intensity control is located next to
the parking/headlamp switch. Turn the thumbwheel up
to adjust the instrument panel lights. Turn the
thumbwheel up to the first notch to return the radio
display and gear shift indicator LED display to full
intensity when the headlamps or parking lamps are on.
To turn on the dome lamps (with the vehicle doors
closed) turn the thumbwheel up to the second
notch position.
Exit Lighting and Delayed Illumination
With this feature, your interior lamps will come on and
stay on for up to 25 seconds when entering the vehicle
and up to 5 seconds when leaving your vehicle.
When the doors are opened, the dome lamps will only
come on if the dome lamp button is in the out position.
When all doors are closed or the dome lamp button is
pressed in, the lamps will stay on for a short period of
time and will then fade out.
Dome Lamps
The dome lamps will come on when you open the doors.
You can also turn the dome lamps on by turning the
thumbwheel, located next to the parking/headlamps
switch knob, all the way up to the second notch. In this
position, the dome lamps will remain on whether the
doors are opened or closed.
Page 115 of 400
yellowblue
2-51
Mirrors
Electrochromic Inside Rearview Mirror
with Compass, Temperature Display and
Headlamp Delay
Your vehicle has electrochromic inside and outside
rearview mirrors. Your vehicle also has a headlamp
delay feature. See ªHeadlamp Delayº in the Index for
more information.
When on, an electrochromic mirror automatically dims
to the proper level to minimize glare from lights behind
you after dark.
The mirror also includes an eight-point compass display
in the upper right corner of the mirror face. When on,
the compass automatically calibrates as the vehicle
is driven.
The mirror also includes a display in the upper right
corner of the mirror. This can be used as a compass or to
indicate outside air temperature.
Page 116 of 400

yellowblue
2-52
Temperature Display
The temperature can be displayed by pressing the TEMP
switch. Pressing the TEMP switch once briefly will
toggle the temperature reading on and off. To alternate
the temperature reading between Fahrenheit and Celsius,
press and hold the TEMP switch for three seconds until
the display shows only F� or C�. Press and release the
TEMP switch to toggle between the Fahrenheit and
Celsius readings. After five seconds of inactivity, the
display will return to normal in the temperature scale
you have selected.The normal display will show a temperature reading in
degrees Fahrenheit or Celsius. If an abnormal reading is
displayed, please consult your dealer.
Electrochromic Mirror Operation
The TEMP side of the switch, located at the bottom of
the mirror, also turns the electrochromic inside and
outside mirrors on and off. An indicator light, located to
the right of the TEMP switch, will come on when the
electrochromic mirrors are turned on. To turn the
mirrors on, press and hold the TEMP switch for eight
seconds. The mirrors will darken and remain dark until
the button is released. To turn the mirrors off, press and
hold the TEMP switch for eight seconds.
Compass Operation
Press the COMP switch once briefly to turn the compass
on or off.
When the ignition and the compass feature are on, the
compass will show two character boxes for
approximately two seconds. After two seconds, the
mirror will display the compass heading.
Page 121 of 400
yellowblue
2-57
Your console also has a
cupholder that swings down
for the rear seat passengers
to use.
The console also contains the following components:
�Rear Seat Audio System Controls
�Rear Heated Seat Switches
�Rear Seat Accessory Power Outlet
�Six
-Disc CD Changer
�Subwoofer
�Audio Amplifier�Shock Sensor Adjuster
�LED (Light Emitting Diode) Theft
-Deterrent
System Indicator
�Cellular Telephone (If Equipped)
For more information on these components, please see
the Index for that item.
Armrest Storage Compartment
Your vehicle has a center armrest storage compartment
in the rear seat.
Other Storage Compartments
Your vehicle includes a number of storage
compartments for storage of often
-used items.
Your vehicle has a storage pocket on each of the front
doors. You can use the pocket to store a variety of
small items.
Page 123 of 400

yellowblue
2-59
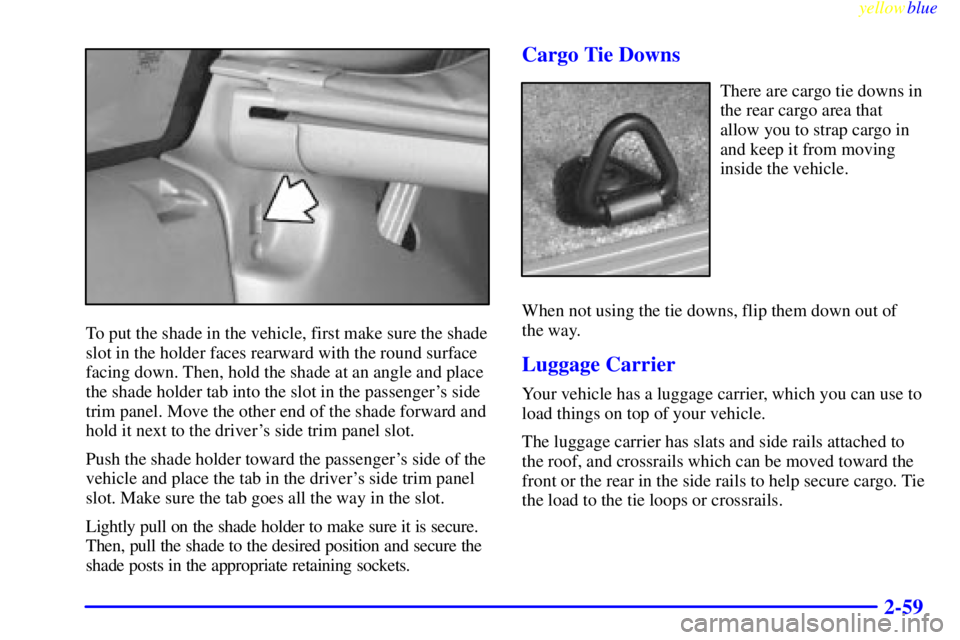
To put the shade in the vehicle, first make sure the shade
slot in the holder faces rearward with the round surface
facing down. Then, hold the shade at an angle and place
the shade holder tab into the slot in the passenger's side
trim panel. Move the other end of the shade forward and
hold it next to the driver's side trim panel slot.
Push the shade holder toward the passenger's side of the
vehicle and place the tab in the driver's side trim panel
slot. Make sure the tab goes all the way in the slot.
Lightly pull on the shade holder to make sure it is secure.
Then, pull the shade to the desired position and secure the
shade posts in the appropriate retaining sockets.
Cargo Tie Downs
There are cargo tie downs in
the rear cargo area that
allow you to strap cargo in
and keep it from moving
inside the vehicle.
When not using the tie downs, flip them down out of
the way.
Luggage Carrier
Your vehicle has a luggage carrier, which you can use to
load things on top of your vehicle.
The luggage carrier has slats and side rails attached to
the roof, and crossrails which can be moved toward the
front or the rear in the side rails to help secure cargo. Tie
the load to the tie loops or crossrails.
Page 125 of 400

yellowblue
2-61
Ashtrays and Cigarette Lighter
Front Ashtray
The front ashtray is located at the bottom of the
instrument panel. Pull on the notch in the ashtray door to
open it.
NOTICE:
If you store paper or other things that burn in
your ashtrays, they could be set on fire by
cigarettes or other smoking materials. That could
cause a fire and possibly damage your vehicle. Do
not store papers and other things that burn in
your ashtrays.
To remove the front ashtray, press the retainer spring
and pivot the ashtray toward you. To replace the ashtray,
place the bottom part of the ashtray on the pivot bar at
the bottom of its mounting on the instrument panel.
Then rotate the ashtray back to its original position.
Rear Door Ashtrays
To use a rear ashtray, flip the lid open.
To remove a rear ashtray, open the lid and pull the
ashtray assembly upward.
To use the cigarette lighter, push it in all the way, and let
go. When it's done heating, it will pop back by itself.
NOTICE:
Holding a cigarette lighter in with your hand
while it is heating can make it overload,
damaging the lighter and the heating element.
Just push the lighter all the way in and let go.
When it's done heating, it will pop back by itself.