Page 2 of 248
ICONS
Indicates a safety alert. Read the
following section onWarnings.
Indicates vehicle information related
to recycling and other
environmental concerns will follow.
Correct vehicle usage and the
authorized disposal of waste
cleaning and lubrication materials are significant steps towards
protecting the environment.
Indicates a message regarding child
safety restraints. Refer toSeating
and safety restraintsfor more
information.
Indicates that this Owner Guide
contains information on this subject.
Please refer to the Index to locate
the appropriate section which will
provide you more information.
Introduction
2
Page 90 of 248

6. Repeat steps 3±5 for opposite door.
If the door does not rest in the fully open position, repeat Steps 1±4
again. If the door still does not operate correctly:
7. Turn the ignition switch to OFF.
8. Remove the PSD fuse (fuse #6) from the passenger fuse panel and
leave it out for thirty (30) seconds. Refer toFuses and relaysin the
Roadside emergencieschapter.
9. Reinstall the fuse and wait ten (10) seconds.
10. Repeat steps 1±6 above.
If the door still does not operate correctly, see you dealer for service.
Sliding Door Child Safety Lock
Your vehicle is equipped with a sliding door child safety lock that helps
prevent passengers from operating the sliding door by using the inside
door handle. This lock is on both doors if equipped. The child safety lock
lever is located in the inside of the sliding door, on the front edge of the
door. Lift the control up to engage the child lock.
If you have the optional power sliding door, disable the power sliding
door by pushing the ON/OFF control in the overhead console to the OFF
position. The power sliding door cannot be opened from the rear seat
when both this feature and the child lock are engaged.
If you want to open the sliding door when the child safety lock is on:
²Unlock the sliding door and open the door from the outside.
²If you have the optional power sliding door, press the right or left
hand control on the overhead console to open the door.
CENTER CONSOLE (IF EQUIPPED)
Your vehicle may be equipped with a variety of console features. These
include:
²utility compartment
²compact disc changer (if equipped)
Controls and features
90
Page 110 of 248
Integrated child seat head restraints
The Integrated Child Seat (ICS)
head restraints can only be adjusted
to two positions, full up or full
down.
The ICS must be properly stowed
and latched in order to adjust the
head restraint.
Seat mounted cup holders (if equipped)
Your vehicle may be equipped with cupholders mounted on the outboard
sides of the second row seat(s). The cupholder is designed to detach
from the seat when subjected to a heavy load. The cupholder can be
reinstalled by lining up the arms with the side shield holes and pushing
toward the seat.
Adjusting rear seats
Lift control to move seat forward or backward.
²2nd row bucket seat
Seating and safety restraints
110
Page 112 of 248

Accessing the 3rd row seat
If your vehicle has an adjustable 2nd row bench seat, it can be adjusted
to allow easier access to the 3rd row seat by sliding the seat forward,
folding the seatback to the forward flat position, or using the recline
control to adjust seatback forward. The ICS (integrated child seat) bench
seat does not have any adjustments.
If your vehicle has 2nd row bucket seats, it has an easy entry seat
feature which allows ready access to the 3rd row seat.
To access the 3rd row seat with
2nd row buckets:
1. Pull the seatback recline control
up and allow seatback to flip
forward.
2. Push seatback toward front of
vehicle. This releases the seat track
automatically and the seat will move
forward.
3. After entering the 3rd row seat,
pull back the seatback until it latches. This will latch and lock the
seatback and the seat track. The seatback and seat will not return to
their original position.
Do not attempt to use this feature when the seatback is folded in the
forward flat position. The seatback must be in an upright position, as
shown, for the system to work properly.
Check to see that the seat and seatback is latched securely in
position. Keep floor area free of objects that would prevent
proper seat engagement. Never attempt to adjust the seat while the
vehicle is in motion.
Seating and safety restraints
112
Page 118 of 248

SAFETY RESTRAINTS
Safety restraints precautions
Always drive and ride with your seatback upright and the lap
belt snug and low across the hips.
To prevent the risk of injury, make sure children sit where they
can be properly restrained.
Never let a passenger hold a child on his or her lap while the
vehicle is moving. The passenger cannot protect the child from
injury in a collision.
All occupants of the vehicle, including the driver, should always
properly wear their safety belts, even when an air bag SRS is
provided.
It is extremely dangerous to ride in a cargo area, inside or
outside of a vehicle. In a collision, people riding in these areas
are more likely to be seriously injured or killed. Do not allow people to
ride in any area of your vehicle that is not equipped with seats and
safety belts. Be sure everyone in your vehicle is in a seat and using a
safety belt properly.
Each seating position in your vehicle has a specific safety belt
assembly which is made up of one buckle and one tongue that
are designed to be used as a pair. 1) Use the shoulder belt on the
outside shoulder only. Never wear the shoulder belt under the arm.
2) Never swing the safety belt around your neck over the inside
shoulder. 3) Never use a single belt for more than one person.
Seating and safety restraints
118
Page 123 of 248

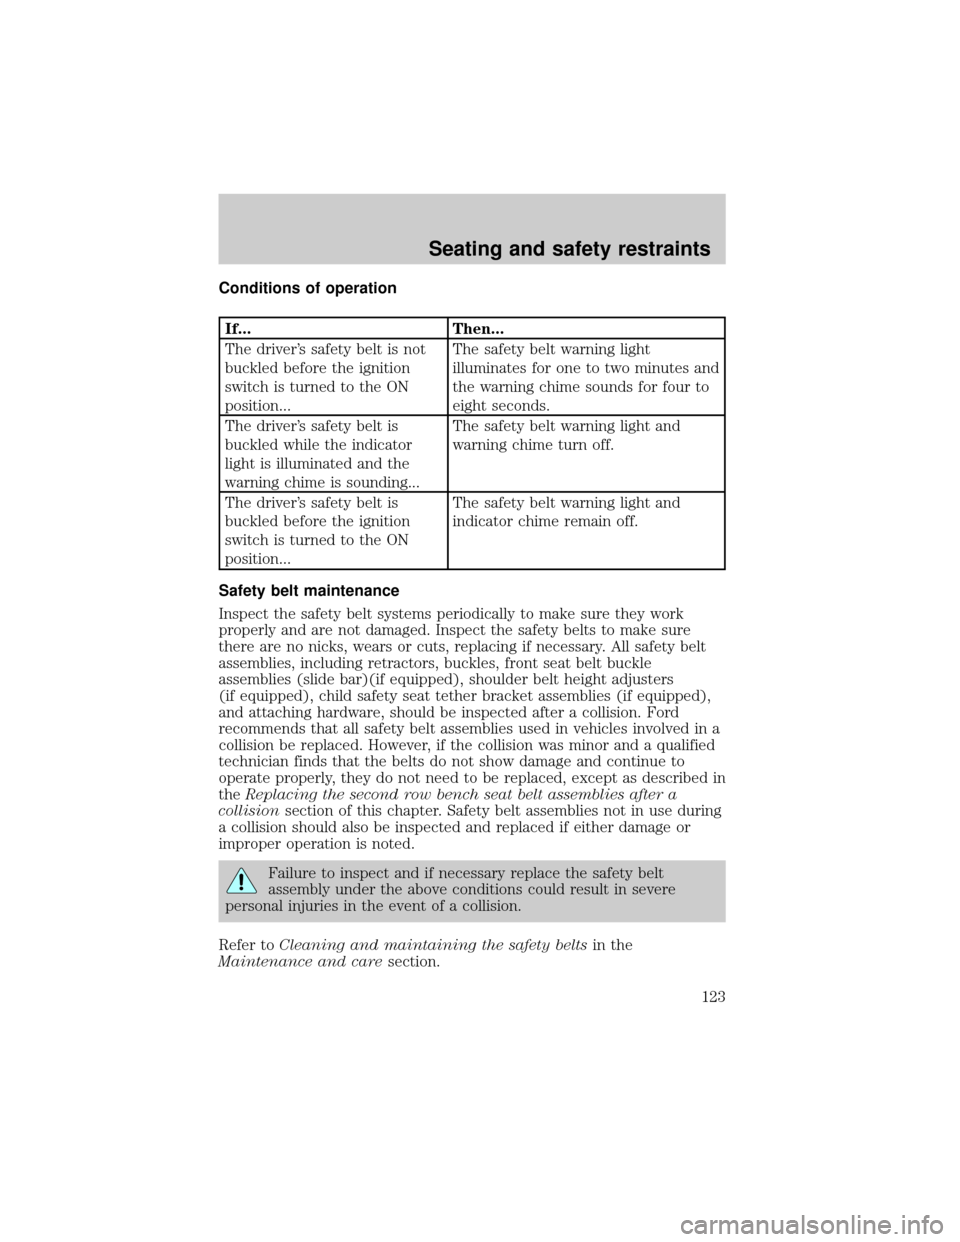
Conditions of operation
If... Then...
The driver's safety belt is not
buckled before the ignition
switch is turned to the ON
position...The safety belt warning light
illuminates for one to two minutes and
the warning chime sounds for four to
eight seconds.
The driver's safety belt is
buckled while the indicator
light is illuminated and the
warning chime is sounding...The safety belt warning light and
warning chime turn off.
The driver's safety belt is
buckled before the ignition
switch is turned to the ON
position...The safety belt warning light and
indicator chime remain off.
Safety belt maintenance
Inspect the safety belt systems periodically to make sure they work
properly and are not damaged. Inspect the safety belts to make sure
there are no nicks, wears or cuts, replacing if necessary. All safety belt
assemblies, including retractors, buckles, front seat belt buckle
assemblies (slide bar)(if equipped), shoulder belt height adjusters
(if equipped), child safety seat tether bracket assemblies (if equipped),
and attaching hardware, should be inspected after a collision. Ford
recommends that all safety belt assemblies used in vehicles involved in a
collision be replaced. However, if the collision was minor and a qualified
technician finds that the belts do not show damage and continue to
operate properly, they do not need to be replaced, except as described in
theReplacing the second row bench seat belt assemblies after a
collisionsection of this chapter. Safety belt assemblies not in use during
a collision should also be inspected and replaced if either damage or
improper operation is noted.
Failure to inspect and if necessary replace the safety belt
assembly under the above conditions could result in severe
personal injuries in the event of a collision.
Refer toCleaning and maintaining the safety beltsin the
Maintenance and caresection.
Seating and safety restraints
123
Page 125 of 248

Important supplemental restraint system (SRS) precautions
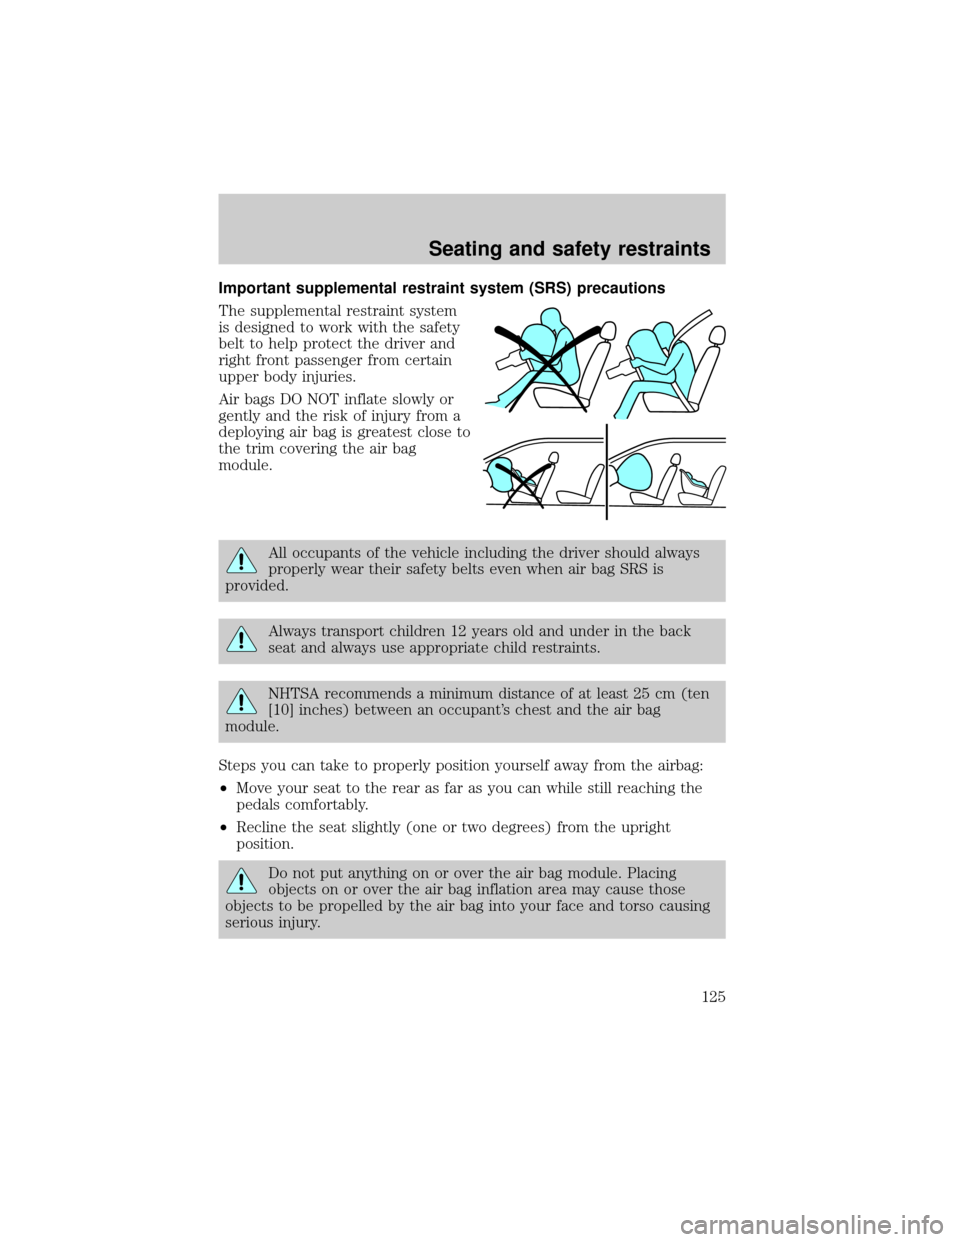
The supplemental restraint system
is designed to work with the safety
belt to help protect the driver and
right front passenger from certain
upper body injuries.
Air bags DO NOT inflate slowly or
gently and the risk of injury from a
deploying air bag is greatest close to
the trim covering the air bag
module.
All occupants of the vehicle including the driver should always
properly wear their safety belts even when air bag SRS is
provided.
Always transport children 12 years old and under in the back
seat and always use appropriate child restraints.
NHTSA recommends a minimum distance of at least 25 cm (ten
[10] inches) between an occupant's chest and the air bag
module.
Steps you can take to properly position yourself away from the airbag:
²Move your seat to the rear as far as you can while still reaching the
pedals comfortably.
²Recline the seat slightly (one or two degrees) from the upright
position.
Do not put anything on or over the air bag module. Placing
objects on or over the air bag inflation area may cause those
objects to be propelled by the air bag into your face and torso causing
serious injury.
Seating and safety restraints
125
Page 126 of 248

Do not attempt to service, repair, or modify the Air Bag
Supplemental Restraint System or its fuses. See your Ford or
Lincoln-Mercury dealer.
Children and air bags
For additional important safety
information, read all information on
safety restraints in this guide.
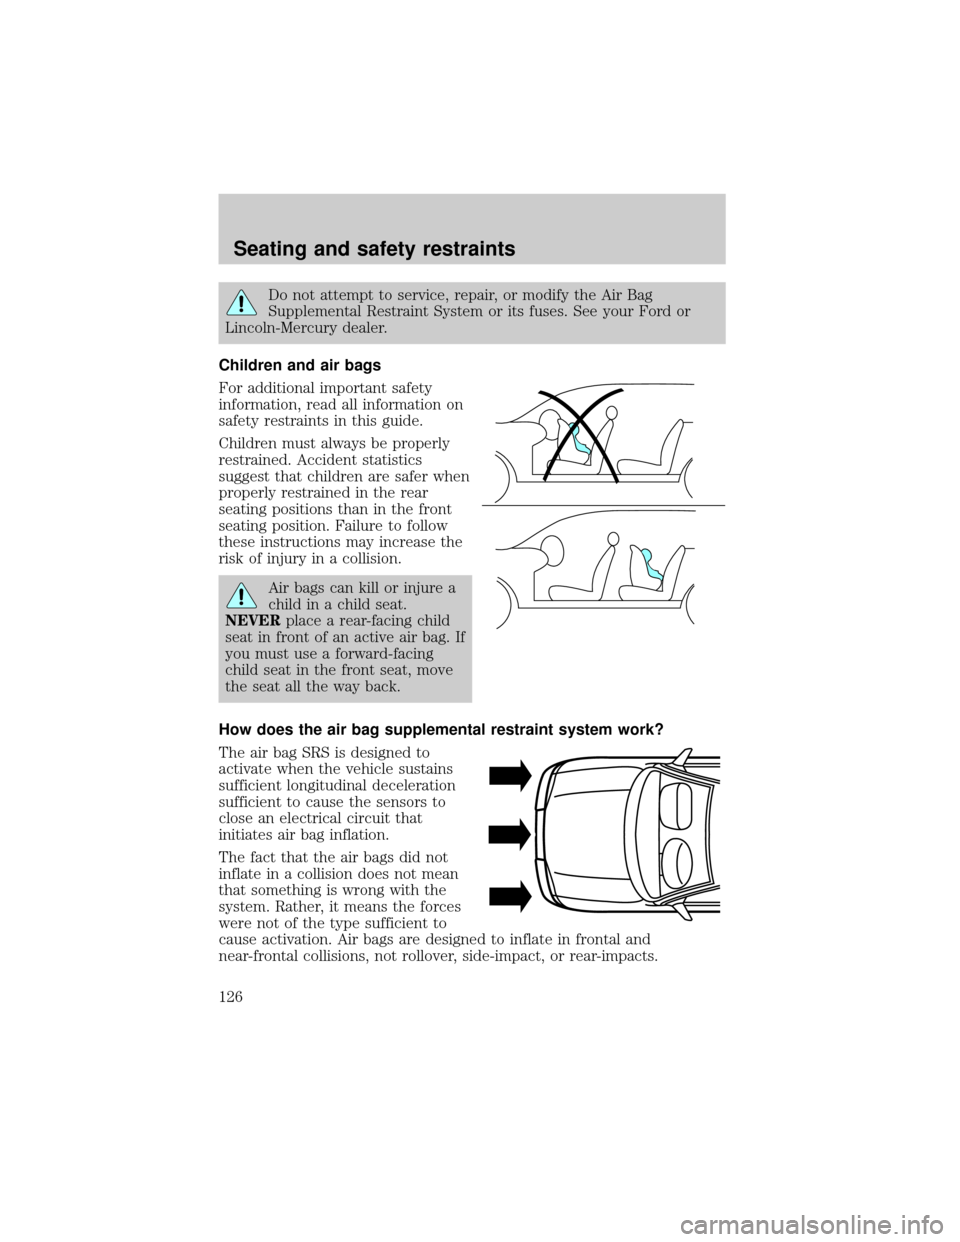
Children must always be properly
restrained. Accident statistics
suggest that children are safer when
properly restrained in the rear
seating positions than in the front
seating position. Failure to follow
these instructions may increase the
risk of injury in a collision.
Air bags can kill or injure a
child in a child seat.
NEVERplace a rear-facing child
seat in front of an active air bag. If
you must use a forward-facing
child seat in the front seat, move
the seat all the way back.
How does the air bag supplemental restraint system work?
The air bag SRS is designed to
activate when the vehicle sustains
sufficient longitudinal deceleration
sufficient to cause the sensors to
close an electrical circuit that
initiates air bag inflation.
The fact that the air bags did not
inflate in a collision does not mean
that something is wrong with the
system. Rather, it means the forces
were not of the type sufficient to
cause activation. Air bags are designed to inflate in frontal and
near-frontal collisions, not rollover, side-impact, or rear-impacts.
Seating and safety restraints
126