1999 FORD WINDSTAR instrument panel
[x] Cancel search: instrument panelPage 37 of 248

REAR WINDOW DEFROSTER (IF EQUIPPED)
The rear defroster control is located
on the instrument panel.
Press the defroster control to clear
the rear window of thin ice and fog.
²The small LED will illuminate
when the defroster is activated.
The engine must be running to operate the rear window defroster.
The defroster turns off automatically after 10 minutes or when the
ignition is turned to the OFF position. To manually turn off the defroster
before ten minutes have passed, push the control again.
USING YOUR AUDIO SYSTEM
AM/FM Stereo
Your vehicle is equipped with a delayed accessory feature. This feature
enables the audio playing media to continue playing up to 10 minutes
after the ignition has been turned off, or until a door is opened.
1234AM/FM
SEEKTONE
CLK
TUNE
TONE VOL
12 FMSTDX
VOL
PUSH
ON
AM / FM STEREO
Controls and features
37
Page 85 of 248

INTERIOR LAMPS
Dome lamps (if equipped)
The front dome lamp is located overhead between the driver and
passenger seats.
The dome lamp will stay on if the
control is moved to the passenger
side position. When the control is in
the middle position, the lamp will
only come on when a door is
opened. If the control is moved to
the driver's side position, the lamp
will not come on at all.
The dome lamp will illuminate whenever a front door is opened. If either
front door has been opened from the outside, the lamp will remain on for
15 seconds after the door is shut. If any other door has been opened
from the inside, the lamp will shut off immediately after the door is
closed.
Rear courtesy/reading lamps (if equipped)
The courtesy lamp lights can be
turned on with rocker switch at any
time.
Rear dome lamp
The dome lamp lights when:
²any door is opened.
²the instrument panel dimmer
switch is held up until the
courtesy lamps come on.
²any of the remote entry controls
are pressed and the ignition is
OFF.
Controls and features
85
Page 96 of 248

This device complies with part 15 of the FCC rules and with RS-210 of
Industry Canada. Operation is subject to the following two conditions:
(1) This device may not cause harmful interference, and (2) This device
must accept any interference received, including interference that may
cause undesired operation.
Changes or modifications not expressly approved by the party
responsible for compliance could void the user's authority to
operate the equipment.
Illuminated entry
The interior lights will illuminate when the remote entry Unlock or Panic
control is pressed with the doors closed or when unlocking or opening a
power sliding door (if equipped).
The system automatically turns off after 25 seconds or when the ignition
is turned to the RUN position. The panel dimmer control mustnotbe
set to the OFF position for the illuminated entry to operate.
The inside lights will not turn off if:
²they have been turned on with the instrument panel dimmer control
or
²any door is open.
The battery saver will shut off the interior lamps 30 minutes after the
last door is closed even if the panel dimmer control is left on.
Illuminated exit
The interior lights will illuminate when the key is removed from the
ignition. When the headlamp control is on the ªsleeping baby modeº, only
the lower interior lights will illuminate.
The system automatically turns off after 25 seconds or when the driver's
door is opened. The panel dimmer control mustnotbe set to the OFF
position for the illuminated entry to operate.
Controls and features
96
Page 101 of 248

The SecuriLockypassive anti-theft system is not compatible with
aftermarket remote start systems. Use of these systems may result in
vehicle starting problems and a loss of security protection. Large metallic
objects or devices such as the Mobil Speedpassyon the same key ring
as your SecuriLockykey may cause vehicle starting problems. These
objects and devices cannot damage the SecuriLockykey, but can cause
a momentary problem if they are too close to the key when starting the
engine. If a problem occurs. turn ignition off and restart the engine with
all other objects on the key ring held away from the SecuriLocky
ignition key.
Spare SecuriLockykeys can be purchased from your dealership and
programmed to your SecuriLockypassive anti-theft system. Refer to
Programming spare SecuriLockykeysfor more information.
If one or both of your SecuriLockykeys are lost or stolen and you want
to ensure the lost or stolen key will not operate your vehicle, bring your
vehicle and all available SecuriLockykeys to your dealership for
reinitialization.
Theft indicator
The theft indicator on top of the instrument panel will operate as
follows:
²When the ignition is OFF, the theft indicator will flash briefly every
2 seconds to indicate the SecuriLockysystem is protecting your
vehicle.
²When the ignition is turned to ON or START, the theft indicator will
light for 3 seconds and then go out. If the theft indicator stays on for
an extended period of time or flashes rapidly, have the system
serviced by your dealership or a qualified technician.
Programming spare SecuriLockYkeys
Spare SecuriLockykeys can be purchased from your dealership and
programmed to your SecuriLockyanti-theft system (up to a total of
8 keys). Your dealership can program your new SecuriLockykey(s) to
your vehicle or you can do it yourself using the following simple
procedure. To program a new SecuriLockykey yourself, you will need
two previously programmed SecuriLockykeys (keys that already
operate your vehicle's engine). If two previously programmed
SecuriLockykeys are not available (one or both of your original keys
were lost or stolen), you must bring your vehicle to your dealership to
have the spare SecuriLockykey(s) programmed.
Controls and features
101
Page 102 of 248

Procedure to program spare SecuriLockYkeys to your vehicle
New SecuriLockykeys must have the correct mechanical key cut for
your vehicle.
Conventional (non-SecuriLocky) keyscannotbe programmed to your
vehicle.
You will need to have two previously programmed SecuriLockykeys and
the new unprogrammed SecuriLockykey readily accessible for timely
implementation of each step in the procedure. Please read and
understand the entire procedure before you begin.
1. Insert the first previously programmed SecuriLockykey into the
ignition and turn the ignition from OFF to RUN (maintain ignition in
RUN for at least one second).
2. Turn ignition to OFF and remove the first SecuriLockykey from the
ignition.
3. Within five seconds of turning the ignition to OFF, insert the second
previously programmed SecuriLockykey into the ignition and turn the
ignition from OFF to RUN (maintain ignition in RUN for at least one
second but no more than 5 seconds).
4. Turn the ignition to OFF and remove the second SecuriLockykey
from the ignition.
5. Within 10 seconds of turning the ignition to OFF, insert the
unprogrammed SecuriLockykey (new key) into the ignition and turn
the ignition from OFF to RUN (maintain ignition in RUN for at least one
second). This step will program your new SecuriLockykey.
6. To program additional SecuriLockykey(s), repeat this procedure from
step 1.
If the programming procedure was successful, the new SecuriLocky
key(s) will start the vehicle's engine. The theft indicator (located on the
instrument panel) will light for three seconds and then go out.
If the programming procedure was not successful, the new SecuriLocky
key(s) will not operate the vehicle's engine. The theft indicator will flash
on and off. Wait at least one minute and then repeat the procedure from
step 1. If failure repeats, bring your vehicle to your dealership to have
the spare SecuriLockykey(s) programmed.
Controls and features
102
Page 137 of 248

Contact the manufacturer of your child safety seat for information about
ordering a tether strap.
Tether anchorage hardware
Children should be placed in the rear in an appropriate child
safety seat that is properly secured to the vehicle.
Rear-facing infant seats must always be secured in the rear seat.
In vehicles without a rear seat, a rear-facing infant seat should
be secured in the front seat only if your vehicle does not have a
passenger side air bag or your vehicle is equipped with a passenger air
bag deactivate switch and the switch is turned to ªOFF.º
When using forward-facing child safety seats in vehicles with
only two seating positions so the forward-facing child safety seat
cannot be placed in the rear of the vehicle, move the passenger seat as
far back from the instrument panel as possible.
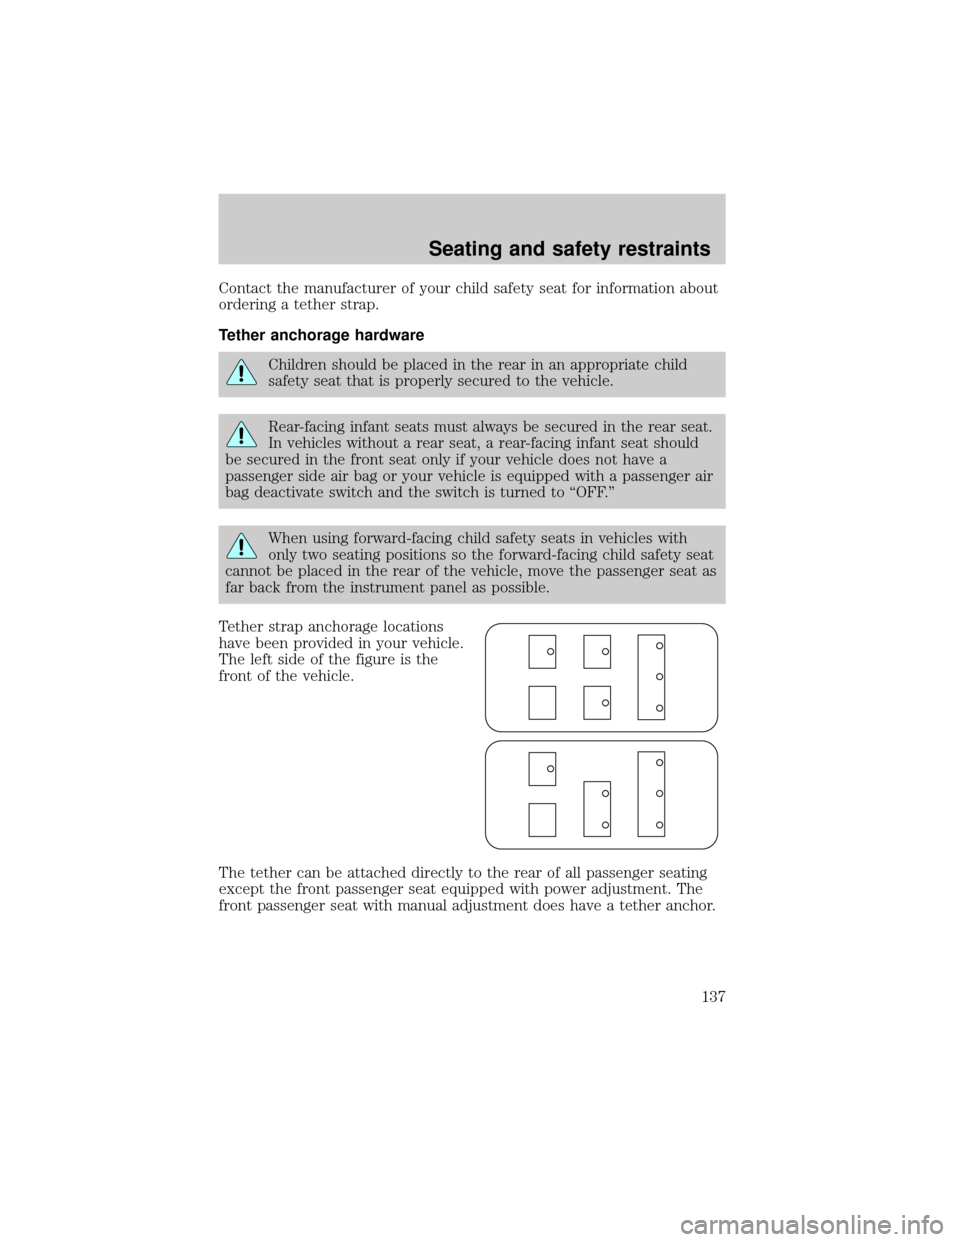
Tether strap anchorage locations
have been provided in your vehicle.
The left side of the figure is the
front of the vehicle.
The tether can be attached directly to the rear of all passenger seating
except the front passenger seat equipped with power adjustment. The
front passenger seat with manual adjustment does have a tether anchor.
Seating and safety restraints
137
Page 162 of 248

TRAILER TOWING
Trailer towing with your vehicle requires the optional trailer tow
electrical package and may require the use of an additional medium duty
trailer tow option package.
Trailer towing puts additional loads on your vehicle's engine,
transmission, axle, brakes, tires, and suspension. For your safety and to
maximize vehicle performance, be sure to use the proper equipment
while towing.
Follow these guidelines to ensure safe towing procedure:
²Stay within your vehicle's load limits. If exceeded, cargo should be
removed from the trailer and/or the vehicle until all weights are within
specified limits.
²Thoroughly prepare your vehicle for towing. Refer toPreparing to
towin this chapter.
²Use extra caution when driving while trailer towing. Refer toDriving
while you towin this chapter.
²Service your vehicle more frequently if you tow a trailer. Refer to
Special Operating Conditions in the Scheduled Maintenance Guide.
²Do not tow a trailer until your vehicle has been driven at least 800 km
(500 miles).
²Refer to the instructions included with towing accessories for the
proper installation and adjustment specifications.
If your vehicle is equipped with the optional heavy duty trailer tow
wiring, it is pre-wired for trailer towing. An electrical connector is
provided under the instrument panel for installing a customer-supplied
electric brake controller. Another electrical connector is provided at the
hitch. This connector provides power to the trailer for taillamps, stop
and turn lamps, back up lamps, battery charge, electric brakes (when a
customer provided controller is installed) and ground. The kit included
with your vehicle provides you with adaptors to attach the brake
controller and convert the hitch connector for Class I trailer usage.
Driving
162
Page 169 of 248

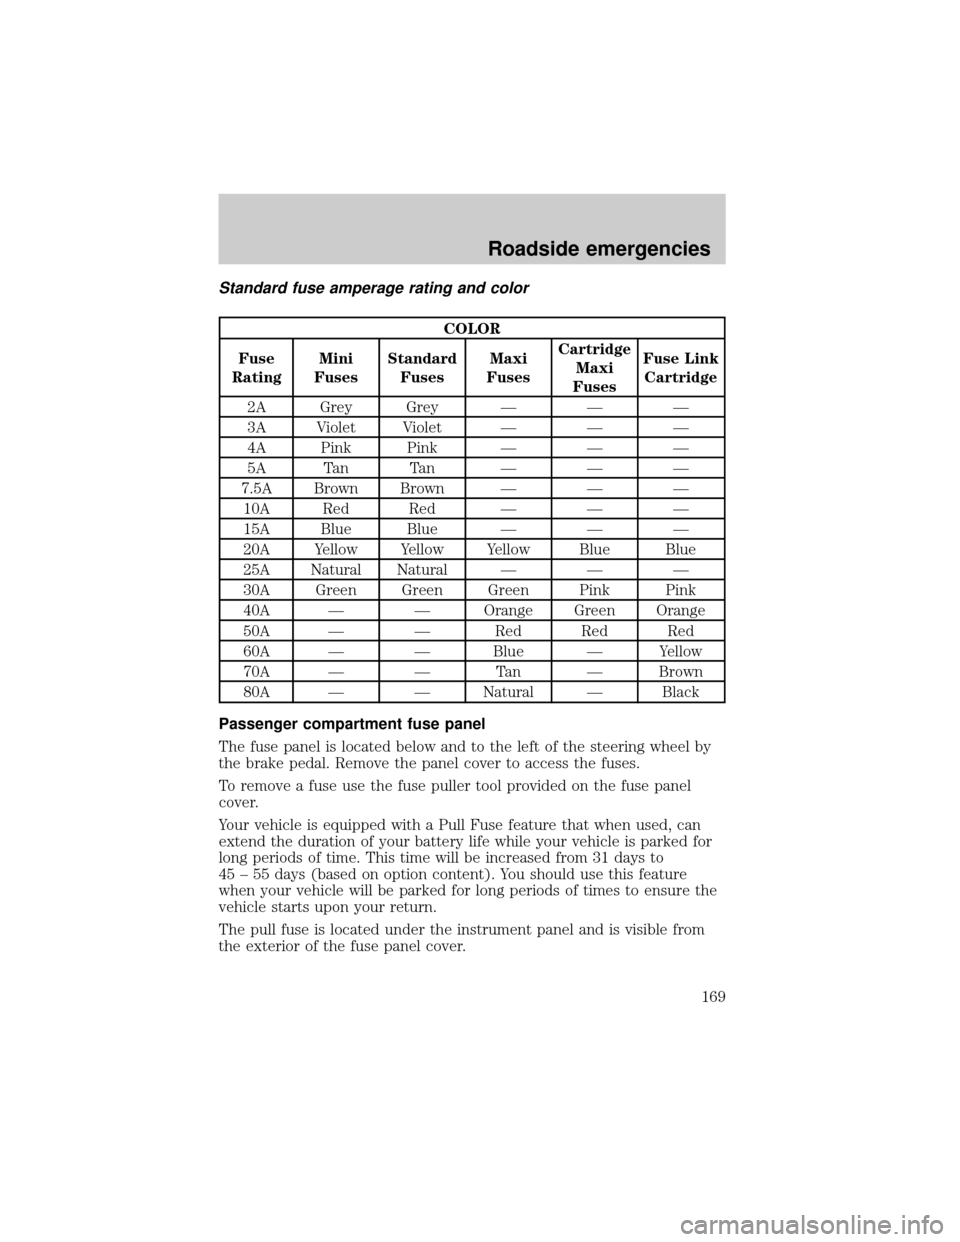
Standard fuse amperage rating and color
COLOR
Fuse
RatingMini
FusesStandard
FusesMaxi
FusesCartridge
Maxi
FusesFuse Link
Cartridge
2A Grey Grey Ð Ð Ð
3A Violet Violet Ð Ð Ð
4A Pink Pink Ð Ð Ð
5A Tan Tan Ð Ð Ð
7.5A Brown Brown Ð Ð Ð
10A Red Red Ð Ð Ð
15A Blue Blue Ð Ð Ð
20A Yellow Yellow Yellow Blue Blue
25A Natural Natural Ð Ð Ð
30A Green Green Green Pink Pink
40A Ð Ð Orange Green Orange
50A Ð Ð Red Red Red
60A Ð Ð Blue Ð Yellow
70A Ð Ð Tan Ð Brown
80A Ð Ð Natural Ð Black
Passenger compartment fuse panel
The fuse panel is located below and to the left of the steering wheel by
the brake pedal. Remove the panel cover to access the fuses.
To remove a fuse use the fuse puller tool provided on the fuse panel
cover.
Your vehicle is equipped with a Pull Fuse feature that when used, can
extend the duration of your battery life while your vehicle is parked for
long periods of time. This time will be increased from 31 days to
45 ± 55 days (based on option content). You should use this feature
when your vehicle will be parked for long periods of times to ensure the
vehicle starts upon your return.
The pull fuse is located under the instrument panel and is visible from
the exterior of the fuse panel cover.
Roadside emergencies
169