Page 179 of 224

To install the new bulb:
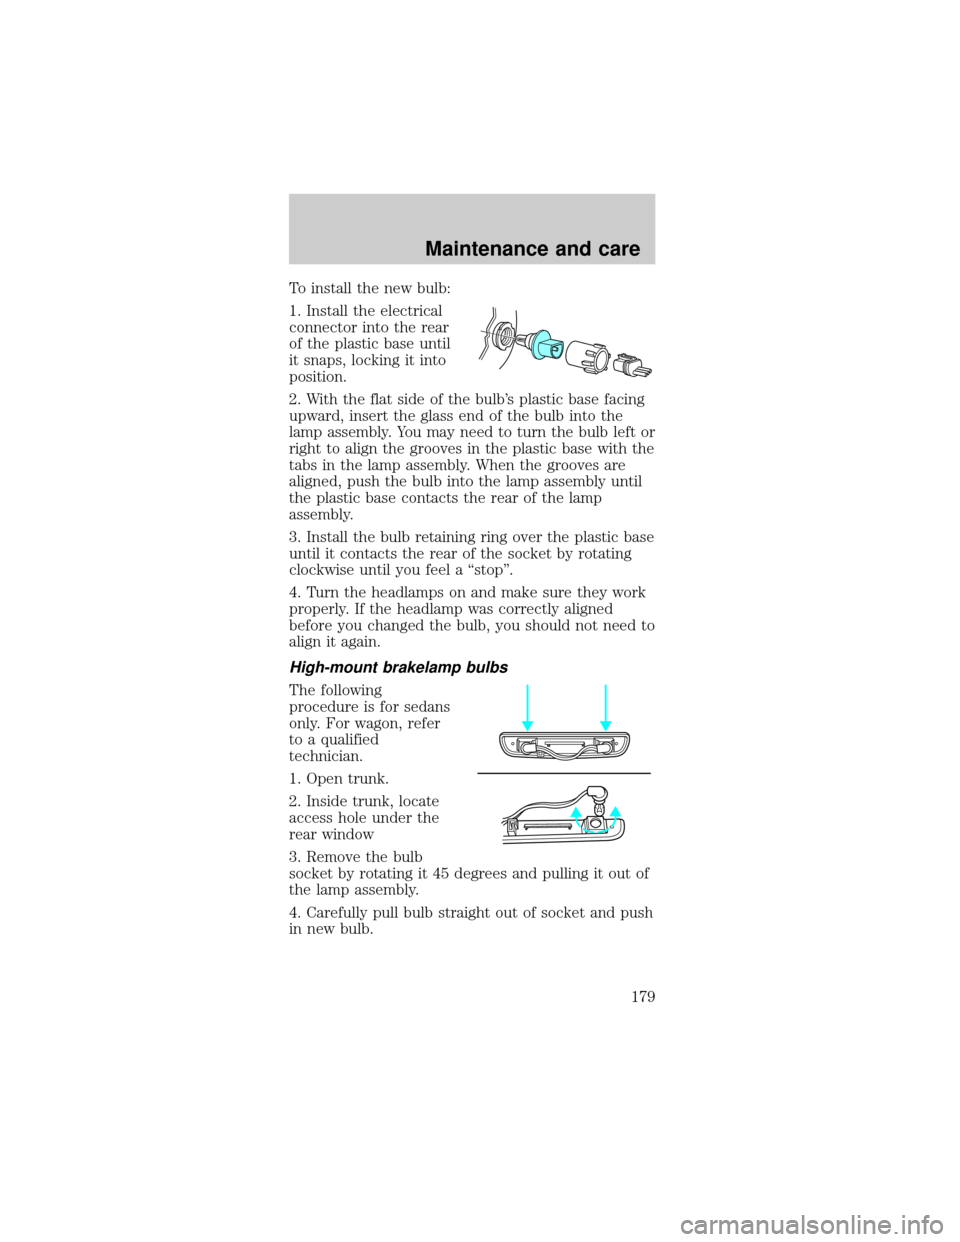
1. Install the electrical
connector into the rear
of the plastic base until
it snaps, locking it into
position.
2. With the flat side of the bulb's plastic base facing
upward, insert the glass end of the bulb into the
lamp assembly. You may need to turn the bulb left or
right to align the grooves in the plastic base with the
tabs in the lamp assembly. When the grooves are
aligned, push the bulb into the lamp assembly until
the plastic base contacts the rear of the lamp
assembly.
3. Install the bulb retaining ring over the plastic base
until it contacts the rear of the socket by rotating
clockwise until you feel a ªstopº.
4. Turn the headlamps on and make sure they work
properly. If the headlamp was correctly aligned
before you changed the bulb, you should not need to
align it again.
High-mount brakelamp bulbs
The following
procedure is for sedans
only. For wagon, refer
to a qualified
technician.
1. Open trunk.
2. Inside trunk, locate
access hole under the
rear window
3. Remove the bulb
socket by rotating it 45 degrees and pulling it out of
the lamp assembly.
4. Carefully pull bulb straight out of socket and push
in new bulb.
Maintenance and care
179
Page 180 of 224
5. To complete installation, follow the removal
procedure in reverse order.
License plate lamp bulbs
To change the license plate bulbs:
Sedan
1. Remove two screws
and the license plate
lamp assembly from
the rear bumper.
2. Remove bulb socket
by turning
counterclockwise.
3. Carefully pull the
bulb out from the
socket and push in the
new bulb.
4. Install the lamp assembly on rear bumper with
two screws.
Wagon
1. Remove screw and
the license plate lamp
assembly from liftgate.
2. Remove bulb socket
by turning
counterclockwise.
3. Carefully pull the
bulb out from the
socket and push in the
new bulb.
4. Install the lamp
assembly on liftgate with screw.
Replacing front parking lamp/turn signal bulbs
For bulb replacement, see a dealer or qualified
technician.
Maintenance and care
180
Page 183 of 224

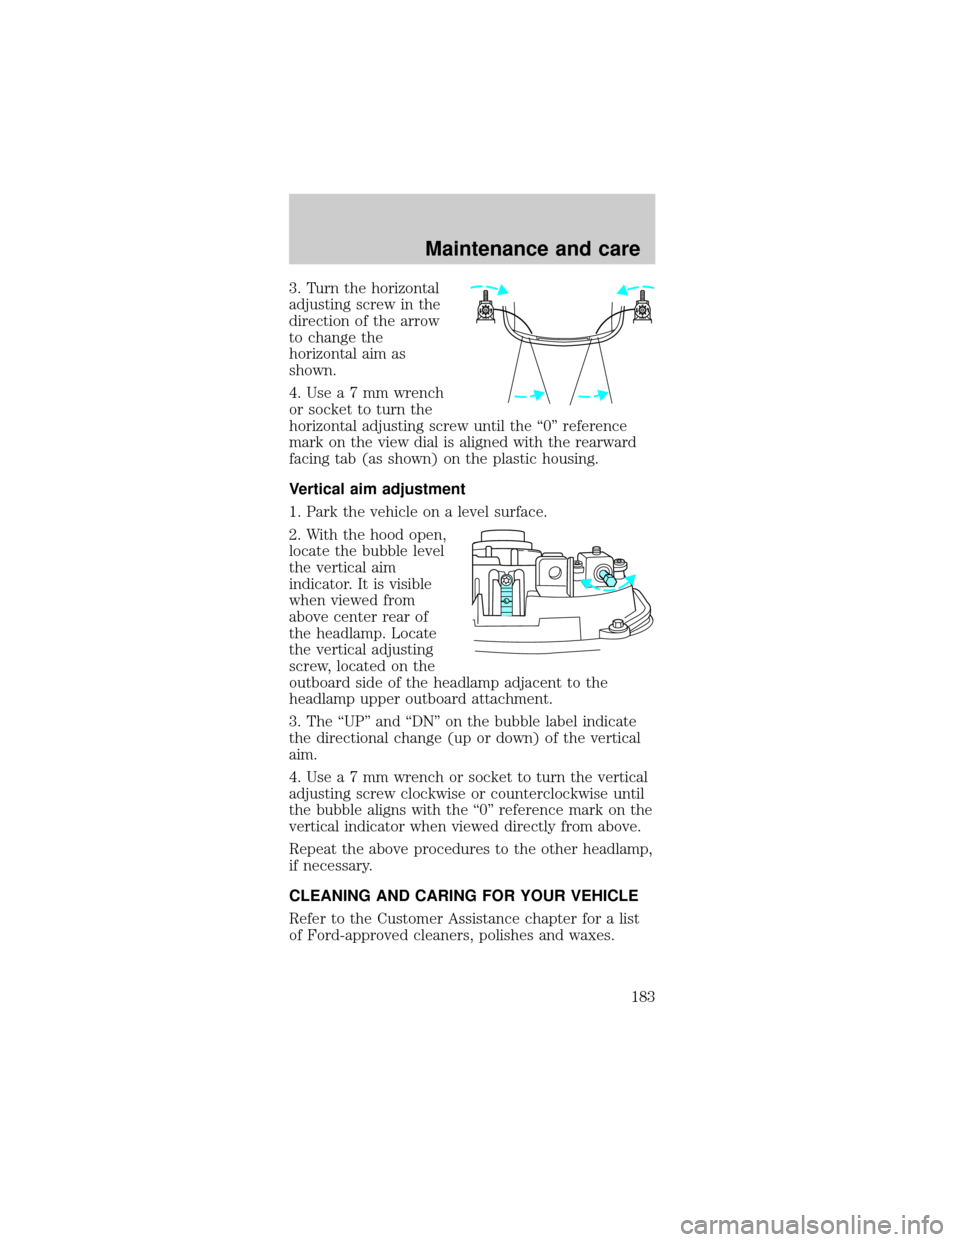
3. Turn the horizontal
adjusting screw in the
direction of the arrow
to change the
horizontal aim as
shown.
4.Usea7mmwrench
or socket to turn the
horizontal adjusting screw until the ª0º reference
mark on the view dial is aligned with the rearward
facing tab (as shown) on the plastic housing.
Vertical aim adjustment
1. Park the vehicle on a level surface.
2. With the hood open,
locate the bubble level
the vertical aim
indicator. It is visible
when viewed from
above center rear of
the headlamp. Locate
the vertical adjusting
screw, located on the
outboard side of the headlamp adjacent to the
headlamp upper outboard attachment.
3. The ªUPº and ªDNº on the bubble label indicate
the directional change (up or down) of the vertical
aim.
4.Usea7mmwrench or socket to turn the vertical
adjusting screw clockwise or counterclockwise until
the bubble aligns with the ª0º reference mark on the
vertical indicator when viewed directly from above.
Repeat the above procedures to the other headlamp,
if necessary.
CLEANING AND CARING FOR YOUR VEHICLE
Refer to the Customer Assistance chapter for a list
of Ford-approved cleaners, polishes and waxes.
Maintenance and care
183
Page 185 of 224

Repairing paint chips
Minor scratches or paint damage from road debris
may be repaired with the Ultra Touch Prep and
Finishing Kit (#F7AZ-19K507±BA), touch-up paint
(#ALBZ-19500±XXXXA), or aerosol paint spray
(#ALAZ-19500±XXXXA) from the Ford Car Care
Chemicals line. Please note that the part numbers
(shown as XXXX above) will vary with your vehicle's
specific coloring. Observe the application
instructions on the products.
Remove particles such as bird droppings, tree sap,
insect remains, tar spots, road salt and industrial
fallout immediately.
Cleaning the wheels
Wash with the same detergent as the body of your
vehicle. Do not use acid-based or alcohol-based
wheel cleaners, steel wool, fuel or strong detergents.
Never use abrasives that will damage the finish of
special wheel surfaces. Use a tar remover to remove
grease and tar.
The brushes used in some automatic car washes may
damage the finish on your wheels. Before going to a
car wash, find out if the brushes are abrasive.
Cleaning the engine
In order to identify your vehicle's engine, refer to
Identifying components in the engine
compartmentin the Maintenance and Care chapter.
Engines are more efficient when they are clean
because grease and dirt buildup keep the engine
warmer than normal. When washing:
²Take care when using a power washer to clean
the engine. The high pressure fluid could
penetrate the sealed parts and cause damage.
²Do not spray with cold water to avoid cracking
the engine block or other engine components.
Maintenance and care
185
Page 193 of 224
LUBRICANT SPECIFICATIONS
ItemsFord Part
Name or
equivalentFord Part
NumberFord
Specifi-
cation
Brake fluid High Per-
formance
DOT 3
Motor
Vehicle
Brake FluidC6AZ-
19542-ABESA-
M6C25-A
and DOT 3
Door latch,
hood latch,
auxiliary
hood latch,
seat tracks,
trunk and
liftgate
latchesMulti-
Purpose
GreaseDOAZ-
19584-AA
or F5AZ-
19G209-AAESA-
M1C93-B
or ESR-
M1C159-A
Lock
cylindersPenetrating
and Lock
LubricantE8AE-
19A501-Bnone
Automatic
transaxle
(AX4S and
AX4N)Motorcraft
MERCONtV
AT FXT-5-QM
MERCONtV
Engine oil Motorcraft
5W-30
Super
Premium
Motor OilXO-
5W30-QSPWSS-
M2C153-G
and API
Certification
Mark
Constant
velocity
jointsCV Joint
Grease
(High
Temp.)E43Z-
19590-AESP-
M1C207-A
Capacities and specifications
193
Page 199 of 224
Vehicle identification number
The vehicle
identification number
is attached to a metal
tag and is located on
the driver side
instrument panel.
Engine number
The engine number (the last eight numbers of the
vehicle identification number) is stamped on the
engine block, transmission, frame and transfer case
(if equipped).
XXXXXXXXXXXXXXXXXAIR BAG
Capacities and specifications
199
Page 200 of 224

GETTING ROADSIDE ASSISTANCE
To fully assist you should you have a vehicle
concern, Ford offers a complimentary roadside
assistance program. This program is separate from
the New Vehicle Limited Warranty. The service is
available:
²24±hours, seven days a week
²for the Basic warranty period (Canada) or New
Vehicle Limited Warranty period (U.S.) of three
years or 60,000 km (36,000 miles), whichever
comes first on Ford and Mercury vehicles, and
four years or 80,000 km (50,000 miles) on Lincoln
vehicles
In the United States, you may purchase additional
roadside assistance coverage beyond this period
through the Ford Auto Club by contacting your Ford
or Lincoln-Mercury dealer.
Roadside assistance will cover:
²changing a flat tire
²jump-starts
²lock-out assistance
²fuel delivery
²towing to the nearest Ford of Canada or Ford
Motor Company dealership, or towing to your
selling dealership if within 56 km (35 miles). Even
non-warranty related tows, like accidents or
getting stuck in the mud or snow, are covered
(some exclusions apply, such as impound towing
or repossession).
Using roadside assistance
Complete the roadside assistance identification card
and place it in your wallet for quick reference. In the
United States, this card is found in the Owner Guide
portfolio in the glove compartment in Ford vehicles
and is mailed to you if you own a Mercury or
Lincoln. In Canada, it's found in the Roadside
Assistance book in the glove compartment.
Customer assistance
200
Page 210 of 224

complement the style and aerodynamic appearance
of your vehicle. In addition, each accessory is made
from high quality materials and meets or exceeds
Ford's rigid engineering and safety specifications.
Ford accessories are warranted for up to 12 months
or 20,000 km (12,000 miles) on all cars and light
trucks and 12 months with unlimited distance on
medium/heavy duty trucks unless the accessory is
installed on a new vehicle, then the warranty
becomes the balance of the new vehicle's warranty
or the accessories warranty, whichever is greater.
See your dealer for complete warranty information
and availability.
Not all accessories are available for all models.
Vehicle Security
Remote keyless entry
Styled wheel protector locks
Vehicle security systems
Comfort and convenience
Air conditioner
Air filtration systems
Cargo nets
Cargo organizers
Cargo shades
Cargo trays
Dash trim
Engine block heaters
Gear shift knob
Luggage presenter (Continental only)
Manual sliding rear window
Tire step
Customer assistance
210