Page 3 of 224
INFORMATION ABOUT THIS GUIDE
The information found in this guide was in effect at
the time of printing. Ford may change the contents
without notice and without incurring obligation.
SPECIAL NOTICES
Notice to owners of natural flexible fuel vehicles
Before you drive your vehicle, be sure to read the
ªFlexible Fuel Vehicle Owner's Guide Supplementº.
This book contains important operation and
maintenance information.
Introduction
3
Page 24 of 224
To control the
temperature, select any
temperature between
18ÉC (65ÉF) and 29ÉC
(85ÉF) by pressing the
temperature control.
For continuous maximum cooling, push the
temperature control until 16ÉC (60ÉF) is shown in
the display window. The EATC will continue
maximum cooling (disregarding the displayed
temperature) until a warmer temperature is selected
by pressing the temperature control.
For continuous maximum heating, push the
temperature control until 32ÉC (90ÉF) is shown in
the display window. The EATC will continue
maximum heating (disregarding the displayed
temperature) until a cooler temperature is selected
by pressing the temperature control.
Temperature conversion
Press MAX A/C and Fat the same time (until
the display changes) to switch between Fahrenheit
and Celsius.
TEMP
—+
F-DEF
R-DEF
—+
TEMP
—+OFFAUTO
TEMPOUT
SIDEA/C MAXF-DEF
R-DEF
VENT
—+AUTOC
Controls and features
24
Page 27 of 224

²-Distributes outside air through the instrument
panel registers and the floor ducts. Heating and air
conditioning capabilities are provided in this mode.
The air will be heated or cooled based on the
temperature selection. For added customer comfort,
the air distributed through the floor ducts will be
slightly warmer than the air sent to the instrument
panel registers.
²MAX A/C-Uses recirculated air to cool the vehicle.
The temperature will remain unchanged and air will
be cooled based on the selected temperature. To
exit, press AUTOMATIC or any other override
controls. MAX A/C is noisier than normal A/C but
more economical and will cool the inside of the
vehicle faster. Airflow is from the instrument panel
registers. This mode can also be used to prevent
undesirable odors from entering the vehicle.
²OFF-Outside air is shut out and the fan will not
operate. For short periods of time only, use this
mode to reduce undesirable odors from entering
the vehicle.
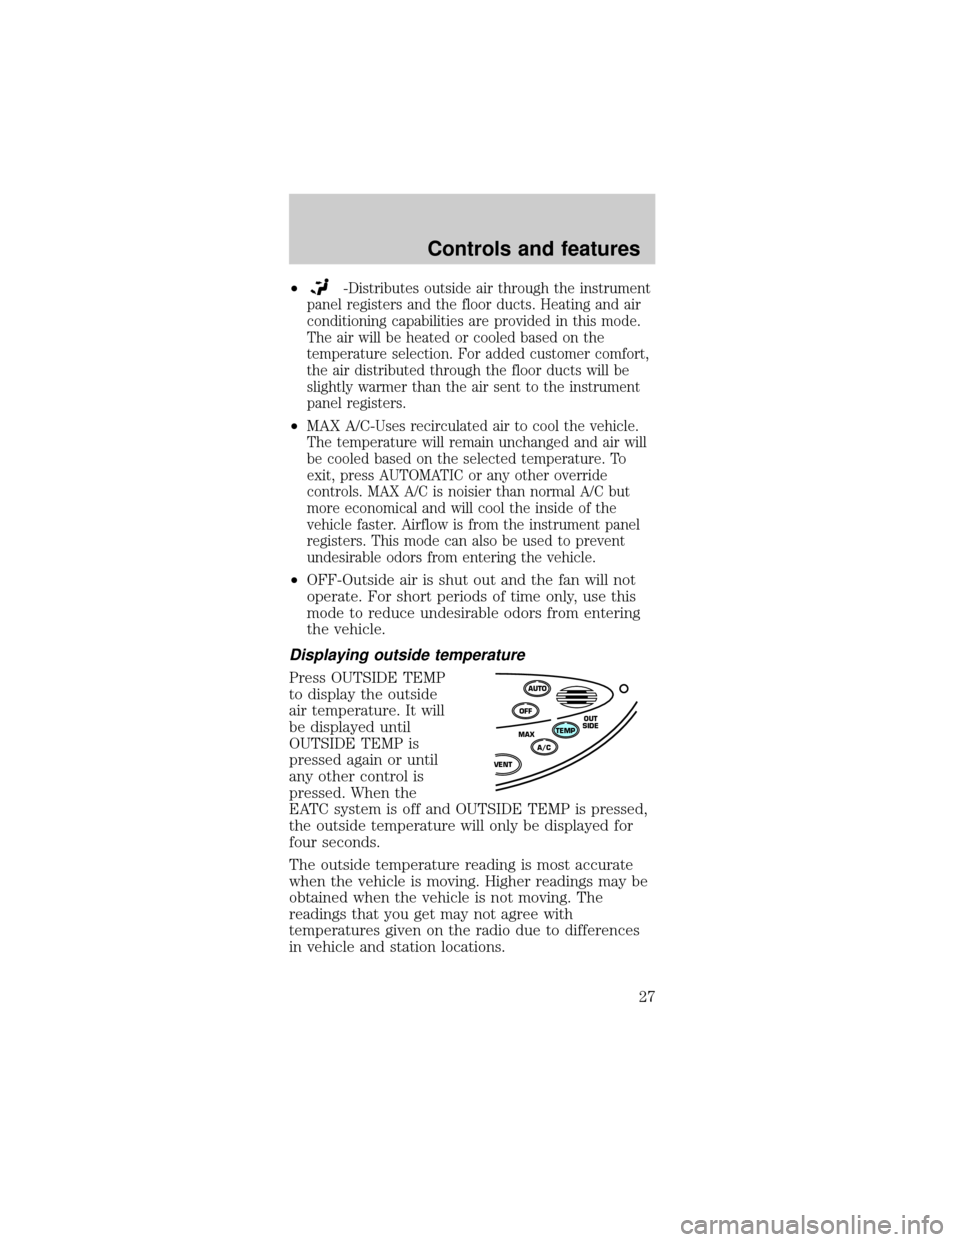
Displaying outside temperature
Press OUTSIDE TEMP
to display the outside
air temperature. It will
be displayed until
OUTSIDE TEMP is
pressed again or until
any other control is
pressed. When the
EATC system is off and OUTSIDE TEMP is pressed,
the outside temperature will only be displayed for
four seconds.
The outside temperature reading is most accurate
when the vehicle is moving. Higher readings may be
obtained when the vehicle is not moving. The
readings that you get may not agree with
temperatures given on the radio due to differences
in vehicle and station locations.
OFFAUTO
TEMPOUT
SIDE
A/C MAX
VENT
Controls and features
27
Page 43 of 224

²The disc is dusty or defective.
²The player's internal temperature is above 60ÉC
(140ÉF). Allow the player to cool down before
operating.
²A disc with format and dimensions not within
industry standards is inserted.
Cleaning compact discs
Inspect all discs for contamination before playing. If
necessary, clean discs only with an approved CD
cleaner and wipe from the center out to the edge.
Do not use circular motion.
CD and CD changer care
²Handle discs by their edges only. Never touch the
playing surface.
²Do not expose discs to direct sunlight or heat
sources for extended periods of time.
²Do not insert more than one disc into each slot of
the CD changer magazine.
Cleaning cassette player (if equipped)
Clean the tape player head with a cassette cleaning
cartridge after ten to twelve hours of play in order
to maintain the best sound and operation.
Cassette and cassette player care
²Use only cassettes that are 90 minutes long or
less.
²Do not expose tapes to direct sunlight, high
humidity, extreme heat or extreme cold. Allow
tapes that may have been exposed to extreme
temperatures to reach a moderate temperature
before playing.
²Tighten very loose tapes by inserting a finger or
pencil into the hole and turning the hub.
²Remove loose labels before inserting tapes.
Controls and features
43
Page 70 of 224

1. Turn the ignition key from OFF to RUN/ACC.
2. Press the power door UNLOCK control three
times.
3. Turn the ignition key from RUN/ACC to OFF.
4. Press the power door UNLOCK control three
times.
5. Turn the ignition key from OFF to RUN/ACC. A
horn chirp indicates the enable/disable feature is
entered.
6. Press the power door UNLOCK control one time.
7. Press the power door LOCK control to toggle the
Autolock/Relock state. You will receive a horn chirp
followed by either a long honk, autolock/relock is
enabled, or no honk, autolock/relock is disabled.
8. Turn ignition to OFF.
If autolock/relock has been changed, the horn will
chirp to confirm procedure is complete.
SECURILOCKYPASSIVE ANTI-THEFT SYSTEM
The SecuriLockypassive anti-theft system provides
an advanced level of vehicle theft protection. Your
vehicle's engine can only be started with the two
special SecuriLockyelectronically coded keys
provided with your vehicle. Each time you start your
vehicle, the SecuriLockykey is read by the
SecuriLockypassive anti-theft system. If the
SecuriLockykey identification code matches the
code stored in the SecuriLockyanti-theft system,
the vehicle's engine is allowed to start. If the
SecuriLockykey identification code does not match
the code stored in the system or if a SecuriLocky
key is not detected (vehicle theft situation), the
vehicle's engine will not operate.
If there is any potential SecuriLockyanti-theft
problem with your vehicle, ensureALL
SecuriLockykeysfor that vehicle are brought to
the dealership, to aid in troubleshooting.
Controls and features
70
Page 131 of 224
Fuse/Relay
LocationFuse Amp
RatingDescription
13 40A** Anti-Lock Brake Module
14 Ð Not Used
15 15A* Daytime Running
Lamps (DRL) Module
16 10A* Electronic Control Unit
(ECU)
17 20A* Rear Control Unit, CD
Changer
18 30A* Anti-Lock Brake Module
19 15A* Horn Relay, Powertrain
Control Module (PCM)
20 15A* Headlamp Switch,
Autolamp Park Relay
21 Ð Not Used
22 30A* Autolamps Relay,
Multifunction Switch,
Headlamp Switch
23 Ð Blower Motor Relay
24 Ð Starter Relay
25 Ð A/C Clutch Relay
26 30A* Generator
27 10A* A/C Clutch Relay
28 15A* Heated Oxygen Sensors,
Canister Vent
29 Ð Fuel Pump Relay
30 Ð PCM Relay
31 Ð Low Speed Cooling Fan
Relay
32 Ð PCM Diode
33 Ð A/C Clutch Diode
34 Ð Not Used
* Mini Fuses ** Maxi Fuses
Roadside emergencies
131
Page 152 of 224

Plain water may be added in an emergency, but you
mustreplace it with a 50/50 mixture of coolant and
distilled water as soon as possible.
Check the coolant level in the coolant reservoir the
next few times you drive the vehicle. If necessary,
add enough of a 50/50 mixture of coolant and
distilled water to bring the liquid level into the cold
fill range on the reservoir.
Never remove the coolant reservoir cap
while the engine is running or hot.
If you must remove the coolant reservoir cap, follow
these steps to avoid personal injury:
1. Before you remove the cap, turn the engine off
and let it cool.
2. When the engine is cool, wrap a thick cloth
around the cap. Slowly turn cap counterclockwise
until pressure begins to release.
3. Step back while the pressure releases.
4. When you are sure that all the pressure has been
released, use the cloth to turn it counterclockwise
and remove the cap.
Change your engine coolant according to the
appropriate schedule listed in the Scheduled
Maintenance Guide.
Recycled engine coolant
Ford Motor Company recommends that Ford and
Lincoln-Mercury dealers use recycled engine coolant
produced by Ford-approved processes.
Not all coolant recycling processes produce coolant
which meets Ford specification ESE-M97B44±A, and
use of such coolant may harm engine and cooling
system components.
Always dispose of used automotive fluids in a
responsible manner. Follow your community's
regulations and standards for recycling and disposing
of automotive fluids.
Maintenance and care
152
Page 155 of 224

TRANSMISSION FLUID
Checking automatic transmission fluid
Refer to your Scheduled Maintenance Guide for
scheduled intervals for fluid checks and changes.
Your transaxle does not consume fluid. However, the
fluid level should be checked if the transaxle is not
working properly, i.e., if the transaxle slips or shifts
slowly or if you notice some sign of fluid leakage.
Automatic transmission fluid expands when
warmed. To obtain an accurate fluid check,
drive the vehicle until it is warmed up
(approximately 30 km [20 miles]). If your
vehicle has been operated for an extended
period at high speeds, in city traffic during hot
weather or pulling a trailer, the vehicle should
be turned off for about 30 minutes to allow
fluid to cool before checking.
1. Drive the vehicle 30 km (20 miles) or until it
reaches normal operating temperature.
2. Park the vehicle on a level surface and engage the
parking brake.
3. With the parking brake engaged and your foot on
the brake pedal, start the engine and move the
gearshift lever through all of the gear ranges. Allow
sufficient time for each gear to engage.
4. Latch the gearshift lever in P (Park) and leave the
engine running.
5. Remove the dipstick, wiping it clean with a clean,
dry lint free rag.
6. Install the dipstick making sure it is fully seated in
the filler tube.
7. Remove the dipstick and inspect the fluid level.
The fluid should be in the designated areas for
normal operating temperature.
Maintenance and care
155