Page 129 of 248
Shifting from 2WD (2WD high) to 4x4 HIGH (4WD high)
Rotate the 4WD control to the 4x4
HIGH position at speeds up to 88
km/h (55 mph).
•Do not shift into 4x4 HIGH with
the rear wheels slipping.
Shifting from 4x4 HIGH (4WD high) to 2WD (2WD high)
Rotate the 4WD control to 2WD at
any forward speed. You do not need
to put the gearshift in R (Reverse)
to disengage your front hubs.
To prevent damage, the electronic
shift 4WD system is designed to
allow up to 45 seconds before the
shift command is performed. In the
event that conflicting shift
commands are selected, allow up to
45 seconds for the shift command to
be performed prior to reporting any shift concerns to your dealer.
Shifting between 4x4 HIGH (4WD high) and 4x4 LOW (4WD low)
1. Bring the vehicle to a complete stop.
2. Depress the brake.
3. Place the gearshift in N (Neutral) (automatic transmission) or depress
the clutch (manual transmission).
4X4
HIGH
2WD4X4
LOW
4X4
HIGH
2WD4X4
LOW
Driving
129
Page 132 of 248
If vehicle speed drops more than 16 km/h (10 mph), the speed control
will cancel automatically. Resume speed with accelerator pedal.
If speed control cancels after climbing the hill, reset speed by pressing
and holding the SET ACCEL button to resume speeds over 50 km/h
(30 mph).
Automatic transmissions may shift frequently while driving up steep
grades. Eliminate frequent shifting by shifting out of
(Overdrive) into
a lower gear.
Driving on snow and ice
A 4WD vehicle has advantages over 2WD vehicles in snow and ice but
can skid like any other vehicle.
Avoid sudden applications of power and quick changes of direction on
snow and ice. Apply the accelerator slowly and steadily when starting
from a full stop.
If your vehicle is equipped with a Rear Anti-lock Brake System (RABS),
you should be careful when braking. Front brake lock-up, on any surface,
causes loss of steering control.
If your vehicle is equipped with a Four Wheel Anti-lock Brake System
(ABS), apply the brakes as you normally would. In order to allow the
ABS to operate properly, keep steady pressure on the brake pedal.
When driving on snow or ice with either braking system, allow more
stopping distance and drive slower than usual. Consider using one of the
lower gears.
VEHICLE LOADING
Before loading a vehicle, familiarize yourself with the following terms:
•Base Curb Weight: Weight of the vehicle including any standard
equipment, fluids, lubricants, etc. It does not include passengers or
aftermarket equipment.
•Payload: Combined maximum allowable weight of cargo, passengers
and optional equipment. The payload equals the gross vehicle weight
rating minus base curb weight.
•GVW (Gross Vehicle Weight): Base curb weight plus payload
weight. The GVW is not a limit or a specification.
Driving
132
Page 136 of 248
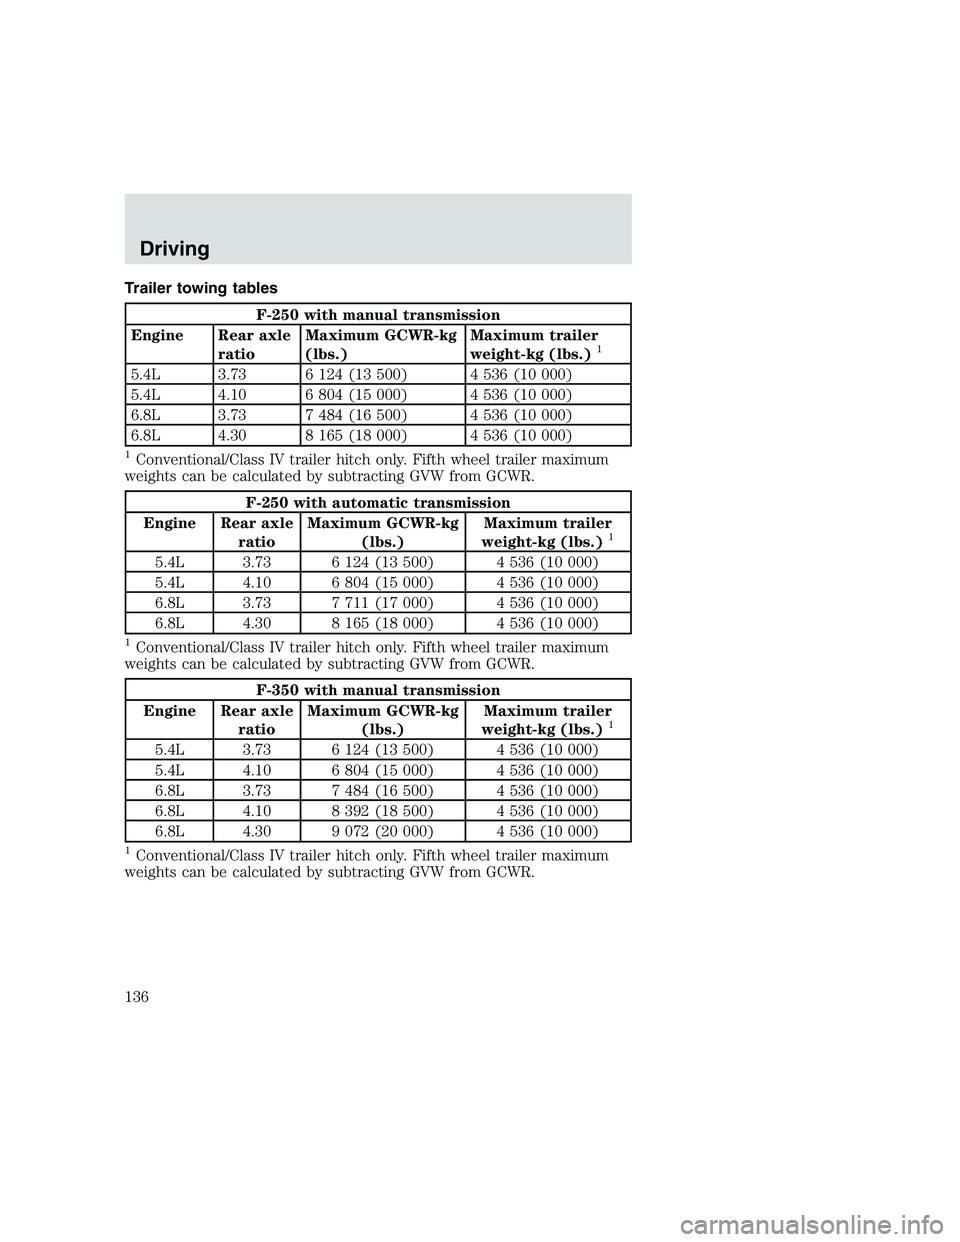
Trailer towing tables
F-250 with manual transmission
Engine Rear axle
ratioMaximum GCWR-kg
(lbs.)Maximum trailer
weight-kg (lbs.)
1
5.4L 3.73 6 124 (13 500) 4 536 (10 000)
5.4L 4.10 6 804 (15 000) 4 536 (10 000)
6.8L 3.73 7 484 (16 500) 4 536 (10 000)
6.8L 4.30 8 165 (18 000) 4 536 (10 000)
1Conventional/Class IV trailer hitch only. Fifth wheel trailer maximum
weights can be calculated by subtracting GVW from GCWR.
F-250 with automatic transmission
Engine Rear axle
ratioMaximum GCWR-kg
(lbs.)Maximum trailer
weight-kg (lbs.)
1
5.4L 3.73 6 124 (13 500) 4 536 (10 000)
5.4L 4.10 6 804 (15 000) 4 536 (10 000)
6.8L 3.73 7 711 (17 000) 4 536 (10 000)
6.8L 4.30 8 165 (18 000) 4 536 (10 000)
1Conventional/Class IV trailer hitch only. Fifth wheel trailer maximum
weights can be calculated by subtracting GVW from GCWR.
F-350 with manual transmission
Engine Rear axle
ratioMaximum GCWR-kg
(lbs.)Maximum trailer
weight-kg (lbs.)
1
5.4L 3.73 6 124 (13 500) 4 536 (10 000)
5.4L 4.10 6 804 (15 000) 4 536 (10 000)
6.8L 3.73 7 484 (16 500) 4 536 (10 000)
6.8L 4.10 8 392 (18 500) 4 536 (10 000)
6.8L 4.30 9 072 (20 000) 4 536 (10 000)
1Conventional/Class IV trailer hitch only. Fifth wheel trailer maximum
weights can be calculated by subtracting GVW from GCWR.
Driving
136
Page 137 of 248
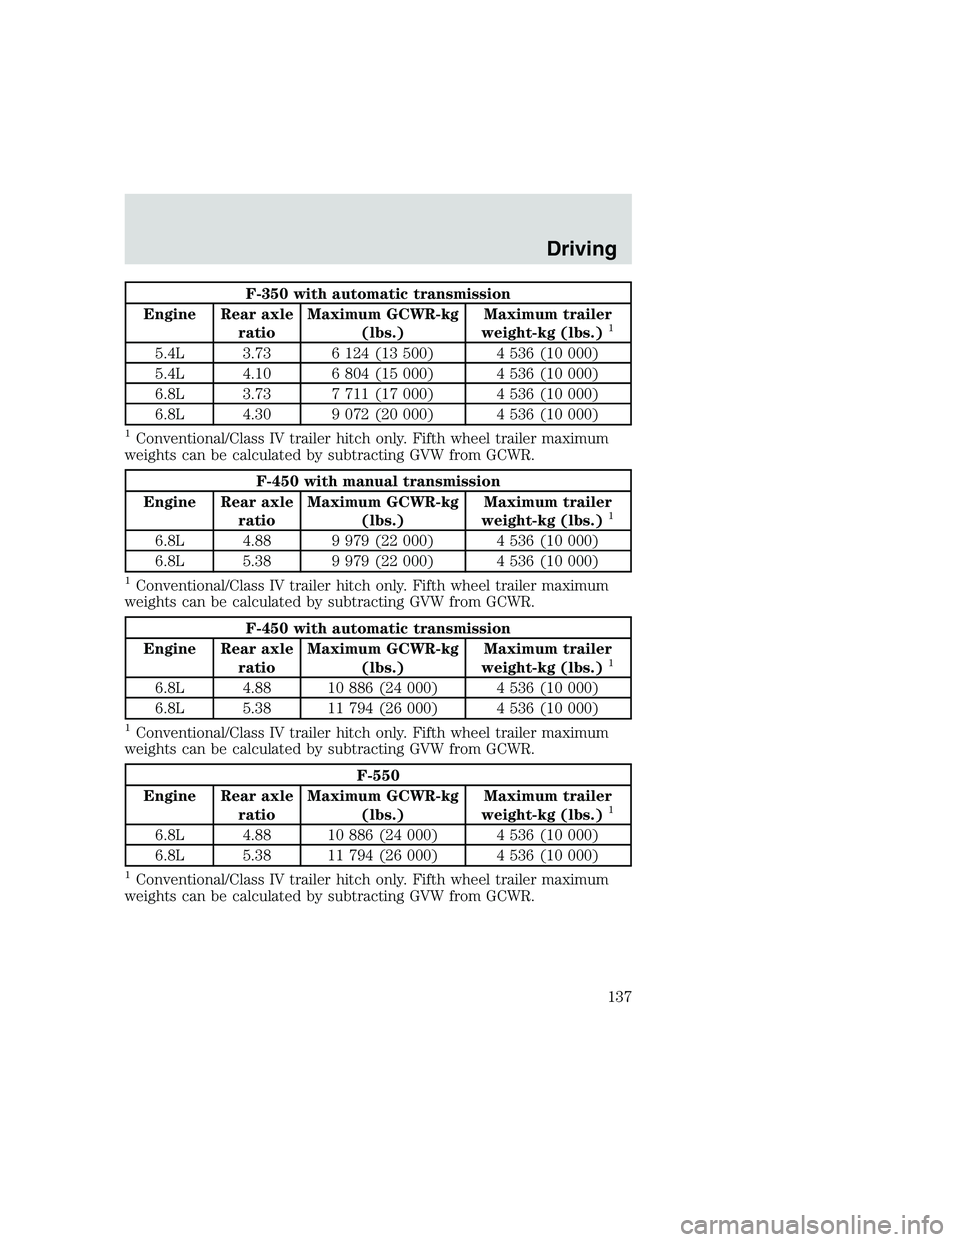
F-350 with automatic transmission
Engine Rear axle
ratioMaximum GCWR-kg
(lbs.)Maximum trailer
weight-kg (lbs.)
1
5.4L 3.73 6 124 (13 500) 4 536 (10 000)
5.4L 4.10 6 804 (15 000) 4 536 (10 000)
6.8L 3.73 7 711 (17 000) 4 536 (10 000)
6.8L 4.30 9 072 (20 000) 4 536 (10 000)
1Conventional/Class IV trailer hitch only. Fifth wheel trailer maximum
weights can be calculated by subtracting GVW from GCWR.
F-450 with manual transmission
Engine Rear axle
ratioMaximum GCWR-kg
(lbs.)Maximum trailer
weight-kg (lbs.)
1
6.8L 4.88 9 979 (22 000) 4 536 (10 000)
6.8L 5.38 9 979 (22 000) 4 536 (10 000)
1Conventional/Class IV trailer hitch only. Fifth wheel trailer maximum
weights can be calculated by subtracting GVW from GCWR.
F-450 with automatic transmission
Engine Rear axle
ratioMaximum GCWR-kg
(lbs.)Maximum trailer
weight-kg (lbs.)
1
6.8L 4.88 10 886 (24 000) 4 536 (10 000)
6.8L 5.38 11 794 (26 000) 4 536 (10 000)
1Conventional/Class IV trailer hitch only. Fifth wheel trailer maximum
weights can be calculated by subtracting GVW from GCWR.
F-550
Engine Rear axle
ratioMaximum GCWR-kg
(lbs.)Maximum trailer
weight-kg (lbs.)
1
6.8L 4.88 10 886 (24 000) 4 536 (10 000)
6.8L 5.38 11 794 (26 000) 4 536 (10 000)
1Conventional/Class IV trailer hitch only. Fifth wheel trailer maximum
weights can be calculated by subtracting GVW from GCWR.
Driving
137
Page 139 of 248
Trailer brakes
Electric brakes and manual, automatic or surge-type brakes are safe if
installed properly and adjusted to the manufacturer’s specifications. The
trailer brakes must meet local and Federal regulations.
Do not connect a trailer’s hydraulic brake system directly to your
vehicle’s brake system. Your vehicle may not have enough
braking power and your chances of having a collision greatly increase.
The braking system of the tow vehicle is rated for operation at the
GVWR not GCWR.
Trailer lamps
Trailer lamps are required on most towed vehicles. Make sure your
trailer lamps conform to local and Federal regulations. See your dealer or
trailer rental agency for proper instructions and equipment for hooking
up trailer lamps.
Using a step bumper
The rear bumper is equipped with an integral hitch and requires only a
ball with a 25.4 mm (one inch) shank diameter. The bumper hasa2270
kg (5 000 lb.) trailer weight and 227 kg (500 lb.) tongue weight
capability.
If it is necessary to relocate the trailer hitch ball position, a
frame-mounted trailer hitch must be installed.
Driving while you tow
Do not drive faster than 88 km/h (55 mph) when towing a trailer.
Speed control may shut off if you are towing on long, steep grades.
When towing a trailer:
•Use a lower gear when towing up or down steep hills. This will
eliminate excessive downshifting and upshifting for optimum fuel
economy and transmission cooling.
•Anticipate stops and brake gradually.
Exceeding the GCWR rating may cause internal transmission
damage and void your warranty coverage.
Driving
139
Page 140 of 248
Servicing after towing
If you tow a trailer for long distances, your vehicle will require more
frequent service intervals. Refer to your Scheduled Maintenance guide
for more information.
Trailer towing tips
•Practice turning, stopping and backing up in an area before starting on
a trip to get the feel of the vehicle trailer combination. When turning,
make wider turns so the trailer wheels will clear curbs and other
obstacles.
•Allow more distance for stopping with a trailer attached.
•The trailer tongue weight should be 10–15% of the loaded trailer
weight.
•After you have traveled 80 km (50 miles), thoroughly check your
hitch, electrical connections and trailer wheel lug nuts.
•When stopped in traffic for long periods of time in hot weather, place
the gearshift in P (Park) (automatic transmissions) or N (Neutral)
(manual transmissions). This aids engine cooling and air conditioner
efficiency.
•Vehicles with trailers should not be parked on a grade. If you must
park on a grade, place wheel chocks under the trailer’s wheels.
Launching or retrieving a boat
When backing down a ramp during boat launching or retrieval,
•Do not allow the static water level to rise above the bottom edge of
the rear bumper and
•Do not allow waves to break higher than 15 cm (six inches) above the
bottom edge of the rear bumper.
Exceeding these limits may allow water to enter critical vehicle
components, adversely affecting driveability, emissions and reliability.
Replace front and rear axle lubricants anytime the axles have been
submerged in water. Axle lubricant quantities are not to be checked
unless a leak is suspected.
Recreational towing
If you may want to tow your vehicle behind another vehicle, such as an
RV, follow these guidelines:
Driving
140
Page 155 of 248
5. The following steps are required to secure the support bracket (if
equipped) under the spare tire:
•Move the support bracket over the spare tire.
•Slide the support bracket over the eyebolt into the slot on the support
bracket.
•Tighten the eyebolt with tapered end of lug wrench leaving it
positioned at a right angle of the slot on the support bracket.
Tire change procedure
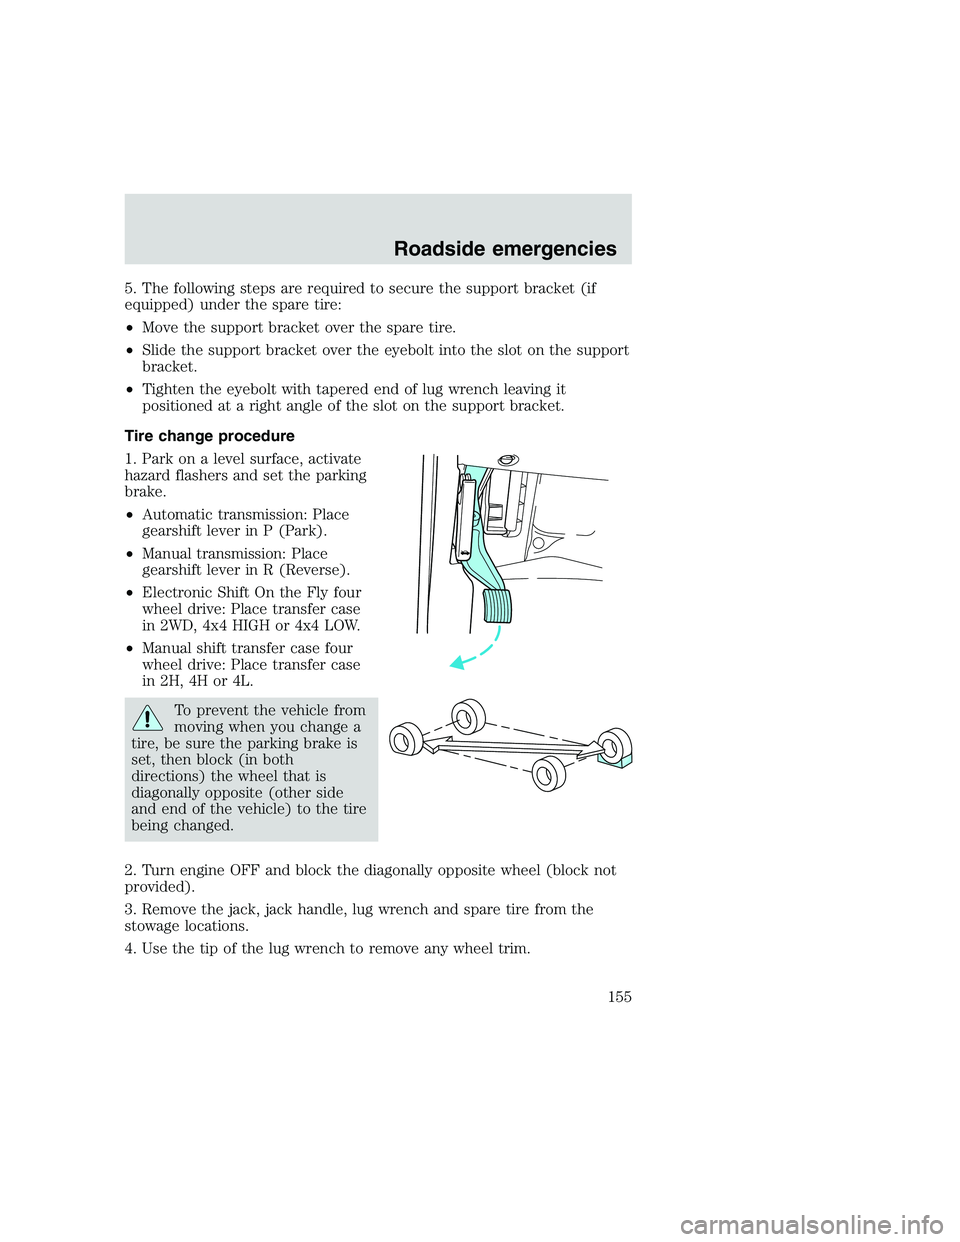
1. Park on a level surface, activate
hazard flashers and set the parking
brake.
•Automatic transmission: Place
gearshift lever in P (Park).
•Manual transmission: Place
gearshift lever in R (Reverse).
•Electronic Shift On the Fly four
wheel drive: Place transfer case
in 2WD, 4x4 HIGH or 4x4 LOW.
•Manual shift transfer case four
wheel drive: Place transfer case
in 2H, 4H or 4L.
To prevent the vehicle from
moving when you change a
tire, be sure the parking brake is
set, then block (in both
directions) the wheel that is
diagonally opposite (other side
and end of the vehicle) to the tire
being changed.
2. Turn engine OFF and block the diagonally opposite wheel (block not
provided).
3. Remove the jack, jack handle, lug wrench and spare tire from the
stowage locations.
4. Use the tip of the lug wrench to remove any wheel trim.
Roadside emergencies
155
Page 156 of 248
5. Loosen each wheel lug nut
one-half turn counterclockwise but
do not remove them until the wheel
is raised off the ground.
When one of the rear
wheels is off the ground,
the transmission alone will not
prevent the vehicle from moving
or slipping off the jack, even if the
transmission is in P (Park)
(automatic transmission) or R
(Reverse) (manual transmission).
To prevent the vehicle from
moving when you change the tire,
be sure that the parking brake is
set and the diagonally opposite
wheel is blocked.
If the vehicle slips off the jack, you or someone else could be
seriously injured.
The following steps apply to F250/F350 only:
6. Insert the hooked end of the jack
handle into the jack and use the
handle to slide the jack under the
vehicle.
7. Position the jack according to the
following guides:
Roadside emergencies
156