1999 FORD F250 flat tire
[x] Cancel search: flat tirePage 152 of 248

Fuse/Relay
LocationFuse Amp
RatingDescription
27 -
(Gasoline
only)
30A*
(Diesel
only)Gasoline only-Not Used
Diesel only-Injector Driver Module
28 30A** Trailer Tow Electronic Brake Controller
29 20A** Radio
30 -- PCM Power Relay
31 -- Blower Motor Relay
32 -- Two Speed Fuel Pump Relay (Gasoline
only), Injector Driver Module Power Relay
(Diesel only)
33 -- Washer Pump Relay
34 -- Windshield Wiper Park/Run Relay
35 -- Windshield Wiper HI/LO Relay
36 -- Not Used
37 -- PCM Relay Diode
38 -- Trailer Tow Backup Lamp Relay
39 -- Trailer Tow Battery Charge Relay
40 -- Electronic Shift On The Fly Relay #1,
Electronic Shift On The Fly Relay #2
* Mini Fuses ** Maxi Fuses ***Circuit Breaker
CHANGING THE TIRES
If you get a flat tire while driving, do not apply the brake heavily.
Instead, gradually decrease your speed. Hold the steering wheel firmly
and slowly move to a safe place on the side of the road.
Spare tire information
Your vehicle may be equipped with a spare tire that can be used as
either a spare or a regular tire. The spare tire is not equipped with wheel
trim. The wheel trim from the original wheel/tire may be used on the
spare.
Roadside emergencies
152
ProCarManuals.com
Page 154 of 248
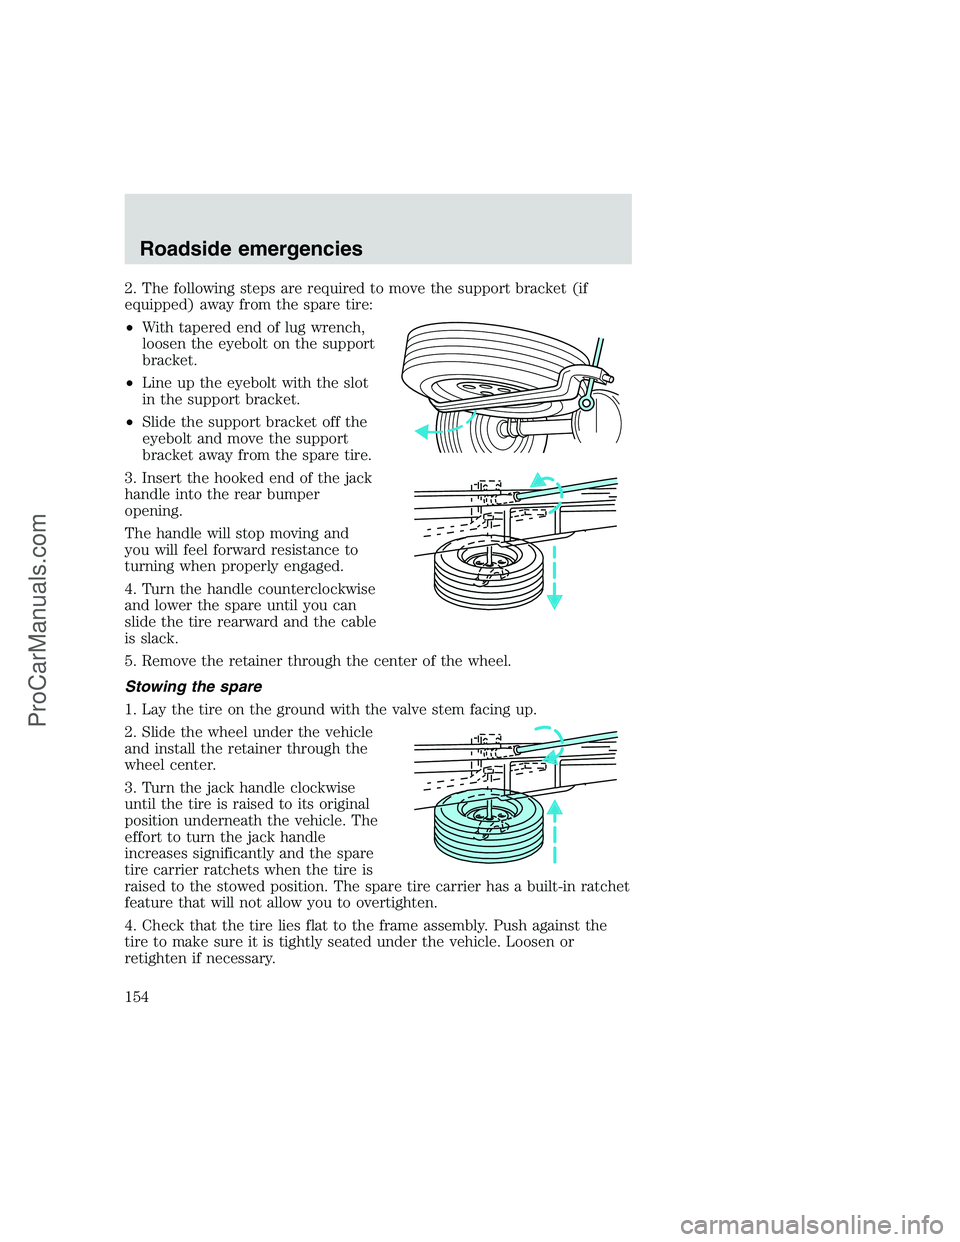
2. The following steps are required to move the support bracket (if
equipped) away from the spare tire:
•With tapered end of lug wrench,
loosen the eyebolt on the support
bracket.
•Line up the eyebolt with the slot
in the support bracket.
•Slide the support bracket off the
eyebolt and move the support
bracket away from the spare tire.
3. Insert the hooked end of the jack
handle into the rear bumper
opening.
The handle will stop moving and
you will feel forward resistance to
turning when properly engaged.
4. Turn the handle counterclockwise
and lower the spare until you can
slide the tire rearward and the cable
is slack.
5. Remove the retainer through the center of the wheel.
Stowing the spare
1. Lay the tire on the ground with the valve stem facing up.
2. Slide the wheel under the vehicle
and install the retainer through the
wheel center.
3. Turn the jack handle clockwise
until the tire is raised to its original
position underneath the vehicle. The
effort to turn the jack handle
increases significantly and the spare
tire carrier ratchets when the tire is
raised to the stowed position. The spare tire carrier has a built-in ratchet
feature that will not allow you to overtighten.
4. Check that the tire lies flat to the frame assembly. Push against the
tire to make sure it is tightly seated under the vehicle. Loosen or
retighten if necessary.
Roadside emergencies
154
ProCarManuals.com
Page 159 of 248
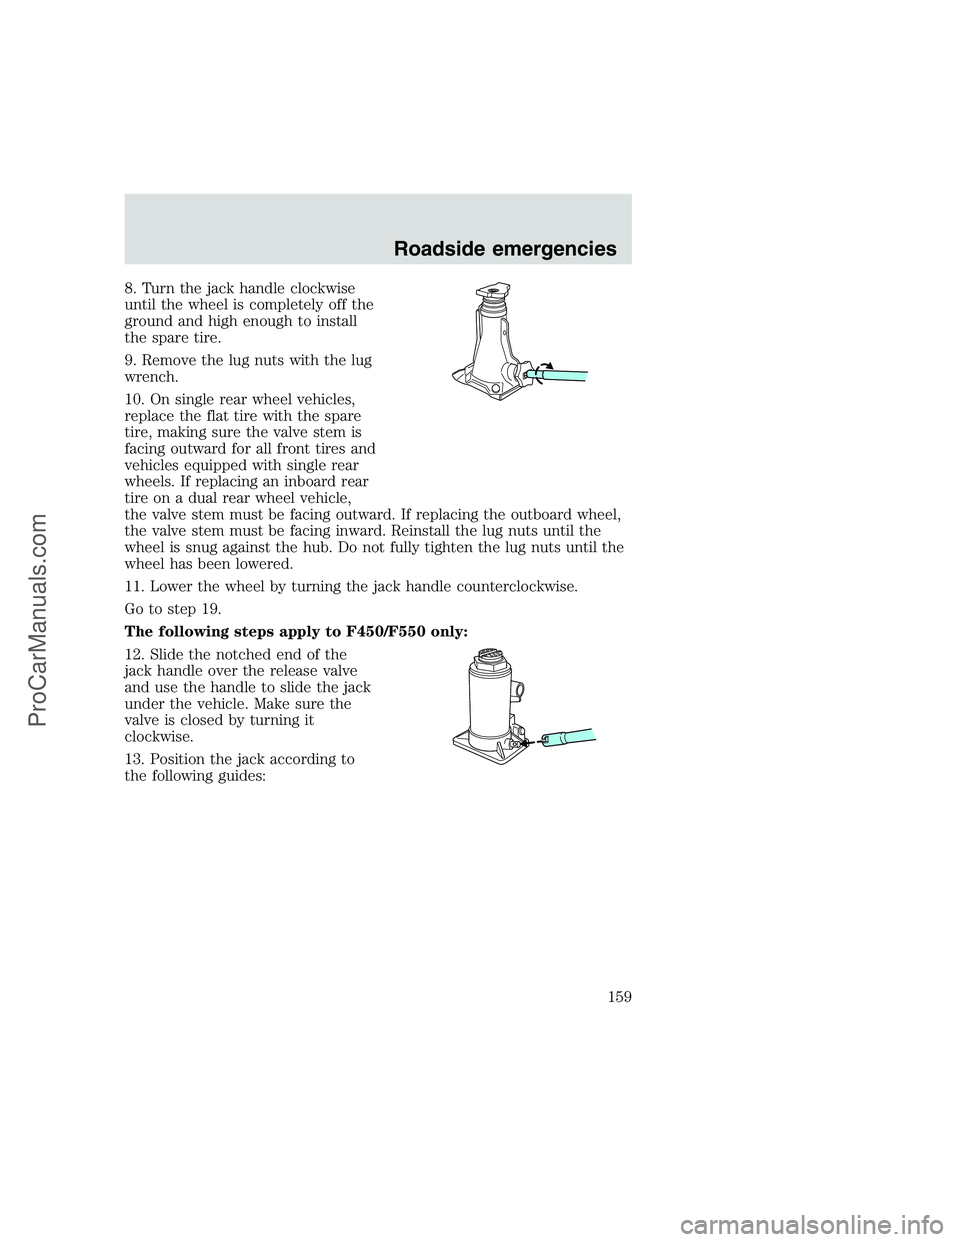
8. Turn the jack handle clockwise
until the wheel is completely off the
ground and high enough to install
the spare tire.
9. Remove the lug nuts with the lug
wrench.
10. On single rear wheel vehicles,
replace the flat tire with the spare
tire, making sure the valve stem is
facing outward for all front tires and
vehicles equipped with single rear
wheels. If replacing an inboard rear
tire on a dual rear wheel vehicle,
the valve stem must be facing outward. If replacing the outboard wheel,
the valve stem must be facing inward. Reinstall the lug nuts until the
wheel is snug against the hub. Do not fully tighten the lug nuts until the
wheel has been lowered.
11. Lower the wheel by turning the jack handle counterclockwise.
Go to step 19.
The following steps apply to F450/F550 only:
12. Slide the notched end of the
jack handle over the release valve
and use the handle to slide the jack
under the vehicle. Make sure the
valve is closed by turning it
clockwise.
13. Position the jack according to
the following guides:
Roadside emergencies
159
ProCarManuals.com
Page 161 of 248
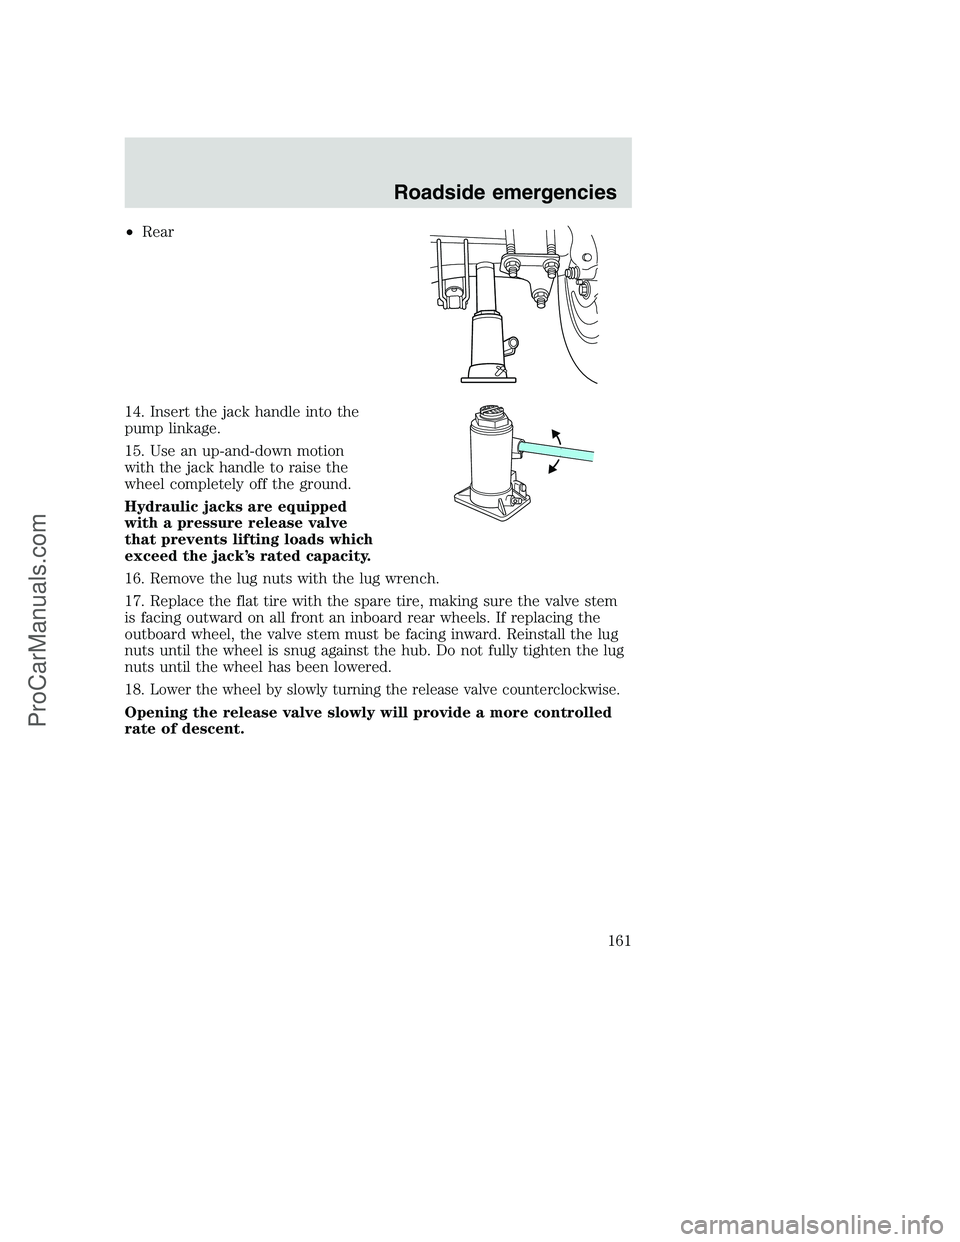
•Rear
14. Insert the jack handle into the
pump linkage.
15. Use an up-and-down motion
with the jack handle to raise the
wheel completely off the ground.
Hydraulic jacks are equipped
with a pressure release valve
that prevents lifting loads which
exceed the jack’s rated capacity.
16. Remove the lug nuts with the lug wrench.
17. Replace the flat tire with the spare tire, making sure the valve stem
is facing outward on all front an inboard rear wheels. If replacing the
outboard wheel, the valve stem must be facing inward. Reinstall the lug
nuts until the wheel is snug against the hub. Do not fully tighten the lug
nuts until the wheel has been lowered.
18.
Lower the wheel by slowly turning the release valve counterclockwise.
Opening the release valve slowly will provide a more controlled
rate of descent.
Roadside emergencies
161
ProCarManuals.com
Page 162 of 248
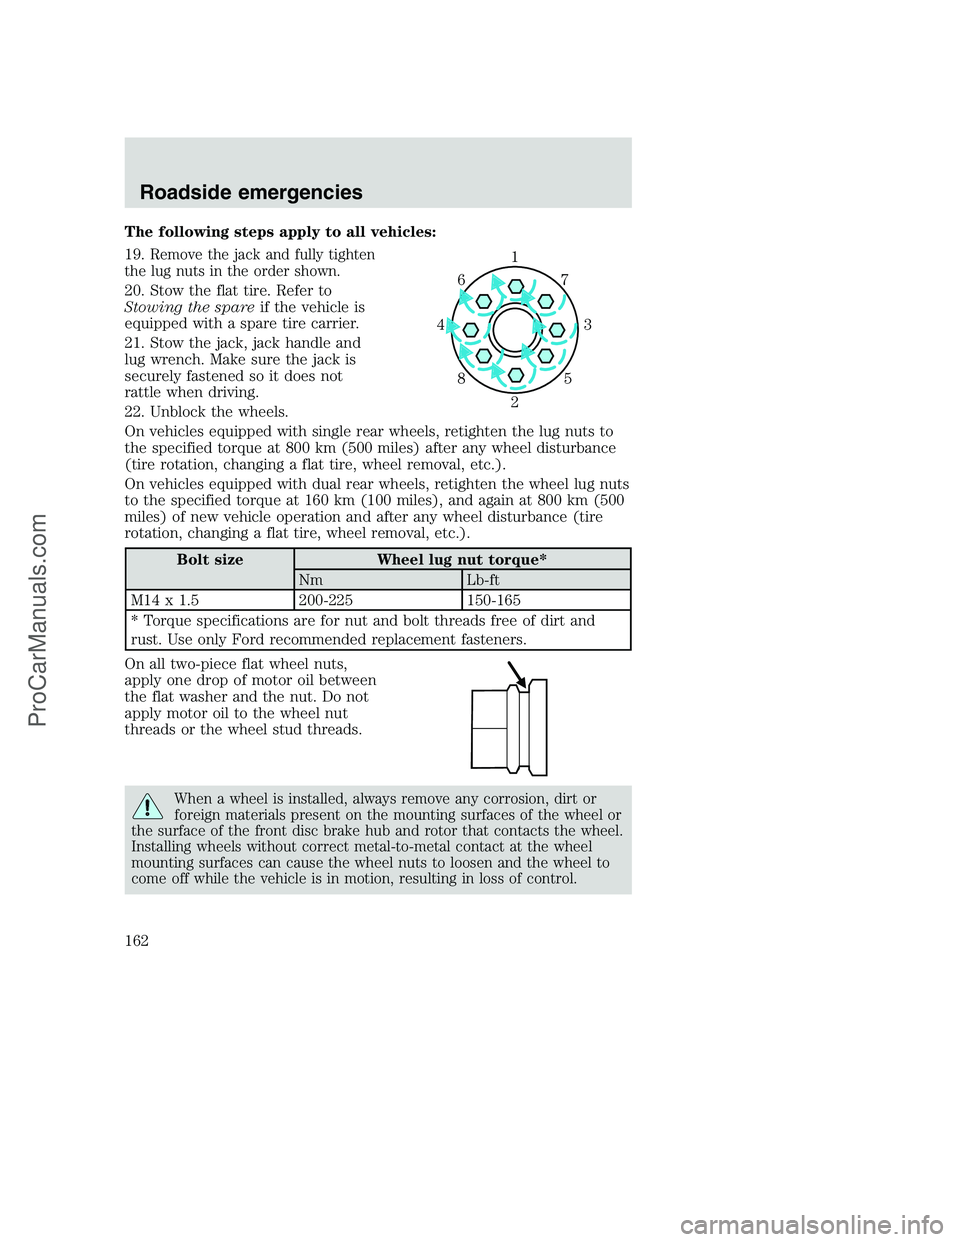
The following steps apply to all vehicles:
19.
Remove the jack and fully tighten
the lug nuts in the order shown.
20. Stow the flat tire. Refer to
Stowing the spareif the vehicle is
equipped with a spare tire carrier.
21. Stow the jack, jack handle and
lug wrench. Make sure the jack is
securely fastened so it does not
rattle when driving.
22. Unblock the wheels.
On vehicles equipped with single rear wheels, retighten the lug nuts to
the specified torque at 800 km (500 miles) after any wheel disturbance
(tire rotation, changing a flat tire, wheel removal, etc.).
On vehicles equipped with dual rear wheels, retighten the wheel lug nuts
to the specified torque at 160 km (100 miles), and again at 800 km (500
miles) of new vehicle operation and after any wheel disturbance (tire
rotation, changing a flat tire, wheel removal, etc.).
Bolt size Wheel lug nut torque*
Nm Lb-ft
M14 x 1.5 200-225 150-165
* Torque specifications are for nut and bolt threads free of dirt and
rust. Use only Ford recommended replacement fasteners.
On all two-piece flat wheel nuts,
apply one drop of motor oil between
the flat washer and the nut. Do not
apply motor oil to the wheel nut
threads or the wheel stud threads.
When a wheel is installed, always remove any corrosion, dirt or
foreign materials present on the mounting surfaces of the wheel or
the surface of the front disc brake hub and rotor that contacts the wheel.
Installing wheels without correct metal-to-metal contact at the wheel
mounting surfaces can cause the wheel nuts to loosen and the wheel to
come off while the vehicle is in motion, resulting in loss of control.
1
3 4
27 6
5 8
Roadside emergencies
162
ProCarManuals.com
Page 191 of 248
Temperature A B C
The temperature grades are A (the highest), B, and C, representing the
tire’s resistance to the generation of heat and its ability to dissipate heat
when tested under controlled conditions on a specified indoor laboratory
test wheel. Sustained high temperature can cause the material of the tire
to degenerate and reduce tire life, and excessive temperature can lead to
sudden tire failure. The grade C corresponds to a level of performance
which all passenger car tires must meet under the Federal Motor Vehicle
Safety Standard No. 109. Grades B and A represent higher levels of
performance on the laboratory test wheel than the minimum required by
law.
The temperature grade for this tire is established for a tire that
is properly inflated and not overloaded. Excessive speed,
underinflation, or excessive loading, either separately or in
combination, can cause heat buildup and possible tire failure.
SERVICING YOUR TIRES
Checking the tire pressure
•Use an accurate tire pressure gauge.
•Check the tire pressure when tires are cold, after the vehicle has been
parked for at least one hour or has been driven less than 5 km (3
miles).
•Adjust tire pressure to recommended specifications found on the
Certification Label.
Improperly inflated tires can affect vehicle handling and can fail
suddenly, possibly resulting in loss of vehicle control.
Tire rotation
Because your vehicle’s tires perform different jobs, they often wear
differently. To make sure your tires wear evenly and last longer, rotate
them as indicated in the Scheduled Maintenance Guide. If you notice
that the tires wear unevenly, have them checked.
The following procedure applies to vehicles equipped with single rear
wheels, if your vehicle is equipped with dual rear wheels it is
recommended that only the front wheels be rotated (side to side).
Maintenance and care
191
ProCarManuals.com
Page 201 of 248
•Resting your foot on the brake pedal while driving may reduce fuel
economy.
•Combine errands and minimize stop-and-go driving.
Maintenance
•Keep tires properly inflated and use only recommended size.
•Operating a vehicle with the wheels out of alignment will reduce fuel
economy.
•Use recommended engine oil. Refer toLubricant Specifications.
•Perform all regularly scheduled maintenance items. Follow the
recommended maintenance schedule and owner maintenance checks
found in your vehicle Scheduled Maintenance Guide.
Conditions
•Heavily loading a vehicle or towing a trailer may reduce fuel economy
at any speed.
•Carrying unnecessary weight may reduce fuel economy (approximately
2 km/h [1 mpg] is lost for every 180 kg [400 lb] of weight carried).
•Adding certain accessories to your vehicle (for example bug
deflectors, rollover/light bars, running boards, ski/luggage racks) may
reduce fuel economy.
•Using fuel blended with alcohol may lower fuel economy.
•Fuel economy may decrease with lower temperatures during the first
12–16 km (8–10 miles) of driving.
•Driving on flat terrain offers improved fuel economy as compared to
driving on hilly terrain.
•Transmissions give their best fuel economy when operated in the top
cruise gear and with steady pressure on the gas pedal.
•Four-wheel-drive operation (if equipped) is less fuel efficient than
two-wheel-drive operation.
•Close windows for high speed driving.
EPA window sticker
Every new vehicle should have the EPA window sticker. Contact your
dealer if the window sticker is not supplied with your vehicle. The EPA
window sticker should be your guide for the fuel economy comparisons
with other vehicles.
Maintenance and care
201
ProCarManuals.com
Page 223 of 248
GETTING ROADSIDE ASSISTANCE
To fully assist you should you have a vehicle concern, Ford offers a
complimentary roadside assistance program. This program is separate
from the New Vehicle Limited Warranty. The service is available:
•24–hours, seven days a week
•for the Basic warranty period (Canada) or New Vehicle Limited
Warranty period (U.S.) of three years or 60,000 km (36,000 miles),
whichever comes first on Ford and Mercury vehicles, and four years or
80,000 km (50,000 miles) on Lincoln vehicles
In the United States, you may purchase additional roadside assistance
coverage beyond this period through the Ford Auto Club by contacting
your Ford or Lincoln-Mercury dealer.
Roadside assistance will cover:
•changing a flat tire
•jump-starts
•lock-out assistance
•fuel delivery
•towing to the nearest Ford of Canada or Ford Motor Company
dealership, or towing to your selling dealership if within 56 km
(35 miles). Even non-warranty related tows, like accidents or getting
stuck in the mud or snow, are covered (some exclusions apply, such
as impound towing or repossession).
Using roadside assistance
Complete the roadside assistance identification card and place it in your
wallet for quick reference. In the United States, this card is found in the
Owner Guide portfolio in the glove compartment in Ford vehicles and is
mailed to you if you own a Mercury or Lincoln. In Canada, it’s found in
the Roadside Assistance book in the glove compartment.
To receive roadside assistance in the United States for Ford or Mercury
vehicles, call 1-800-241-3673 or if you own a Lincoln vehicle, call
1–800–521–4140. In Canada call 1–800–665–2006.
Should you need to arrange assistance for yourself, Ford will reimburse a
reasonable amount. To obtain information about reimbursement, call
1-800-241-3673 in the United States for Ford or Mercury vehicles; or if
you own a Lincoln vehicle, call 1–800–521–4140. Call 1–800–665–2006 in
Canada.
Customer assistance
223
ProCarManuals.com