1999 FORD F250 towing
[x] Cancel search: towingPage 138 of 248
Preparing to tow
Use the proper equipment for towing a trailer, and make sure it is
properly attached to your vehicle. See your dealer or a reliable trailer
dealer if you require assistance.
Hitches
Do not use hitches that clamp onto the vehicle’s bumper or attach to the
axle. You must distribute the load in your trailer so that 10% of the total
weight of the trailer is on the tongue.
Load equalizing hitch
When hooking up a trailer using a load equalizing hitch, always use the
following procedure:
1. Park the unloaded vehicle on a level surface. With the ignition on and
all doors closed, allow the vehicle to stand for several minutes so that it
can level.
2. Measure the height of a reference point on the front and rear bumpers
at the center of the vehicle.
3. Attach the trailer to the vehicle and adjust the hitch equalizers so that
the front bumper height is within 0–13 mm (1/2 inch) of the reference
point. After proper adjustment, the rear bumper should be no higher
than in Step 3.
Adjusting an equalizing hitch so the rear bumper of the vehicle
is lower or higher than it was unloaded will defeat the function
of the load equalizing hitch and may cause unpredictable handling.
Safety chains
Always connect the trailer’s safety chains to the vehicle. To connect the
trailer’s safety chains, cross the chains under the trailer tongue and allow
slack for turning corners.
If you use a rental trailer, follow the instructions that the rental agency
gives to you.
Do not attach safety chains to the bumper.
Driving
138
ProCarManuals.com
Page 139 of 248
Trailer brakes
Electric brakes and manual, automatic or surge-type brakes are safe if
installed properly and adjusted to the manufacturer’s specifications. The
trailer brakes must meet local and Federal regulations.
Do not connect a trailer’s hydraulic brake system directly to your
vehicle’s brake system. Your vehicle may not have enough
braking power and your chances of having a collision greatly increase.
The braking system of the tow vehicle is rated for operation at the
GVWR not GCWR.
Trailer lamps
Trailer lamps are required on most towed vehicles. Make sure your
trailer lamps conform to local and Federal regulations. See your dealer or
trailer rental agency for proper instructions and equipment for hooking
up trailer lamps.
Using a step bumper
The rear bumper is equipped with an integral hitch and requires only a
ball with a 25.4 mm (one inch) shank diameter. The bumper hasa2270
kg (5 000 lb.) trailer weight and 227 kg (500 lb.) tongue weight
capability.
If it is necessary to relocate the trailer hitch ball position, a
frame-mounted trailer hitch must be installed.
Driving while you tow
Do not drive faster than 88 km/h (55 mph) when towing a trailer.
Speed control may shut off if you are towing on long, steep grades.
When towing a trailer:
•Use a lower gear when towing up or down steep hills. This will
eliminate excessive downshifting and upshifting for optimum fuel
economy and transmission cooling.
•Anticipate stops and brake gradually.
Exceeding the GCWR rating may cause internal transmission
damage and void your warranty coverage.
Driving
139
ProCarManuals.com
Page 140 of 248

Servicing after towing
If you tow a trailer for long distances, your vehicle will require more
frequent service intervals. Refer to your Scheduled Maintenance guide
for more information.
Trailer towing tips
•Practice turning, stopping and backing up in an area before starting on
a trip to get the feel of the vehicle trailer combination. When turning,
make wider turns so the trailer wheels will clear curbs and other
obstacles.
•Allow more distance for stopping with a trailer attached.
•The trailer tongue weight should be 10–15% of the loaded trailer
weight.
•After you have traveled 80 km (50 miles), thoroughly check your
hitch, electrical connections and trailer wheel lug nuts.
•When stopped in traffic for long periods of time in hot weather, place
the gearshift in P (Park) (automatic transmissions) or N (Neutral)
(manual transmissions). This aids engine cooling and air conditioner
efficiency.
•Vehicles with trailers should not be parked on a grade. If you must
park on a grade, place wheel chocks under the trailer’s wheels.
Launching or retrieving a boat
When backing down a ramp during boat launching or retrieval,
•Do not allow the static water level to rise above the bottom edge of
the rear bumper and
•Do not allow waves to break higher than 15 cm (six inches) above the
bottom edge of the rear bumper.
Exceeding these limits may allow water to enter critical vehicle
components, adversely affecting driveability, emissions and reliability.
Replace front and rear axle lubricants anytime the axles have been
submerged in water. Axle lubricant quantities are not to be checked
unless a leak is suspected.
Recreational towing
If you may want to tow your vehicle behind another vehicle, such as an
RV, follow these guidelines:
Driving
140
ProCarManuals.com
Page 141 of 248
•4x2 vehicles must have the driveshaft removed if the rear wheels are
to be kept on the ground. If only the front wheels will be on the
ground, the driveshaft does not need to be removed.
•4x4 Electronic Shift on the Fly vehicles cannot be towed with any
wheels on the ground.
•
4x4 vehicles with a manual shift (floor-mounted) transfer case shifter
must have the transfer case and transmission gearshift levers placed in
the N (Neutral) position in order to tow with all wheels on the ground.
SNOWPLOWING
For low speed snow removal, Ford offers a Snowplow Package as an
option. If you do not have this equipment, do not use your vehicle as a
snowplow or powertrain and suspension system damage may occur.
Do not install a snowplow and plow with your vehicle until it has been
driven at least 800 km (500 miles).
Installing snowplow
Read the following instructions before installing a snowplow:
•Front GAWR must not exceed 63% of the GVW. Add ballast weight to
the back of the vehicle, if necessary. Refer to the Safety Compliance
Certification Label to find Front GAWR.
•The Front Axle Accessory Reserve Capacity and the Total Accessory
Reserve Capacity listed on the bottom right of the Safety Compliance
Certification Label will determine whether or not the addition of a
snowplow will overload your vehicle.
•The weight of the snowplow and supporting components distributed to
the front axle must not exceed the front accessory reserve capacity.
•The total weight of the snowplow and aftermarket equipment must
not exceed the Total Accessory Reserve Capacity.
•The weight of the installed snowplow and aftermarket equipment must
not load the vehicle beyond the GAWR (front/rear) and GVWR listed
on the Safety Compliance Certification Label.
•The total weight of the snowplow and aftermarket equipment must be
considered part of the payload and must not exceed the Gross
Combined Weight Rating (GCWR) for towing.
•Federal and most local regulations require additional exterior lamps
for snowplow-equipped vehicles. Consult your dealer for additional
information.
Driving
141
ProCarManuals.com
Page 154 of 248
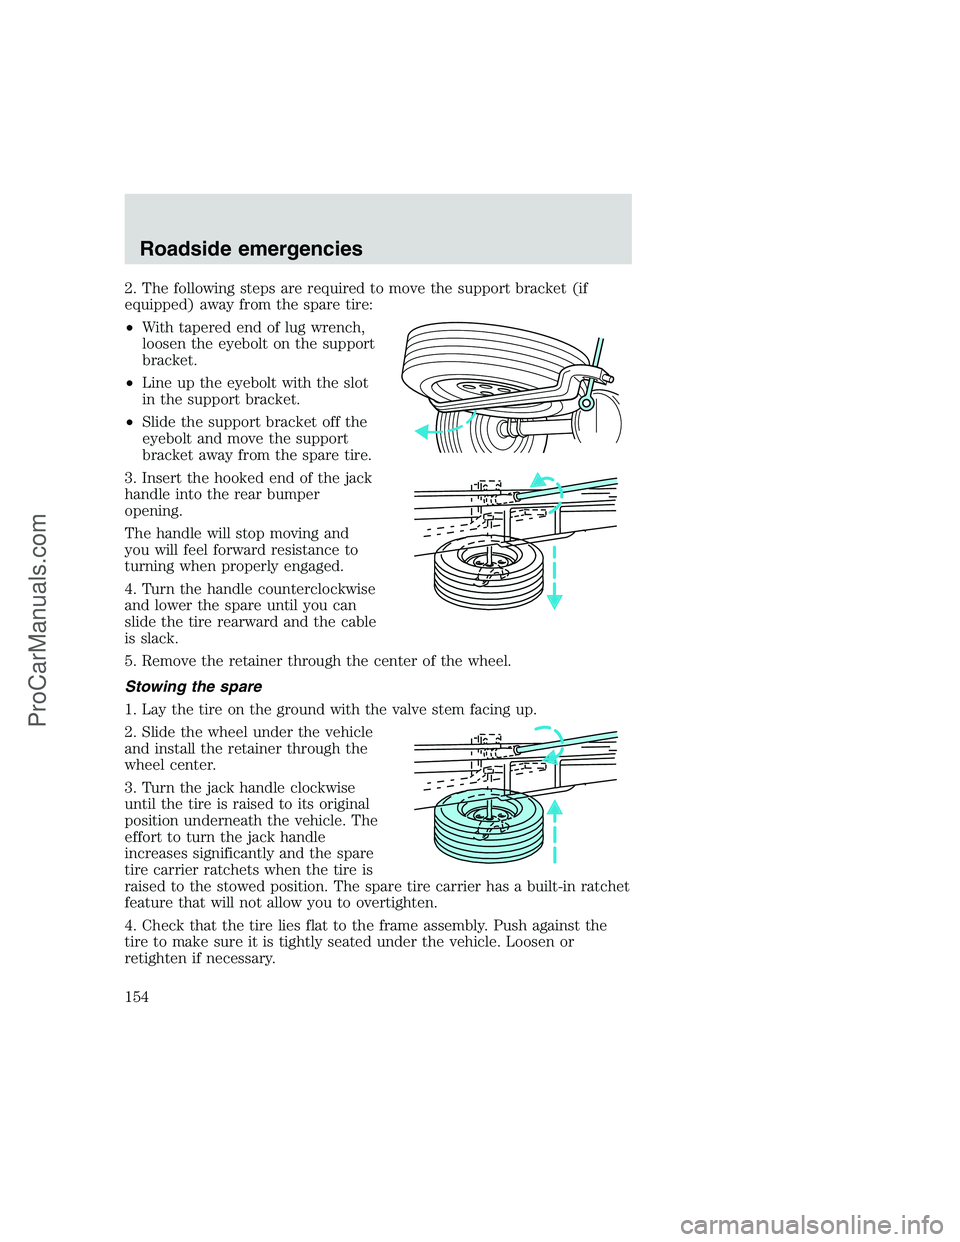
2. The following steps are required to move the support bracket (if
equipped) away from the spare tire:
•With tapered end of lug wrench,
loosen the eyebolt on the support
bracket.
•Line up the eyebolt with the slot
in the support bracket.
•Slide the support bracket off the
eyebolt and move the support
bracket away from the spare tire.
3. Insert the hooked end of the jack
handle into the rear bumper
opening.
The handle will stop moving and
you will feel forward resistance to
turning when properly engaged.
4. Turn the handle counterclockwise
and lower the spare until you can
slide the tire rearward and the cable
is slack.
5. Remove the retainer through the center of the wheel.
Stowing the spare
1. Lay the tire on the ground with the valve stem facing up.
2. Slide the wheel under the vehicle
and install the retainer through the
wheel center.
3. Turn the jack handle clockwise
until the tire is raised to its original
position underneath the vehicle. The
effort to turn the jack handle
increases significantly and the spare
tire carrier ratchets when the tire is
raised to the stowed position. The spare tire carrier has a built-in ratchet
feature that will not allow you to overtighten.
4. Check that the tire lies flat to the frame assembly. Push against the
tire to make sure it is tightly seated under the vehicle. Loosen or
retighten if necessary.
Roadside emergencies
154
ProCarManuals.com
Page 162 of 248
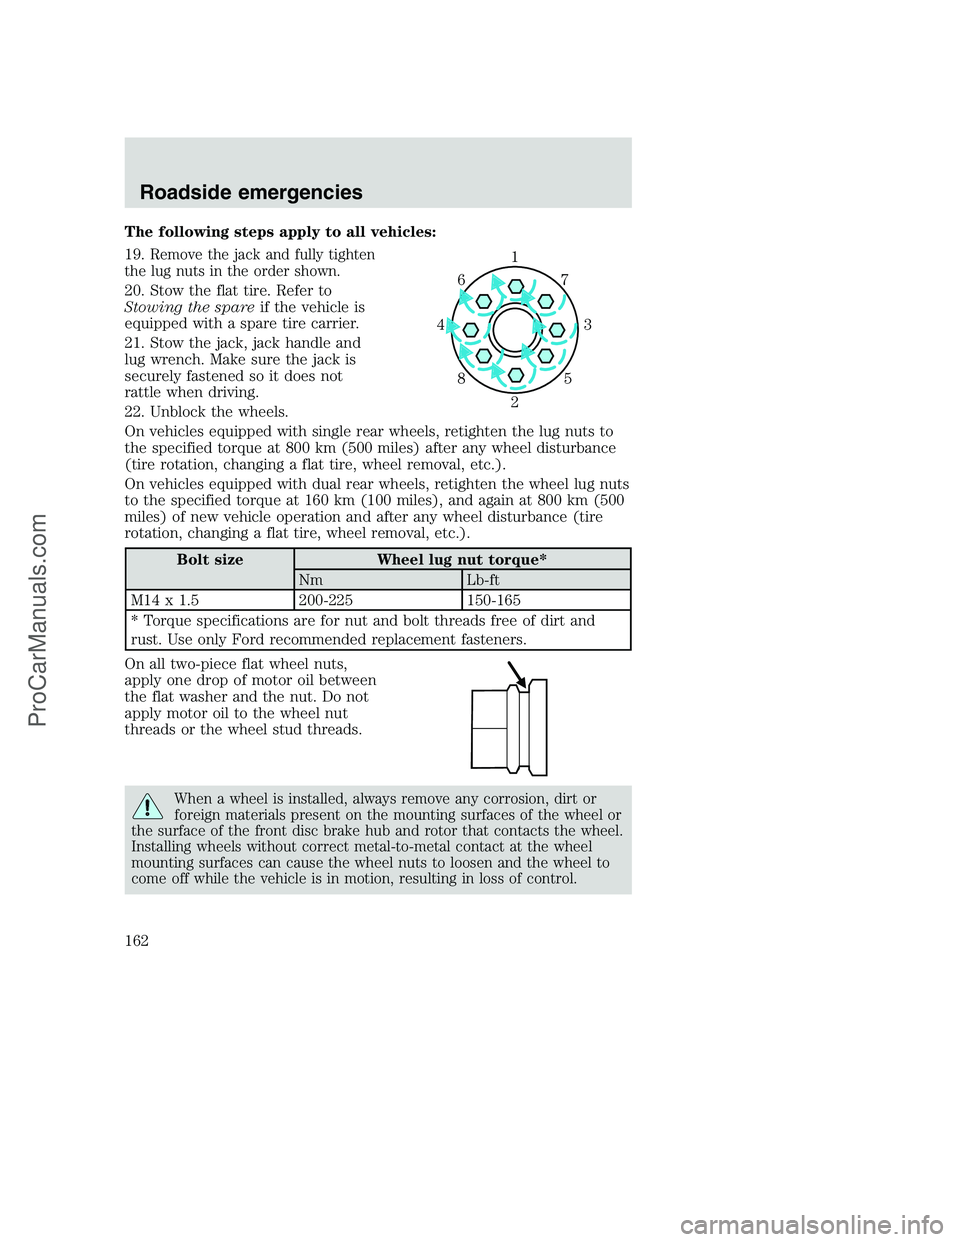
The following steps apply to all vehicles:
19.
Remove the jack and fully tighten
the lug nuts in the order shown.
20. Stow the flat tire. Refer to
Stowing the spareif the vehicle is
equipped with a spare tire carrier.
21. Stow the jack, jack handle and
lug wrench. Make sure the jack is
securely fastened so it does not
rattle when driving.
22. Unblock the wheels.
On vehicles equipped with single rear wheels, retighten the lug nuts to
the specified torque at 800 km (500 miles) after any wheel disturbance
(tire rotation, changing a flat tire, wheel removal, etc.).
On vehicles equipped with dual rear wheels, retighten the wheel lug nuts
to the specified torque at 160 km (100 miles), and again at 800 km (500
miles) of new vehicle operation and after any wheel disturbance (tire
rotation, changing a flat tire, wheel removal, etc.).
Bolt size Wheel lug nut torque*
Nm Lb-ft
M14 x 1.5 200-225 150-165
* Torque specifications are for nut and bolt threads free of dirt and
rust. Use only Ford recommended replacement fasteners.
On all two-piece flat wheel nuts,
apply one drop of motor oil between
the flat washer and the nut. Do not
apply motor oil to the wheel nut
threads or the wheel stud threads.
When a wheel is installed, always remove any corrosion, dirt or
foreign materials present on the mounting surfaces of the wheel or
the surface of the front disc brake hub and rotor that contacts the wheel.
Installing wheels without correct metal-to-metal contact at the wheel
mounting surfaces can cause the wheel nuts to loosen and the wheel to
come off while the vehicle is in motion, resulting in loss of control.
1
3 4
27 6
5 8
Roadside emergencies
162
ProCarManuals.com
Page 168 of 248
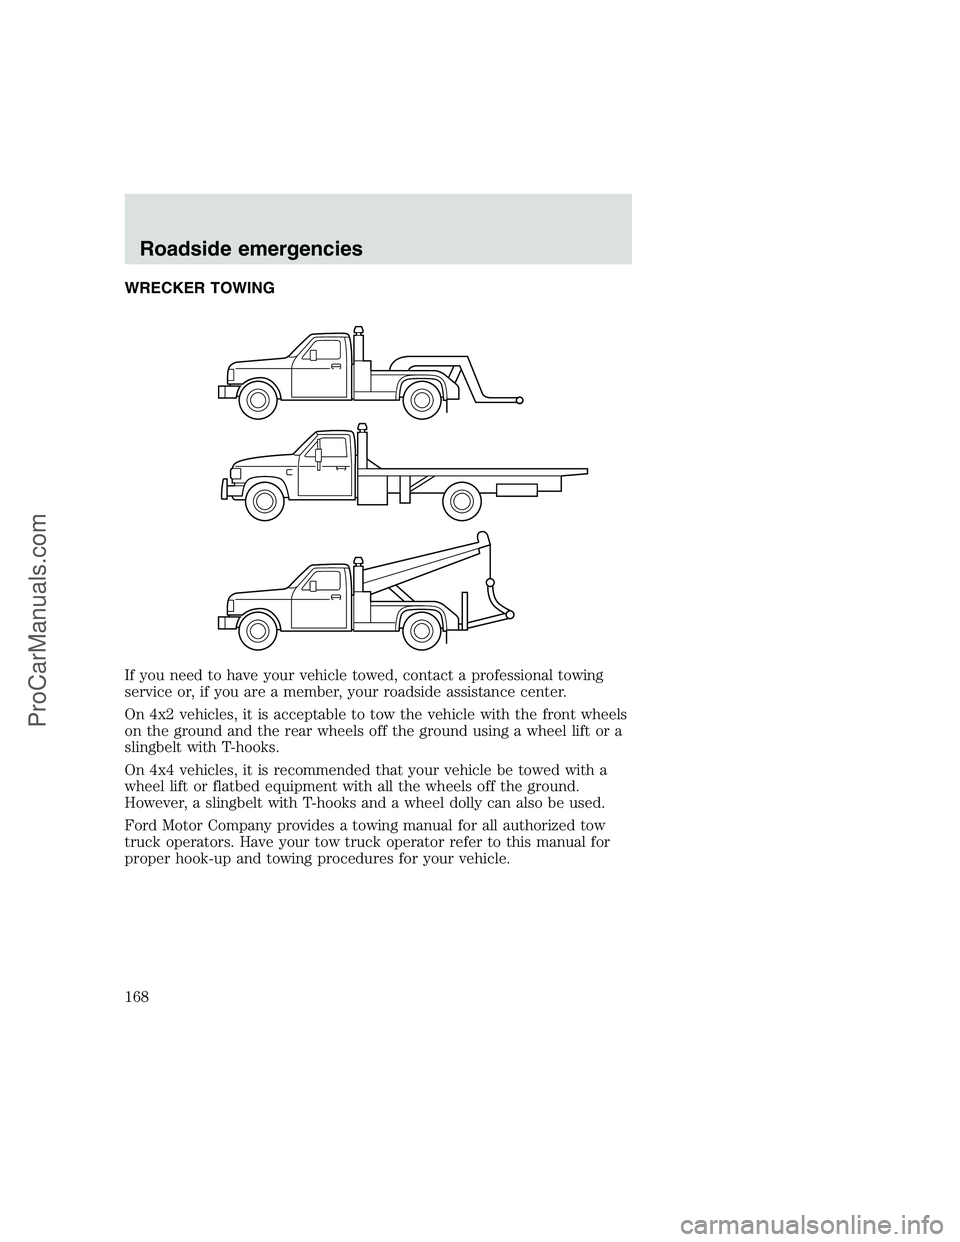
WRECKER TOWING
If you need to have your vehicle towed, contact a professional towing
service or, if you are a member, your roadside assistance center.
On 4x2 vehicles, it is acceptable to tow the vehicle with the front wheels
on the ground and the rear wheels off the ground using a wheel lift or a
slingbelt with T-hooks.
On 4x4 vehicles, it is recommended that your vehicle be towed with a
wheel lift or flatbed equipment with all the wheels off the ground.
However, a slingbelt with T-hooks and a wheel dolly can also be used.
Ford Motor Company provides a towing manual for all authorized tow
truck operators. Have your tow truck operator refer to this manual for
proper hook-up and towing procedures for your vehicle.
Roadside emergencies
168
ProCarManuals.com
Page 201 of 248
•Resting your foot on the brake pedal while driving may reduce fuel
economy.
•Combine errands and minimize stop-and-go driving.
Maintenance
•Keep tires properly inflated and use only recommended size.
•Operating a vehicle with the wheels out of alignment will reduce fuel
economy.
•Use recommended engine oil. Refer toLubricant Specifications.
•Perform all regularly scheduled maintenance items. Follow the
recommended maintenance schedule and owner maintenance checks
found in your vehicle Scheduled Maintenance Guide.
Conditions
•Heavily loading a vehicle or towing a trailer may reduce fuel economy
at any speed.
•Carrying unnecessary weight may reduce fuel economy (approximately
2 km/h [1 mpg] is lost for every 180 kg [400 lb] of weight carried).
•Adding certain accessories to your vehicle (for example bug
deflectors, rollover/light bars, running boards, ski/luggage racks) may
reduce fuel economy.
•Using fuel blended with alcohol may lower fuel economy.
•Fuel economy may decrease with lower temperatures during the first
12–16 km (8–10 miles) of driving.
•Driving on flat terrain offers improved fuel economy as compared to
driving on hilly terrain.
•Transmissions give their best fuel economy when operated in the top
cruise gear and with steady pressure on the gas pedal.
•Four-wheel-drive operation (if equipped) is less fuel efficient than
two-wheel-drive operation.
•Close windows for high speed driving.
EPA window sticker
Every new vehicle should have the EPA window sticker. Contact your
dealer if the window sticker is not supplied with your vehicle. The EPA
window sticker should be your guide for the fuel economy comparisons
with other vehicles.
Maintenance and care
201
ProCarManuals.com