1999 FORD F150 turn signal
[x] Cancel search: turn signalPage 4 of 232

P
ON
OFFRES
SET
ACCEL
COAST
EL
L
H H
F
CH
BRAKEPRND2
FUEL
RESETSELECT
RESET
THEFT
020406080
00
20
40
60
MPHkm/h
Headlamp control
(pg. 16)
Instrument panel
dimmer switch
(pg. 17)Turn signal and
wiper/washer control
(pg. 67) Instrument cluster
(pg. 6)Speed control*
(pg. 62)
Driver side air bag
(pg. 95)
* if equipped
Instrumentation
4
Page 9 of 232

Anti-lock brake system (ABS)
Momentarily illuminates when the
ignition is turned to the ON position
and the engine is off. If the light
remains on, continues to flash or
fails to illuminate, have the system
serviced immediately. With the ABS light on, the anti-lock brake system
is disabled and normal braking is still effective unless the brake warning
light also remains illuminated with parking brake released.
Turn signal
Illuminates when the left or right
turn signal or the hazard lights are
turned on. If one or both of the
indicators stay on continuously or
flash faster, check for a burned-out
turn signal bulb. Refer toExterior bulbsin theMaintenance and care
chapter.
High beams
Illuminates when the high beam
headlamps are turned on.
Anti-theft system (if equipped)
Refer toSecuriLockypassive
anti-theft systemin theControls
and featureschapter.
Charging system
Illuminates when the ignition is
turned to the ON position and the
engine is off. The light also
illuminates when the battery is not
charging properly, requiring
electrical system service.
ABS
THEFT
Instrumentation
9
Page 55 of 232

²Do not expose tapes to direct sunlight, high humidity, extreme heat or
extreme cold. Allow tapes that may have been exposed to extreme
temperatures to reach a moderate temperature before playing.
²Tighten very loose tapes by inserting a finger or pencil into the hole
and turning the hub.
²Remove loose labels before inserting tapes.
²Do not leave tapes in the cassette player for a long time when not
being played.
Radio frequency information
The Federal Communications Commission (FCC) and the Canadian Radio
and Telecommunications Commission(CRTC) establish the frequencies
AM and FM stations may use for their broadcasts. Allowable frequencies
are:
AM 530, 540±1600, 1610 kHz
FM 87.9, 88.1±107.1, 107.9 MHz
Not all frequencies are used in a given area.
Radio reception factors
Three factors can affect radio reception:
²Distance/strength.The further an FM signal travels, the weaker it is.
The listenable range of the average FM station is approximately 40 km
(24 miles). This range can be affected by ªsignal modulation.º Signal
modulation is a process radio stations use to increase their
strength/volume relative to other stations.
²Terrain.Hills, mountains and tall buildings between your vehicle's
antenna and the radio station signal can cause FM reception problems.
Static can be caused on AM stations by power lines, electric fences,
traffic lights and thunderstorms. Moving away from an interfering
structure (out of its ªshadowº) returns your reception to normal.
²Station overload.Weak signals are sometimes captured by stronger
signals when you pass a broadcast tower. A stronger signal may
temporarily overtake a weaker signal and play while the weak station
frequency is displayed.
The audio system automatically switches to single channel reception if it
will improve the reception of a station normally received in stereo.
Controls and features
55
Page 62 of 232

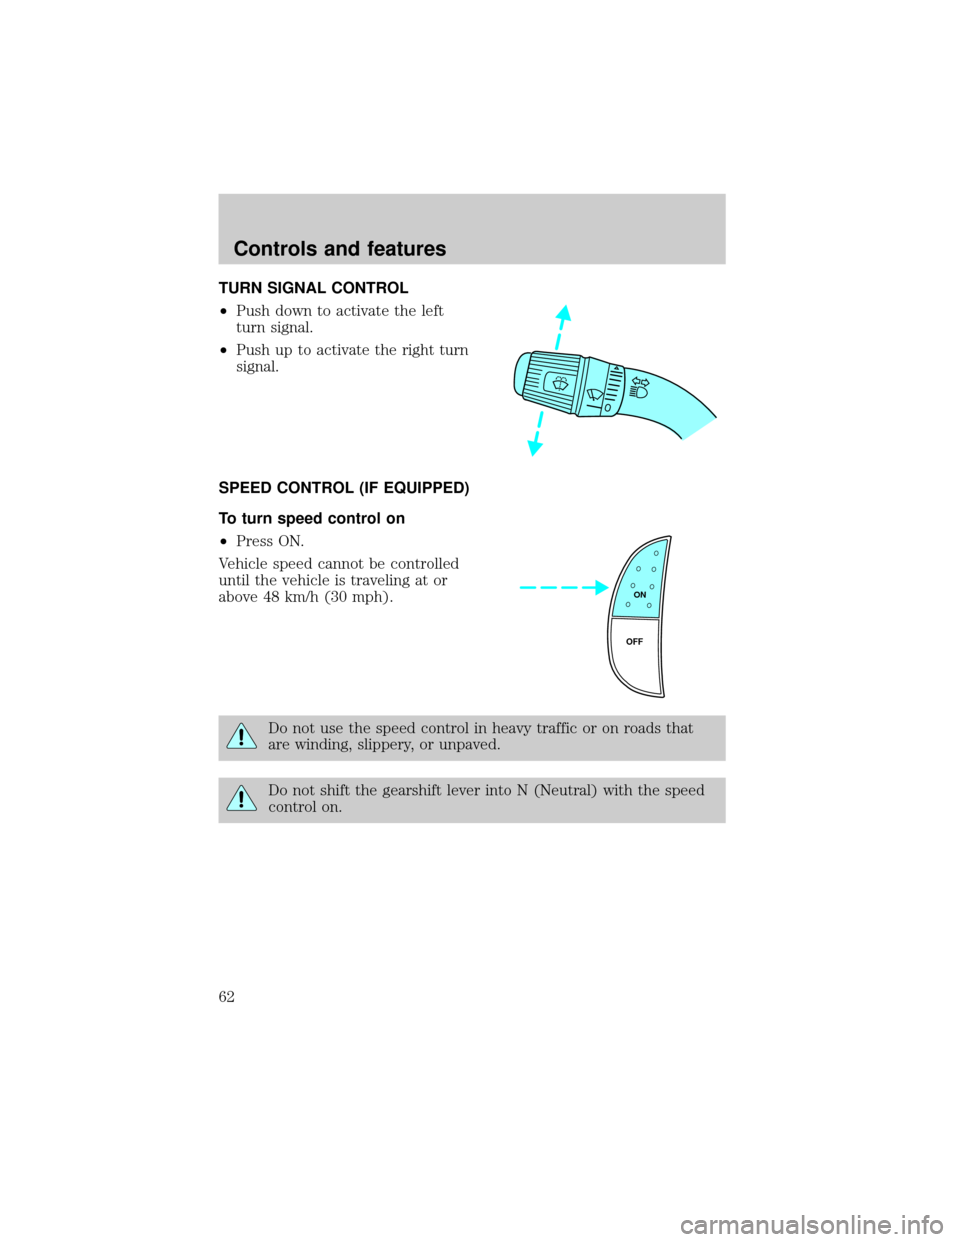
TURN SIGNAL CONTROL
²Push down to activate the left
turn signal.
²Push up to activate the right turn
signal.
SPEED CONTROL (IF EQUIPPED)
To turn speed control on
²Press ON.
Vehicle speed cannot be controlled
until the vehicle is traveling at or
above 48 km/h (30 mph).
Do not use the speed control in heavy traffic or on roads that
are winding, slippery, or unpaved.
Do not shift the gearshift lever into N (Neutral) with the speed
control on.
ON
OFF
Controls and features
62
Page 71 of 232

POWER SIDE VIEW MIRRORS (IF EQUIPPED)
The ignition must be in ACC or ON position to adjust the power side
view mirrors.
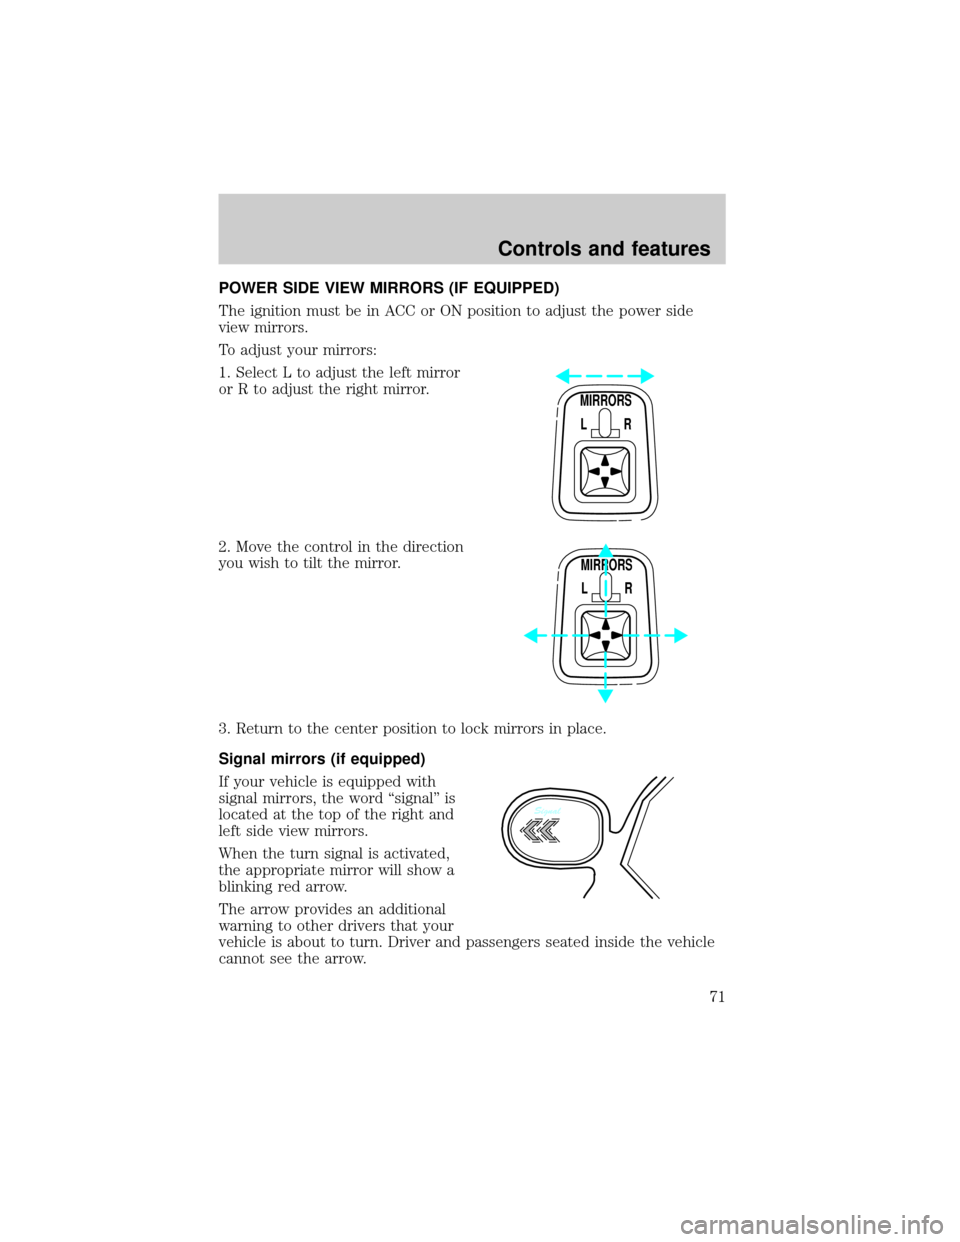
To adjust your mirrors:
1. Select L to adjust the left mirror
or R to adjust the right mirror.
2. Move the control in the direction
you wish to tilt the mirror.
3. Return to the center position to lock mirrors in place.
Signal mirrors (if equipped)
If your vehicle is equipped with
signal mirrors, the word ªsignalº is
located at the top of the right and
left side view mirrors.
When the turn signal is activated,
the appropriate mirror will show a
blinking red arrow.
The arrow provides an additional
warning to other drivers that your
vehicle is about to turn. Driver and passengers seated inside the vehicle
cannot see the arrow.
MIRRORS
L R
MIRRORS
L R
Signal
Controls and features
71
Page 204 of 232

EXTERIOR BULBS
Replacing exterior bulbs
Check the operation of the following lamps frequently:
²Headlamps
²Foglamps (if equipped)
²High-mount brakelamp
²Brakelamps
²Turn signals
²License plate lamp
²Tail lamps
²Back-up lamps
Do not remove lamp bulbs unless they can be replaced immediately with
new ones. If a bulb is removed for an extended period of time,
contaminants may enter the lamp housings and affect lamp performance.
Replacing headlamp bulbs
Handle a halogen headlamp bulb carefully and keep out of
children's reach. Grasp the bulb only by its plastic base and do
not touch the glass. The oil from your hand could cause the bulb to
break the next time the headlamps are operated.
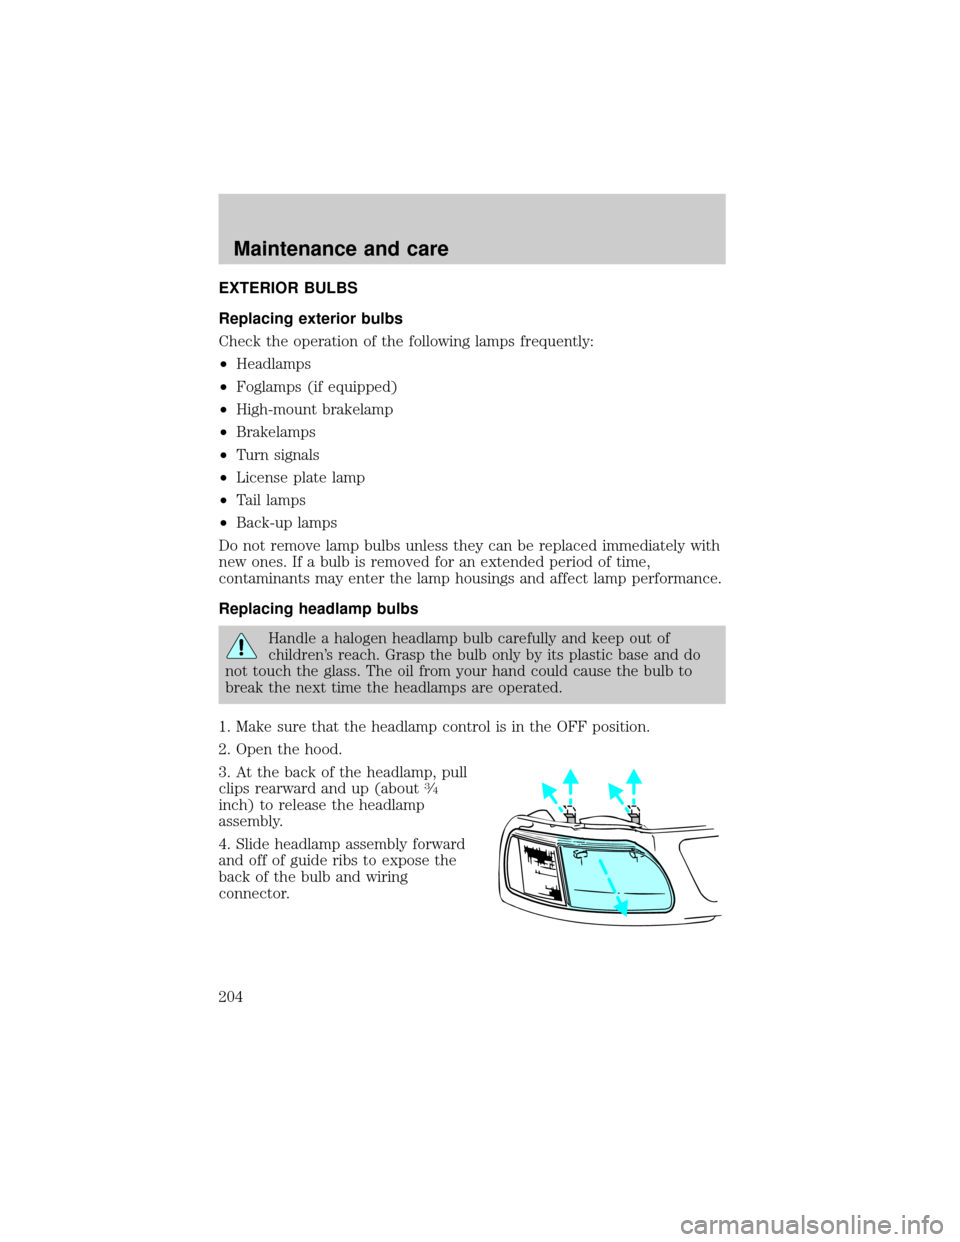
1. Make sure that the headlamp control is in the OFF position.
2. Open the hood.
3. At the back of the headlamp, pull
clips rearward and up (about
3¤4
inch) to release the headlamp
assembly.
4. Slide headlamp assembly forward
and off of guide ribs to expose the
back of the bulb and wiring
connector.
Maintenance and care
204
Page 206 of 232

Replacing front parking lamp/turn signal bulbs
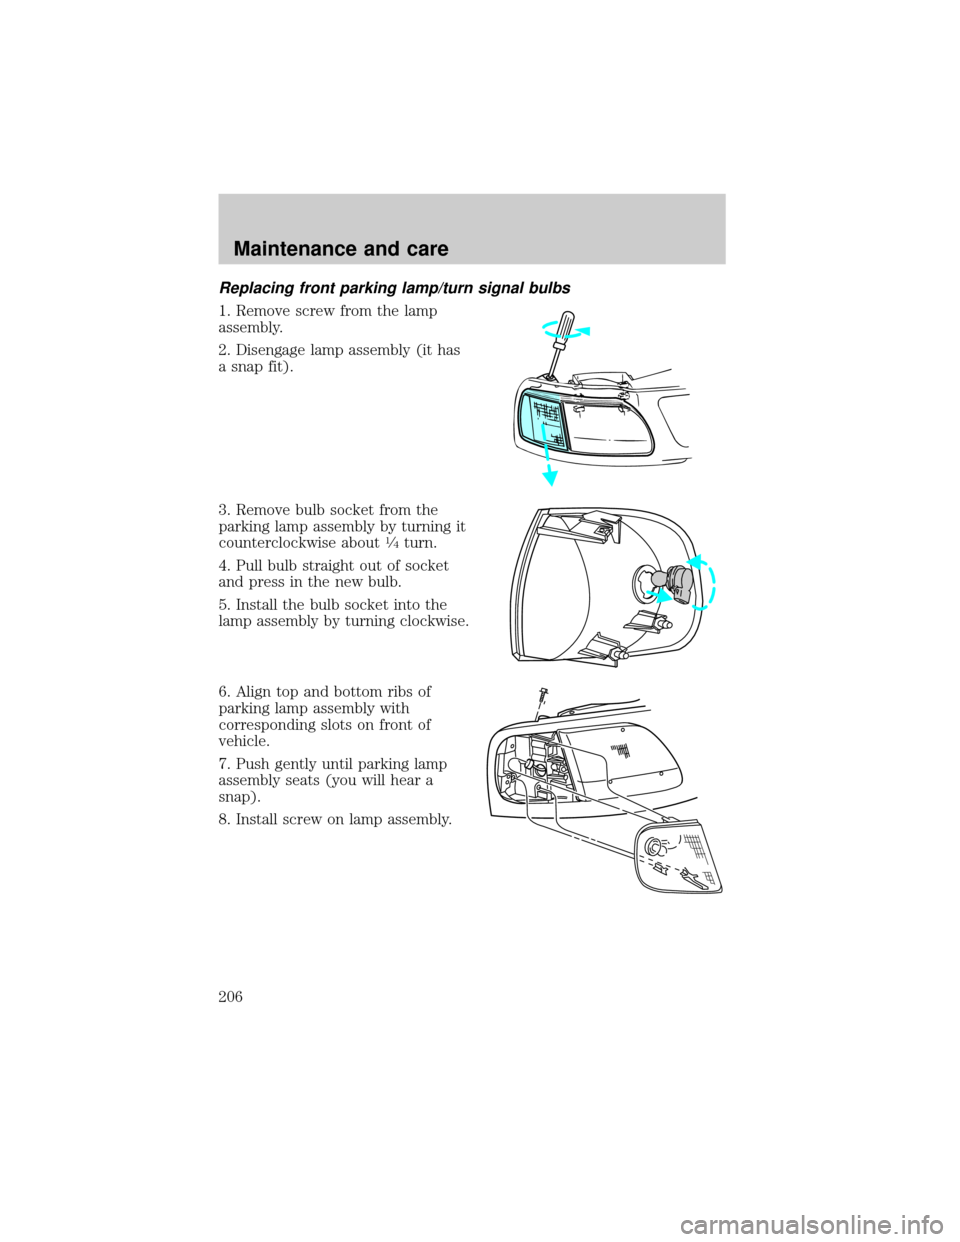
1. Remove screw from the lamp
assembly.
2. Disengage lamp assembly (it has
a snap fit).
3. Remove bulb socket from the
parking lamp assembly by turning it
counterclockwise about
1¤4turn.
4. Pull bulb straight out of socket
and press in the new bulb.
5. Install the bulb socket into the
lamp assembly by turning clockwise.
6. Align top and bottom ribs of
parking lamp assembly with
corresponding slots on front of
vehicle.
7. Push gently until parking lamp
assembly seats (you will hear a
snap).
8. Install screw on lamp assembly.
Maintenance and care
206
Page 226 of 232

detergent in fuel .....................197
filling your vehicle
with fuel ...........................195,198
quality ......................................197
running out of fuel .................197
safety information relating to
automotive fuels .....................195
Fuses ...................................150,151
Gas mileage
(see Fuel economy) ...199,200,201
Gauges .........................................12
engine coolant temperature
gauge .........................................13
engine oil pressure gauge ........15
fuel gauge ..................................12
GVWR
(Gross Vehicle Weight Rating)
calculating ...............................135
Hazard flashers .........................149
Headlamps
aiming ......................................209
bulb specifications ..................208
high beam ..............................9,68
warning chime ..........................11
Heating ........................................56
heater only system ..............56,57
heating and air
conditioning system ............58,60
Hood ..........................................169
Ignition .......................................219
Inspection/maintenance
(I/M) testing ..............................203
Instrument panel ..........................6
cleaning ...................................212
Keys
key in ignition chime ...............11
positions of the ignition ...........61
removing from the ignition ....127
Lamps
autolamp system .......................17
daytime running light ...............16
fog lamps ...................................16headlamps .................................16
headlamps, flash to pass ..........68
instrument panel, dimming .....17
interior lamps ...........................69
replacing bulbs ..204,206,207,208
Lane change indicator
(see Turn signal) ........................62
Lights, warning and indicator
air bag ..........................................8
air suspension .........................119
anti-lock brakes (ABS) ..............9
anti-theft .....................................9
brake ............................................8
charging system ..........................9
door ajar ....................................11
engine oil pressure ...................10
fuel reset ...................................11
low fuel ........................................6
safety belt ...................................8
service engine soon ....................7
turn signal indicator ...................9
Lumbar support, seats ..........87,88
Manual transmission
reverse .....................................127
Mirrors
fold away ...................................72
side view mirrors (power) .......71
Motorcraft parts ........................198
Octane rating ............................197
Odometer .....................................13
Overdrive .....................................68
Parking brake ............................117
Power distribution box
(see Fuses) ...............................154
Power door locks ..............70,80,81
Power steering ..........................118
fluid,
checking and adding .......181,182
Radio ....19,20,21,22,24,25,26,27,28
29,30,31,33,34,35,36
Relays ........................................150
Remote entry system ............79,80
Index
226