1999 FORD F150 height
[x] Cancel search: heightPage 92 of 232
²Allow the belt to retract. As the belt retracts, you will hear a clicking
sound. This indicates the safety belt is now in the automatic locking
mode.
How to disengage the automatic locking mode
Disconnect the combination lap/shoulder belt and allow it to retract
completely to disengage the automatic locking mode and activate the
vehicle sensitive (emergency) locking mode.
Front safety belt height adjustment
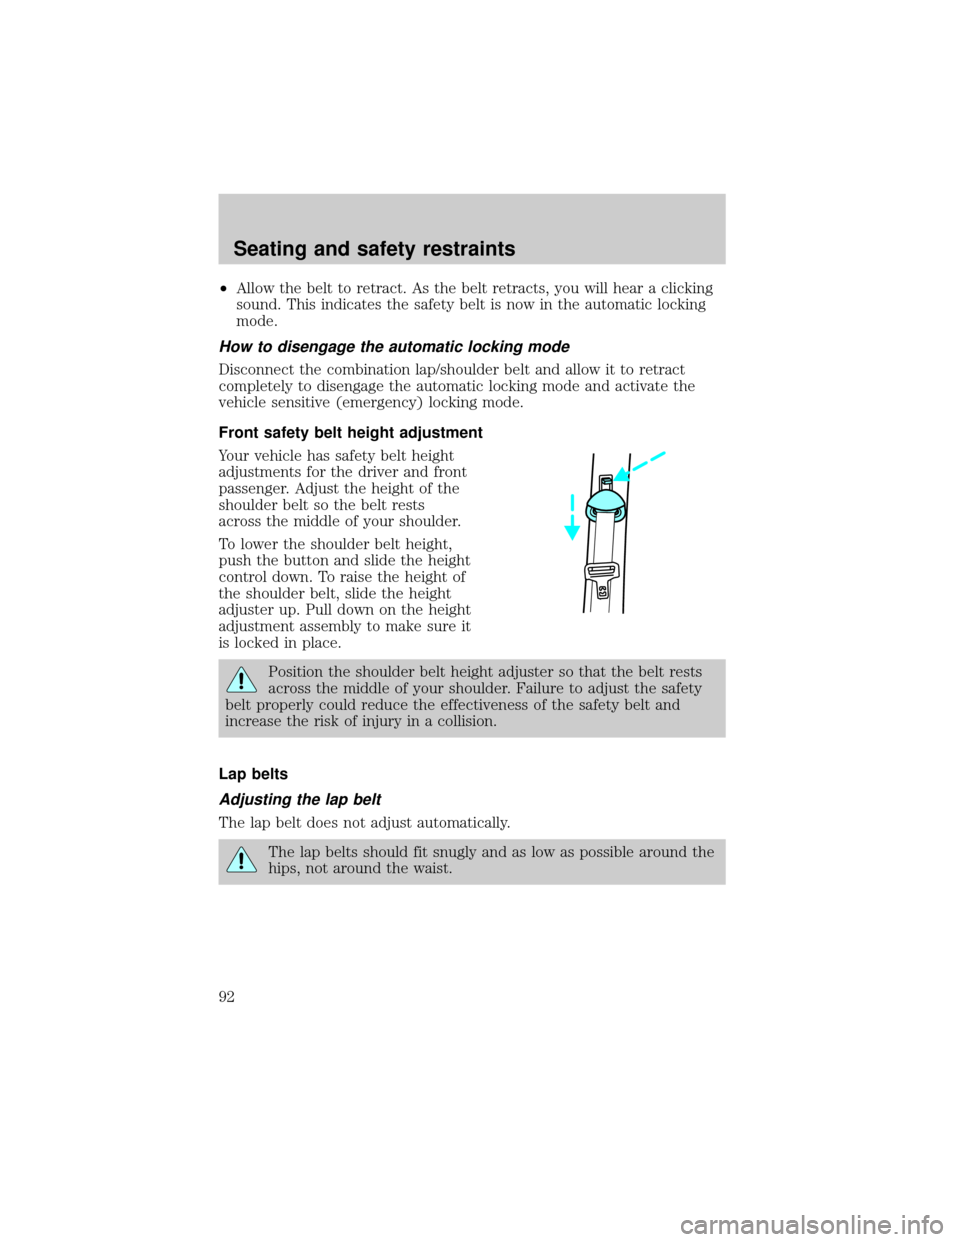
Your vehicle has safety belt height
adjustments for the driver and front
passenger. Adjust the height of the
shoulder belt so the belt rests
across the middle of your shoulder.
To lower the shoulder belt height,
push the button and slide the height
control down. To raise the height of
the shoulder belt, slide the height
adjuster up. Pull down on the height
adjustment assembly to make sure it
is locked in place.
Position the shoulder belt height adjuster so that the belt rests
across the middle of your shoulder. Failure to adjust the safety
belt properly could reduce the effectiveness of the safety belt and
increase the risk of injury in a collision.
Lap belts
Adjusting the lap belt
The lap belt does not adjust automatically.
The lap belts should fit snugly and as low as possible around the
hips, not around the waist.
Seating and safety restraints
92
Page 94 of 232
Conditions of operation
If... Then...
The driver's safety belt is not
buckled before the ignition switch
is turned to the ON position...The safety belt warning light
illuminates for one to two minutes
and the warning chime sounds for
four to eight seconds.
The driver's safety belt is buckled
while the indicator light is
illuminated and the warning chime
is sounding...The safety belt warning light and
warning chime turn off.
The driver's safety belt is buckled
before the ignition switch is turned
to the ON position...The safety belt warning light and
indicator chime remain off.
Safety belt maintenance
Inspect the safety belt systems periodically to make sure they work
properly and are not damaged. Inspect the safety belts to make sure
there are no nicks, wears or cuts, replacing if necessary. All safety belt
assemblies, including retractors, buckles, front seat belt buckle
assemblies (slide bar)(if equipped), shoulder belt height adjusters (if
equipped), child safety seat tether bracket assemblies (if equipped), and
attaching hardware, should be inspected after a collision. Ford
recommends that all safety belt assemblies used in vehicles involved in a
collision be replaced. However, if the collision was minor and a qualified
technician finds that the belts do not show damage and continue to
operate properly, they do not need to be replaced. Safety belt assemblies
not in use during a collision should also be inspected and replaced if
either damage or improper operation is noted.
Failure to inspect and if necessary replace the safety belt
assembly under the above conditions could result in severe
personal injuries in the event of a collision.
Refer toCleaning and maintaining the safety beltsin the
Maintenance and caresection.
Seating and safety restraints
94
Page 141 of 232
Trailer frontal area considerations:
²Not to exceed towing vehicle front area without Class III trailer towing
package
²Not to exceed 5.52 square meters (60 square feet) with Class III
trailer towing package
Preparing to tow
Use the proper equipment for towing a trailer, and make sure it is
properly attached to your vehicle. See your dealer or a reliable trailer
dealer if you require assistance.
Hitches
Do not use hitches that clamp onto the vehicle's bumper or attach to the
axle. You must distribute the load in your trailer so that 10% of the total
weight of the trailer is on the tongue.
Load equalizing hitch
When hooking up a trailer using a load equalizing hitch, always use the
following procedure:
1. Park the unloaded vehicle on a level surface. With the ignition on and
all doors closed, allow the vehicle to stand for several minutes so that it
can level.
2. Turn the air suspension (if equipped) control to OFF.
3. Measure the height of a reference point on the front and rear bumpers
at the center of the vehicle.
4. Attach the trailer to the vehicle and adjust the hitch equalizers so that
the front bumper height is within 0±13 mm (0.5 in) of the reference
point. After proper adjustment, the rear bumper should be no higher
than in Step 3.
5. Turn the air suspension (if equipped) control to ON.
Adjusting an equalizing hitch so the rear bumper of the vehicle
is lower or higher than it was unloaded will defeat the function
of the load equalizing hitch and may cause unpredictable handling.
Driving
141
Page 146 of 232
²The Front Axle Accessory Reserve Capacity and the Total Accessory
Reserve Capacity listed on the bottom right of the Safety Compliance
Certification Label will determine whether or not the addition of a
snowplow will overload your vehicle.
²The weight of the snowplow and supporting components distributed to
the front axle must not exceed the front accessory reserve capacity.
²The total weight of the snowplow and aftermarket equipment must
not exceed the Total Accessory Reserve Capacity.
²The weight of the installed snowplow and aftermarket equipment must
not load the vehicle beyond the GAWR (front/rear) and GVWR listed
on the Safety Compliance Certification Label.
²The total weight of the snowplow and aftermarket equipment must be
considered part of the payload and must not exceed the Gross
Combined Weight Rating (GCWR) for towing.
²Federal and most local regulations require additional exterior lamps
for snowplow-equipped vehicles. Consult your dealer for additional
information.
²After installing a snowplow to the vehicle, ensure the vehicle's front
toe alignment and front ride height are within specification (reset if
required). These specifications are located in the vehicle's Workshop
Manual. Adherence to the toe, tire pressures and ride height
specification is important for proper tire wear, ride, handling and
headlight aim. Also, maintain the engine oil and transmission fluid
change intervals following the severe duty schedule.
Do not exceed the GVWR or the GAWR specified on the Safety
Compliance Certification Label.
Removing snowplow
Read the following instructions before removing a snowplow:
²After removing a snowplow from the vehicle, ensure the vehicle's front
toe alignment and front ride height are within specification (reset if
required). These specifications are located in the vehicle's Workshop
Manual. Adherence to the toe and ride height specification is
important for proper tire wear, ride, handling and headlight aim.
Driving
146
Page 220 of 232
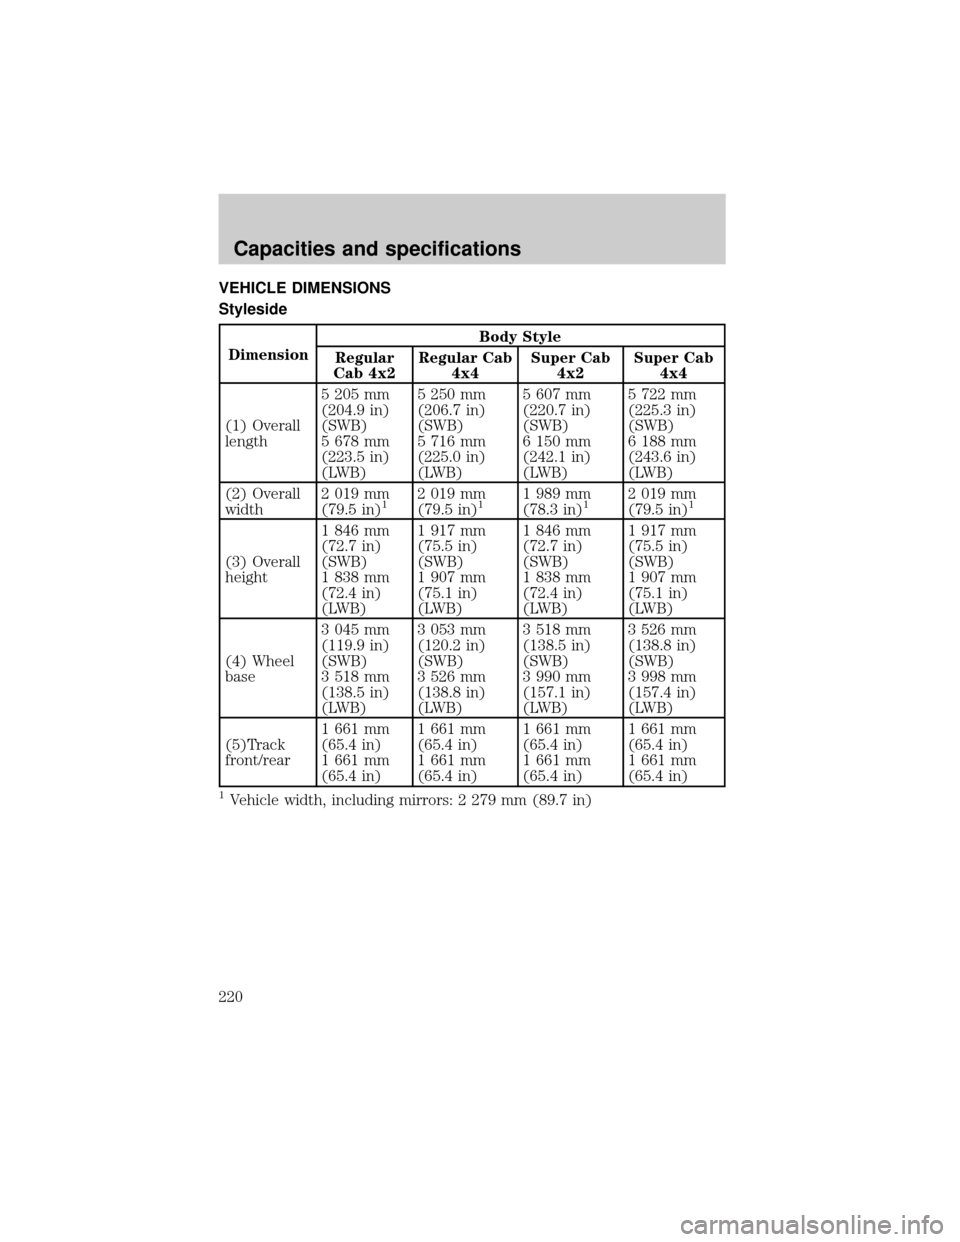
VEHICLE DIMENSIONS
Styleside
DimensionBody Style
Regular
Cab 4x2Regular Cab
4x4Super Cab
4x2Super Cab
4x4
(1) Overall
length5 205 mm
(204.9 in)
(SWB)
5 678 mm
(223.5 in)
(LWB)5 250 mm
(206.7 in)
(SWB)
5 716 mm
(225.0 in)
(LWB)5 607 mm
(220.7 in)
(SWB)
6 150 mm
(242.1 in)
(LWB)5 722 mm
(225.3 in)
(SWB)
6 188 mm
(243.6 in)
(LWB)
(2) Overall
width2 019 mm
(79.5 in)
12 019 mm
(79.5 in)11 989 mm
(78.3 in)12 019 mm
(79.5 in)1
(3) Overall
height1 846 mm
(72.7 in)
(SWB)
1 838 mm
(72.4 in)
(LWB)1 917 mm
(75.5 in)
(SWB)
1 907 mm
(75.1 in)
(LWB)1 846 mm
(72.7 in)
(SWB)
1 838 mm
(72.4 in)
(LWB)1 917 mm
(75.5 in)
(SWB)
1 907 mm
(75.1 in)
(LWB)
(4) Wheel
base3 045 mm
(119.9 in)
(SWB)
3 518 mm
(138.5 in)
(LWB)3 053 mm
(120.2 in)
(SWB)
3 526 mm
(138.8 in)
(LWB)3 518 mm
(138.5 in)
(SWB)
3 990 mm
(157.1 in)
(LWB)3 526 mm
(138.8 in)
(SWB)
3 998 mm
(157.4 in)
(LWB)
(5)Track
front/rear1 661 mm
(65.4 in)
1 661 mm
(65.4 in)1 661 mm
(65.4 in)
1 661 mm
(65.4 in)1 661 mm
(65.4 in)
1 661 mm
(65.4 in)1 661 mm
(65.4 in)
1 661 mm
(65.4 in)
1Vehicle width, including mirrors: 2 279 mm (89.7 in)
Capacities and specifications
220
Page 221 of 232
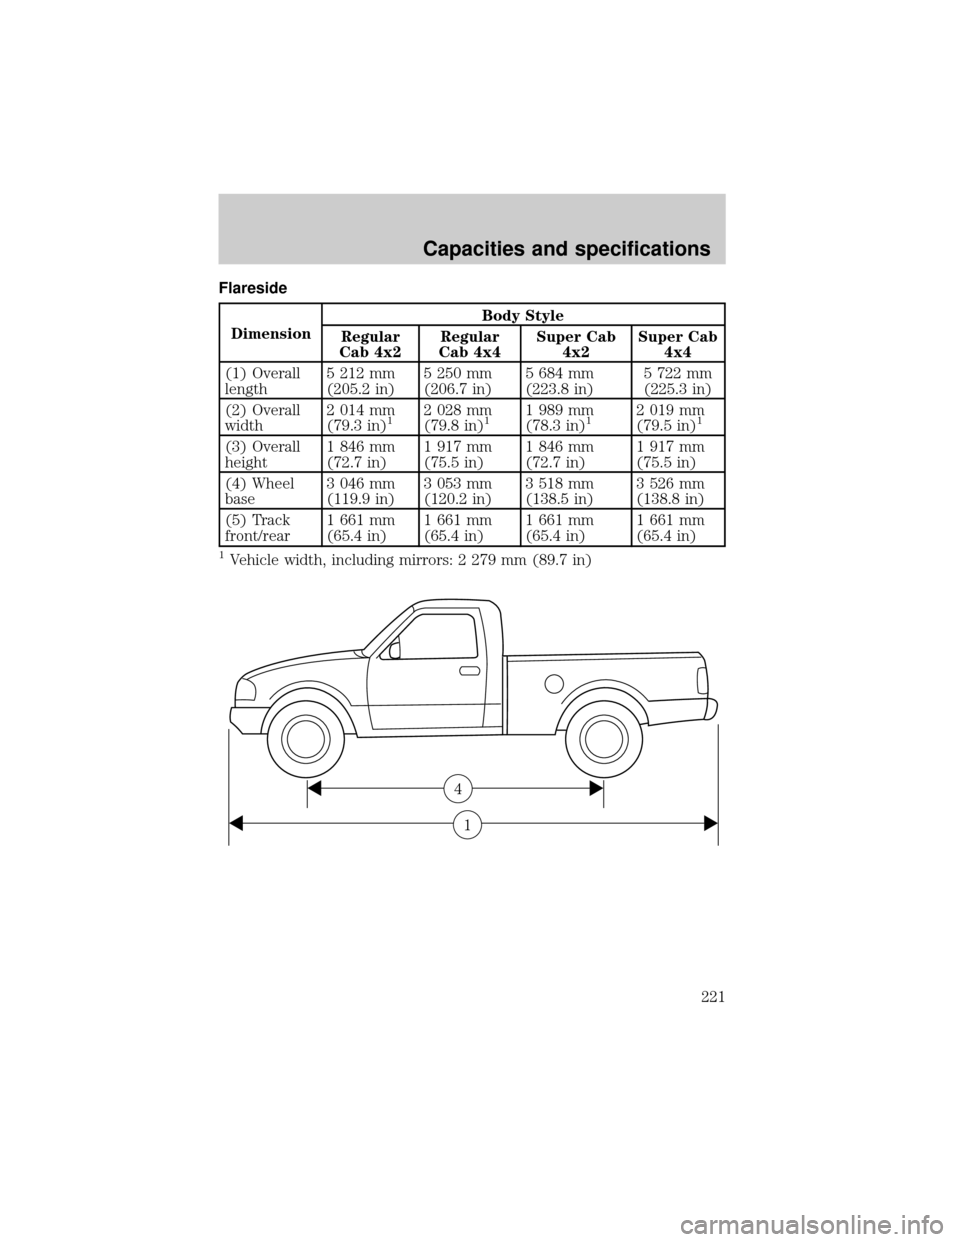
Flareside
DimensionBody Style
Regular
Cab 4x2Regular
Cab 4x4Super Cab
4x2Super Cab
4x4
(1) Overall
length5 212 mm
(205.2 in)5 250 mm
(206.7 in)5 684 mm
(223.8 in)5 722 mm
(225.3 in)
(2) Overall
width2 014 mm
(79.3 in)
12 028 mm
(79.8 in)11 989 mm
(78.3 in)12 019 mm
(79.5 in)1
(3) Overall
height1 846 mm
(72.7 in)1 917 mm
(75.5 in)1 846 mm
(72.7 in)1 917 mm
(75.5 in)
(4) Wheel
base3 046 mm
(119.9 in)3 053 mm
(120.2 in)3 518 mm
(138.5 in)3 526 mm
(138.8 in)
(5) Track
front/rear1 661 mm
(65.4 in)1 661 mm
(65.4 in)1 661 mm
(65.4 in)1 661 mm
(65.4 in)
1Vehicle width, including mirrors: 2 279 mm (89.7 in)
1
4
Capacities and specifications
221