Page 145 of 232

4WD ± Electronic shift transfer case
1. Place transmission in N (Neutral).
2. Shift the transfer case to 2H (2WD high).
3. Lockout the center disconnect by capping off one of the front axle
vacuum motor lines. See your dealer for assistance.
4. Maximum speed is 56 km/h (35 mph).
5. Maximum distance is 80 km (50 miles).
If a distance of 80 km (50 miles) or a speed of 56 km/h (35 mph) must
be exceeded, you must disconnect the rear driveshaft. With the rear
driveshaft disconnected, the maximum speed is 88 km/h (55 mph) and
there are no mileage restrictions.
See your dealer for help with disconnecting the driveshaft.
SNOWPLOWING
Ford recommends the following specifications for low speed, personal
use snow removal:
²F-150/F±250 4WD Regular Cab long wheelbase
²4.6L or 5.4L engine
²Heavy duty service package
²Super engine cooling
²Heavy duty front suspension package
²Automatic transmission with auxiliary automatic transmission fluid
cooling
²All-terrain tires
Do not install a snowplow and plow with your vehicle until it has been
driven at least 800 km (500 miles).
Installing snowplow
Read the following instructions before installing a snowplow:
²Front GAWR must not exceed 63% of the GVW. Add ballast weight to
the back of the vehicle, if necessary. Refer to the Safety Compliance
Certification Label to find Front GAWR.
Driving
145
Page 168 of 232

SERVICE RECOMMENDATIONS
To help you service your vehicle:
²We highlight do-it-yourself items in the engine compartment for easy
location.
²We provide a Scheduled Maintenance Guide which makes tracking
routine service easy.
If your vehicle requires professional service, your dealership can provide
necessary parts and service. Check your ªWarranty Guideº to find out
which parts and services are covered.
Use only recommended fuels, lubricants, fluids and service parts
conforming to specifications. Motorcraft parts are designed and built to
provide the best performance in your vehicle.
PRECAUTIONS WHEN SERVICING YOUR VEHICLE
Be especially careful when inspecting or servicing your vehicle.
²Do not work on a hot engine.
²When the engine is running, keep loose clothing, jewelry or long hair
away from moving parts.
²Do not work on a vehicle with the engine running in an enclosed
space, unless you are sure you have enough ventilation.
²Keep all lit cigarettes, open flames and other lit material away from
the battery and all fuel related parts.
If you disconnect the battery, the engine must ªrelearnº its idle
conditions before your vehicle will drive properly, as explained in the
Batterysection in this chapter.
Working with the engine off
²Automatic transmission:
1. Set the parking brake and ensure the gearshift is securely latched in P
(Park).
2. Turn off the engine and remove the key.
3. Block the wheels to prevent the vehicle from moving unexpectedly.
²Manual transmission:
1. Set the parking brake.
2. Depress the clutch and place the gearshift in 1 (First).
Maintenance and care
168
Page 170 of 232
IDENTIFYING COMPONENTS IN THE ENGINE COMPARTMENT
4.2L V6 engine
1. Battery
2. Engine oil filler cap
3. Engine oil dipstick
4. Clutch fluid reservoir (manual transmission)
5. Brake fluid reservoir
6. Engine coolant reservoir
7. Air filter assembly
8. Power steering fluid reservoir
9. Transmission fluid dipstick (automatic transmission)
10. Windshield washer fluid reservoir
67
1245
8910
3
Maintenance and care
170
Page 171 of 232
4.6L V8/5.4L V8 engines
1. Engine oil dipstick
2. Clutch fluid reservoir (manual transmission)
3. Power steering fluid reservoir
4. Brake fluid reservoir
5. Power distribution box
6. Air filter assembly
7. Engine coolant reservoir
8. Windshield washer fluid reservoir
9. Battery
10. Transmission fluid dipstick (automatic transmission)
11. Engine oil filler cap
87
910111324
6
5
Maintenance and care
171
Page 182 of 232

TRANSMISSION FLUID
Checking automatic transmission fluid
Refer to your Scheduled Maintenance Guide for scheduled intervals for
fluid checks and changes. Your transmission does not consume fluid.
However, the fluid level should be checked if the transmission is not
working properly, i.e., if the transmission slips or shifts slowly or if you
notice some sign of fluid leakage.
Automatic transmission fluid expands when warmed. To obtain an
accurate fluid check, drive the vehicle until it is at normal operating
temperature (approximately 30 km [20 miles]). If your vehicle has been
operated for an extended period at high speeds, in city traffic during hot
weather or pulling a trailer, the vehicle should be turned off for about
30 minutes to allow fluid to cool before checking.
1. Drive the vehicle 30 km (20 miles) or until it reaches normal operating
temperature.
2. Park the vehicle on a level surface and engage the parking brake.
3. With the parking brake engaged and your foot on the brake pedal,
start the engine and move the gearshift lever through all of the gear
ranges. Allow sufficient time for each gear to engage.
4. Latch the gearshift lever in P (Park) and leave the engine running.
5. Remove the dipstick, wiping it clean with a clean, dry lint free rag.
6. Install the dipstick making sure it is fully seated in the filler tube.
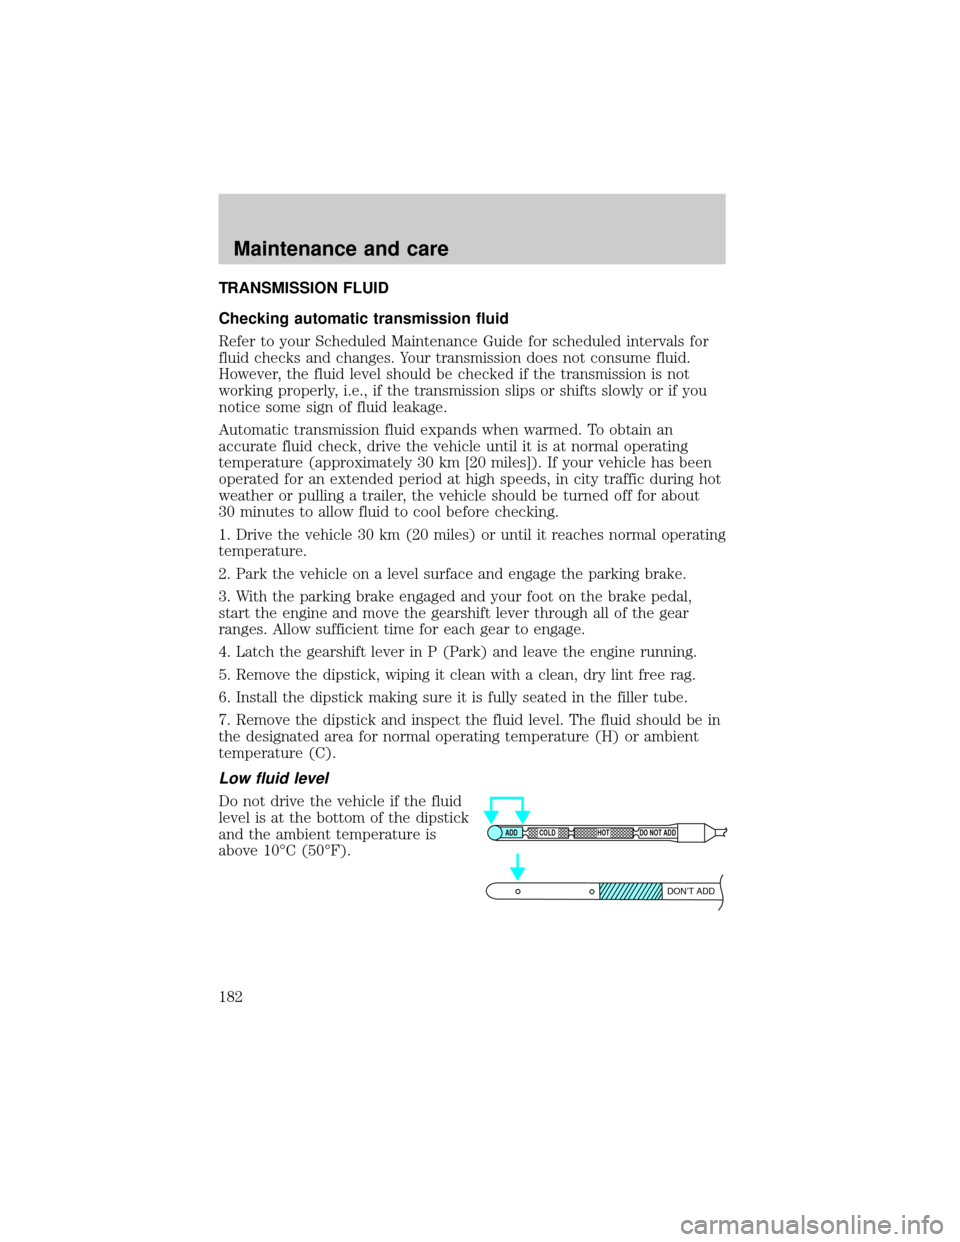
7. Remove the dipstick and inspect the fluid level. The fluid should be in
the designated area for normal operating temperature (H) or ambient
temperature (C).
Low fluid level
Do not drive the vehicle if the fluid
level is at the bottom of the dipstick
and the ambient temperature is
above 10ÉC (50ÉF).
ADD COLD HOT DO NOT ADD
DON’T ADD
Maintenance and care
182
Page 184 of 232
Adjusting automatic transmission fluid levels
Before adding any fluid, make sure the correct type is used. The type of
fluid used is normally indicated on the dipstick and/or dipstick handle
and also in theLubricant specificationssection in theCapacities and
specificationschapter.
Use of a non-approved automatic transmission fluid may cause
internal transmission component damage.
If necessary, add fluid in 250 mL (1/2 pint) increments through the filler
tube until the level is correct.
If an overfill occurs, excess fluid
should be removed by a qualified
technician.
An overfill condition of
transmission fluid may cause
shift and/or engagement
concerns and/or possible
damage.
Checking and adding manual transmission fluid
1. Clean the filler plug.
2. Remove the filler plug and
inspect the fluid level.
ADD COLD HOT DO NOT ADD
DON’T ADD
Maintenance and care
184
Page 216 of 232

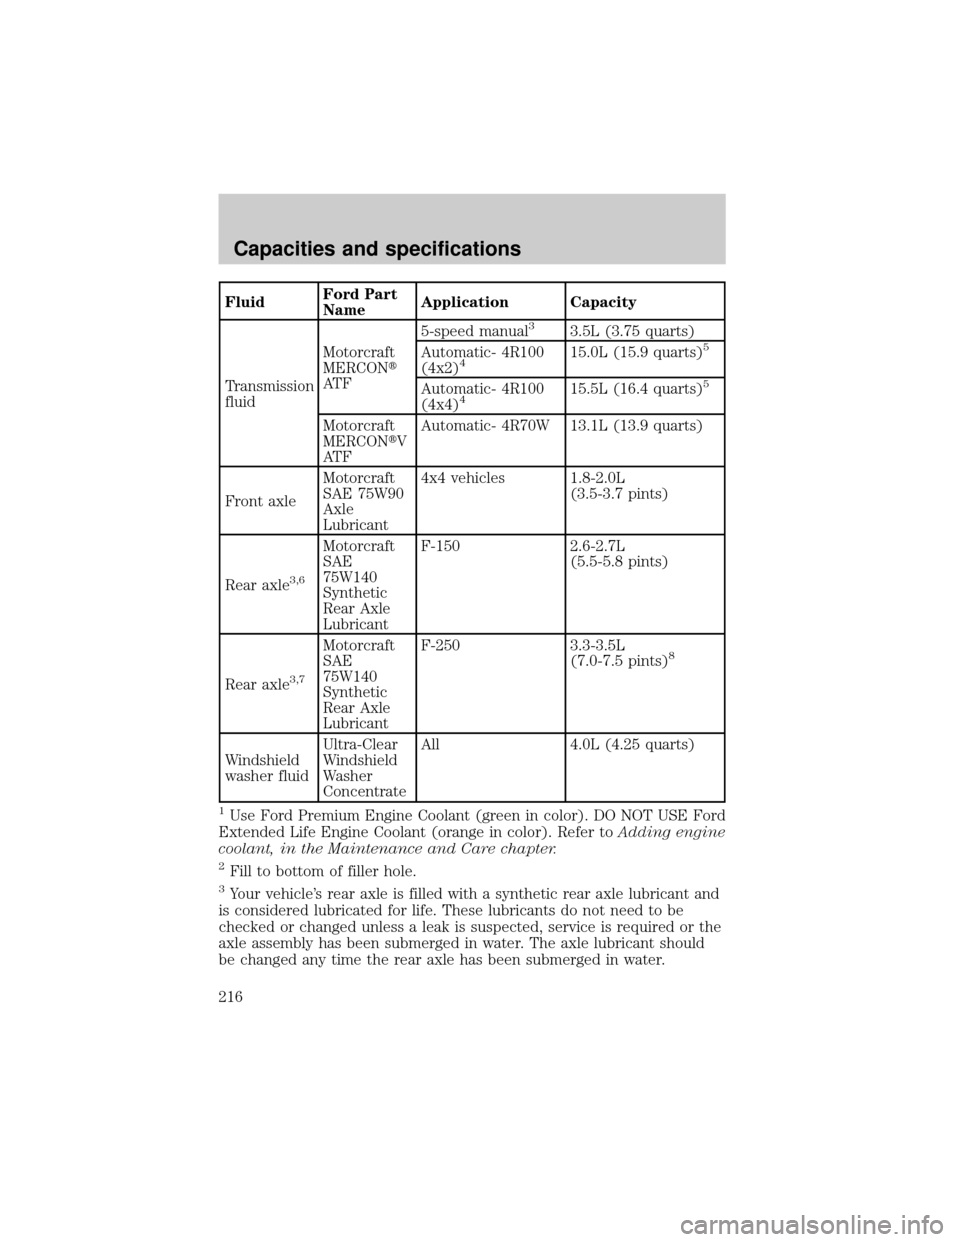
FluidFord Part
NameApplication Capacity
Transmission
fluidMotorcraft
MERCONt
AT F5-speed manual
33.5L (3.75 quarts)
Automatic- 4R100
(4x2)
415.0L (15.9 quarts)5
Automatic- 4R100
(4x4)415.5L (16.4 quarts)5
Motorcraft
MERCONtV
AT FAutomatic- 4R70W 13.1L (13.9 quarts)
Front axleMotorcraft
SAE 75W90
Axle
Lubricant4x4 vehicles 1.8-2.0L
(3.5-3.7 pints)
Rear axle
3,6
Motorcraft
SAE
75W140
Synthetic
Rear Axle
LubricantF-150 2.6-2.7L
(5.5-5.8 pints)
Rear axle
3,7
Motorcraft
SAE
75W140
Synthetic
Rear Axle
LubricantF-250 3.3-3.5L
(7.0-7.5 pints)8
Windshield
washer fluidUltra-Clear
Windshield
Washer
ConcentrateAll 4.0L (4.25 quarts)
1Use Ford Premium Engine Coolant (green in color). DO NOT USE Ford
Extended Life Engine Coolant (orange in color). Refer toAdding engine
coolant, in the Maintenance and Care chapter.
2Fill to bottom of filler hole.
3Your vehicle's rear axle is filled with a synthetic rear axle lubricant and
is considered lubricated for life. These lubricants do not need to be
checked or changed unless a leak is suspected, service is required or the
axle assembly has been submerged in water. The axle lubricant should
be changed any time the rear axle has been submerged in water.
Capacities and specifications
216
Page 217 of 232

Fill to 6±14 mm (1/4±9/16 inch) below bottom of filler hole.
4Ensure the correct automatic transmission fluid is used for a specific
application. Check the container to verify the fluid is MERCONt
approved. Transmission fluid requirements are indicated on the dipstick
handle. Refer to the Scheduled Maintenance Guide.
Do NOT use any non-approved automatic transmission fluid for an
application specifying MERCONt. Use of a non-approved fluid may cause
internal transmission component damage.
5Indicates only approximate dry-fill capacity. Some applications may
vary based on cooler size and if equipped with an in-tank cooler. The
amount of transmission fluid and fluid level should be set by the
indication on the dipstick's normal operating range.
6Add 118 ml (4 oz.) of additive friction modifier C8AZ-19B546-A, Ford
specification EST-M2C118±A, for complete fill of 8.8 inch and 9.75 inch
Traction-Lok axles.
7Add 236 ml (8 oz.) of additive Friction Modifier C8AZ-19B546-A, Ford
Specification EST-M2C118-A, for complete fill of 10.25 inch Traction-Lok
axles.
8In-vehicle refill: approximately 3.1L (6.5 pints).
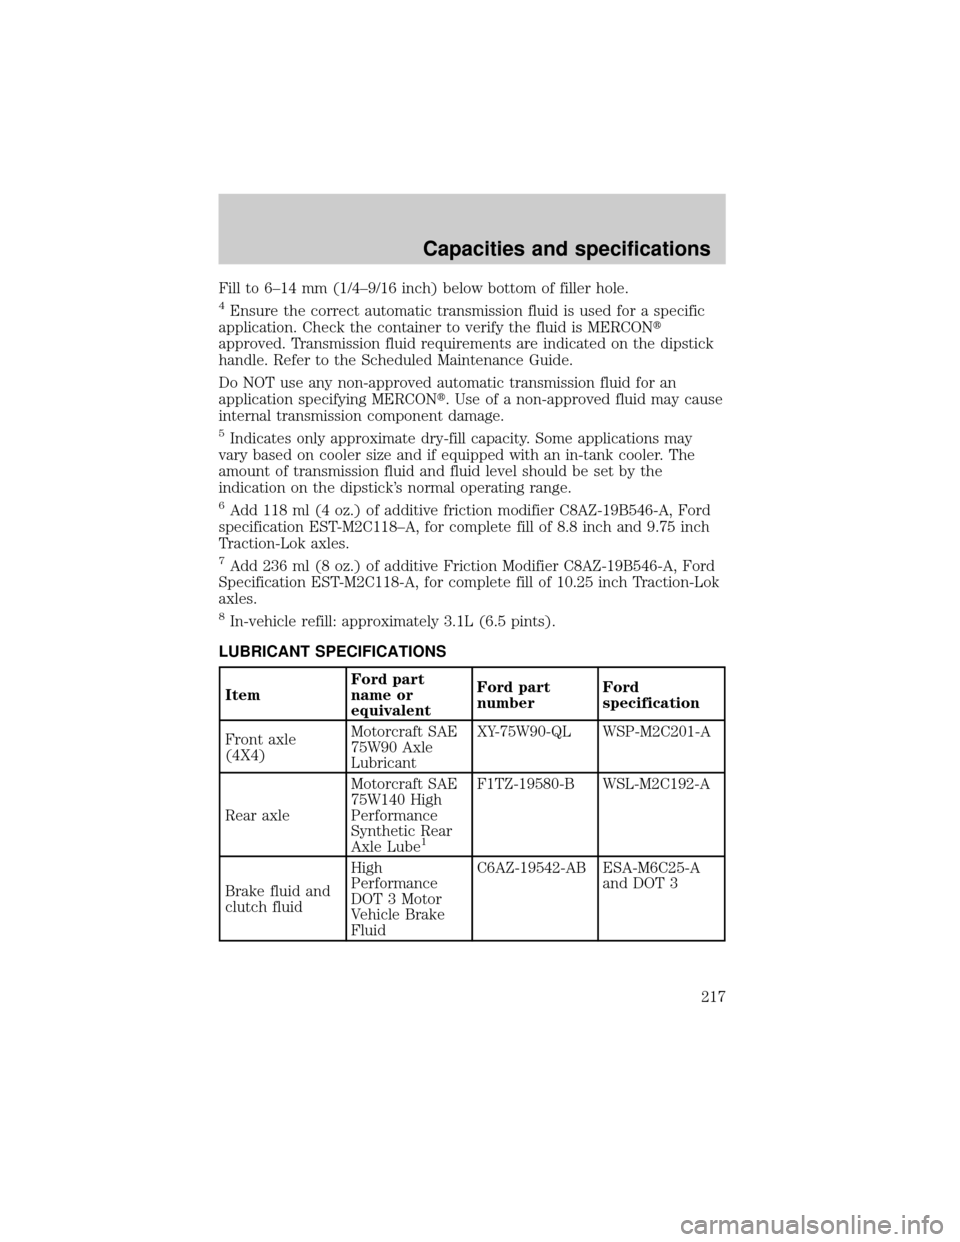
LUBRICANT SPECIFICATIONS
ItemFord part
name or
equivalentFord part
numberFord
specification
Front axle
(4X4)Motorcraft SAE
75W90 Axle
LubricantXY-75W90-QL WSP-M2C201-A
Rear axleMotorcraft SAE
75W140 High
Performance
Synthetic Rear
Axle Lube
1
F1TZ-19580-B WSL-M2C192-A
Brake fluid and
clutch fluidHigh
Performance
DOT 3 Motor
Vehicle Brake
FluidC6AZ-19542-AB ESA-M6C25-A
and DOT 3
Capacities and specifications
217