Page 46 of 96

4. Apply the parking brake and turn
engine OFF.
5. Block the wheel that is diagonally
opposite the tire you are changing.
The parking brake is on the
transmission. Therefore, the vehicle
will not be prevented from moving
when a rear wheel is lifted, even if
the parking brake is applied. Be
sure to block both directions of the wheel that is diagonally opposite to
the wheel that is being lifted.
If the vehicle slips off the jack, you or someone else could be
seriously injured.
6. Remove the spare tire and jack from the storage location.
7. Loosen the wheel nut by pulling up on the handle of the lug nut
wrench about one-half turn (counterclockwise). Do not remove the
wheel lug nuts until you raise the tire off the ground.
Replacing the tire
To lessen the risk of personal injury, do not put any part of your
body under the vehicle while changing a tire. Do not start the
engine when your vehicle is on the jack. The jack is only meant for
changing the tire.
Roadside emergencies
46
Page 47 of 96
8. Position the jack to raise the front or rear wheel.
•Never use the front or rear
differential as a jacking point.
Rear axle jacking points:
Front axle jacking points:
Place the jack under the front axle.
9. Raise the vehicle until the wheel is completely off the ground.
10. Remove the lug nuts with the lug nut wrench.
11. Replace the flat tire with the spare tire.
12. Use the lug nut wrench to screw
the lug nut snugly against the
wheel.
13. Lower the vehicle.
14. Remove the jack and fully
tighten the lug nuts in the following pattern:
Roadside emergencies
47
Page 48 of 96

Never use wheels or lug
nuts different than the
original equipment as this could
damage the wheel or mounting
system. This damage could allow
the wheels to come off while the
vehicle is being driven.
15. Replace any wheel trim.
16. Stow the jack, handle and lug wrench.
17. Unblock the wheels.
On vehicles equipped with dual rear wheels, retighten the wheel lug nuts
to the specified torque at 160 km (100 miles), and again at 800 km (500
miles) of new vehicle operation and after any wheel disturbance (tire
rotation, changing a flat tire, wheel removal, etc.).
Bolt size Wheel lug nut torque*
Nm Lb-ft
M14 x 1.5 200-225 150-165
* Torque specifications are for nut and bolt threads free of dirt and rust. Use
only Ford recommended replacement fasteners.
On all two-piece flat wheel nuts,
apply one drop of motor oil between
the flat washer and the nut. Do not
apply motor oil to the wheel nut
threads or the wheel stud threads.
When a wheel is installed, always remove any corrosion, dirt or
foreign materials present on the mounting surfaces of the wheel or
the surface of the front disc brake hub and rotor that contacts the wheel.
Installing wheels without correct metal-to-metal contact at the wheel
mounting surfaces can cause the wheel nuts to loosen and the wheel to
come off while the vehicle is in motion, resulting in loss of control.
JUMP STARTING YOUR VEHICLE
The gases around the battery can explode if exposed to flames,
sparks, or lit cigarettes. An explosion could result in injury or
vehicle damage.
1
3 4
27 6
5 8
Roadside emergencies
48
Page 53 of 96
After the disabled vehicle has been started and the jumper cables
removed, allow it to idle for several minutes so the engine computer can
relearnits idle conditions.
WRECKER TOWING
If you need to have your vehicle towed, contact a professional towing
service or, if you are a member, your roadside assistance center. It is
recommended that your vehicle be towed with a wheel lift or flatbed
equipment.
When calling for a tow truck, tell the operator what kind of vehicle you
have.
Roadside emergencies
53
Page 54 of 96

SERVICE RECOMMENDATIONS
To help you service your vehicle:
•We highlight do-it-yourself items in the engine compartment for easy
location.
•We provide a Scheduled Maintenance Guide which makes tracking
routine service easy.
If your vehicle requires professional service, your dealership can provide
necessary parts and service. Check your “Warranty Guide” to find out
which parts and services are covered.
Use only recommended fuels, lubricants, fluids and service parts
conforming to specifications. Motorcraft parts are designed and built to
provide the best performance in your vehicle.
PRECAUTIONS WHEN SERVICING YOUR VEHICLE
Be especially careful when inspecting or servicing your vehicle.
•Do not work on a hot engine.
•When the engine is running, make sure that loose clothing, jewelry or
long hair does not get caught up in moving parts.
•Do not work on a vehicle with the engine running in an enclosed
space, unless you are sure you have enough ventilation.
•Keep all lit cigarettes, open flames and other lit material away from
the battery and all fuel related parts.
If you disconnect the battery, the engine must “relearn” its idle
conditions before your vehicle will drive properly, as explained inBattery
in this chapter.
Working with the engine off
1. Set the parking brake and ensure the gearshift is securely latched in P
(Park).
2. Turn off the engine and remove the key.
3. Block the wheels to prevent the vehicle from moving unexpectedly.
Working with the engine on
1. Set the parking brake and ensure the gearshift is securely latched in P
(Park).
2. Block the wheels to prevent the vehicle from moving unexpectedly.
Maintenance and care
54
Page 64 of 96
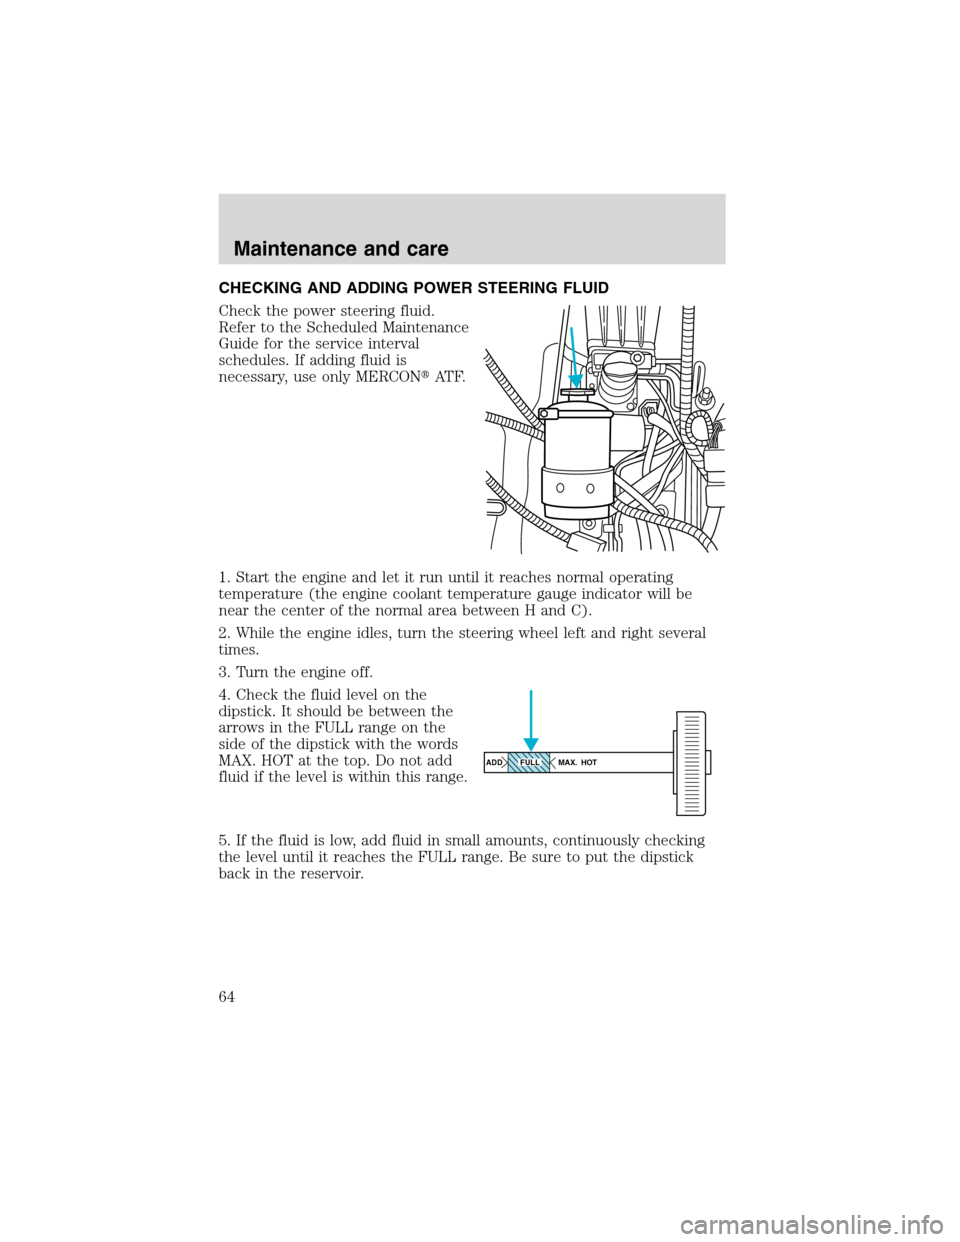
CHECKING AND ADDING POWER STEERING FLUID
Check the power steering fluid.
Refer to the Scheduled Maintenance
Guide for the service interval
schedules. If adding fluid is
necessary, use only MERCON�AT F.
1. Start the engine and let it run until it reaches normal operating
temperature (the engine coolant temperature gauge indicator will be
near the center of the normal area between H and C).
2. While the engine idles, turn the steering wheel left and right several
times.
3. Turn the engine off.
4. Check the fluid level on the
dipstick. It should be between the
arrows in the FULL range on the
side of the dipstick with the words
MAX. HOT at the top. Do not add
fluid if the level is within this range.
5. If the fluid is low, add fluid in small amounts, continuously checking
the level until it reaches the FULL range. Be sure to put the dipstick
back in the reservoir.
ADD MAX. HOTFULL
Maintenance and care
64
Page 70 of 96

Tire rotation
Because your vehicle’s tires perform different jobs, they often wear
differently. To make sure your tires wear evenly and last longer, rotate
them as indicated in the Scheduled Maintenance Guide. If you notice
that the tires wear unevenly, have them checked.
Replacing the tires
Replace the tires when the wear
band is visible through the tire
treads.
Failure to follow these precautions may adversely affect the
handling of the vehicle and make it easier for the driver to lose
control and roll over.
Tires that are larger or smaller than your vehicle’s original tires may also
affect the accuracy of your speedometer.
The tires on your vehicle have been match mounted to the original
equipment wheels. Replacement tires should be mounted so that the
match mount mark on the tire aligns with the small dimple in the face of
the wheel rim.
SNOW TIRES AND CHAINS
Snow tires must be the same size and grade as the tires you
currently have on your vehicle.
The tires on your vehicle have all weather treads to provide traction in
rain and snow. However, in some climates, you may need to use snow
tires and chains. If you need to use chains, it is recommended that steel
wheels (of the same size and specifications) be used as chains may chip
aluminum wheels.
Maintenance and care
70
Page 76 of 96

condition. To ready the on-board diagnostics system for I/M testing, a
minimum of 30 minutes of city and highway driving is necessary as
described below:
•First, at least 10 minutes of driving on an expressway or highway.
•Next, at least 20 minutes driving in stop-and-go, city-type traffic with
at least four idle periods.
Allow the vehicle to sit for at least eight hours without starting the
engine. Then, start the engine and complete the above driving cycle. The
engine must warm up to its normal operating temperature. Once started,
do not turn off the engine until the above driving cycle is complete.
EXTERIOR BULBS
Replacing exterior bulbs
Check the operation of the following lamps frequently:
•Headlamps
•Tail lamps
•Brakelamps
•Turn signals
•Backup lamps
•License plate lamp
Do not remove lamp bulbs unless they will be replaced immediately. If a
bulb is removed for an extended period of time, contaminants may enter
the lamp housings and affect performance.
CLEANING AND CARING FOR YOUR VEHICLE
Refer to the Customer Assistance chapter for a list of Ford-approved
cleaners, polishes and waxes.
Cleaning the wheels
Wash with the same detergent as the body of your vehicle. Do not use
acid-based or alcohol-based wheel cleaners, steel wool, fuel or strong
detergents. Never use abrasives that will damage the finish of special
wheel surfaces. Use a tar remover to remove grease and tar.
The brushes used in some automatic car washes may damage the finish
on your wheels. Before going to a car wash, find out if the brushes are
abrasive.
Maintenance and care
76