1999 FORD EXPLORER light
[x] Cancel search: lightPage 161 of 264

Once through water, always try the brakes. Wet brakes do not stop the
vehicle as effectively as dry brakes. Drying can be improved by moving
your vehicle slowly while applying light pressure on the brake pedal.
After driving through mud, clean off residue stuck to rotating driveshafts
and tires. Excess mud stuck on tires and rotating driveshafts causes an
imbalance that could damage drive components.
If the transmission, transfer case or front axle are submerged in water,
their fluids should be checked and changed, if necessary.
Water intrusion into the transmission may damage the
transmission.
If the rear axle is submerged in water, the rear axle lubricant should be
checked and changed, if necessary. The rear axle is filled with a
synthetic lubricant and does not normally require a lubricant change for
the life of the vehicle. Rear axle lubricant quantities should not need to
be checked unless a leak is suspected.
Driving on hilly or sloping terrain
When driving on a hill, avoid driving crosswise or turning on steep
slopes. You could lose traction and slip sideways. Drive straight up,
straight down or avoid the hill completely. Know the conditions on the
other side of a hill before driving over the crest.
When climbing a steep hill, start in a lower gear rather than downshifting
to a lower gear from a higher gear once the ascent has started. This
reduces the strain on the engine.
When descending a steep hill, avoid sudden braking. Shift to a lower gear
when added engine braking is desired.
When speed control is on and you are driving uphill, your vehicle speed
may drop considerably, especially if you are carrying a heavy load.
If vehicle speed drops more than 16 km/h (10 mph), the speed control
will cancel automatically. Resume speed with accelerator pedal.
If speed control cancels after climbing the hill, reset speed by pressing
and holding the SET ACCEL button (to resume speeds over 50 km/h (30
mph).
Automatic transmissions may shift frequently while driving up steep
grades. Eliminate frequent shifting by shifting out of
(Overdrive) into
D (Drive).
Driving
161
Page 163 of 264

You should either know the terrain or examine maps of the area before
driving. Map out your route before driving in the area. For more
information on driving off-road, read the ªFour Wheelingº supplement in
your owner's portfolio.
If your vehicle gets stuck
If the vehicle is stuck in mud or snow it may be rocked out by shifting
from forward and reverse gears, stopping between shifts, in a steady
pattern. Press lightly on the accelerator in each gear.
Do not rock the vehicle for more than a few minutes. The
transmission and tires may be damaged or the engine can
overheat.
Do not spin the wheels at over 56 km/h (35 mph). The tires may
fail and injure a passenger or bystander.
Sand
When driving over sand, try to keep all four wheels on the most solid
area of the trail. Do not reduce the tire pressures but shift to a lower
gear and drive steadily through the terrain. Apply the accelerator slowly
and avoid spinning the wheels.
Mud and water
If you must drive through high water, drive slowly. Traction or brake
capability may be limited.
When driving through water, determine the depth; avoid water higher
than the bottom of the hubs (if possible) and proceed slowly. If the
ignition system gets wet, the vehicle may stall.
Once through water, always try the brakes. Wet brakes do not stop the
vehicle as effectively as dry brakes. Drying can be improved by moving
your vehicle slowly while applying light pressure on the brake pedal.
After driving through mud, clean off residue stuck to rotating driveshafts,
halfshafts and tires. Excess mud stuck on tires and rotating driveshafts
causes an imbalance that could damage drive components.
If the transmission, transfer case or front axle are submerged in water,
their fluids should be checked and changed, if necessary.
Water intrusion into the transmission may damage the
transmission.
Driving
163
Page 167 of 264

Calculating the load your vehicle can carry/tow
1. Use the appropriate maximum gross combined weight rating (GCWR)
chart to find the maximum GCWR for your type engine and rear axle
ratio.
2. Weigh your vehicle as you customarily operate the vehicle without
cargo. To obtain correct weights, try taking your vehicle to a shipping
company or an inspection station for trucks.
3. Subtract your loaded vehicle weight from the maximum GCWR on the
following charts. This is the maximum trailer weight your vehicle can tow
and must fall below the maximum shown under maximum trailer weight
on the chart.
DRIVING THROUGH WATER
Do not drive quickly through standing water, especially if the depth is
unknown. Traction or brake capability may be limited and if the ignition
system gets wet, your engine may stall. Water may also enter your
engine's air intake and severely damage your engine.
If driving through deep or standing water is unavoidable, proceed very
slowly. Never drive through water that is higher than the bottom of the
hubs.
Once through the water, always try the brakes. Wet brakes do not stop
the vehicle as effectively as dry brakes. Drying can be improved by
moving your vehicle slowly while applying light pressure on the brake
pedal.
Driving through deep water where the transmission is submerged
may allow water into the transmission and cause internal
transmission damage.
Driving
167
Page 174 of 264

Safety chains
Always connect the trailer's safety chains to the vehicle. To connect the
trailer's safety chains, cross the chains under the trailer tongue and allow
slack for turning corners.
If you use a rental trailer, follow the instructions that the rental agency
gives to you.
Do not attach safety chains to the bumper.
Trailer brakes
Electric brakes and manual, automatic or surge-type brakes are safe if
installed properly and adjusted to the manufacturer's specifications. The
trailer brakes must meet local and Federal regulations.
Do not connect a trailer's hydraulic brake system directly to your
vehicle's brake system. Your vehicle may not have enough
braking power and your chances of having a collision greatly increase.
The braking system of the tow vehicle is rated for operation at the
GVWR not GCWR.
Trailer lamps
Trailer lamps are required on most towed vehicles. Make sure your
trailer lamps conform to local and Federal regulations. See your dealer or
trailer rental agency for proper instructions and equipment for hooking
up trailer lamps.
Never connect any trailer lighting to the vehicle's taillamp
circuits, because it may damage the electrical system resulting in
fire. Contact your local Ford dealership for assistance in proper trailer
tow wiring installation. Additional electrical equipment may be
required.
Using a step bumper
The rear bumper is equipped with an integral hitch and requires only a
ball with a 19 mm (3/4 inch) shank diameter. The bumper has a 1 590 kg
(3 500 lb.) trailer weight and 159 kg (350 lb.) tongue weight capability.
Use a frame-mounted weight distributing hitch for trailers over 1 590 kg
(3 500 lb).
Driving
174
Page 178 of 264

HAZARD FLASHER
Use only in an emergency to warn traffic of vehicle breakdown,
approaching danger, etc. The hazard flashers can be operated when the
ignition is off.
²The hazard lights control is
located on top of the steering
column.
²Depress hazard lights control to
activate all hazard flashers
simultaneously.
²Depress control again to turn the
flashers off.
FUEL PUMP SHUT-OFF SWITCH
After a collision, if the engine cranks but does not start, the fuel pump
shut-off switch may have been activated. The ªFuel Resetº indicator light
will illuminate in the instrument cluster. The shut-off switch is a device
intended to stop the electric fuel pump when your vehicle has been
involved in a substantial jolt.
1. Turn the ignition to the OFF position.
2. Check the fuel system for leaks.
3. If no fuel leak is apparent, reset the fuel pump shut-off switch by
pushing in the reset button.
4. Turn the ignition to the ON position. Pause for a few seconds and
return the key to the OFF position.
5. Make a further check for leaks in the fuel system.
Roadside emergencies
178
Page 182 of 264

The fuses are coded as follows:
Fuse/Relay
LocationFuse Amp
RatingDescription
1 7.5A Power Mirror Switch, Power Antenna
2 7.5A Blower Motor Relay, Air Bag Diagnostic
Monitor
3 7.5A Left Stop/Turn Trailer Tow Connector
4 10A Left Headlamp
5 10A Data Link Connector (DLC)
6 7.5A Rear Blower Motor (Without EATC)
7 7.5A Right Stop/Turn Trailer Tow Connector
8 10A Right Headlamp, Foglamp Relay
9 7.5A Brake Pedal Position Switch
10 7.5A Speed Control/Amplifier Assembly, Generic
electronic Module (GEM), Shift Lock
Actuator, Blend Door Actuator, A/C - Heater
Assembly, Flasher, Overhead Console, Load
Leveling Module
11 7.5A Instrument Cluster
12 7.5A Washer Pump Relay, Rear Washer Pump
Relay
13 20A Brake Pedal Position Switch, Brake Pressure
Switch
14 10A 4 Wheel Anti-Lock Brake System (4WABS)
Module, 4WABS Main Relay
15 7.5A Instrument Cluster
16 30A Windshield Wiper Motor, Wiper Hi-Lo Relay,
Wiper Run/Park Relay
17 25A Cigar Lighter
18 25A Drivers Unlock Relay, All Unlock Relay, All
Lock Relay
19 25A PCM Power Diode
Roadside emergencies
182
Page 186 of 264

Fuse/Relay
LocationFuse Amp
RatingDescription
3 30A* Heated Backlight
4 15A* Fog Lamps and Daytime Running Lamps
5 Ð Not Used
6 10A* Powertrain Control Module
7 30A* 4 Wheel Anti-Lock System (4WABS) Module
8 15A* Rear Wiper Motor
9 20A* Fuel Pump Relay and RAP Module
10 15A* Horn Relay
11 15A* Parklamps Relay and Mainlight Switch
12 30A* Mainlight Switch and Multifunction Switch
13 15A* Heated Oxygen Sensor, EGR Vacuum
Regulator, EVR Solenoid, Camshaft Position
(CMP) Sensor, Canister Vent Solenoid
14 30A* Generator/Voltage Regulator
15 Ð Not Used
1 Ð Wiper Park Relay
2 Ð A/C Relay
3 Ð Wiper High/Low Relay
4 Ð PCM Power Relay
5 Ð Fuel Pump Relay
6 Ð Starter Relay
7 Ð Horn Relay
8 Ð Rear Wipe Down Relay
9 Ð Blower Motor Relay
10 Ð Rear Wipe Up Relay
1 Ð Not Used
1 Ð Not Used
2 Ð Electronic Engine Controls Diode
* Mini Fuses ** Maxi Fuses
15.0L Engines Only
Roadside emergencies
186
Page 188 of 264

Removing the spare tire
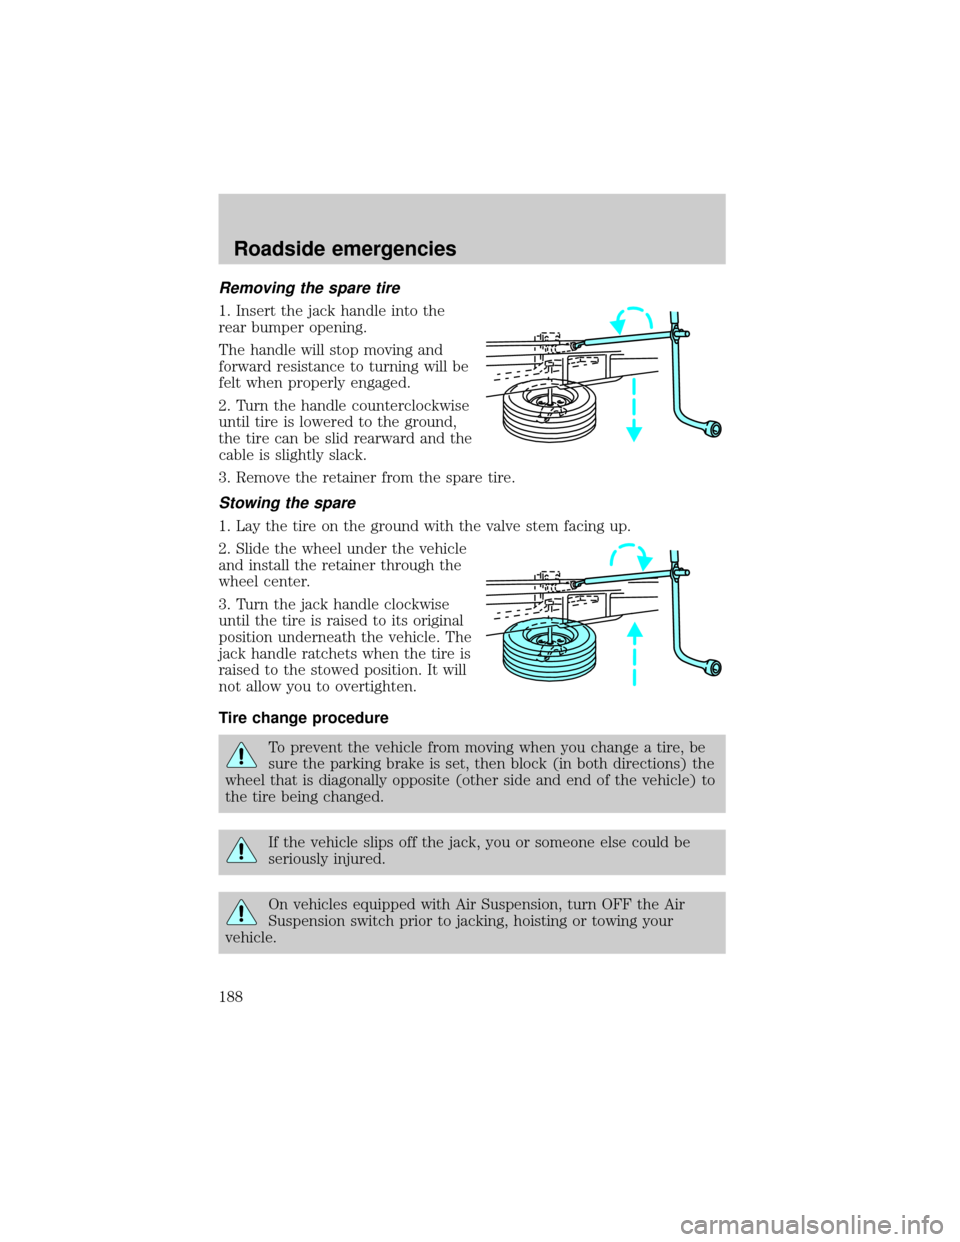
1. Insert the jack handle into the
rear bumper opening.
The handle will stop moving and
forward resistance to turning will be
felt when properly engaged.
2. Turn the handle counterclockwise
until tire is lowered to the ground,
the tire can be slid rearward and the
cable is slightly slack.
3. Remove the retainer from the spare tire.
Stowing the spare
1. Lay the tire on the ground with the valve stem facing up.
2. Slide the wheel under the vehicle
and install the retainer through the
wheel center.
3. Turn the jack handle clockwise
until the tire is raised to its original
position underneath the vehicle. The
jack handle ratchets when the tire is
raised to the stowed position. It will
not allow you to overtighten.
Tire change procedure
To prevent the vehicle from moving when you change a tire, be
sure the parking brake is set, then block (in both directions) the
wheel that is diagonally opposite (other side and end of the vehicle) to
the tire being changed.
If the vehicle slips off the jack, you or someone else could be
seriously injured.
On vehicles equipped with Air Suspension, turn OFF the Air
Suspension switch prior to jacking, hoisting or towing your
vehicle.
Roadside emergencies
188