Page 68 of 216

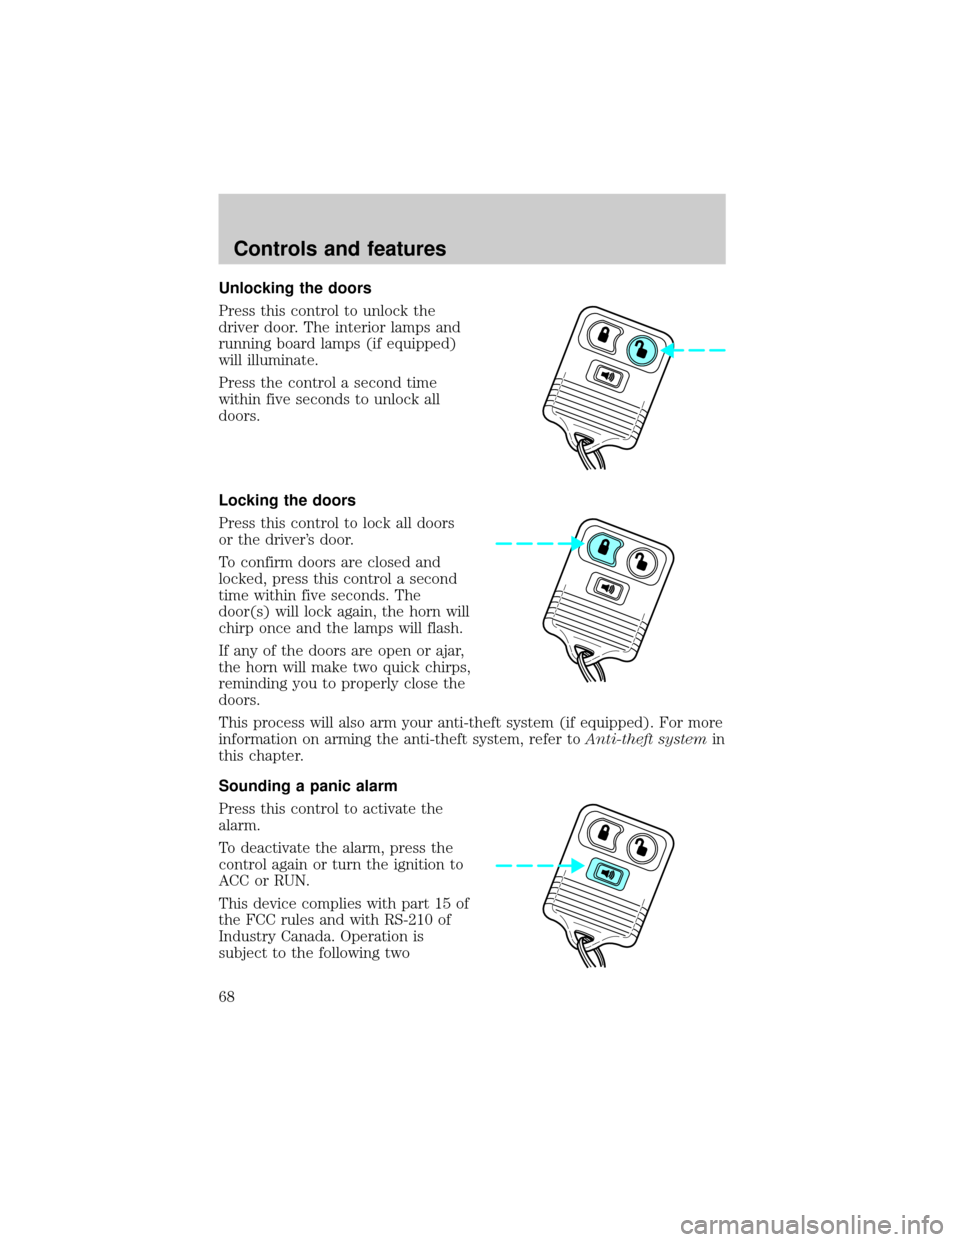
Unlocking the doors
Press this control to unlock the
driver door. The interior lamps and
running board lamps (if equipped)
will illuminate.
Press the control a second time
within five seconds to unlock all
doors.
Locking the doors
Press this control to lock all doors
or the driver's door.
To confirm doors are closed and
locked, press this control a second
time within five seconds. The
door(s) will lock again, the horn will
chirp once and the lamps will flash.
If any of the doors are open or ajar,
the horn will make two quick chirps,
reminding you to properly close the
doors.
This process will also arm your anti-theft system (if equipped). For more
information on arming the anti-theft system, refer toAnti-theft systemin
this chapter.
Sounding a panic alarm
Press this control to activate the
alarm.
To deactivate the alarm, press the
control again or turn the ignition to
ACC or RUN.
This device complies with part 15 of
the FCC rules and with RS-210 of
Industry Canada. Operation is
subject to the following two
Controls and features
68
Page 71 of 216

Deactivating/activating the autolock feature
Before following the procedure, make sure that the ignition is OFF and
all vehicle doors and the liftgate window are closed.
You must complete steps 1-7 within 30 seconds or the procedure will
have to be repeated. If the procedure needs to be repeated, you must
wait 30 seconds.
1. Turn the ignition key to RUN.
2. Press the power door unlock control three times.
3. Turn the ignition key from RUN to OFF.
4. Press the power door unlock control three times.
5. Turn the ignition back to RUN. The horn will chirp.
6. Press the unlock control, then press the lock control. The horn will
chirp once if autolock was deactivated or twice (one short and one long
chirp) if autolock was activated.
7. Turn the ignition to OFF. The horn will chirp once to confirm the
procedure is complete.
Keyless entry system (if equipped)
With the keyless entry keypad, you can:
²lock or unlock the vehicle doors without using the key.
Your vehicle has a factory set 5 digit code that operates the keyless entry
system. You can also program your own 5 digit personal entry code. The
factory-set code is located:
²on the owner's wallet card in the glove compartment
²taped to the computer module.
When pressing the controls on the keyless entry keypad, press the
middle of the controls to ensure a good activation.
Controls and features
71
Page 73 of 216

Unlocking the doors with the keyless entry system
To unlock the driver door, enter either the factory set code or the
personal code (each digit must be pressed within five seconds of the
prior digit). The interior lamps will also illuminate.
To unlock all doors, enter the factory set code or personal code (driver
door unlocks) and press the 3/4 control within five seconds.
Locking the doors with the keyless entry system
It is not necessary to enter the factory or personal code prior to locking
all doors. To lock the doors:
²Press the 7/8 control and the 9/0 control at the same time.
Activating/deactivating autolock with the keyless entry system
Before following the activation or deactivation procedures, make sure
that the anti-theft system (if equipped) is not armed, ignition is off, and
all vehicle doors and liftgate window are closed.
1. Enter 5 digit entry code
2. Press and hold 7/8 control
3. Press and release 3/4 control while holding 7/8 control
4. Release 7/8 control.
The horn will chirp once if autolock was deactivated or twice (one short
and one long chirp) if autolock was activated.
To re-activate autolock, repeat steps 1±4.
Controls and features
73
Page 134 of 216

If the battery has been disconnected and reconnected, refer to the
Batterysection of theMaintenance and Carechapter.
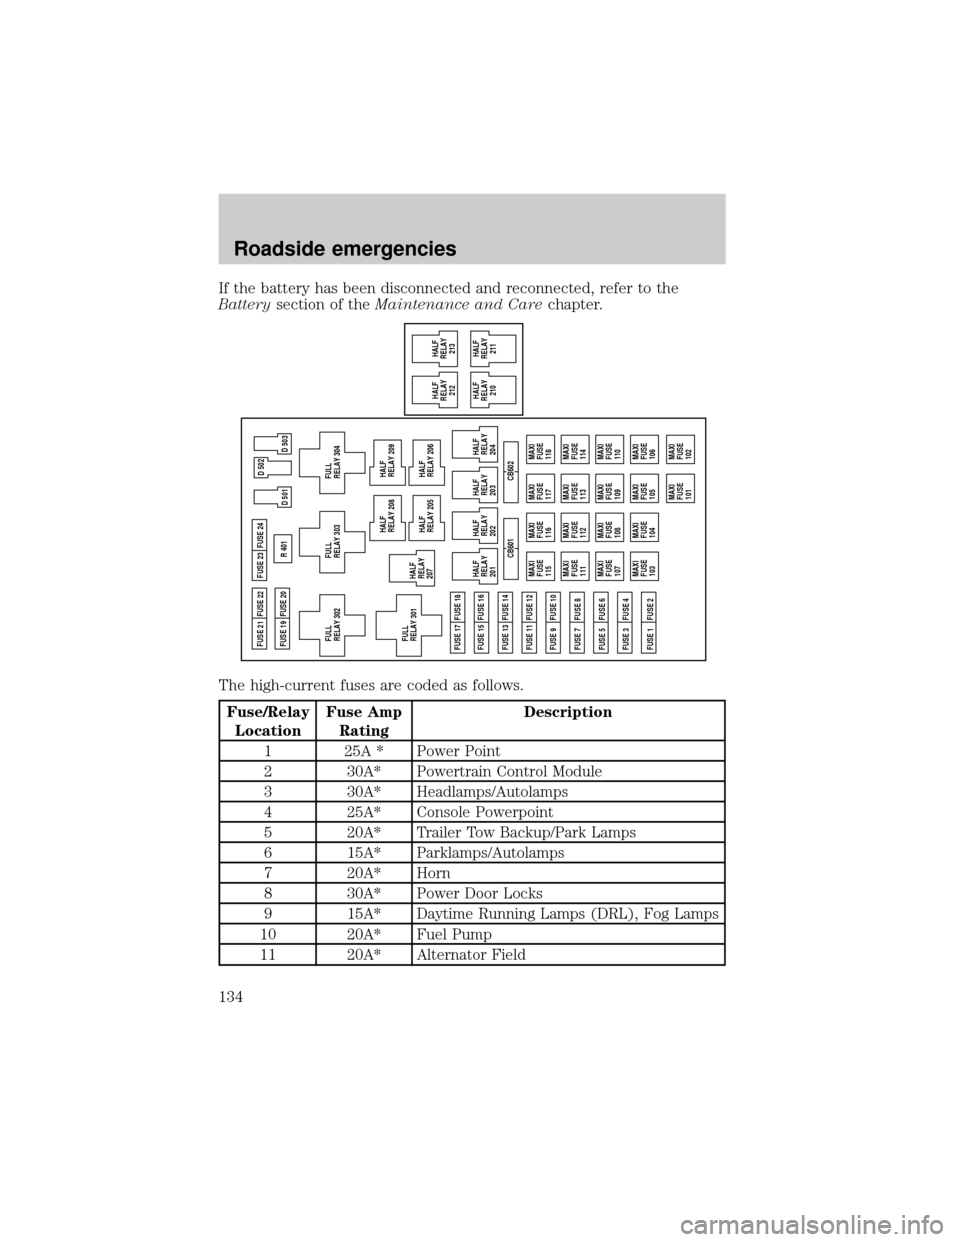
The high-current fuses are coded as follows.
Fuse/Relay
LocationFuse Amp
RatingDescription
1 25A * Power Point
2 30A* Powertrain Control Module
3 30A* Headlamps/Autolamps
4 25A* Console Powerpoint
5 20A* Trailer Tow Backup/Park Lamps
6 15A* Parklamps/Autolamps
7 20A* Horn
8 30A* Power Door Locks
9 15A* Daytime Running Lamps (DRL), Fog Lamps
10 20A* Fuel Pump
11 20A* Alternator Field
MAXI
FUSE
115MAXI
FUSE
116MAXI
FUSE
117
MAXI
FUSE
118
MAXI
FUSE
111MAXI
FUSE
112MAXI
FUSE
113
MAXI
FUSE
114
MAXI
FUSE
107MAXI
FUSE
108MAXI
FUSE
109
MAXI
FUSE
110
MAXI
FUSE
103MAXI
FUSE
104MAXI
FUSE
105
MAXI
FUSE
106
MAXI
FUSE
101MAXI
FUSE
102 CB601 CB602 FUSE 17 FUSE 18FUSE 21 FUSE 22
FUSE 19 FUSE 20FUSE 23
FULL
RELAY 302R 401
D 501 FUSE 24
FUSE 15 FUSE 16
FUSE 13 FUSE 14
FUSE 11 FUSE 12
FUSE 9 FUSE 10
FUSE 7 FUSE 8
FUSE 5 FUSE 6
FUSE 3 FUSE 4
FUSE 1 FUSE 2
D 503 D 502
FULL
RELAY 301HALF
RELAY
207
FULL
RELAY 303
FULL
RELAY 304
HALF
RELAY
201
HALF
RELAY
202HALF
RELAY 208
HALF
RELAY 209
HALF
RELAY 205
HALF
RELAY 206
HALF
RELAY
203
HALF
RELAY
204
HALF
RELAY
212
HALF
RELAY
210HALF
RELAY
213
HALF
RELAY
211
Roadside emergencies
134
Page 136 of 216
Fuse/Relay
LocationFuse Amp
RatingDescription
116 40A** Rear Window Defroster, Heated Mirrors
117 Ð Not Used
118 Ð Not Used
201 Ð Trailer Tow Park Lamp Relay
202 Ð Front Wiper Run/Park Relay
203 Ð Trailer Tow Backup Lamp Relay
204 Ð A/C Clutch Relay
205 Ð Horn Relay
206 Ð Foglamp Relay
207 Ð Front Washer Pump Relay
208 Ð Rear Washer Pump Relay
209 Ð Front Wiper Hi/Lo Relay
210 Ð Not Used
211 Ð Not Used
212 Ð Rear Wiper Up Relay
213 Ð Rear Wiper Down Relay
301 Ð Fuel Pump Relay
302 Ð Trailer Tow Battery Charge Relay
303 Ð Not Used
304 Ð Powertrain Control Module Relay
401 Ð Not Used
501 Ð Powertrain Control Module Diode
502 Ð A/C Clutch Diode
503 Ð Not Used
601 30A Delayed Accessory (Power Windows, Flip
Windows, Moonroof)
602 Ð Not Used
*Mini fuses **Maxi fuses
Relays
Relays are located in the power distribution box and should be replaced
by qualified technicians.
Roadside emergencies
136