Page 123 of 216

Trailer towing table (with heavy duty trailer tow option)
GCWR (Gross Combined Weight Rating)/trailer weights
EngineRear
axle
ratioTire size Maximum GCWRTrailer weight
range
(0 - maximum)
4x2
4.6L 3.3140.6 cm
(16 in)4 990 kg
(11 000 lbs.)0-2676 kg
(0-5 900 lbs.)
5.4L 3.3140.6 cm
(16 in)5 443 kg
(12 000 lbs.)0-3 078 kg
(0-6 800 lbs.)
5.4L 3.7340.6 cm
(16 in)6 123 kg
(13 500 lbs.)0-3 757 kg
(0-8 300 lbs.)
4x4
4.6L 3.5540.6 cm
(16 in)5 216 kg
(11 500 lbs.)0-2 716 kg
(0-6 000 lbs.)
4.6L 3.5543.2 cm
(17 in)4 990 kg
(11 000 lbs.)0-2 494 kg
(5 500 lbs.)
5.4L 3.3140.6 cm
(16 in)5 443 kg
(12 000 lbs.)0-2 902 kg
(0-6 400 lbs.)
5.4L 3.7340.6 cm
(16 in)6 123 kg
(13 500 lbs.)0-3 556 kg
(0-7 900 lbs.)
5.4L 3.7343.2 cm
(17 in)5 897 kg
(13 000 lbs.)0-3 395 kg
(0-7 500 lbs.)
Maximum frontal area of trailer is 5.6 square meters (60 square feet)
Do not exceed the maximum loads listed on the Safety Compliance
Certification label. For load specification terms found on the label, refer
toVehicle loadingin this chapter. Remember to figure in the tongue
load of your loaded trailer when figuring the total weight.
Towing trailers beyond the maximum recommended gross trailer
weight exceeds the limit of the vehicle and could result in
engine damage, transmission damage, structural damage, loss of control
and personal injury.
Driving
123
Page 126 of 216

Driving while you tow
Do not drive faster than 88 km/h (55 mph) when towing a trailer.
Speed control may shut off if you are towing on long, steep grades.
When towing a trailer:
²Use a lower gear when towing up or down steep hills. This will
eliminate excessive downshifting and upshifting for optimum fuel
economy and transmission cooling.
²Anticipate stops and brake gradually.
Exceeding the GCWR rating may cause internal transmission
damage and void your warranty coverage.
Servicing after towing
If you tow a trailer for long distances, your vehicle will require more
frequent service intervals. Refer to your Scheduled Maintenance guide
for more information.
Towing behind another vehicle
Do not tow your vehicle behind another vehicle, such as an RV.
Your vehicle cannot be flat-towed with all wheels on the ground.
Trailer towing tips
²Practice turning, stopping and backing up in an area before starting on
a trip to get the feel of the vehicle trailer combination. When turning,
make wider turns so the trailer wheels will clear curbs and other
obstacles.
²Allow more distance for stopping with a trailer attached.
²The trailer tongue weight should be 10% of the loaded trailer weight.
²After you have traveled 80 km (50 miles), thoroughly check your
hitch, electrical connections and trailer wheel lug nuts.
²When stopped in traffic for long periods of time in hot weather, place
the gearshift in P (Park) and increase idle speed. This aids engine
cooling and air conditioner efficiency.
²Vehicles with trailers should not be parked on a grade. If you must
park on a grade, place wheel chocks under the trailer's wheels.
Driving
126
Page 128 of 216

HAZARD FLASHER
Use only in an emergency to warn traffic of vehicle breakdown,
approaching danger, etc. The hazard flashers can be operated when the
ignition is off.
²The hazard lights control is
located on top of the steering
column.
²Depress hazard lights control to
activate all hazard flashers
simultaneously.
²Depress control again to turn the
flashers off.
FUEL PUMP SHUT-OFF SWITCH
After a collision, if the engine cranks but does not start, the fuel pump
shut-off switch may have been activated. The ªFuel Resetº indicator light
will illuminate in the instrument cluster. The shut-off switch is a device
intended to stop the electric fuel pump when your vehicle has been
involved in a substantial jolt.
1. Turn the ignition to the OFF position.
2. Check the fuel system for leaks.
3. If no fuel leak is apparent, reset the fuel pump shut-off switch by
pushing in the reset button.
4. Turn the ignition to the ON position. Pause for a few seconds and
return the key to the OFF position.
5. Make a further check for leaks in the fuel system.
Roadside emergencies
128
Page 133 of 216
Fuse/Relay
LocationFuse Amp
RatingDescription
26 10A Right Side Low Beam Headlamp
27 5A Foglamp Relay and Foglamp Indicator
28 10A Left Side Low Beam Headlamp
29 5A Autolamp Module, Transmission Overdrive
Control Switch
30 30A Passive Anti Theft Transceiver, Cluster,
Ignition Coils, Powertrain Control Module
Relay
31 10A Rear Integrated Control Panel (Audio), CD
Player
Relay 1 Ð Interior Lamp Relay
Relay 2 Ð Battery Saver Relay
Relay 3 Ð Rear Window Defroster Relay
Relay 4 Ð One Touch Down Window Relay
Relay 5 Ð ACC Delay Relay
Power distribution box
The power distribution box is
located in the engine compartment.
The power distribution box contains
high-current fuses that protect your
vehicle's main electrical systems
from overloads.
Always disconnect the battery before servicing high current
fuses.
Always replace the cover to the Power Distribution Box before
reconnecting the battery or refilling fluid reservoirs.
Roadside emergencies
133
Page 137 of 216

CHANGING THE TIRES
If you get a flat tire while driving, do not apply the brake heavily.
Instead, gradually decrease your speed. Hold the steering wheel firmly
and slowly move to a safe place on the side of the road.
Spare tire information
Your vehicle is equipped with a spare tire that may be used as a spare or
a regular tire. The spare is identical to the other tires on your vehicle,
although the wheel trim may not match.
Location of the spare tire and tools
The spare tire and tools for your vehicle are stowed in the following
locations:
Item Location
Spare tire Under the vehicle, just forward of the rear
bumper
Jack, wheel nut wrench,
instructions, work glovesBehind the access panel located on the
right rear quarter panel interior trim
Jack handle On top of the radiator support at the front
of the engine compartment
Removing the jack handle
1. Open the hood.
2. Un-snap the end of the handle that is retained by the clip on the top
of the windshield washer bottle.
3. Un-snap the shaft of the handle from the two retaining clips attached
to the top of the radiator shroud.
Removing the jack and tools
1. Locate the access panel on the right rear quarter panel interior trim.
Lift and rotate the two panel retaining clips and remove the panel.
2. Un-snap the wheel lug nut wrench, instructions and work gloves from
their retaining bracket.
3. Remove the jack by turning the thumbwheel counterclockwise to
relieve tension against the stowage bracket.
Roadside emergencies
137
Page 139 of 216
On vehicles equipped with Air Suspension, turn OFF the Air
Suspension switch prior to jacking, hoisting or towing your
vehicle.
Refer to the instruction sheet (located behind the interior trim access
panel with the jack) for detailed tire change instructions.
1. Park on a level surface, activate
hazard flashers and set the parking
brake.
2. Place gearshift lever in P (Park)
and turn engine OFF.
3. Block the diagonally opposite
wheel.
4. Obtain the spare tire and jack
from their storage locations.
5. Use the tip of the lug wrench to
remove any wheel trim.
6. Loosen each wheel lug nut
one-half turn counterclockwise but
do not remove them until the wheel
is raised off the ground.
BRAKE
HOOD
Roadside emergencies
139
Page 141 of 216
²Front (4x4)
²Rear
To lessen the risk of
personal injury, do not put
any part of your body under the
vehicle while changing a tire. Do
not start the engine when your
vehicle is on the jack. The jack is
only meant for changing the tire.
²Never use the front or rear
differential as a jacking point.
9. Remove the lug nuts with the lug wrench.
10. Replace the flat tire with the spare tire, making sure the valve stem
is facing outward. Reinstall the lug nuts until the wheel is snug against
the hub. Do not fully tighten the lug nuts until the wheel has been
lowered.
11. Lower the wheel by turning the jack handle counterclockwise.
Roadside emergencies
141
Page 142 of 216

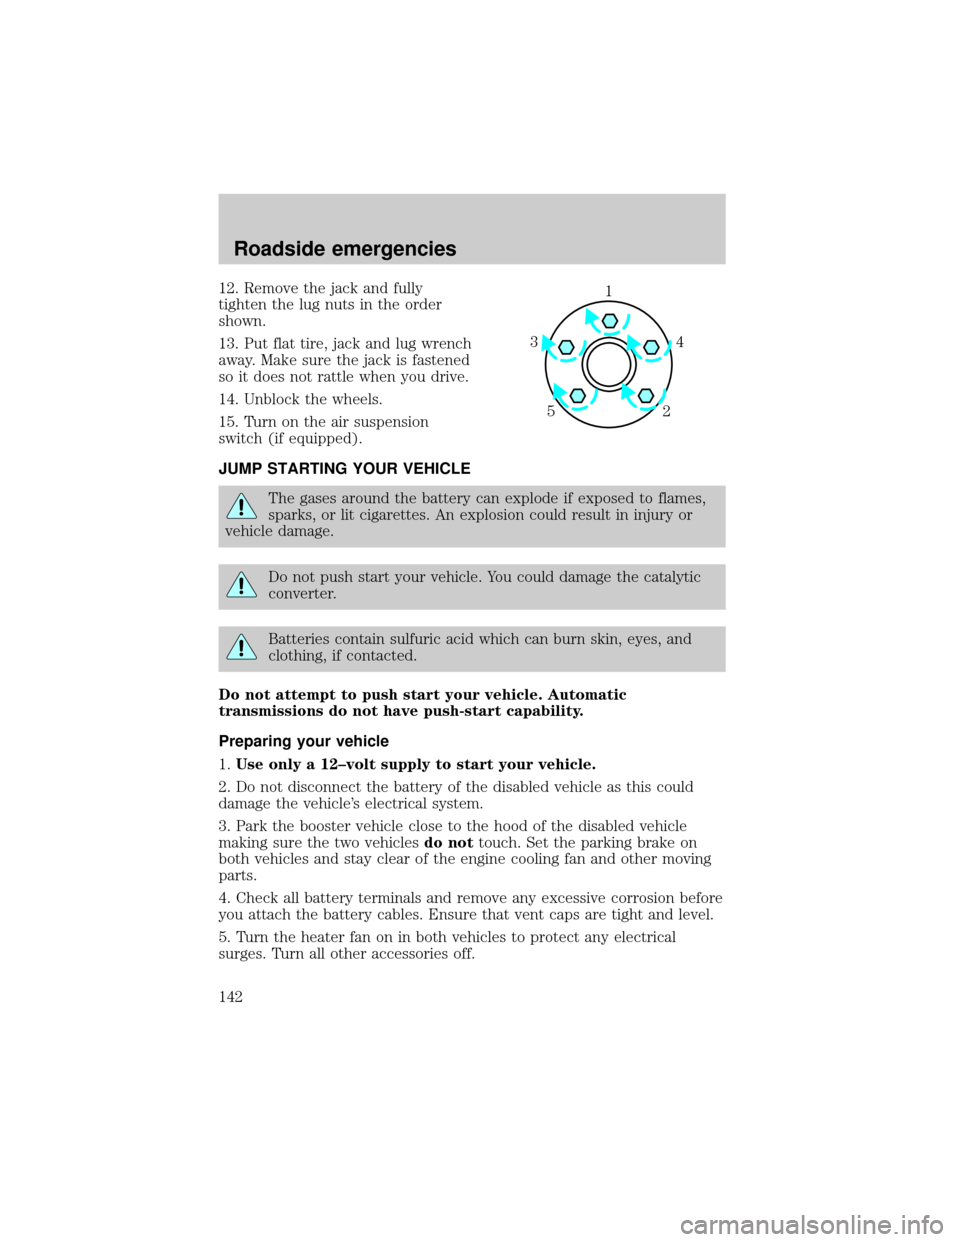
12. Remove the jack and fully
tighten the lug nuts in the order
shown.
13. Put flat tire, jack and lug wrench
away. Make sure the jack is fastened
so it does not rattle when you drive.
14. Unblock the wheels.
15. Turn on the air suspension
switch (if equipped).
JUMP STARTING YOUR VEHICLE
The gases around the battery can explode if exposed to flames,
sparks, or lit cigarettes. An explosion could result in injury or
vehicle damage.
Do not push start your vehicle. You could damage the catalytic
converter.
Batteries contain sulfuric acid which can burn skin, eyes, and
clothing, if contacted.
Do not attempt to push start your vehicle. Automatic
transmissions do not have push-start capability.
Preparing your vehicle
1.Use only a 12±volt supply to start your vehicle.
2. Do not disconnect the battery of the disabled vehicle as this could
damage the vehicle's electrical system.
3. Park the booster vehicle close to the hood of the disabled vehicle
making sure the two vehiclesdo nottouch. Set the parking brake on
both vehicles and stay clear of the engine cooling fan and other moving
parts.
4. Check all battery terminals and remove any excessive corrosion before
you attach the battery cables. Ensure that vent caps are tight and level.
5. Turn the heater fan on in both vehicles to protect any electrical
surges. Turn all other accessories off.
1
4 3
52
Roadside emergencies
142