Page 135 of 208
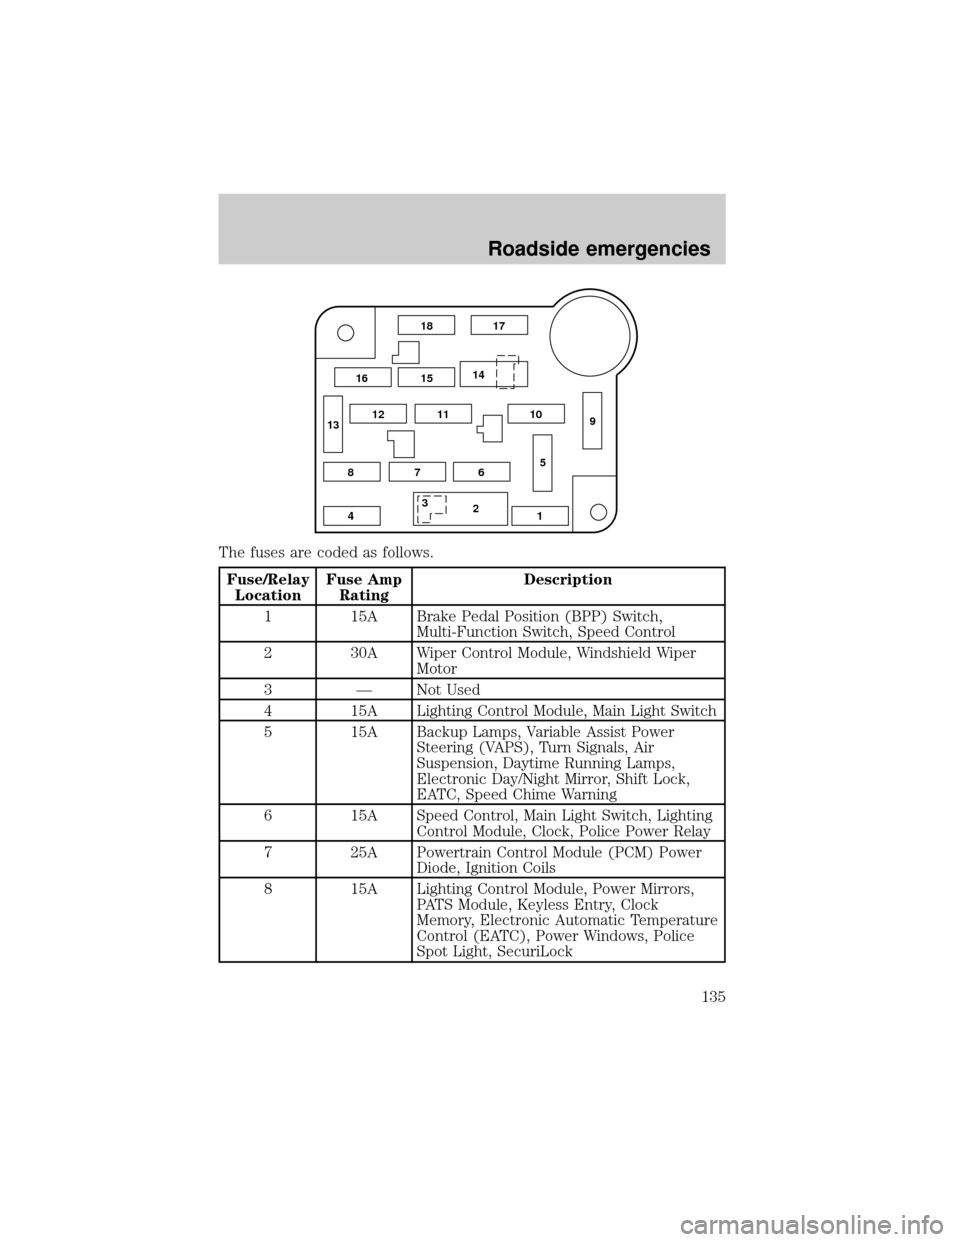
The fuses are coded as follows.
Fuse/Relay
LocationFuse Amp
RatingDescription
1 15A Brake Pedal Position (BPP) Switch,
Multi-Function Switch, Speed Control
2 30A Wiper Control Module, Windshield Wiper
Motor
3 Ð Not Used
4 15A Lighting Control Module, Main Light Switch
5 15A Backup Lamps, Variable Assist Power
Steering (VAPS), Turn Signals, Air
Suspension, Daytime Running Lamps,
Electronic Day/Night Mirror, Shift Lock,
EATC, Speed Chime Warning
6 15A Speed Control, Main Light Switch, Lighting
Control Module, Clock, Police Power Relay
7 25A Powertrain Control Module (PCM) Power
Diode, Ignition Coils
8 15A Lighting Control Module, Power Mirrors,
PATS Module, Keyless Entry, Clock
Memory, Electronic Automatic Temperature
Control (EATC), Power Windows, Police
Spot Light, SecuriLock
18 17
15 16
8
412 7659 12 101114
13
3
Roadside emergencies
135
Page 178 of 208

Readiness for Inspection/Maintenance (I/M) testing
In some localities, it may be a legal requirement to pass an I/M test of
the on-board diagnostics system. If your ªCheck Engine/Service Engine
Soonº light is on, refer to the description in theWarning Lights and
Chimessection of theInstrumentationchapter. Your vehicle may not
pass the I/M test with the ªCheck Engine/Service Engine Soonº light on.
If the vehicle's powertrain system or its battery has just been serviced,
the on-board diagnostics system is reset to a ªnot ready for I/M testº
condition. To ready the on-board diagnostics system for I/M testing, a
minimum of 30 minutes of city and highway driving is necessary as
described below:
²First, at least 10 minutes of driving on an expressway or highway.
²Next, at least 20 minutes driving in stop-and-go, city-type traffic with
at least four idle periods.
Allow the vehicle to sit for at least eight hours without starting the
engine. Then, start the engine and complete the above driving cycle. The
engine must warm up to its normal operating temperature. Once started,
do not turn off the engine until the above driving cycle is complete.
EXTERIOR BULBS
Replacing exterior bulbs
Check the operation of the following lamps frequently:
²Headlamps
²Tail lamps
²Brakelamps
²High-mount brakelamp
²Turn signals
²Backup lamps
²License plate lamp
Do not remove lamp bulbs unless they will be replaced immediately. If a
bulb is removed for an extended period of time, contaminants may enter
the lamp housings and affect performance.
Maintenance and care
178
Page 180 of 208

2. Install the bulb retaining ring over the plastic base until it contacts the
rear of the socket by rotating it clockwise until you feel a ªstop.º
3. Connect the electrical connector into the rear of the plastic base until
it snaps, locking it into position.
4. Install the protective cover over headlamps locking it in place with
three knobs.
5. Turn the headlamps on and make sure they work properly. If the
headlamp was correctly aligned before you changed the bulb, you should
not need to align it again.
Replacing front parking lamp/turn signal bulbs
1. Make sure headlamp switch is in OFF position, then open the hood.
2. Remove the protective cover by turning the three knobs to the unlock
position.
3. Disengage the safety snap on the connector by pulling upward slightly
on the clip.
4. Disconnect the electrical
connector from the bulb socket.
5. Rotate the bulb socket
counterclockwise about
1¤4turn and
remove from lamp assembly.
6. Carefully pull bulb straight out of the socket and push in the new
bulb.
7. To complete installation, follow the removal procedure in reverse
order.
Maintenance and care
180
Page 182 of 208

Using the right bulbs
Function Trade Number
Headlamp 9007
Park lamp and turn lamp (front) 3457 NAK
Side marker (front) 194 NA
Cornering lamp (front) 3156K
Tail, stop, turn (rear) 3157 K
Side marker (rear) 194
Backup lamp 3156K
License plate lamp 168
High-mount brakelamp 912
Luggage compartment lamp 212-2
Dome lamp 906
Rear reading lamp 211-2
Map lamp 168
Illuminated visor mirror 168
Dual floorwell lamp 906
Glove compartment 168
To replace all instrument panel lights - see your dealer.
AIMING THE HEADLAMPS
The alignment of your headlamps should be checked by a qualified
service technician if:
²Oncoming motorists frequently signal you to deactivate your high
beams, and your high beams are not activated.
²The headlamps do not seem to provide enough light for clear night
vision.
²The headlamp beams are pointed substantially away from a slightly
down and to the right position.
CLEANING AND CARING FOR YOUR VEHICLE
Refer to the Customer Assistance chapter for a list of Ford-approved
cleaners, polishes and waxes.
Maintenance and care
182
Page 206 of 208

detergent in fuel .....................173
filling your vehicle
with fuel ...........................169,171
quality ......................................172
running out of fuel .................173
safety information relating to
automotive fuels .....................169
Fuses ...................................133,134
Gas mileage (see Fuel
economy) ..............173,174,175,176
Gauges ....................................11,12
battery voltage gauge ...............16
engine coolant temperature
gauge .........................................15
engine oil pressure gauge ........16
fuel gauge ..................................12
odometer ...................................14
speedometer .............................13
trip odometer ............................14
Hazard flashers .........................132
Head restraints ......................91,92
Headlamps
aiming ......................................182
bulb specifications ..................182
high beam ..............................9,23
Heating ........................................25
heating and air
conditioning system ............25,27
Hood ..........................................149
Ignition .......................................189
Inspection/maintenance
(I/M) testing ..............................178
Instrument panel ..........................6
cleaning ...................................185
Keyless entry system
keypad .......................................88
programming
entry code .......................88,89,90
Keys
positions of the ignition ...........67
Lamps
autolamp system .......................24daytime running light ...............24
headlamps .................................23
headlamps, flash to pass ..........23
instrument panel, dimming .....23
interior lamps .........................181
replacing bulbs ..178,179,180,181
Lane change indicator
(see Turn signal) ........................66
Lights, warning and indicator ......6
air bag ..........................................8
air suspension ...........................10
anti-lock brakes (ABS) .........8,22
brake .......................................8,22
charging system ..........................9
low coolant ..................................9
low fuel ........................................6
oil pressure .................................9
overdrive off ..............................10
safety belt ...................................8
speed control ............................72
traction control active .........10,21
turn signal indicator ...................9
Locks
childproof ..................................81
Lumbar support, seats ...............95
Message center ...........................16
reset button ..............................17
select button .............................17
Mirrors
automatic dimming
rearview mirror .........................76
side view mirrors (power) .......80
Motorcraft parts ........................173
Octane rating ............................172
Overdrive .....................................68
Parking brake ............................118
Power distribution box
(see Fuses) ...............................136
Power door locks ...................80,83
Power steering ...................121,122
fluid, checking and adding ....159
Index
206