1999 DODGE NEON open hood
[x] Cancel search: open hoodPage 8 of 1200
JUMP STARTING, TOWING AND HOISTING
INDEX
page page
SERVICE PROCEDURES
HOISTING RECOMMENDATIONS............ 9JUMP STARTING PROCEDURE.............. 7
TOWING RECOMMENDATIONS.............. 8
SERVICE PROCEDURES
JUMP STARTING PROCEDURE
WARNING: REVIEW ALL SAFETY PRECAUTIONS
AND WARNINGS IN GROUP 8A, BATTERY/START-
ING/CHARGING SYSTEMS DIAGNOSTICS. DO NOT
JUMP START A FROZEN BATTERY, PERSONAL
INJURY CAN RESULT. DO NOT JUMP START WHEN
MAINTENANCE FREE BATTERY INDICATOR DOT IS
YELLOW OR BRIGHT COLOR. DO NOT JUMP
START A VEHICLE WHEN THE BATTERY FLUID IS
BELOW THE TOP OF LEAD PLATES. DO NOT
ALLOW JUMPER CABLE CLAMPS TO TOUCH
EACH OTHER WHEN CONNECTED TO A BOOSTER
SOURCE. DO NOT USE OPEN FLAME NEAR BAT-
TERY. REMOVE METALLIC JEWELRY WORN ON
HANDS OR WRISTS TO AVOID INJURY BY ACCI-
DENTAL ARCING OF BATTERY CURRENT. WHEN
USING A HIGH OUTPUT BOOSTING DEVICE, DO
NOT ALLOW BATTERY VOLTAGE TO EXCEED 16
VOLTS. REFER TO INSTRUCTIONS PROVIDED
WITH DEVICE BEING USED.
CAUTION: When using another vehicle as a
booster, do not allow vehicles to touch. Electrical
systems can be damaged on either vehicle.
TO JUMP START A DISABLED VEHICLE:
(1) Raise hood on disabled vehicle and visually
inspect engine compartment for:
²Battery cable clamp condition, clean if necessary.
²Frozen battery.
²Yellow or bright color test indicator, if equipped.
²Low battery fluid level.
²Generator drive belt condition and tension.
²Fuel fumes or leakage, correct if necessary.
CAUTION: If the cause of starting problem on dis-
abled vehicle is severe, damage to booster vehicle
charging system can result.
(2) When using another vehicle as a booster
source, park the booster vehicle within cable reach.
Turn off all accessories, set the parking brake, placethe automatic transmission in PARK or the manual
transmission in NEUTRAL and turn the ignition
OFF.
(3) On disabled vehicle, place gear selector in park
or neutral and set park brake. Turn off all accesso-
ries.
(4) Connect jumper cables to booster battery. RED
clamp to positive terminal (+). BLACK clamp to neg-
ative terminal (-). DO NOT allow clamps at opposite
end of cables to touch, electrical arc will result.
Review all warnings in this procedure.
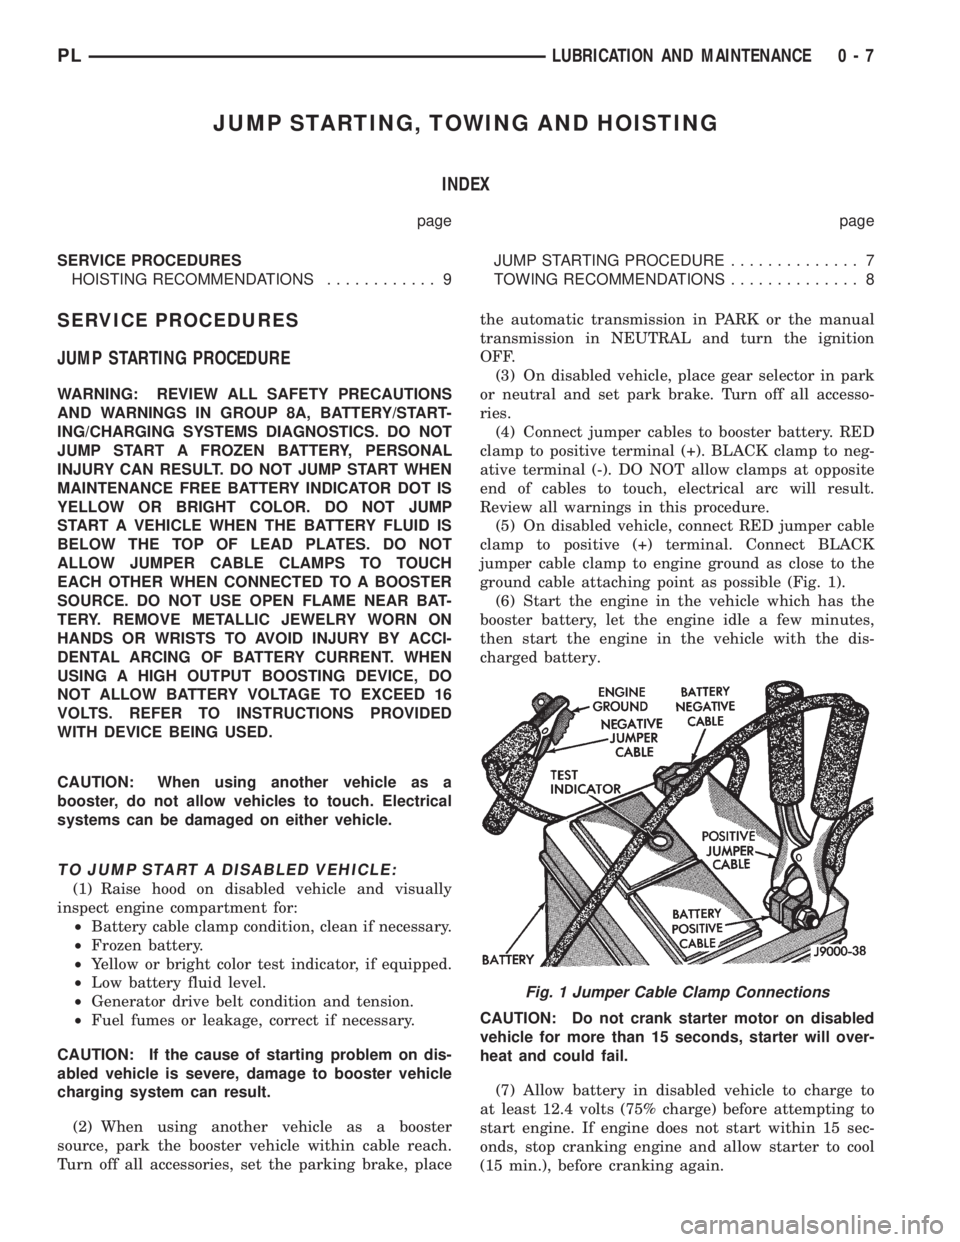
(5) On disabled vehicle, connect RED jumper cable
clamp to positive (+) terminal. Connect BLACK
jumper cable clamp to engine ground as close to the
ground cable attaching point as possible (Fig. 1).
(6) Start the engine in the vehicle which has the
booster battery, let the engine idle a few minutes,
then start the engine in the vehicle with the dis-
charged battery.
CAUTION: Do not crank starter motor on disabled
vehicle for more than 15 seconds, starter will over-
heat and could fail.
(7) Allow battery in disabled vehicle to charge to
at least 12.4 volts (75% charge) before attempting to
start engine. If engine does not start within 15 sec-
onds, stop cranking engine and allow starter to cool
(15 min.), before cranking again.
Fig. 1 Jumper Cable Clamp Connections
PLLUBRICATION AND MAINTENANCE 0 - 7
Page 213 of 1200
(5) Connect automatic transmission hoses, if
equipped. Tighten hose clamps to 4 N´m (35 in. lbs.).
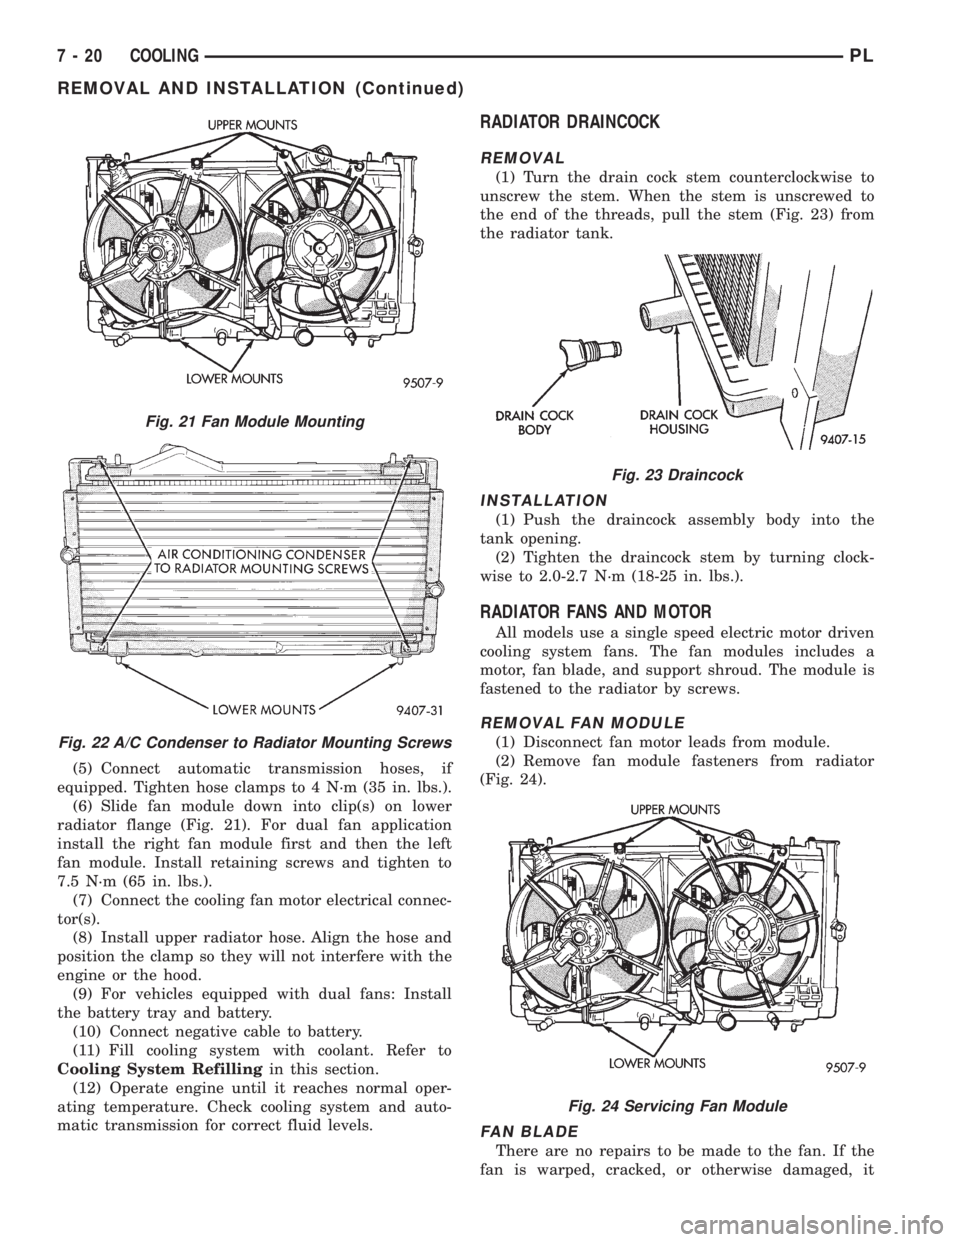
(6) Slide fan module down into clip(s) on lower
radiator flange (Fig. 21). For dual fan application
install the right fan module first and then the left
fan module. Install retaining screws and tighten to
7.5 N´m (65 in. lbs.).
(7) Connect the cooling fan motor electrical connec-
tor(s).
(8) Install upper radiator hose. Align the hose and
position the clamp so they will not interfere with the
engine or the hood.
(9) For vehicles equipped with dual fans: Install
the battery tray and battery.
(10) Connect negative cable to battery.
(11) Fill cooling system with coolant. Refer to
Cooling System Refillingin this section.
(12) Operate engine until it reaches normal oper-
ating temperature. Check cooling system and auto-
matic transmission for correct fluid levels.
RADIATOR DRAINCOCK
REMOVAL
(1) Turn the drain cock stem counterclockwise to
unscrew the stem. When the stem is unscrewed to
the end of the threads, pull the stem (Fig. 23) from
the radiator tank.
INSTALLATION
(1) Push the draincock assembly body into the
tank opening.
(2) Tighten the draincock stem by turning clock-
wise to 2.0-2.7 N´m (18-25 in. lbs.).
RADIATOR FANS AND MOTOR
All models use a single speed electric motor driven
cooling system fans. The fan modules includes a
motor, fan blade, and support shroud. The module is
fastened to the radiator by screws.
REMOVAL FAN MODULE
(1) Disconnect fan motor leads from module.
(2) Remove fan module fasteners from radiator
(Fig. 24).
FAN BLADE
There are no repairs to be made to the fan. If the
fan is warped, cracked, or otherwise damaged, it
Fig. 21 Fan Module Mounting
Fig. 22 A/C Condenser to Radiator Mounting Screws
Fig. 23 Draincock
Fig. 24 Servicing Fan Module
7 - 20 COOLINGPL
REMOVAL AND INSTALLATION (Continued)
Page 218 of 1200
BATTERY
CONTENTS
page page
GENERAL INFORMATION
INTRODUCTION......................... 1
DESCRIPTION AND OPERATION
BATTERY IGNITION OFF DRAW (IOD)........ 1
CHARGING TIME REQUIRED............... 1
DIAGNOSIS AND TESTING
BATTERY BUILT-IN TEST INDICATOR........ 2
BATTERY IGNITION OFF DRAW (IOD)........ 3
BATTERY LOAD TEST..................... 5
BATTERY OPEN CIRCUIT VOLTAGE TEST..... 6
BATTERY TEMPERATURE SENSOR.......... 6
SERVICE PROCEDURES
BATTERY CHARGING..................... 6CHARGING COMPLETELY DISCHARGED
BATTERY............................. 7
VISUAL INSPECTION..................... 7
REMOVAL AND INSTALLATION
BATTERY TRAY.......................... 9
BATTERY............................... 8
FRESH AIR INLET TUBE REMOVAL.......... 9
SPECIFICATIONS
BATTERY SPECIFICATIONS............... 10
TORQUE.............................. 10
GENERAL INFORMATION
INTRODUCTION
The battery stores, stabilizes, and delivers electri-
cal current to operate various electrical systems in
the vehicle. The determination of whether a battery
is good or bad is made by its ability to accept a
charge. It also must supply high-amperage current
for a long enough period to be able to start the vehi-
cle. The capability of the battery to store electrical
current comes from a chemical reaction. This reac-
tion takes place between the sulfuric acid solution
(electrolyte) and the lead +/- plates in each cell of the
battery. As the battery discharges, the plates react
with the acid from the electrolyte. When the charging
system charges the battery, the water is converted to
sulfuric acid in the battery. The concentration of acid
in the electrolyte is measured as specific gravity
using a hydrometer. The original equipment (OE)
battery is equipped with a hydrometer (test indica-
tor) built into the battery cover. The specific gravity
indicates the battery's state-of-charge. The OE bat-
tery is sealed and water cannot be added.
The battery is vented to release gases that are cre-
ated when the battery is being charged and dis-
charged. The battery top, posts, and terminals should
be cleaned when other under hood maintenance is
performed.
When the electrolyte level is below the top of the
plates, Yellow/Clear in the test Indicator, the battery
must be replaced. The battery must be completely
charged, and the battery top, posts, and cable clampsmust be cleaned before diagnostic procedures are per-
formed.DESCRIPTION AND OPERATION
BATTERY IGNITION OFF DRAW (IOD)
A completely normal vehicle will have a small
amount of current drain on the battery with the key
out of the ignition. It can range from 4 to 10 milli-
amperes after all the modules time out. If a vehicle
will not be operated for approximately a 20 days, the
IOD fuse should be disconnected to minimize the
vehicle electrical drain on the battery. The IOD fuse
is located in the Power Distribution Center (PDC).
Refer to the PDC to locate the cover proper fuse.
CHARGING TIME REQUIRED
WARNING: NEVER EXCEED 20 AMPS WHEN
CHARGING A COLD -1ÉC (30ÉF) BATTERY. PER-
SONAL INJURY MAY RESULT.
The time required to charge a battery will vary
depending upon the following factors.
SIZE OF BATTERY
A completely discharged large heavy-duty battery
may require more recharging time than a completely
discharged small capacity battery. Refer to Battery
Charging Timetable for proper charging times.
PLBATTERY 8A - 1
Page 275 of 1200

(8) If all tests performed test good, replace the dial
and gauge assembly.
(9) If the tachometer continues to be inoperative,
replace the print circuit board.
TEMPERATURE GAUGE
(1) Disconnect the coolant temperature sensor
(Fig. 12).
(2) Turn ignition switch ON. The temperature
gauge should be at its lowest position. Turn ignition
switch OFF.
(3) Ground temperature gauge sending unit con-
nector Pin 3. Refer to Group 8W, wiring Diagrams.
Turn ignition switch ON. The temperature gauge
should be at its highest position. After the seat belt
lamp goes out, the cluster should chime for about
eight seconds.
(a) If OK, check temperature sending unit con-
nector for proper connection. If connections are OK,
replace the sending unit.
(b) If not OK, and the high temperature chime
sounds but the gauge shows cold, replace the gauge
assembly. If gauge is still not working, replace the
printed circuit board.
SPEEDOMETER SYSTEM
The vehicle is equipped with a electronically driven
speedometer and odometer assemblies. A signal is
sent from a transmission-mounted vehicle speed sen-
sor to the speedometer circuitry through the wiring
harness.
SEAT BELT REMINDER SYSTEM TEST
For testing of this system refer to Group 8U,
Chime Warning/Reminder Systems.
SENDING UNIT
When a problem occurs with a cluster gauge check
for a defective sending unit or wiring. Do this before
disassembling the cluster.(1) Sending units and wiring can be checked by
grounding the connector leads at the sending unit in
the vehicle.
(2) With the ignition in the ON position, a
grounded input will cause the fuel or temperature
gauge to read at or above maximum.
SERVICE ENGINE SOON INDICATOR
Refer to Group 25, Emission Control Systems for
procedures.
VEHICLE SPEED SENSOR TEST
To test the vehicle speed sensor and related compo-
nents use a scan tool (DRB), and refer to the appro-
priate Powertrain Diagnostics Test Procedure
Manual.
REMOVAL AND INSTALLATION
ASH RECEIVER RETAINER AND LAMP
REMOVAL
(1) Open up and remove the ash receiver recepta-
cle.
(2) Remove the center bezel.
(3) Remove the two ash receiver retainer attaching
screws from the upper-rearward face and remove
retainer.
(4) For lamp replacement, remove the clamp and
lamp hood from the top of the retainer. Remove the
wiring clip at the forward edge of the retainer and
remove the lamp socket from the hood and replace
lamp.
INSTALLATION
For installation reverse the above procedures.
When installing the retainer ensure that the forward
tabs are inserted properly into the slots in the instru-
ment panel.
CENTER BEZEL
REMOVAL
(1) Open the ash receiver receptacle.
(2) Grasp the bezel and pull rearward disengaging
the clips.
INSTALLATION
For installation, reverse the above procedures.
CIGAR LIGHTER RECEPTACLE
REMOVAL
(1) Remove the cigar lighter element.
(2) Reach underneath the instrument panel
through the bottom access hole and disconnect the
cigar lighter receptacle wiring connectors.
Fig. 12 Engine Coolant Temperature Sensor
8E - 6 INSTRUMENT PANEL AND SYSTEMSPL
DIAGNOSIS AND TESTING (Continued)
Page 335 of 1200
LAMP BULB SERVICE
INDEX
page page
REMOVAL AND INSTALLATION
CENTER HIGH MOUNTED STOP LAMP BULB . . . 7
DOME LAMP BULB....................... 8
FOG LAMP BULB......................... 6
FRONT SIDE MARKER LAMP BULB.......... 7
HEADLAMP BULB........................ 6
LICENSE PLATE LAMP BULB............... 8PARK AND TURN SIGNAL LAMP BULB........ 6
REAR CARGO LAMP BULB................. 8
TAIL, STOP, BACK-UP AND TURN SIGNAL
LAMP BULB........................... 7
UNDERHOOD LAMP BULB................. 8
VISOR VANITY LAMP BULB................. 8
REMOVAL AND INSTALLATION
HEADLAMP BULB
REMOVAL
(1) Release hood latch and open hood.
(2) Disengage wire connector from headlamp bulb
connector.
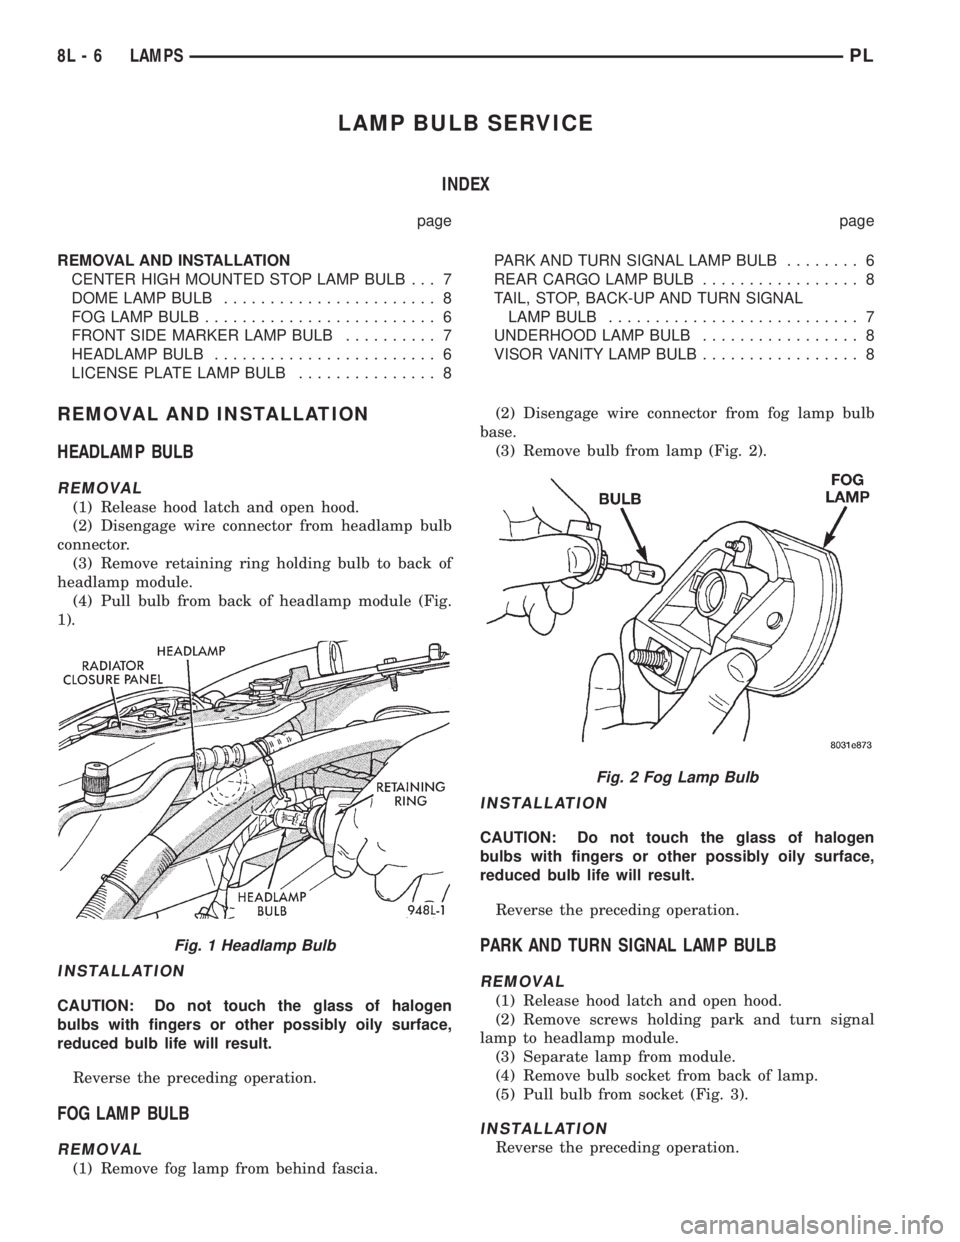
(3) Remove retaining ring holding bulb to back of
headlamp module.
(4) Pull bulb from back of headlamp module (Fig.
1).
INSTALLATION
CAUTION: Do not touch the glass of halogen
bulbs with fingers or other possibly oily surface,
reduced bulb life will result.
Reverse the preceding operation.
FOG LAMP BULB
REMOVAL
(1) Remove fog lamp from behind fascia.(2) Disengage wire connector from fog lamp bulb
base.
(3) Remove bulb from lamp (Fig. 2).
INSTALLATION
CAUTION: Do not touch the glass of halogen
bulbs with fingers or other possibly oily surface,
reduced bulb life will result.
Reverse the preceding operation.
PARK AND TURN SIGNAL LAMP BULB
REMOVAL
(1) Release hood latch and open hood.
(2) Remove screws holding park and turn signal
lamp to headlamp module.
(3) Separate lamp from module.
(4) Remove bulb socket from back of lamp.
(5) Pull bulb from socket (Fig. 3).
INSTALLATION
Reverse the preceding operation.
Fig. 1 Headlamp Bulb
Fig. 2 Fog Lamp Bulb
8L - 6 LAMPSPL
Page 338 of 1200
LAMP SERVICE
INDEX
page page
REMOVAL AND INSTALLATION
CENTER HIGH MOUNTED STOP LAMP
(CHMSL)............................. 10
DOME LAMP........................... 11
FOG LAMP.............................. 9
FRONT SIDE MARKER LAMP.............. 10
HEADLAMP MODULE..................... 9LICENSE PLATE LAMP................... 11
PARK AND TURN SIGNAL LAMP............. 9
REAR CARGO LAMP..................... 11
TAIL, STOP AND TURN SIGNAL LAMP........ 10
UNDERHOOD LAMP..................... 11
VISOR VANITY LAMP..................... 11
REMOVAL AND INSTALLATION
HEADLAMP MODULE
REMOVAL
(1) Release hood latch and open hood.
(2) From behind bumper fascia, remove bolt hold-
ing outboard end of module to fender and closure
panel.
(3) Loosen bolts holding inboard end of module to
radiator closure panel and remove bolt to grille.
(4) Remove bolts attaching top of module to upper
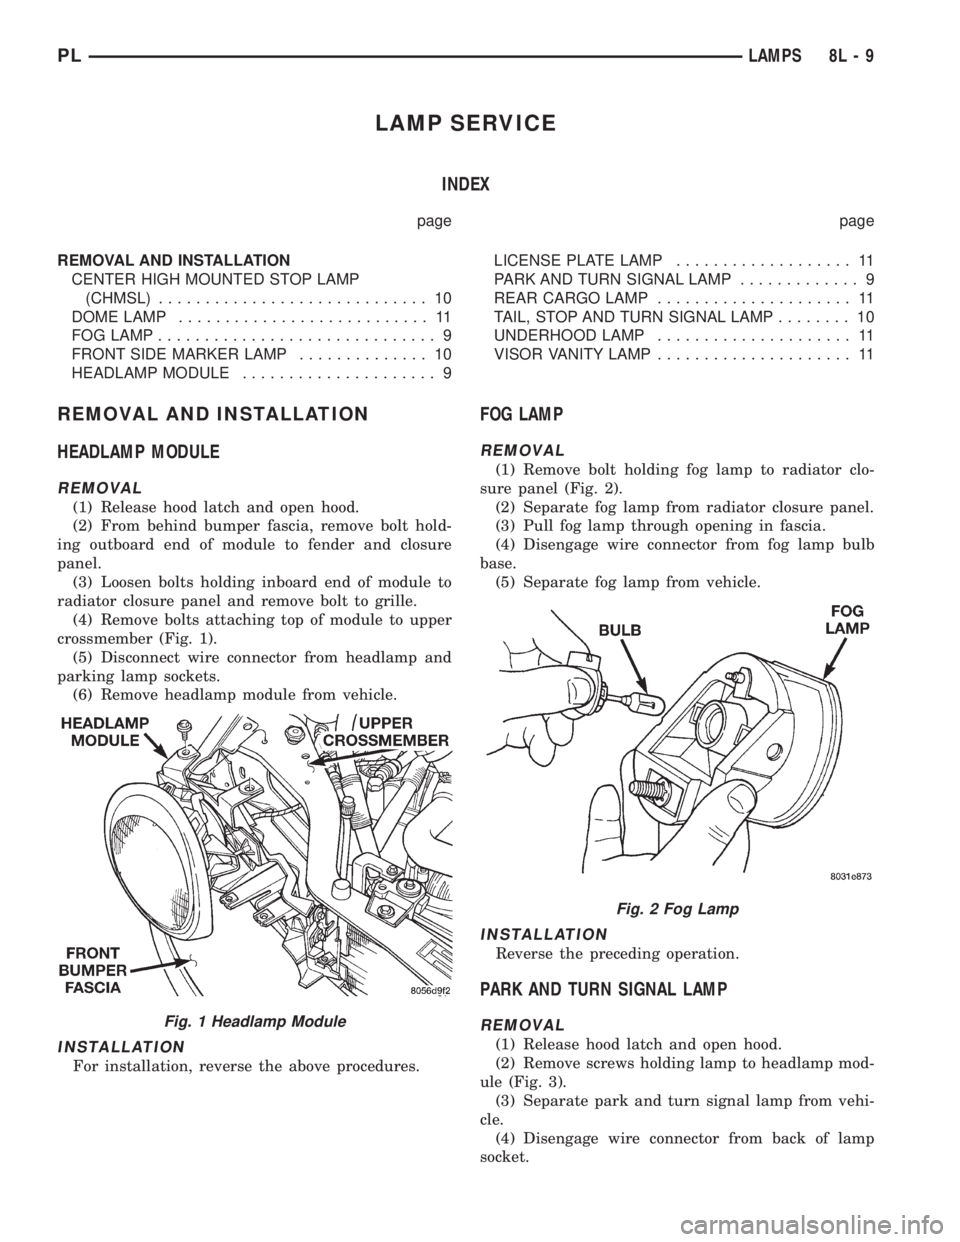
crossmember (Fig. 1).
(5) Disconnect wire connector from headlamp and
parking lamp sockets.
(6) Remove headlamp module from vehicle.
INSTALLATION
For installation, reverse the above procedures.
FOG LAMP
REMOVAL
(1) Remove bolt holding fog lamp to radiator clo-
sure panel (Fig. 2).
(2) Separate fog lamp from radiator closure panel.
(3) Pull fog lamp through opening in fascia.
(4) Disengage wire connector from fog lamp bulb
base.
(5) Separate fog lamp from vehicle.
INSTALLATION
Reverse the preceding operation.
PARK AND TURN SIGNAL LAMP
REMOVAL
(1) Release hood latch and open hood.
(2) Remove screws holding lamp to headlamp mod-
ule (Fig. 3).
(3) Separate park and turn signal lamp from vehi-
cle.
(4) Disengage wire connector from back of lamp
socket.
Fig. 1 Headlamp Module
Fig. 2 Fog Lamp
PLLAMPS 8L - 9
Page 340 of 1200
LICENSE PLATE LAMP
REMOVAL
(1) Remove screws holding license plate lamp to
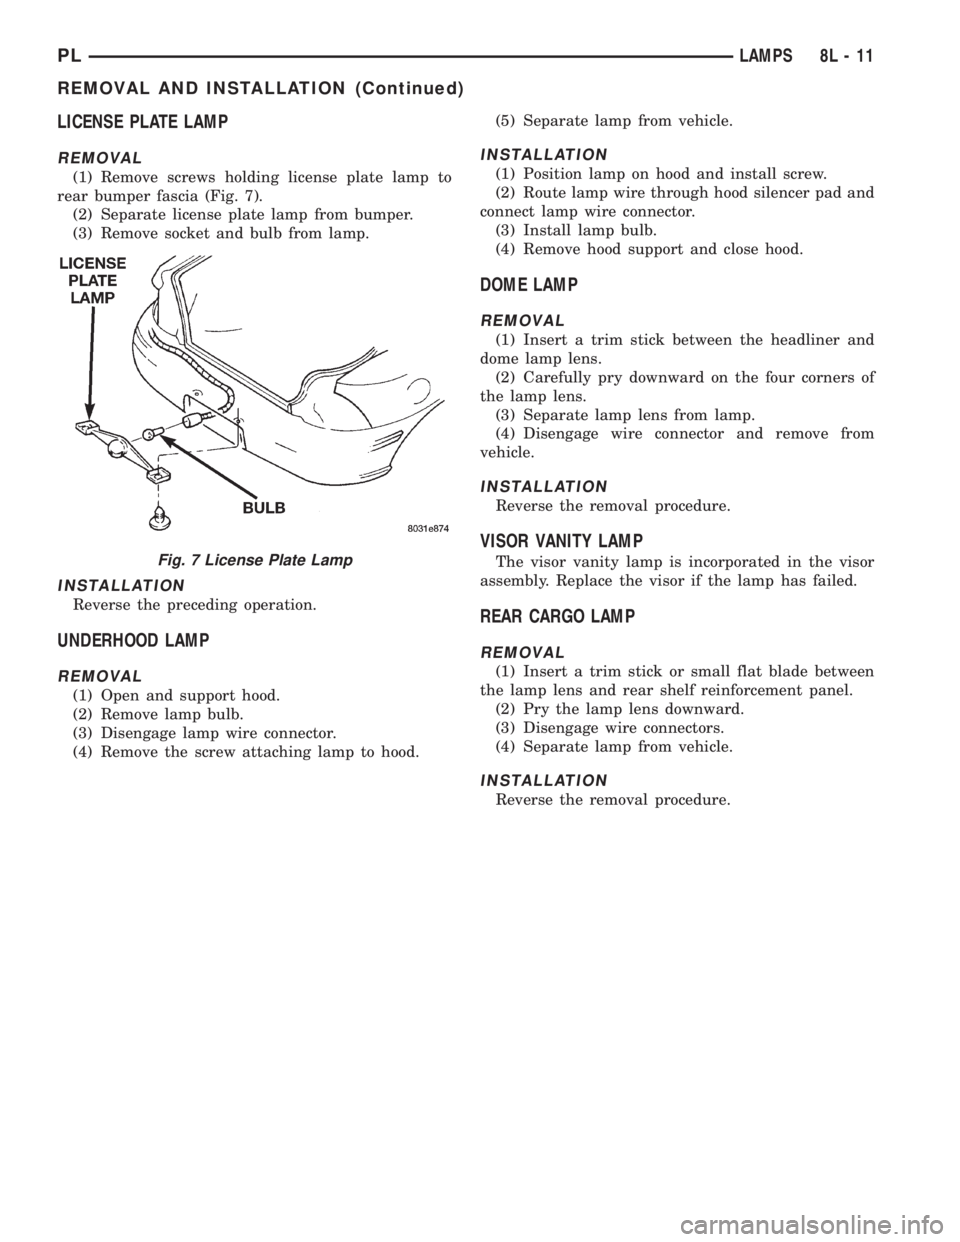
rear bumper fascia (Fig. 7).
(2) Separate license plate lamp from bumper.
(3) Remove socket and bulb from lamp.
INSTALLATION
Reverse the preceding operation.
UNDERHOOD LAMP
REMOVAL
(1) Open and support hood.
(2) Remove lamp bulb.
(3) Disengage lamp wire connector.
(4) Remove the screw attaching lamp to hood.(5) Separate lamp from vehicle.
INSTALLATION
(1) Position lamp on hood and install screw.
(2) Route lamp wire through hood silencer pad and
connect lamp wire connector.
(3) Install lamp bulb.
(4) Remove hood support and close hood.
DOME LAMP
REMOVAL
(1) Insert a trim stick between the headliner and
dome lamp lens.
(2) Carefully pry downward on the four corners of
the lamp lens.
(3) Separate lamp lens from lamp.
(4) Disengage wire connector and remove from
vehicle.
INSTALLATION
Reverse the removal procedure.
VISOR VANITY LAMP
The visor vanity lamp is incorporated in the visor
assembly. Replace the visor if the lamp has failed.
REAR CARGO LAMP
REMOVAL
(1) Insert a trim stick or small flat blade between
the lamp lens and rear shelf reinforcement panel.
(2) Pry the lamp lens downward.
(3) Disengage wire connectors.
(4) Separate lamp from vehicle.
INSTALLATION
Reverse the removal procedure.
Fig. 7 License Plate Lamp
PLLAMPS 8L - 11
REMOVAL AND INSTALLATION (Continued)
Page 345 of 1200
LAMP BULB SERVICE
INDEX
page page
REMOVAL AND INSTALLATION
CITYLIGHT LAMP BULB.................... 3
FOG LAMP BULB......................... 3FRONT TURN SIGNAL LAMP BULB........... 2
HEADLAMP BULB........................ 2
SIDE REPEATER LAMP BULB............... 4
REMOVAL AND INSTALLATION
HEADLAMP BULB
REMOVAL
(1) Release hood latch and open hood.
(2) Disengage wire connector to headlamp bulb.
(3) Remove headlamp assembly from vehicle.
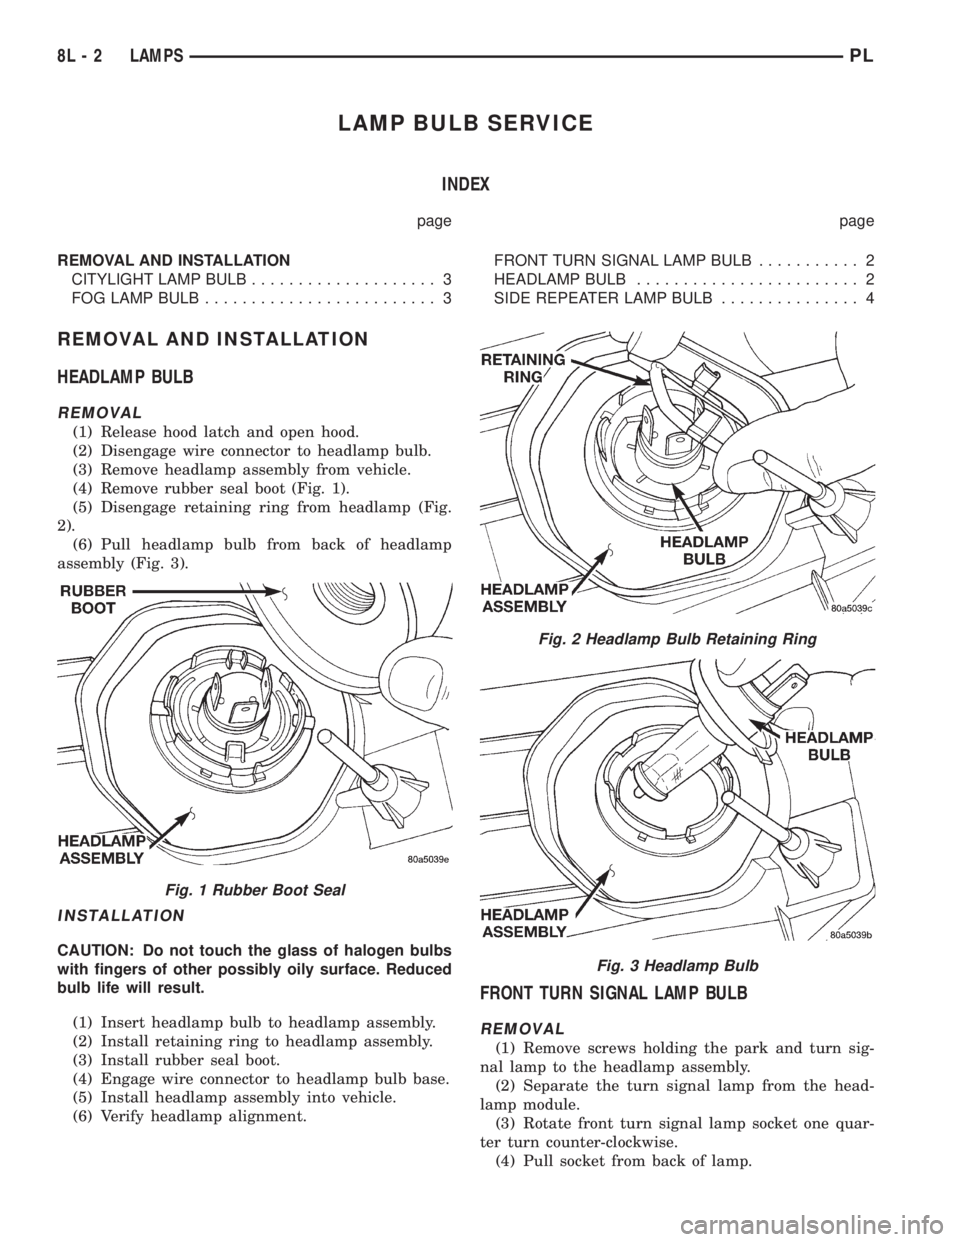
(4) Remove rubber seal boot (Fig. 1).
(5) Disengage retaining ring from headlamp (Fig.
2).
(6) Pull headlamp bulb from back of headlamp
assembly (Fig. 3).
INSTALLATION
CAUTION: Do not touch the glass of halogen bulbs
with fingers of other possibly oily surface. Reduced
bulb life will result.
(1) Insert headlamp bulb to headlamp assembly.
(2) Install retaining ring to headlamp assembly.
(3) Install rubber seal boot.
(4) Engage wire connector to headlamp bulb base.
(5) Install headlamp assembly into vehicle.
(6) Verify headlamp alignment.
FRONT TURN SIGNAL LAMP BULB
REMOVAL
(1) Remove screws holding the park and turn sig-
nal lamp to the headlamp assembly.
(2) Separate the turn signal lamp from the head-
lamp module.
(3) Rotate front turn signal lamp socket one quar-
ter turn counter-clockwise.
(4) Pull socket from back of lamp.
Fig. 1 Rubber Boot Seal
Fig. 2 Headlamp Bulb Retaining Ring
Fig. 3 Headlamp Bulb
8L - 2 LAMPSPL