Page 156 of 440

yellowblue
2-56Turn and Lane Change Signals
The turn signal has two upward (for right) and two
downward (for left) positions. These positions allow you
to signal a turn or a lane change.
To signal a turn, move the lever all the way up
or down. When the turn is finished, the lever will
return automatically.
An arrow on the instrument
panel will flash in the
direction of the turn or
lane change.
To signal a lane change, just raise or lower the lever
until the arrow starts to flash. Hold it there until you
complete your lane change. The lever will return by
itself when you release it.
As you signal a turn or a lane change, if the arrow
flashes faster than normal, a signal bulb may be burned
out and other drivers won't see your turn signal.
If a bulb is burned out, replace it to help avoid an
accident. If the arrows don't go on at all when you
signal a turn, check for burned
-out bulbs and check the
fuse (see ªFuses and Circuit Breakersº in the Index).If you have a trailer towing option with added wiring for
the trailer lamps, the signal indicator will flash at a
normal rate even if a turn signal bulb is burned out.
Check the front and rear turn signal lamps regularly to
make sure they are working.
Turn Signal on Chime
If either turn signal is left on for more than
3/4 mile (1.2 km), a chime will sound to let the
driver know to turn it off.
If you need to leave the signal on for more than
3/4 mile (1.2 km), turn off the signal and then turn it
back on.
Headlamp High/Low Beam Changer
To change the headlamps from high to low beam, or low
to high, simply pull the turn signal lever all the way
toward you. Then release it.
When the high beams are
on, this light on the
instrument cluster will also
be on.
Page 274 of 440

yellowblue
4-38 Making Turns
NOTICE:
Making very sharp turns while trailering could
cause the trailer to come in contact with the
vehicle. Your vehicle could be damaged. Avoid
making very sharp turns while trailering.
When you're turning with a trailer, make wider turns than
normal. Do this so your trailer won't strike soft shoulders,
curbs, road signs, trees or other objects. Avoid jerky or
sudden maneuvers. Signal well in advance.
Turn Signals When Towing a Trailer
When you tow a trailer, your vehicle has to have
extra wiring.
The arrows on your instrument panel will flash
whenever you signal a turn or lane change. Properly
hooked up, the trailer lamps will also flash, telling other
drivers you're about to turn, change lanes or stop.When towing a trailer, the arrows on your instrument
panel will flash for turns even if the bulbs on the trailer
are burned out. Thus, you may think drivers behind you
are seeing your signal when they are not. It's important
to check occasionally to be sure the trailer bulbs are
still working.
Driving On Grades
Reduce speed and shift to a lower gear before you start
down a long or steep downgrade. If you don't shift
down, you might have to use your brakes so much that
they would get hot and no longer work well.
If you are towing a trailer that weighs more than
1,000 lbs. (450 kg), you may prefer to drive in
THIRD (3) instead of AUTOMATIC OVERDRIVE (D)
(or, as you need to, a lower gear). This will minimize
heat build
-up and extend the life of your transaxle.
Page 341 of 440
yellowblue
6-31
CAUTION:
Batteries have acid that can burn you and gas
that can explode. You can be badly hurt if you
aren't careful. See ªJump Startingº in the Index
for tips on working around a battery without
getting hurt.
Contact your dealer to learn how to prepare your vehicle
for longer storage periods.
Also, for your audio system, see ªTheft
-Deterrent
Featureº in the Index.
Jump Starting
For jump starting instructions, see ªJump Startingº in
the Index.
Bulb Replacement
For the type of bulbs, see ªReplacement Bulbsº
in the Index.
Halogen Bulbs
CAUTION:
Halogen bulbs have pressurized gas inside and
can burst if you drop or scratch the bulb. You or
others could be injured. Be sure to read and
follow the instructions on the bulb package.
Headlamps
1. Open the hood.
2. Remove the front turn signal/parking lamp assembly.
See ªFront Turn Signal/Parking Lampsº later in
this section.
Page 344 of 440
yellowblue
6-34
9. Align the pins on the bottom of the headlamp
assembly with the holes in the lamp support bracket
while placing the holes in the assembly over the
bolts where the wing nuts attach.
10. Replace and tighten the wing nuts.
11. Replace the parking/turn signal lamp assembly by
lining up the tabs at the back of the assembly with
the holes in the fender.
12. Tighten the bolt connecting the parking/turn signal
lamp assembly. Be sure the tab from the
parking/turn signal lamp assembly is inboard of the
tab from the headlamp assembly.
Front Turn Signal/Parking Lamps
1. Open the hood.
2. Remove the thumb screw attaching the parking/turn
signal lamp assembly to the headlamp assembly.
3. Pull the parking/turn signal lamp assembly away
from the vehicle.
4. Unscrew the bulb socket from the lamp assembly by
pressing the tab while turning it counterclockwise.
Page 345 of 440
yellowblue
6-35
5. Replace the bulb by pulling the old one out and
gently pushing the new one into the lamp socket.
6. Line up the tabs on the sockets with the gaps in the
socket holes and screw the bulb socket back into the
lamp housing until an audible click is heard (the tab
popping back out).7. To replace the lamp assembly, line up and insert the
tabs on the back of the assembly with the slots in the
fender. Engage the lower clip on the front of the
lamp assembly, keeping the upper tab on the
parking/turn signal lamp assembly inboard of the
headlamp bracket tab.
8. To align the parking/turn signal lamp assembly with
the headlamp assembly, lift up the parking/turn
signal lamp assembly until the upper edge is
contacting the fender.
9. Fasten the parking/turn signal lamp assembly to the
headlamp assembly with the thumb screw removed
in Step 2.
Page 346 of 440
yellowblue
6-36 Front Sidemarker
1. Open the hood.
2. Remove the thumb screw attaching the parking/turn
signal lamp assembly to the headlamp assembly.
3. Pull the parking/turn signal lamp assembly away
from the vehicle.
4. Unscrew the bulb socket from the lamp assembly by
turning it counterclockwise.
5. Replace the bulb by pulling the old one out and
gently pushing the new one into the lamp socket.
6. Line up the tabs on the sockets with the gaps in the
socket holes and screw the bulb socket back into the
lamp housing.
Page 347 of 440

yellowblue
6-37
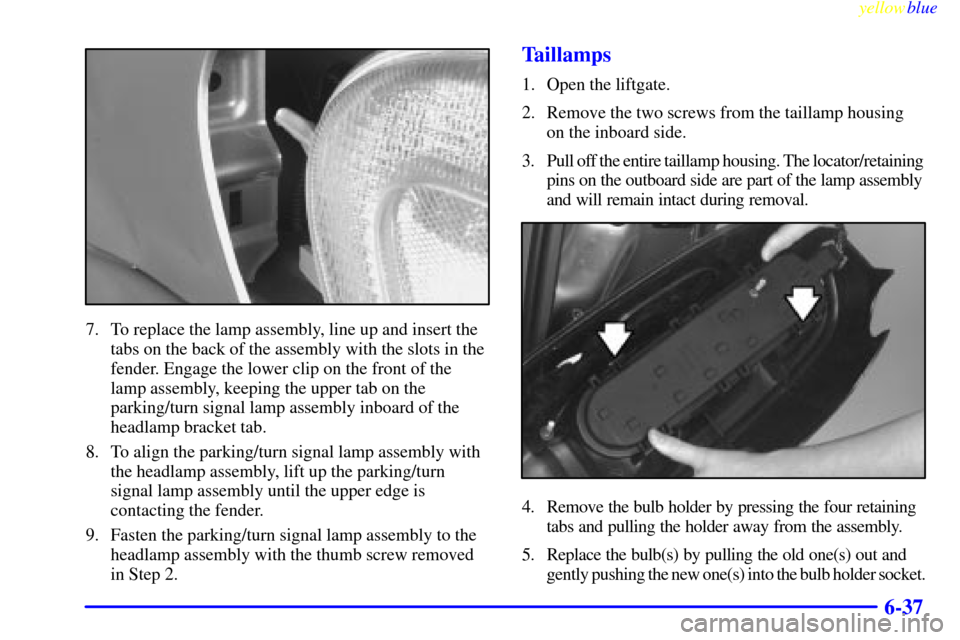
7. To replace the lamp assembly, line up and insert the
tabs on the back of the assembly with the slots in the
fender. Engage the lower clip on the front of the
lamp assembly, keeping the upper tab on the
parking/turn signal lamp assembly inboard of the
headlamp bracket tab.
8. To align the parking/turn signal lamp assembly with
the headlamp assembly, lift up the parking/turn
signal lamp assembly until the upper edge is
contacting the fender.
9. Fasten the parking/turn signal lamp assembly to the
headlamp assembly with the thumb screw removed
in Step 2.
Taillamps
1. Open the liftgate.
2. Remove the two screws from the taillamp housing
on the inboard side.
3. Pull off the entire taillamp housing. The locator/retaining
pins on the outboard side are part of the lamp assembly
and will remain intact during removal.
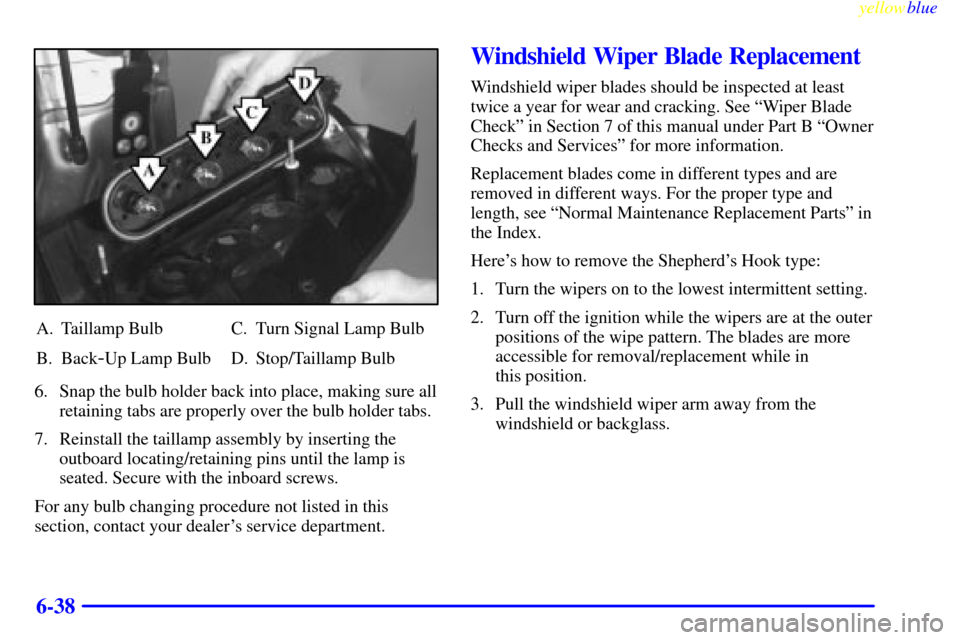
4. Remove the bulb holder by pressing the four retaining
tabs and pulling the holder away from the assembly.
5. Replace the bulb(s) by pulling the old one(s) out and
gently pushing the new one(s) into the bulb holder socket.
Page 348 of 440

yellowblue
6-38
A. Taillamp Bulb
B. Back
-Up Lamp BulbC. Turn Signal Lamp Bulb
D. Stop/Taillamp Bulb
6. Snap the bulb holder back into place, making sure all
retaining tabs are properly over the bulb holder tabs.
7. Reinstall the taillamp assembly by inserting the
outboard locating/retaining pins until the lamp is
seated. Secure with the inboard screws.
For any bulb changing procedure not listed in this
section, contact your dealer's service department.
Windshield Wiper Blade Replacement
Windshield wiper blades should be inspected at least
twice a year for wear and cracking. See ªWiper Blade
Checkº in Section 7 of this manual under Part B ªOwner
Checks and Servicesº for more information.
Replacement blades come in different types and are
removed in different ways. For the proper type and
length, see ªNormal Maintenance Replacement Partsº in
the Index.
Here's how to remove the Shepherd's Hook type:
1. Turn the wipers on to the lowest intermittent setting.
2. Turn off the ignition while the wipers are at the outer
positions of the wipe pattern. The blades are more
accessible for removal/replacement while in
this position.
3. Pull the windshield wiper arm away from the
windshield or backglass.