Page 208 of 336
yellowblue
5-24 Removing the Spare Tire and Tools
The equipment you'll need
is in the trunk. Pull the
carpeting from the floor of
the trunk. Turn the center
nut on the compact spare
cover counterclockwise to
remove it. Then lift and
remove the cover.
Turn the wing nut
counterclockwise and
remove it. Then lift off the
spacer and remove the spare
tire. See ªCompact Spare
Tireº in the Index for more
information about the
compact spare.
Turn the nut holding the jack and wrench
counterclockwise and remove it. Then remove the jack
and wrench.
Page 210 of 336
yellowblue
5-26
To remove a center cap, use the wrench to pry gently at
the notch. Don't use a tool that is narrower than the
wrench to pry at this notch.
If your vehicle has wheel nut caps, remove them using
the wheel wrench.
Removing the Flat Tire and Installing the
Spare Tire
1. Using the wheel wrench, loosen all the wheel nuts.
Don't remove them yet.
2. Turn the jack handle clockwise to raise the jack lift
head a few inches.
Page 213 of 336
yellowblue
5-29
5. Raise the vehicle by turning the jack handle
clockwise. Raise the vehicle far enough off the
ground for the spare tire to fit under the vehicle.
6. Remove all wheel nuts and take off the flat tire.
7. Remove any rust or dirt
from the wheel bolts,
mounting surfaces and
spare wheel.
8. Install the spare tire.
CAUTION:
Rust or dirt on the wheel, or on the parts to
which it is fastened, can make the wheel nuts
become loose after a time. The wheel could come
off and cause an accident. When you change a
wheel, remove any rust or dirt from the places
where the wheel attaches to the vehicle. In an
emergency, you can use a cloth or a paper towel
to do this; but be sure to use a scraper or wire
brush later, if you need to, to get all the rust or
dirt off.
Page 214 of 336
yellowblue
5-30
CAUTION:
Never use oil or grease on studs or nuts. If you
do, the nuts might come loose. Your wheel could
fall off, causing a serious accident.
9. Replace the wheel
nuts with the
rounded end of the
nuts toward the
wheel. Tighten
each nut by hand
until the wheel
is held against
the hub.
10. Lower the vehicle by turning the jack handle
counterclockwise. Lower the jack completely.
Page 226 of 336

yellowblue
6-6
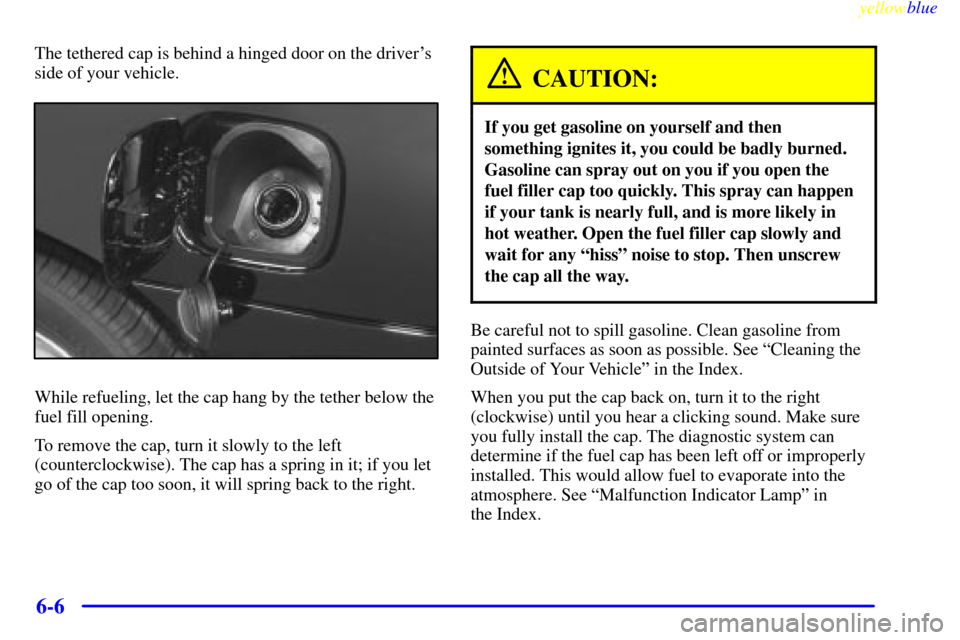
The tethered cap is behind a hinged door on the driver's
side of your vehicle.
While refueling, let the cap hang by the tether below the
fuel fill opening.
To remove the cap, turn it slowly to the left
(counterclockwise). The cap has a spring in it; if you let
go of the cap too soon, it will spring back to the right.
CAUTION:
If you get gasoline on yourself and then
something ignites it, you could be badly burned.
Gasoline can spray out on you if you open the
fuel filler cap too quickly. This spray can happen
if your tank is nearly full, and is more likely in
hot weather. Open the fuel filler cap slowly and
wait for any ªhissº noise to stop. Then unscrew
the cap all the way.
Be careful not to spill gasoline. Clean gasoline from
painted surfaces as soon as possible. See ªCleaning the
Outside of Your Vehicleº in the Index.
When you put the cap back on, turn it to the right
(clockwise) until you hear a clicking sound. Make sure
you fully install the cap. The diagnostic system can
determine if the fuel cap has been left off or improperly
installed. This would allow fuel to evaporate into the
atmosphere. See ªMalfunction Indicator Lampº in
the Index.
Page 253 of 336
yellowblue
6-33
Contact your dealer to learn how to prepare your vehicle
for longer storage periods.
Also, for your audio system, see ªTheft
-Deterrent
Featureº in the Index.
Bulb Replacement
In this section you'll find directions for changing the
bulbs in some of the lamps on your vehicle. See
ªReplacement Bulbsº in the Index to find the type of
bulb you should use.
Halogen Bulbs
CAUTION:
Halogen bulbs have pressurized gas inside and
can burst if you drop or scratch the bulb. You or
others could be injured. Be sure to read and
follow the instructions on the bulb package.
Headlamps
1. Open the hood.
2. Press and turn the bulb a quarter
-turn
(counterclockwise for the driver's side; clockwise for
the passenger's side) and remove it from the
retaining ring by gently pulling it back and away
from the headlamp.
3. Remove the electrical connector from the bulb by
raising the lock tab and pulling the connector away
from the bulb's base.
Page 254 of 336
yellowblue
6-34
4. Install the electrical connector to the bulb.
5. Install the new bulb by inserting the smallest tab
on the bulb base into the matching notch in the
retaining ring. Turn the bulb a quarter
-turn clockwise
until it stops.
6. Close the hood.
Front Parking and Turn Signal Lamp
1. Open the hood. There is one flap on each side of
the radiator.
2. Open the flap by lifting the tab.
Page 255 of 336
yellowblue
6-35
3. Position the radiator air side baffle aside and remove
the two fasteners. Remove the snap screw from
the fascia.4. Slide the headlamp assembly inboard to release the
mounting tabs and gently pull the inside of the
assembly away from the vehicle.
5. Push the tab on the bulb socket and turn
it counterclockwise. Pull the socket out of
the assembly.
6. Remove the bulb from the socket by pulling it out.
Do not twist the bulb.
7. Push in the new bulb.
8. Reverse Steps 1 through 4 to replace the assembly.