Page 231 of 368
yellowblue
5-25
CAUTION:
Never use oil or grease on studs or nuts. If you
do, the nuts might come loose. Your wheel could
fall off, causing a serious accident.
9. Place the spare on the wheel-mounting surface.
10. Replace the wheel nuts
with the rounded end of
the nuts toward the
wheel. Tighten each nut
by hand or with the
wheel wrench until the
wheel is held against
the hub.
11. Lower the vehicle by turning the jack handle
counterclockwise. Lower the jack completely.
Page 237 of 368

yellowblue
5-31
NOTICE:
Spinning your wheels can destroy parts of your
vehicle as well as the tires. If you spin the wheels
too fast while shifting your transaxle back and
forth, you can destroy your transaxle.
For information about using tire chains on your vehicle,
see ªTire Chainsº in the Index.
Rocking Your Vehicle To Get It Out
First, turn your steering wheel left and right. That will
clear the area around your front wheels. Then shift back
and forth between REVERSE (R) and a forward gear
(or with a manual transaxle, between FIRST (1) or
SECOND (2) and REVERSE (R)), spinning the wheels
as little as possible. Release the accelerator pedal while
you shift, and press lightly on the accelerator pedal
when the transaxle is in gear. By slowly spinning your
wheels in the forward and reverse directions, you will
cause a rocking motion that may free your vehicle. If
that doesn't get you out after a few tries, you may need
to be towed out. If you do need to be towed out, see
ªTowing Your Vehicleº in the Index.
Page 247 of 368
yellowblue
6-9
Then go to the front of the vehicle and lift up on the
secondary hood release handle. The secondary hood
release lever is located near the front center of the hood
toward the driver's side.
To make sure that the secondary hood release handle
works properly, lubricate the hood latch at least once
a year.
Lift the hood, release the
hood prop from its retainer
and put the hood prop into
the slot in the hood marked
ªprop rod.º
Use the prop rod sleeve
when handling the
hood prop.
Before closing the hood, be sure all the filler caps are on
properly. Then lift the hood to relieve pressure on the
hood prop. Remove the hood prop from the slot in the
hood and return the prop to its retainer. Lower the hood
8 to 10 inches (20 to 25 cm) above the vehicle and
release so that it will latch fully. Check to make sure the
hood is closed and repeat if necessary.
Page 251 of 368
yellowblue
6-13 Checking Engine Oil
Pull out the dipstick and clean it with a paper towel or
cloth, then push it back in all the way. Remove it again,
keeping the tip down, and check the level.
When to Add Engine Oil
If the oil is at or below the ADD mark, then you'll need
to add at least one quart of oil. But you must use the
right kind. This part explains what kind of oil to use. For
crankcase capacity, see ªCapacities and Specificationsº
in the Index.
NOTICE:
Don't add too much oil. If your engine has so
much oil that the oil level gets above the upper
mark that shows the proper operating range,
your engine could be damaged.
This is where you add oil if you have a 2.2L engine.
Page 258 of 368
yellowblue
6-20
Checking the Fluid Level
�Park your vehicle on a level place. Keep the
engine running.
�With the parking brake applied, place the shift lever
in PARK (P).
�With your foot on the brake pedal, move the shift
lever through each gear range, pausing for about
three seconds in each range. Then, position the shift
lever in PARK (P).
�Let the engine run at idle for three to five minutes.
Then, without shutting off the engine, follow
these steps:
1. If you have a
three
-speed automatic
transaxle, the handle on
the transaxle dipstick is
a red ring. Pull out the
dipstick and wipe it with
a clean rag or
paper towel.2. Push it back in all the way, wait three seconds and
then pull it back out again.
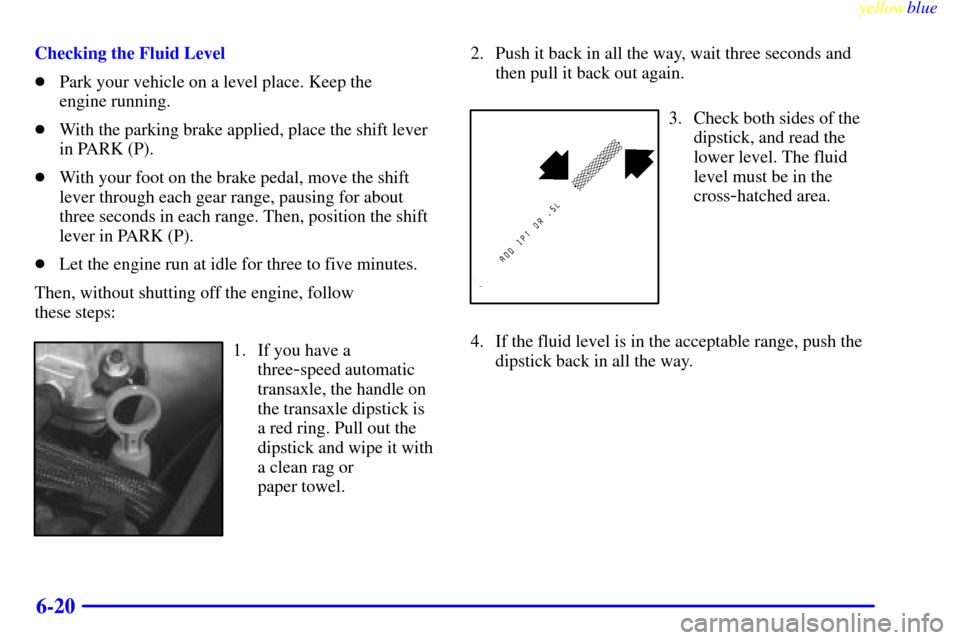
3. Check both sides of the
dipstick, and read the
lower level. The fluid
level must be in the
cross
-hatched area.
4. If the fluid level is in the acceptable range, push the
dipstick back in all the way.
Page 259 of 368

yellowblue
6-21 How to Add Fluid
Refer to the Maintenance Schedule to determine what
kind of transaxle fluid to use. See ªRecommended
Fluids and Lubricantsº in the Index.
If the fluid level is low, add only enough of the proper
fluid to bring the level into the cross
-hatched area
on the dipstick.
1. Pull out the dipstick.
2. Using a long
-neck funnel, add enough fluid at the
dipstick hole to bring it to the proper level.
It doesn't take much fluid, generally less than one
pint (0.5 L). Don't overfill.
NOTICE:
We recommend you use only fluid labeled
DEXRON�-III, because fluid with that label is
made especially for your automatic transaxle.
Damage caused by fluid other than
DEXRON
�-III is not covered by your new
vehicle warranty.
3. After adding fluid, recheck the fluid level as
described under ªHow to Check.º
4. When the correct fluid level is obtained, push the
dipstick back in all the way.
Automatic Transaxle Fluid
(Four
-Speed Only)
It is not necessary to check the transaxle fluid level. A
transaxle fluid leak is the only reason for fluid loss. If a
leak occurs, take the vehicle to the dealership service
department and have it repaired as soon as possible. You
may also have your fluid level checked by your dealer
or service center when you have your oil changed.
Change both the fluid and filter every 50,000 miles (83
000 km) if the vehicle is mainly driven under one or
more of these conditions:
�In heavy city traffic where the outside temperature
regularly reaches 90�F (32�C) or higher.
�In hilly or mountainous terrain.
�When doing frequent trailer towing.
�Uses such as found in taxi, police or delivery service.
If you do not use your vehicle under any of these
conditions, the fluid and filter do not require changing.
Page 261 of 368
yellowblue
6-23
Then, follow these steps:
1. The manual transaxle
dipstick is located below
the brake master
cylinder, near the rear of
the transaxle case. Flip
the handle up and then
pull out the dipstick and
clean it with a rag or
paper towel.
2. Push it back in all the way and remove it.
3. Check both sides of the dipstick and read the lower
level. The fluid level must be between the ADD and
FULL marks. (Note: Fluid may appear at the bottom
of the dipstick even when the fluid level is several
pints low.)
4. If the fluid level is where it should be, push the
dipstick back in all the way and flip the handle
down. If the fluid level is low, add more fluid as
described in the next steps.
Page 274 of 368
yellowblue
6-36 Headlamps
1. Remove the first bolt. Then remove the remaining
plastic fasteners holding the shield. Use the end of a
flat
-head screwdriver to pull up the center of the
fastener. Be careful not to break the fasteners that
hold the shield in place.
2. Remove the other bolt that anchors the headlamp
assembly. Pull the headlamp assembly toward the
front of the vehicle to access the bulb assembly.
When replacing the driver's side headlamp, twist the
bulb assembly one
-eighth of a turn counterclockwise
and remove it from the headlamp assembly.
When replacing the passenger's side headlamp, twist
the bulb assembly one
-eighth of a turn clockwise
and remove it from the headlamp assembly.