Page 248 of 368
yellowblue
6-10 2.2L L4 Engine (Code 4)
When you open the hood, you'll see:
A. Coolant Surge Tank
B. Power Steering Fluid Reservoir
C. Engine Oil Fill Cap/Dipstick
D. Brake Fluid ReservoirE. Hydraulic Clutch Fluid
Reservoir (If Equipped)
F. Automatic Transaxle Fluid
Dipstick (If Equipped)G. Engine Air Cleaner/Filter
H. Battery
I. Windshield Washer Fluid
Reservoir
Page 249 of 368
yellowblue
6-11 2.4L L4 Engine (Code T)
When you open the hood, you'll see:
A. Coolant Surge Tank
B. Engine Oil Fill Cap
C. Engine Oil Dipstick
D. Power Steering Fluid ReservoirE. Brake Fluid Reservoir
F. Hydraulic Clutch Fluid
Reservoir (If Equipped)
G. BatteryH. Engine Air Cleaner/Filter
I. Windshield Washer Fluid
Reservoir
Page 250 of 368
yellowblue
6-12
Engine Oil
It's a good idea to check your engine oil every time you
get fuel. In order to get an accurate reading, the oil must
be warm and the vehicle must be on level ground.
Check the oil here if you
have a 2.2L engine.
Check the oil here if you have a 2.4L engine. The
dipstick's handle will be a yellow ring.
Turn off the engine and give the oil several minutes to
drain back into the oil pan. If you don't, the oil dipstick
might not show the actual level.
Page 251 of 368
yellowblue
6-13 Checking Engine Oil
Pull out the dipstick and clean it with a paper towel or
cloth, then push it back in all the way. Remove it again,
keeping the tip down, and check the level.
When to Add Engine Oil
If the oil is at or below the ADD mark, then you'll need
to add at least one quart of oil. But you must use the
right kind. This part explains what kind of oil to use. For
crankcase capacity, see ªCapacities and Specificationsº
in the Index.
NOTICE:
Don't add too much oil. If your engine has so
much oil that the oil level gets above the upper
mark that shows the proper operating range,
your engine could be damaged.
This is where you add oil if you have a 2.2L engine.
Page 252 of 368
yellowblue
6-14
This is where you add oil if you have a 2.4L engine.
Be sure to fill it enough to put the level somewhere in
the proper operating range. Push the dipstick all the way
back in when you're through.
What Kind of Engine Oil to Use
Oils recommended for your
vehicle can be identified by
looking for the ªStarburstº
symbol. This symbol
indicates that the oil has
been certified by the
American Petroleum
Institute (API). Do not use
any oil which does not carry
this Starburst symbol.
If you change your own oil, be sure you use oil that has
the Starburst symbol on the front of the oil container. If
you have your oil changed for you, be sure the oil put
into your engine is American Petroleum Institute
certified for gasoline engines.
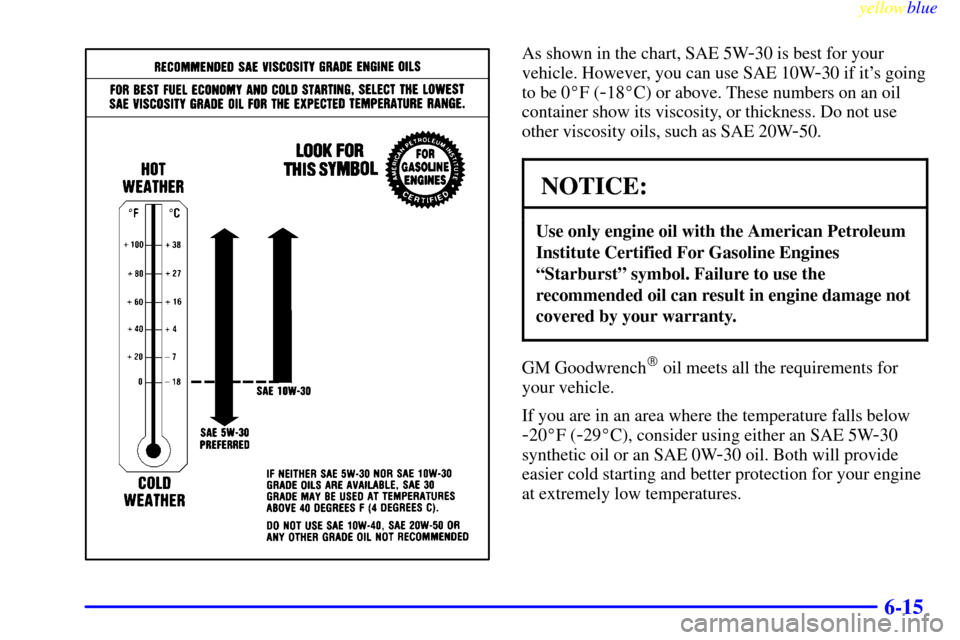
You should also use the proper viscosity oil for your
vehicle, as shown in the following chart:
Page 253 of 368
yellowblue
6-15
As shown in the chart, SAE 5W-30 is best for your
vehicle. However, you can use SAE 10W
-30 if it's going
to be 0�F (
-18�C) or above. These numbers on an oil
container show its viscosity, or thickness. Do not use
other viscosity oils, such as SAE 20W
-50.
NOTICE:
Use only engine oil with the American Petroleum
Institute Certified For Gasoline Engines
ªStarburstº symbol. Failure to use the
recommended oil can result in engine damage not
covered by your warranty.
GM Goodwrench� oil meets all the requirements for
your vehicle.
If you are in an area where the temperature falls below
-20�F (-29�C), consider using either an SAE 5W-30
synthetic oil or an SAE 0W
-30 oil. Both will provide
easier cold starting and better protection for your engine
at extremely low temperatures.
Page 254 of 368

yellowblue
6-16 Engine Oil Additives
Don't add anything to your oil. Your dealer is ready to
advise if you think something should be added.
When to Change Engine Oil
If any one of these is true for you, use the short trip/city
maintenance schedule:
�Most trips are less than 5 to 10 miles (8 to 16 km).
This is particularly important when outside
temperatures are below freezing.
�Most trips include extensive idling (such as frequent
driving in stop
-and-go traffic).
�Most trips are through dusty areas.
�The vehicle is used for delivery service, police, taxi
or other commercial application.
Driving under these conditions causes engine oil to
break down sooner. If any one of these is true for your
vehicle, then you need to change your oil and filter
every 3,000 miles (5 000 km) or 3 months
-- whichever
occurs first.If none of them is true, use the long trip/highway
maintenance schedule. Change the oil and filter every
7,500 miles (12 500 km) or 12 months
-- whichever
occurs first. Driving a vehicle with a fully warmed
engine under highway conditions causes engine oil to
break down slower.
What to Do with Used Oil
Did you know that used engine oil contains certain
elements that may be unhealthy for your skin and could
even cause cancer? Don't let used oil stay on your skin
for very long. Clean your skin and nails with soap and
water, or a good hand cleaner. Wash or properly throw
away clothing or rags containing used engine oil. (See
the manufacturer's warnings about the use and disposal
of oil products.)
Used oil can be a real threat to the environment. If you
change your own oil, be sure to drain all free
-flowing oil
from the filter before disposal. Don't ever dispose of oil
by putting it in the trash, pouring it on the ground, into
sewers, or into streams or bodies of water. Instead,
recycle it by taking it to a place that collects used oil. If
you have a problem properly disposing of your used oil,
ask your dealer, a service station or a local recycling
center for help.
Page 255 of 368
yellowblue
6-17
Engine Air Cleaner/Filter
The air cleaner is located on the driver's side of the
engine compartment near the battery.
To check or replace the filter, remove the screws that
hold the cover on and lift the cover. Be sure to reinstall
the air cleaner filter and replace the cover tightly.
Refer to the Maintenance Schedule to determine when to
replace the air filter.
See ªScheduled Maintenance Servicesº in the Index.

When you open the hood, youll see:
A. Coolant Surge Tank
B. Power Steering Fluid Reservoir
C. Engine Oil Fill Cap/Dipstick
D. Brake Fluid ReservoirE. Hydr")

When you open the hood, youll see:
A. Coolant Surge Tank
B. Engine Oil Fill Cap
C. Engine Oil Dipstick
D. Power Steering Fluid ReservoirE. Brake Fluid Res")