Page 207 of 328

yellowblue
4-37 When You Are Ready to Leave After
Parking on a Hill
1. Apply your regular brakes and hold the pedal down
while you:
�Start your engine;
�Shift into a gear; and
�Be sure the parking brake has released.
2. Let up on the brake pedal.
3. Drive slowly until the trailer is clear of the chocks.
4. Stop and have someone pick up and store the chocks.
Maintenance When Trailer Towing
Your vehicle will need service more often when you're
pulling a trailer. See the Maintenance Schedule booklet
for more on this. Things that are especially important in
trailer operation are automatic transmission fluid (don't
overfill), engine oil, axle lubricant, drive belt, cooling
system and brake system. If you're trailering, it's a good
idea to review this information before you start
your trip.
Check periodically to see that all hitch nuts and bolts
are tight.
Engine Cooling When Trailer Towing
Your cooling system may temporarily overheat during
severe operating conditions. See ªEngine Overheatingº
in the Index.
Page 240 of 328
yellowblue
6-2
Service
Your dealer knows your vehicle best and wants you to
be happy with it. We hope you'll go to your dealer for
all your service needs. You'll get genuine GM parts and
GM
-trained and supported service people.
We hope you'll want to keep your GM vehicle all GM.
Genuine GM parts have one of these marks:
Doing Your Own Service Work
If you want to do some of your own service work, you'll
want to use the proper service manual. It tells you much
more about how to service your vehicle than this manual
can. To order the proper service manual, see ªService
and Owner Publicationsº in the Index.
Your vehicle has an air bag system. Before attempting to
do your own service work, see ªServicing Your Air
Bag
-Equipped Vehicleº in the Index.
You should keep a record with all parts receipts and list
the mileage and the date of any service work you
perform. See ªMaintenance Recordº in the Maintenance
Schedule booklet.
Page 252 of 328

yellowblue
6-14 Engine Oil Additives
Don't add anything to your oil. Your dealer is ready to
advise if you think something should be added.
When to Change Engine Oil
If any one of these is true for you, use the short trip/city
maintenance schedule:
�Most trips are less than 5 to 10 miles (8 to 16 km).
This is particularly important when outside
temperatures are below freezing.
�Most trips include extensive idling (such as frequent
driving in stop
-and-go traffic).
�Most trips are through dusty areas.
�You frequently tow a trailer or use a carrier on top of
your Catera.
�The vehicle is used for delivery service, police, taxi
or other commercial application.
Driving under these conditions causes engine oil to
break down sooner. If any one of these is true for your
vehicle, then you need to change your oil and filter
every 5,000 miles (8 000 km) or 3 months
-- whichever
occurs first.If none of them is true, use the long trip/highway
maintenance schedule. Change the oil and filter at the
first 5,000 miles (8 000 km) or 3 months
-- whichever
occurs first. Then, change the oil and filter every
10,000 miles (16 000 km) or 12 months
-- whichever
occurs first. Driving a vehicle with a fully warmed
engine under highway conditions causes engine oil to
break down slower.
What to Do with Used Oil
Did you know that used engine oil contains certain
elements that may be unhealthy for your skin and could
even cause cancer? Don't let used oil stay on your skin
for very long. Clean your skin and nails with soap and
water, or a good hand cleaner. Wash or properly throw
away clothing or rags containing used engine oil. (See
the manufacturer's warnings about the use and disposal
of oil products.)
Used oil can be a real threat to the environment. If you
change your own oil, be sure to drain all free
-flowing oil
from the filter before disposal. Don't ever dispose of oil
by putting it in the trash, pouring it on the ground, into
sewers, or into streams or bodies of water. Instead,
recycle it by taking it to a place that collects used oil. If
you have a problem properly disposing of your used oil,
ask your dealer, a service station or a local recycling
center for help.
Page 254 of 328

yellowblue
6-16
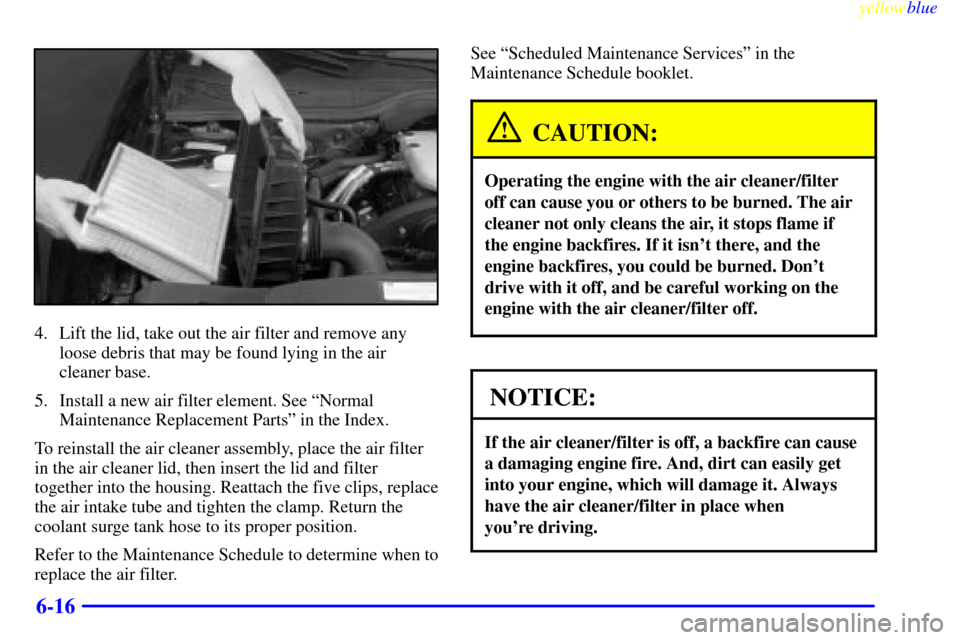
4. Lift the lid, take out the air filter and remove any
loose debris that may be found lying in the air
cleaner base.
5. Install a new air filter element. See ªNormal
Maintenance Replacement Partsº in the Index.
To reinstall the air cleaner assembly, place the air filter
in the air cleaner lid, then insert the lid and filter
together into the housing. Reattach the five clips, replace
the air intake tube and tighten the clamp. Return the
coolant surge tank hose to its proper position.
Refer to the Maintenance Schedule to determine when to
replace the air filter.See ªScheduled Maintenance Servicesº in the
Maintenance Schedule booklet.
CAUTION:
Operating the engine with the air cleaner/filter
off can cause you or others to be burned. The air
cleaner not only cleans the air, it stops flame if
the engine backfires. If it isn't there, and the
engine backfires, you could be burned. Don't
drive with it off, and be careful working on the
engine with the air cleaner/filter off.
NOTICE:
If the air cleaner/filter is off, a backfire can cause
a damaging engine fire. And, dirt can easily get
into your engine, which will damage it. Always
have the air cleaner/filter in place when
you're driving.
Page 257 of 328
yellowblue
6-19
NOTICE:
We recommend you use only fluid labeled
DEXRON�-III, because fluid with that label is
made especially for your automatic transmission.
Damage caused by fluid other than
DEXRON
�-III is not covered by your new
vehicle warranty.
Rear Axle
When to Check Lubricant
Refer to the Maintenance Schedule to determine how
often to check the lubricant. See ªPeriodic Maintenance
Inspectionsº and ªScheduled Maintenance Servicesº in
the Maintenance Schedule booklet.
How to Check Lubricant
If the level is below the bottom of the filler plug hole,
you'll need to add some lubricant. Add enough lubricant
to raise the level to the bottom of the filler plug hole.
What to Use
Refer to the Maintenance Schedule to determine what
kind of lubricant to use. See ªRecommended Fluids and
Lubricantsº in the Maintenance Schedule booklet.
Page 266 of 328

yellowblue
6-28
CAUTION:
The brake pad wear indicator light means that
soon your brakes won't work well. That could
lead to an accident. When the brake pad wear
indicator light comes on and stays on, have your
vehicle serviced.
NOTICE:
Continuing to drive with worn-out brake pads
could result in costly brake repair.
Some driving conditions or climates may cause a brake
squeal when the brakes are first applied or lightly
applied. This does not mean something is wrong with
your brakes.Properly torqued wheel bolts are necessary to help
prevent brake pulsation. When tires are rotated, inspect
brake pads for wear and evenly torque wheel bolts in the
proper sequence to GM specifications.
Brake linings should always be replaced as complete
axle sets.
See ªBrake System Inspectionº in the Maintenance
Schedule booklet under Part C ªPeriodic
Maintenance Inspections.º
Brake Pedal Travel
See your dealer if the brake pedal does not return to
normal height, or if there is a rapid increase in pedal
travel. This could be a sign of brake trouble.
Brake Adjustment
Every time you apply the brakes, with or without the
vehicle moving, your brakes adjust for wear.
Page 274 of 328
yellowblue
6-36
Wiper Blade Replacement
Windshield wiper blades should be inspected at least
twice a year for wear or cracking. See ªWiper Blade
Checkº in the Maintenance Schedule booklet under
Part B ªOwner Checks and Servicesº for
more information.
It's a good idea to clean or replace the wiper blade
assembly on a regular basis or when worn. For proper
windshield wiper blade type, see ªNormal Maintenance
Replacement Partsº later in this section.
To replace the wiper blade assembly:
1. Pull the windshield wiper assembly away from
the windshield.
2. Lift the wiper blade assembly up so it is in a ªTº
shaped position. You should be able to see a tab.
3. Squeeze the tab together and pull the wiper blade
assembly down enough to release it from the ªJº
hooked end of the wiper arm. Slide the assembly
away from the arm.
4. Replace the blade.
Page 277 of 328

yellowblue
6-39
NOTICE: (Continued)
�Tire overloading
�Bad wear
�Bad handling
�Bad fuel economy.
If your tires have too much air (overinflation),
you can get the following:
�Unusual wear
�Bad handling
�Rough ride
�Needless damage from road hazards.
When to Check
Check your tires once a month or more. Also, check the
tire pressure of the spare tire.How to Check
Use a good quality pocket
-type gage to check tire
pressure. You can't tell if your tires are properly inflated
simply by looking at them. Radial tires may look
properly inflated even when they're underinflated.
Be sure to put the valve caps back on the valve stems.
They help prevent leaks by keeping out dirt
and moisture.
Tire Inspection and Rotation
Tires should be rotated at 5,000 miles (8 000 km) and
then every 10,000 miles (16 000 km) thereafter. Any
time you notice unusual wear, rotate your tires as soon
as possible and check wheel alignment. Also check for
damaged tires or wheels. See ªWhen It's Time for New
Tiresº and ªWheel Replacementº later in this section for
more information.
The purpose of regular rotation is to achieve more
uniform wear for all tires on the vehicle. The first
rotation is the most important. See ªScheduled
Maintenance Servicesº in the Maintenance Schedule
booklet for scheduled rotation intervals.