Page 82 of 328

yellowblue
2-20 To Use the Engine Coolant Heater
1. Turn off the engine.
2. Open the hood and unwrap the electrical cord.
The electrical cord for the engine coolant heater is in
front of the air cleaner filter and under the headlamp
cover, on the passenger's side of the engine.
3. Plug it into a normal, grounded 110
-volt AC outlet.
CAUTION:
Plugging the cord into an ungrounded outlet
could cause an electrical shock. Also, the wrong
kind of extension cord could overheat and cause
a fire. You could be seriously injured. Plug the
cord into a properly grounded three
-prong
11 0
-volt AC outlet. If the cord won't reach, use a
heavy
-duty three-prong extension cord rated for
at least 15 amps.
4. Before starting the engine, be sure to unplug and
store the cord as it was before to keep it away from
moving engine parts. If you don't, it could
be damaged.
How long should you keep the coolant heater plugged
in? The answer depends on the outside temperature, the
kind of oil you have, and some other things. Instead of
trying to list everything here, we ask that you contact
your dealer in the area where you'll be parking your
vehicle. The dealer can give you the best advice for that
particular area.
Page 146 of 328

yellowblue
3-8
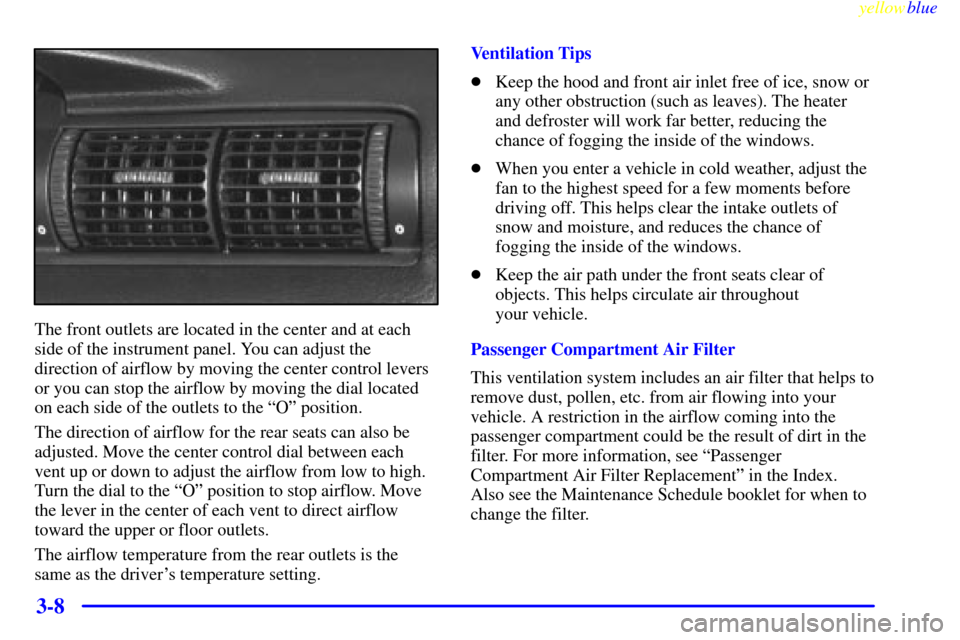
The front outlets are located in the center and at each
side of the instrument panel. You can adjust the
direction of airflow by moving the center control levers
or you can stop the airflow by moving the dial located
on each side of the outlets to the ªOº position.
The direction of airflow for the rear seats can also be
adjusted. Move the center control dial between each
vent up or down to adjust the airflow from low to high.
Turn the dial to the ªOº position to stop airflow. Move
the lever in the center of each vent to direct airflow
toward the upper or floor outlets.
The airflow temperature from the rear outlets is the
same as the driver's temperature setting.Ventilation Tips
�Keep the hood and front air inlet free of ice, snow or
any other obstruction (such as leaves). The heater
and defroster will work far better, reducing the
chance of fogging the inside of the windows.
�When you enter a vehicle in cold weather, adjust the
fan to the highest speed for a few moments before
driving off. This helps clear the intake outlets of
snow and moisture, and reduces the chance of
fogging the inside of the windows.
�Keep the air path under the front seats clear of
objects. This helps circulate air throughout
your vehicle.
Passenger Compartment Air Filter
This ventilation system includes an air filter that helps to
remove dust, pollen, etc. from air flowing into your
vehicle. A restriction in the airflow coming into the
passenger compartment could be the result of dirt in the
filter. For more information, see ªPassenger
Compartment Air Filter Replacementº in the Index.
Also see the Maintenance Schedule booklet for when to
change the filter.
Page 239 of 328

6-
yellowblue
6-1
Section 6 Service and Appearance Care
Here you will find information about the care of your vehicle. This section begins with service and fuel information,
and then it shows how to check important fluid and lubricant levels. There is also technical information about your
vehicle, and a part devoted to its appearance care.
6
-2 Service
6
-3 Fuel
6
-5 Fuels in Foreign Countries
6
-5 Filling Your Tank
6
-8 Checking Things Under the Hood
6
-11 Engine Oil
6
-15 Engine Air Cleaner/Filter
6
-18 Automatic Transmission Fluid
6
-19 Rear Axle
6
-20 Surge Tank Pressure Cap
6
-20 Engine Coolant
6
-24 Power Steering Fluid
6
-25 Windshield Washer Fluid
6
-26 Brakes
6
-29 Battery
6
-30 Bulb Replacement
6
-36 Wiper Blade Replacement6
-37 Tires
6
-46 Appearance Care
6
-46 Cleaning the Inside of Your Vehicle
6
-48 Care of Safety Belts
6
-49 Cleaning the Outside of Your Vehicle
6
-51 Cleaning Aluminum or Chrome-Plated
Wheels (If Equipped)
6
-52 Underbody Maintenance
6
-53 GM Vehicle Care/Appearance Materials
6
-54 Vehicle Identification Number (VIN)
6
-54 Service Parts Identification Label
6
-55 Electrical System
6
-62 Replacement Bulbs
6
-62 Capacities and Specifications
6
-63 Air Conditioning Refrigerants
6
-63 Normal Maintenance Replacement Parts
Page 248 of 328
yellowblue
6-10
When you open the hood, you'll see:
A. Coolant Fill Location
B. Engine Air Cleaner/Filter
C. Passenger Compartment
Air FilterD. Engine Oil Fill Location
E. Engine Oil Dipstick Location
F. Windshield Washer FluidG. Brake Master Cylinder
H. Power Steering Fluid
I. Battery
Before closing the hood, be sure all filler caps are on properly. Then pull the hood down and close it firmly.
Page 253 of 328
yellowblue
6-15
Engine Air Cleaner/Filter
The air cleaner is located behind the headlamps on the
passenger's side of the engine. Be sure the engine has
cooled before following these steps to replace the
air filter.
1. Unhook the five clips that attach the air cleaner lid to
the housing. You may need to use a screwdriver to
help you unhook the clips.
2. With a screwdriver, loosen the retaining clamp on
the air intake tube and then disconnect the tube as
shown by the arrow above.
3. Move the hose going to the coolant surge tank out of
the way so the air cleaner lid can be lifted.
Page 254 of 328

yellowblue
6-16
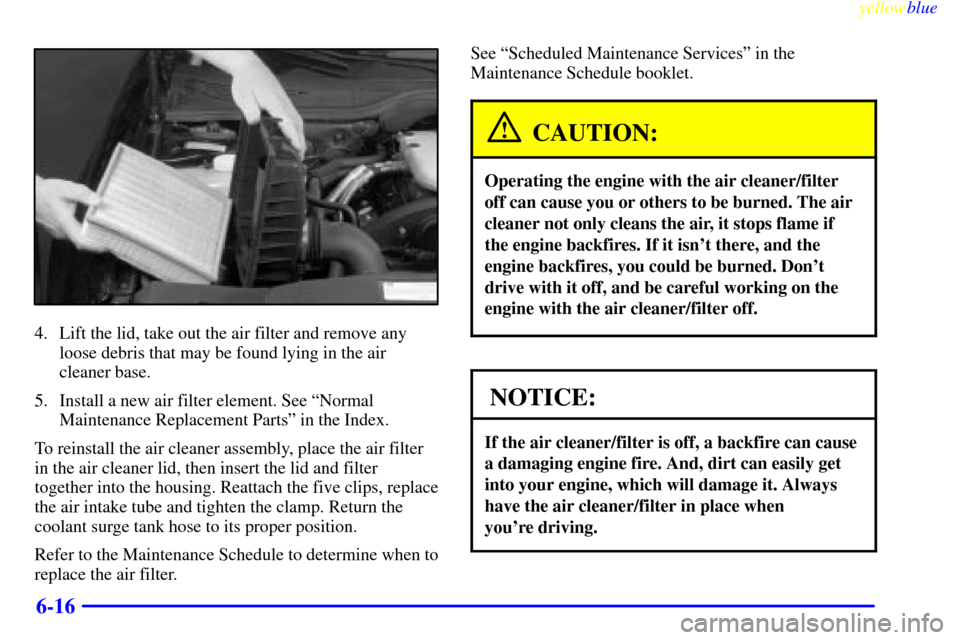
4. Lift the lid, take out the air filter and remove any
loose debris that may be found lying in the air
cleaner base.
5. Install a new air filter element. See ªNormal
Maintenance Replacement Partsº in the Index.
To reinstall the air cleaner assembly, place the air filter
in the air cleaner lid, then insert the lid and filter
together into the housing. Reattach the five clips, replace
the air intake tube and tighten the clamp. Return the
coolant surge tank hose to its proper position.
Refer to the Maintenance Schedule to determine when to
replace the air filter.See ªScheduled Maintenance Servicesº in the
Maintenance Schedule booklet.
CAUTION:
Operating the engine with the air cleaner/filter
off can cause you or others to be burned. The air
cleaner not only cleans the air, it stops flame if
the engine backfires. If it isn't there, and the
engine backfires, you could be burned. Don't
drive with it off, and be careful working on the
engine with the air cleaner/filter off.
NOTICE:
If the air cleaner/filter is off, a backfire can cause
a damaging engine fire. And, dirt can easily get
into your engine, which will damage it. Always
have the air cleaner/filter in place when
you're driving.
Page 255 of 328
yellowblue
6-17 Passenger Compartment
Air Filter Replacement
The passenger compartment air filter traps most of the
pollen from the air entering your vehicle. Like your
vehicle's air cleaner filter, it may need to be changed
periodically. For how often to change the passenger
compartment air filter, see your Maintenance
Schedule booklet.
The access panel for the passenger compartment air
filter is below the grille, at the base of the windshield on
the passenger's side of the engine compartment.
1. Open the hood of your vehicle.
2. Lift the engine compartment rear seal (see the arrow
in the illustration) and pull it back far enough to be
able to lift open the grille flap.
3. Unhook both retaining clips that secure the filter
in place.
4. Slide the filter toward the front of the car and then
pull the filter straight out.
Page 256 of 328

yellowblue
6-18
5. Replace the filter by sliding it back in, reattaching
both retaining clips and closing the grille flap.
6. Replace the engine compartment rear seal.
7. Close the engine hood.
For the type of filter to use, see ªNormal Maintenance
Replacement Partsº in the Index.
Automatic Transmission Fluid
It is not necessary to check the transmission fluid level.
A transmission fluid leak is the only reason for fluid
loss. If a leak occurs, take your vehicle to the dealership
service department and have it repaired as soon as
possible. You may also have your fluid level checked by
your dealer or service center when you have your
oil changed.
Change both the fluid and filter every 50,000 miles
(83 000 km) if the vehicle is mainly driven under one or
more of these conditions:
�In heavy city traffic where the outside temperature
regularly reaches 90�F (32�C) or higher.
�In hilly or mountainous terrain.
�When doing frequent trailer towing.
�Uses such as found in taxi, police or delivery service.
If you do not use your vehicle under any of these
conditions, the fluid and filter do not require changing.