1999 BMW 540i engine oil
[x] Cancel search: engine oilPage 133 of 1002

Downloaded from www.Manualslib.com manuals search engine
. - -- -
Cylinder Head Removal and Installation --
Remove bolts (arrows) holding timing chain cover to cylinder
head. (Photo shows camshafts and camshaft bearing caps in
place).
4 Using BMW special tool 11 2 250 or equivalent, loosen cylin-
der head bolts in several stages, in sequence shown. Discard
head bolts.
NOJE-
BMW special tool 11 2 250 is a thin-walled Torx El2 socket
with an extended reach. The cylinder head bolts are re-
cessed into the head below the
camshaft towers with little
working space.
- Lift off cylinder head. Refer to 116 Cylinder Head and Val-
vetrain for cylinder head reconditioning information.
Cylinder head, installing, M52 TU and M54
engines
Clean cylinder head and gasket surfaces of cylinder bloclc
and all timing chain covers.
CAUTION- Remove foreign matter and liquid from bolt holes. Trapped oil
or coolant in bolt holes can cause damage to
blocl~,
CAUJION-
Do not use a metal scraper or wire brush to clean the alumi-
num cylinder head or pistons. If necessary, use a hard wood-
en orplastic scraper. Also available are abrasive discs to be
used in conjunction with an electric drill. Be sure to use the
correct disc for the type of metal being cleaned.
Evaluate cylinder head as shown in
116 Cylinder Head and
Valvetrain.
NOTE- If the cylinder head has been machined, a special 0.3
mm
(0.01 1 in.) thicker gasket should be installed. The thicker
gasket is available from an authorized
BMW dealer and
should be marked accordingly
Cylinder head and valve specifications are covered in 116
Cylinder Head and Valvetrain.
Page 134 of 1002

Downloaded from www.Manualslib.com manuals search engine
11 3-40
I Cylinder Head Removal and Installation
Lubricate camshafts, camshaft carriers, bearing caps, hy-
draulic lifters, friction washers, splined shafts and spline hubs
with assembly lubricant before installation.
4 Check that two cylinder head aligning sleeves (arrows) are
correctly positioned in block and are not damaged.
- Apply elastic sealing compound Three Bond 1209 8 to cor-
ner joints on cylinder block to timing chain cover.
- Place new cylinder head gasket on cylinder block.
NOTE-
The word "OBEN" or "TOP printed on the gasket, should
face up. The cylinder headgaslet will fit correctly in only one
orientation.
- Set cylinder head in position, guiding primary chain through
cylinder head opening.
CAUJION-
Make sure the crankshaft, which had been rotated approxi-
mately 30" opposite the direction of engine rotation from
TDC, is still in thatposition before lowering the cylinder head
into position. All pistons must be out of TDC position to pre-
vent
valve/piston interference when the camshafts are in-
stalled.
- Lightly lubricate new cylinder head bolts and washers with
oil. Install bolts and washers finger tight. Install cylinder head
to lower timing chain cover bolts finger tight.
NOJE-
Cylinder head bolts should not be reused. They are
stretch-type bolts and must be replaced whenever loos-
ened.
* Aluminum cylinder blocls use different length cylinder
head bolts and torque values than cast iron blocks.
Check that all washers for
Nle head bolts are in place be-
fore installing the bolts. Some of the washers may be
staked to the cylinder head.
I 12 10 4 2 6 8 141 Tighten cylinder head bolts in correct sequence (1-14)
CA U TIOW-
The bolts should be tightened in three stages as listed below
The final stages require the use of a BMW special tool
11 2
110 or a suitable protractor to tighten the bolts to a specified
torque angle.
Page 145 of 1002

Downloaded from www.Manualslib.com manuals search engine
113-51
Cylinder Head Removal and Installation
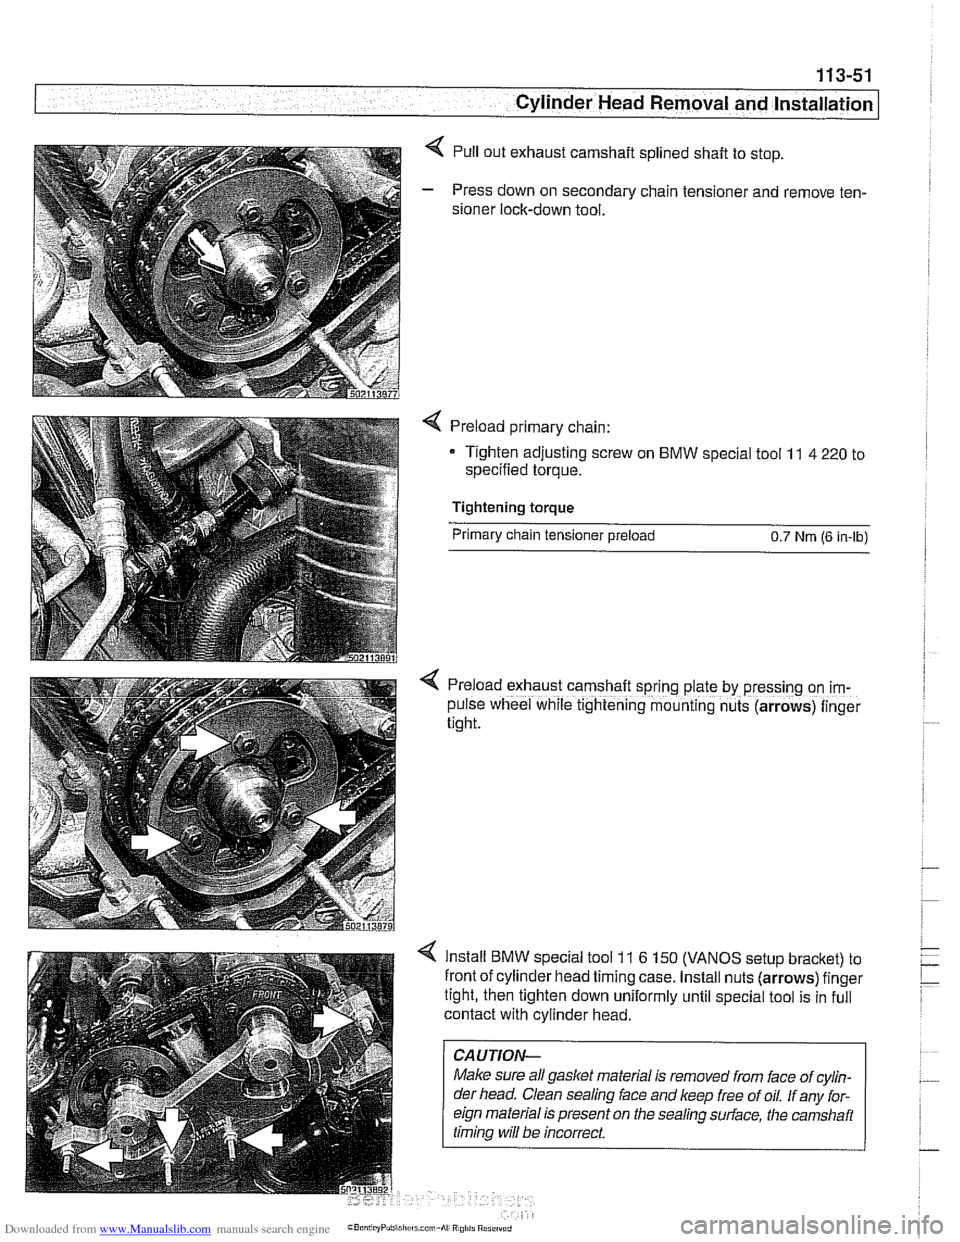
< Pull out exhaust camshaft splined shaft to stop.
- Press down on secondary chain tensioner and remove ten-
sioner lock-down tool.
Preload primary chain:
Tighten adjusting screw on
BMW special tool 11 4 220 to
specified torque.
Tightening torque
Primary chain tensioner preload
0.7 Nrn (6 in-lb)
< Preload exhaust camshaft sprrng plate by pressing on im-
pulse wheel while tightening mounting nuts (arrows) finger
tight.
Install BMW special tool 11 6 150 (VANOS setup bracket) to
front of cylinder head timing case. Install nuts (arrows) finger
tight, then tighten down uniformly until special tool is in full
contact with cylinder head.
CAUTION-
Make sure all gasket material is removed from face of cylin-
der head. Clean sealing
face and keep free of oil. If any for-
eign material is present on the sealing
sudace, the camshait
timina will be incorrect.
Page 147 of 1002

Downloaded from www.Manualslib.com manuals search engine
Cylinder Head Removal and Installation /
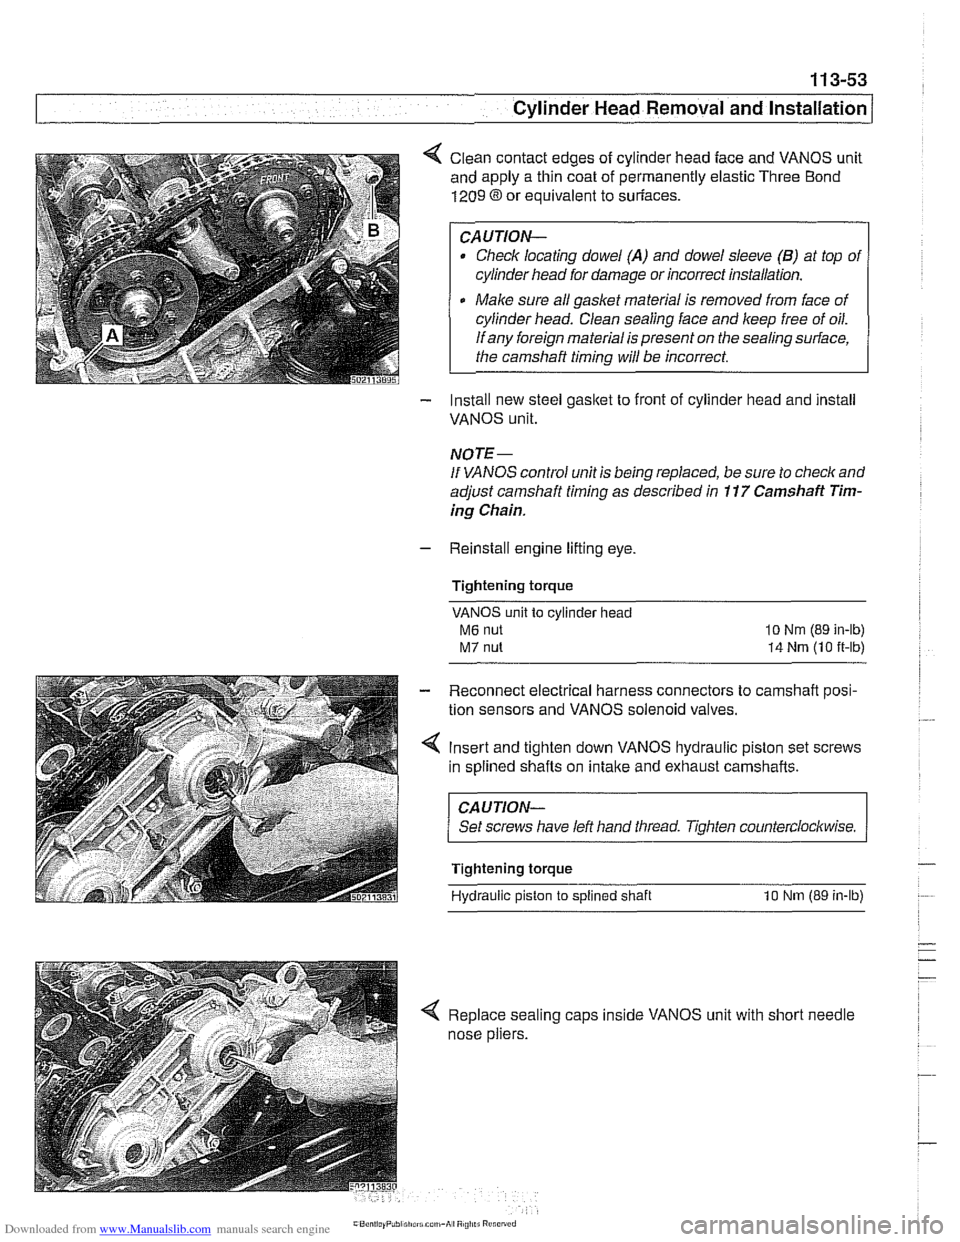
< Clean contact edges of cylinder head face and VANOS unit
and apply a thin coat of permanently elastic Three Bond
1209 8 or equivalent to suriaces.
CAUTION-
Check locating dowel (A) and dowel sleeve (B) at top of
cylinder head for damage or incorrect installation.
Make sure all gasket material is removed from face of
cylinder head. Clean sealing face and keep free of oil.
If any foreign material is present on the sealing surface,
the camshaft timing will be incorrect.
- Install new steel gasket to front of cylinder head and install
VANOS unit.
NOTE -
If VANOS control unit is being replaced, be sure to check and
adjust camshaft timing as described in
11 7 Camshaft Tim-
ing Chain.
- Reinstall engine lifting eye.
Tightening torque
VANOS unit to cylinder head
M6 nut
M7 nut
lo Nm (89 in-lb)
14 Nrn (10 it-lb)
- Reconnect electrical harness connectors to camshaft posi-
tion sensors and VANOS solenoid valves.
4 Insert and tighten down VANOS hydraulic piston set screws
in splined shafts on
intake and exhaust camshafts.
CAUJION-
Set screws have left hand tliread. Tighten counterclockwise.
Tightening torque
Hydraulic piston
to splined shaft 10 Nm (89 in-lb)
< Replace sealing caps inside VANOS unit with short needle
nose pliers.
Page 148 of 1002

Downloaded from www.Manualslib.com manuals search engine
. ." ".
[Cylinder Head Removal and Installation - .. - -1 -
4 Insert and secure VANOS sealing plugs (arrows) with new
sealing O-rings.
Tightening torque Sealing
plug to VANOS 50
Nm (37 ft-lb)
4 Install coolant pipe fasteners at base of cylinder head and
tighten fasteners (arrows).
NOTE-
Use new sealing O-ring on coolant pipe.
- lnstall VANOS oil line banjo bolt with new seals. Attach oil
line to VANOS unit.
Tightening torque Oil line to VANOS unit
(banjo bolt) 32
Nm (24 ft-ib)
- Remove adjustable timing chain tensioner tool and reinstall
chain tensioner.
Tightening torque Primary chain tensioner cylinder to
cylinder head 70
Nm
(52 fi-ib)
- Remove flywheel locking tool from transmission bell housing.
Replace special tool bore sealing plug.
- Remove camshaft locking tools from cylinder head
4 lnstall intake camshaft cover and cylinder head cover.
0 Check for correct seating of half-moon seals (A) in back of
cylinder head cover.
Use a small amount of Three Bond
1209 8 or equivalent
sealant at corners
(B) of half-moon cutouts.
Seat gasket and seal corners in front of cylinder head at
VANOS unit.
Tightening torque
Cylinder head cover to cylinder head
(M6) 10 Nm (89 in-lb)
Page 149 of 1002

Downloaded from www.Manualslib.com manuals search engine
Cylinder Head Removal and Installation
- Install exhaust manifolds using new gaskets and nuts. Coat
manifold studs with copper paste prior to installing nuts.
Tightening torque Exhaust
maniiold to cylinder head (M7)
20 Nm (15 ft-lb)
- Install electrical harness connectors for oil pressure sender
and coolant temperature sensor before installing
intalte man-
ifold.
7 Install intake manifold:
1. Manifold mounting nuts: tighten to 15 Nm (1 1 ft-lb)
2. Fuel pipe bracltet
3. Fuel pipe bracltet
4. Vacuum pump bracltet
5. Manifold mounting bracltet
6.
Tank venting valve bracltet
7. Mounting bracket to manifold bolt (M6)
8. Mounting bracket to cylinder block nut (MIO), tighten to
47 Nm (33 fi-lb)
Intake manifold installation is reverse of removal, noting the
following:
* Use new fuel injector seals.
Carefully
check intake manifold gasket and replace if nec-
essary.
Inspect O-ring seal between mass air flow sensor and air
filter housing. To facilitate reassembly, coat seal with
acid-
free grease.
Use new fuel injector seals.
Carefully check intake manifold gasket and replace if
necessary.
CA UTIOPI-
When reattaching throttle assembly harness connector, con-
nector is fully tightened when arrows on connector
andplug
line up.
Tightening torque
lntalte manifold to cylinder
head (M7)
15 Nm (1 1 it-lb) ~ ~- Mounting bracket to cylinder bloclt (M10) 47 Nm (33 ft-lb)
Mounting bracket to intake manifold (MI?) 10 Nm (89 in-lb)
Page 150 of 1002

Downloaded from www.Manualslib.com manuals search engine
11 3-56
I Cvlinder Head Removal and Installation
- Installation of the remaining parts is reverse or removal, not-
ing the following:
- Refill cooling system as described in 170 Radiator and
Cooling System.
Change engine oil and filter as described in
020 Mainte-
nance.
If necessary, adjust accelerator cable.
a Reconnect battery.
CAUTION- To prevent damaging the engine electronic systems, installall
ground wire previously removed, including the ground wires
for the
ionition coils.
Tightening torque Coolant drain
pluq to cylinder bloclc 25 Nm (1 8 ft-lb)
Radiator cooling fan to coolant pump 40 Nm (30 ft-lb) -
Radiator drain screw to radiator 2.5
Nm (22 in-lb)
spark plug to cylinder head 25
Nm (1 8 ft-lb)
CYLINDER MEAD REMOVAL AND
INSTALLATION (M62 ENGINE)
This procedure covers cylinder head removal and installation
for the
M62 V-8 engine. Procedures forthe M62 TU VANOS
engine are not covered in this manual.
Intake manifold, left cylinder head, and right cylinder head re-
moval and installation are written as separate procedures.
The intake manifold must be removed before the cylinder
heads can be removed.
WARNING
-
Due to risk of personal injuv be sure the engine is cold be-
fore beginning the removal procedure.
Cylinder head removal and installation requires multiple spe-
cial service tools. Read the entire procedure before beginning
the repair.
Intake manifold, removal and installation,
M62 engine
- Disconnect negative (-) battery cable.
CAUTION- Prior to disconnecting the
batterj read the baitery discon-
nection cautions
in 001 General Cautions and Warnings.
Page 152 of 1002

Downloaded from www.Manualslib.com manuals search engine
Cylinder Head Removal and Installation
Pry out ignition coil cover trim caps,
covers from lefl and right sides. remove fasteners
and
< Disconnect throttle cables from throttle shafl (A) and remove
cables from support bracket
(B).
< Disconnect cable from jump start post (arrow) on left cylinder
head cover.