Page 42 of 99
15-42
Removing and installing right cylinder head
Notes:
All hose connections are secured with clips.
Charge air system must be free of leaks.
Replace all seals and gaskets
Removing
- Remove engine Page 10
-1 .
- Unplug connector from air recirculation valve -2-.
Pa
ge 42 of 99 Valve
gear, servicin
g
11/21/2002 htt
p://127.0.0.1:8080/audi/servlet/Dis
play?action=Goto&t
yp
e=re
pair&id=AUDI.B5.GE05.15.1
Page 47 of 99
15-47
Note:
Turn over the engine at the central bolt on the crankshaft. - Turn crankshaft to TDC by hand. Marks -A- and -B- must be aligned.
- Check position of camshafts: larger holes in securing plates on
camshaft sprockets must align opposite one another on inside. If this is
not the case, turn crankshaft one revolution further.
- Remove sealing plug from cylinder block, left.
The TDC drilling in the crankshaft must be visible (or able to be felt) in
line with the sealing plug hole.
- Screw clamping bolt 3242 for crankshaft into sealing plug hole and
tighten.
Pa
ge 47 of 99 Valve
gear, servicin
g
11/21/2002 htt
p://127.0.0.1:8080/audi/servlet/Dis
play?action=Goto&t
yp
e=re
pair&id=AUDI.B5.GE05.15.1
Page 49 of 99

15-49
Notes:
Mark the direction of rotation of the toothed belt
with chalk or felt pen before removing. A used
belt can break if it rotates in the wrong direction
when reinstalled.
The toothed belt tensioning element is oil-
damped and can therefore only be compressed
slowly by applying constant pressure.
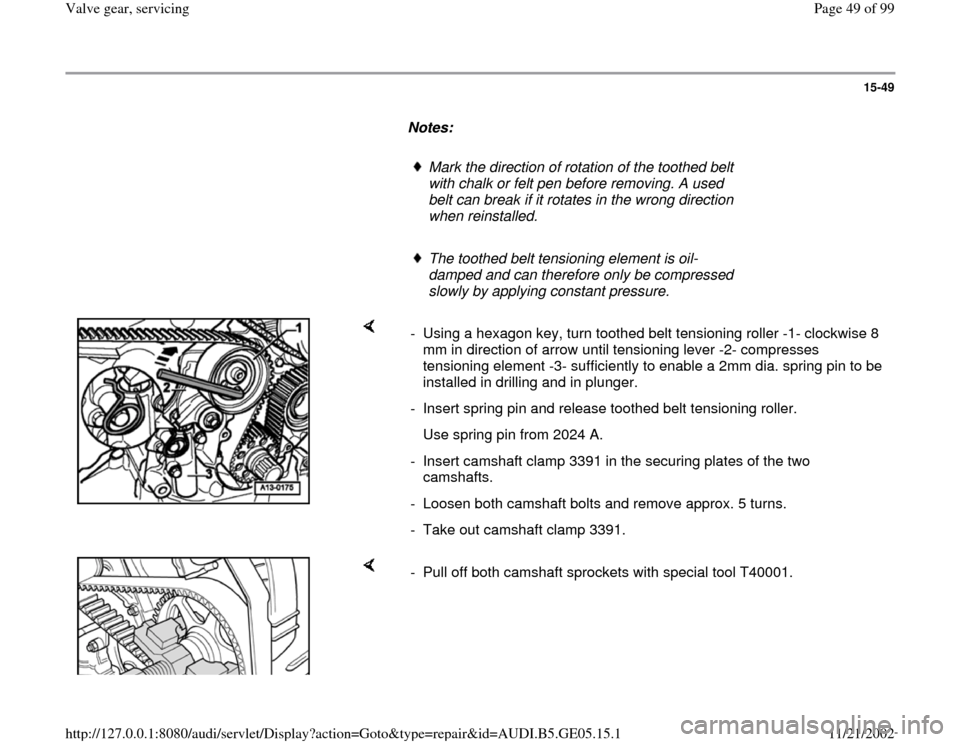
- Using a hexagon key, turn toothed belt tensioning roller -1- clockwise 8
mm in direction of arrow until tensioning lever -2- compresses
tensioning element -3- sufficiently to enable a 2mm dia. spring pin to be
installed in drilling and in plunger.
- Insert spring pin and release toothed belt tensioning roller.
Use spring pin from 2024 A.
- Insert camshaft clamp 3391 in the securing plates of the two
camshafts.
- Loosen both camshaft bolts and remove approx. 5 turns.
- Take out camshaft clamp 3391.
- Pull off both camshaft sprockets with special tool T40001.
Pa
ge 49 of 99 Valve
gear, servicin
g
11/21/2002 htt
p://127.0.0.1:8080/audi/servlet/Dis
play?action=Goto&t
yp
e=re
pair&id=AUDI.B5.GE05.15.1
Page 77 of 99
15-76
Right cylinder head
- Remove right-hand cylinder head cover Page
15
-25
All:
- Unbolt Hall sensor housing (10 Nm).
- Remove bolt securing Hall sensor rotor (20 Nm)
and carefully lever off rotor using a screwdriver.
- Insert camshaft clamp 3391 in securing plates of
two camshafts.
- Loosen both camshaft bolts and remove approx.
5 turns.
- Take out camshaft clamp 3391.
Pa
ge 77 of 99 Valve
gear, servicin
g
11/21/2002 htt
p://127.0.0.1:8080/audi/servlet/Dis
play?action=Goto&t
yp
e=re
pair&id=AUDI.B5.GE05.15.1
Page 78 of 99
15-77
Make sure that the retaining catches do not break off when levering out
the oil lines. - Pull off both camshaft sprockets with special tool T40001.
- Using a screwdriver, carefully pry oil feed lines for camshaft bearings
out of camshaft bearings.
Note:
Do not over tighten retainer for chain tensioner, otherwise camshaft
adjuster can be damaged. - Secure camshaft adjuster using retainer for chain tensioner 3366.
Pa
ge 78 of 99 Valve
gear, servicin
g
11/21/2002 htt
p://127.0.0.1:8080/audi/servlet/Dis
play?action=Goto&t
yp
e=re
pair&id=AUDI.B5.GE05.15.1
Page 80 of 99
15-79
Installing - Remove bolts securing camshaft adjuster -6-.
- Remove bearing caps 1, 3, 5 and 7 from inlet and exhaust camshafts
and place them in correct order on a clean surface.
- Loosen bearing caps 2 and 4 alternately and in diagonal sequence,
and remove from both camshafts.
- Take out both camshafts together with camshaft adjuster.
- Replace rubber/metal gasket for camshaft adjuster and apply a thin
coat of sealant D 454 300 A2 to the shaded area.
Pa
ge 80 of 99 Valve
gear, servicin
g
11/21/2002 htt
p://127.0.0.1:8080/audi/servlet/Dis
play?action=Goto&t
yp
e=re
pair&id=AUDI.B5.GE05.15.1
Page 82 of 99
15-81
Notes:
The dowel sleeves for the bearing caps and
camshaft adjuster must be in the cylinder head.
Install the bearing caps so that the markings on
the bearing caps can be read from the inlet side
of the cylinder head.
- Tighten bolts securing chain tensioner (watch
position of dowel sleeves).
- Tighten bearing caps 2 and 4 of inlet and exhaust camshafts
alternately and in diagonal sequence (watch position of dowel sleeves).
- Install two bearing caps next to chain sprockets on inlet and exhaust
camshafts.
Pa
ge 82 of 99 Valve
gear, servicin
g
11/21/2002 htt
p://127.0.0.1:8080/audi/servlet/Dis
play?action=Goto&t
yp
e=re
pair&id=AUDI.B5.GE05.15.1
Page 87 of 99
15-86
Camshaft axial clearance, checking
- Remove camshafts Page 15
-75
.
- Remove lifters.
- Install camshafts in cylinder head without drive
chain and secure by tightening bearing caps 2
and 4.
- Attach dial gauge to cylinder head with universal dial gauge bracket
VW 387.
- Press camshaft against dial gauge by hand.
- Set dial gauge to -0-.
- Press camshaft away from dial gauge.
- Note reading on gauge:
New
Wear limit
0.05 ... 0.15 mm 0.20 mm
Pa
ge 87 of 99 Valve
gear, servicin
g
11/21/2002 htt
p://127.0.0.1:8080/audi/servlet/Dis
play?action=Goto&t
yp
e=re
pair&id=AUDI.B5.GE05.15.1