Page 10 of 75
69-45
Also
All seatbelts with activated belt tensioners.
On Board Diagnostic will recognize if belt
tensioners have been activated for airbag V, 7
and 8.
A - if airbag control module has been
triggered:
Front seat belt tensioners: Read Measuring Value Block 1
1
2
3
4
Repair Manual, Body On Board Diagnostic (OBD), Repair Group 01
Rear seat belt tensioners: - Read Measuring Value Block display group 1:
Activated belt tensioners can be identified by "0111" or "too large"
indicated on display.
Read Measuring Value Block 2
1
2
3
4
Repair Manual, Body On Board Diagnostic (OBD), Repair Group 01
- Read Measuring Value Block display group 2:
Activated belt tensioners can be identified by "0111" or "too large"
indicated on display.
Pa
ge 10 of 75 Airba
gs, servicin
g
11/19/2002 htt
p://127.0.0.1:8080/audi/servlet/Dis
play?action=Goto&t
yp
e=re
pair&id=AUDI.B5.BD03.69.3
Page 11 of 75
69-46
B - If airbag control module is replaced:
- Check DTC memory:
Repair Manual, Body On Board Diagnostic
(OBD), Repair Group 01
Activated belt tensioners can be identified by the
DTC: "Ignitor for belt tensioner - resistance is too
high"
- If necessary (visual check) also replace: all
damaged components.
Accident without airbag deployment
If airbag Malfunction Indicator Lamp (MIL) -K75-
does not indicate a DTC, then airbag
components do not need to be replaced. Check
seat belts separately.
After replacing airbag units or the control module,
attach label (only tear-off strip) to registration
card and send in registration card.
Pa
ge 11 of 75 Airba
gs, servicin
g
11/19/2002 htt
p://127.0.0.1:8080/audi/servlet/Dis
play?action=Goto&t
yp
e=re
pair&id=AUDI.B5.BD03.69.3
Page 18 of 75
69-51
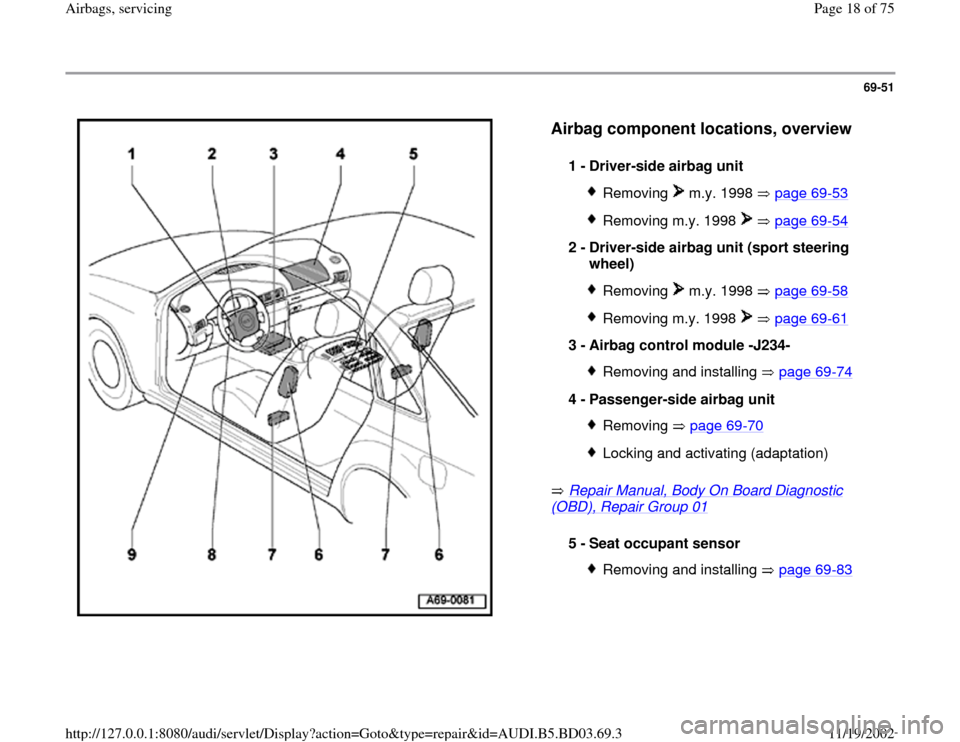
Airbag component locations, overview
Repair Manual, Body On Board Diagnostic
(OBD), Repair Group 01
1 -
Driver-side airbag unit
Removing m.y. 1998 page 69
-53
Removing m.y. 1998 page 69
-54
2 -
Driver-side airbag unit (sport steering
wheel)
Removing m.y. 1998 page 69
-58
Removing m.y. 1998 page 69
-61
3 -
Airbag control module -J234-
Removing and installing page 69
-74
4 -
Passenger-side airbag unit
Removing page 69
-70
Locking and activating (adaptation)
5 -
Seat occupant sensor
Removing and installing page 69
-83
Pa
ge 18 of 75 Airba
gs, servicin
g
11/19/2002 htt
p://127.0.0.1:8080/audi/servlet/Dis
play?action=Goto&t
yp
e=re
pair&id=AUDI.B5.BD03.69.3
Page 32 of 75
69-64
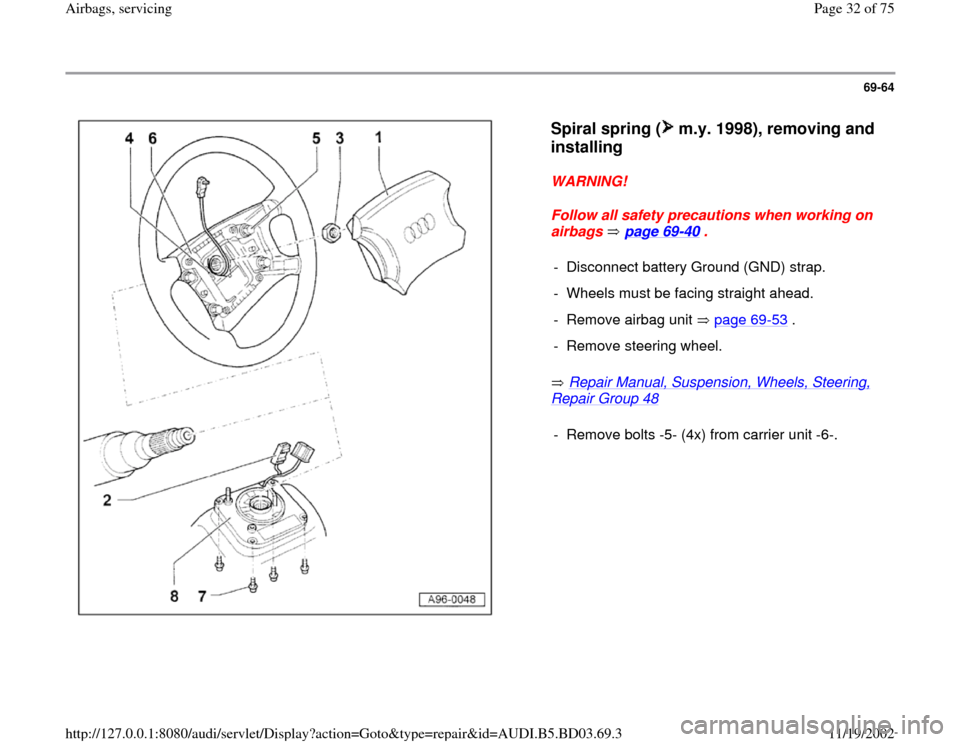
Spiral spring ( m.y. 1998), removing and
installing
WARNING!
Follow all safety precautions when working on
airbags page 69
-40
.
Repair Manual, Suspension, Wheels, Steering,
Repair Group 48
- Disconnect battery Ground (GND) strap.
- Wheels must be facing straight ahead.
- Remove airbag unit page 69
-53
.
- Remove steering wheel.- Remove bolts -5- (4x) from carrier unit -6-.
Pa
ge 32 of 75 Airba
gs, servicin
g
11/19/2002 htt
p://127.0.0.1:8080/audi/servlet/Dis
play?action=Goto&t
yp
e=re
pair&id=AUDI.B5.BD03.69.3
Page 54 of 75
69-84
- When installing, make sure bar -2- points toward
tunnel.
- After installing sensor mat, test sensor mat
function using VAG1551 Scan Tool (ST) page
69
-84
.
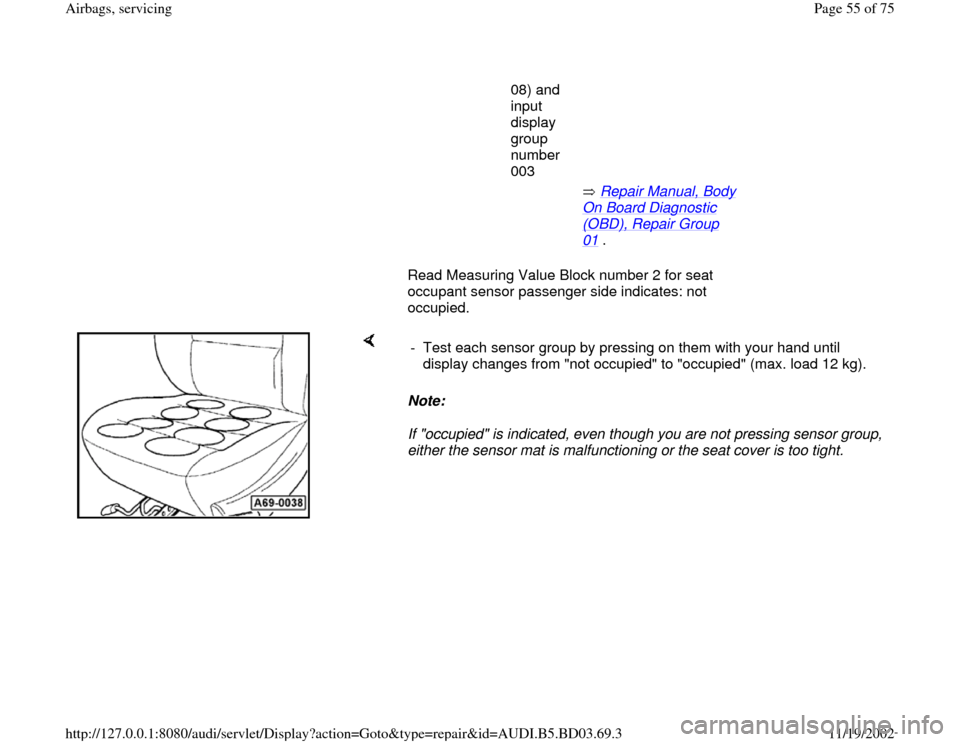
Testing sensor mat function
Note:
Illustration is shown without cover.
- Remove any seat mats before testing sensor
mats.
- Connect
VAG1551
scan tool
Repair Manual, Body
On Board Diagnostic (OBD), Repair Group 01
.
-
Select
Read
Measuring
Value
Block
(function
Pa
ge 54 of 75 Airba
gs, servicin
g
11/19/2002 htt
p://127.0.0.1:8080/audi/servlet/Dis
play?action=Goto&t
yp
e=re
pair&id=AUDI.B5.BD03.69.3
Page 55 of 75
08) and
input
display
group
number
003
Repair Manual, Body
On Board Diagnostic (OBD), Repair Group 01
.
Read Measuring Value Block number 2 for seat
occupant sensor passenger side indicates: not
occupied.
Note:
If "occupied" is indicated, even though you are not pressing sensor group,
either the sensor mat is malfunctioning or the seat cover is too tight. - Test each sensor group by pressing on them with your hand until
display changes from "not occupied" to "occupied" (max. load 12 kg).
Pa
ge 55 of 75 Airba
gs, servicin
g
11/19/2002 htt
p://127.0.0.1:8080/audi/servlet/Dis
play?action=Goto&t
yp
e=re
pair&id=AUDI.B5.BD03.69.3
Page 66 of 75
69-93
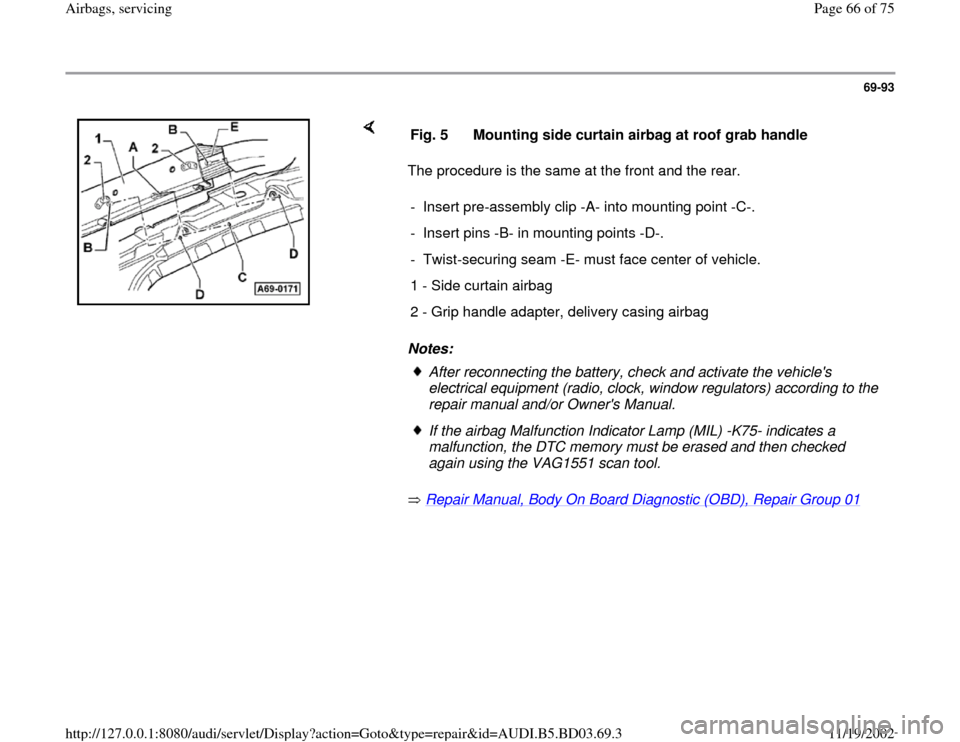
The procedure is the same at the front and the rear.
Notes:
Repair Manual, Body On Board Diagnostic (OBD), Repair Group 01
Fig. 5 Mounting side curtain airbag at roof grab handle
- Insert pre-assembly clip -A- into mounting point -C-.
- Insert pins -B- in mounting points -D-.
- Twist-securing seam -E- must face center of vehicle.
1 - Side curtain airbag
2 - Grip handle adapter, delivery casing airbag
After reconnecting the battery, check and activate the vehicle's
electrical equipment (radio, clock, window regulators) according to the
repair manual and/or Owner's Manual. If the airbag Malfunction Indicator Lamp (MIL) -K75- indicates a
malfunction, the DTC memory must be erased and then checked
again using the VAG1551 scan tool.
Pa
ge 66 of 75 Airba
gs, servicin
g
11/19/2002 htt
p://127.0.0.1:8080/audi/servlet/Dis
play?action=Goto&t
yp
e=re
pair&id=AUDI.B5.BD03.69.3
Page 75 of 75
69-100
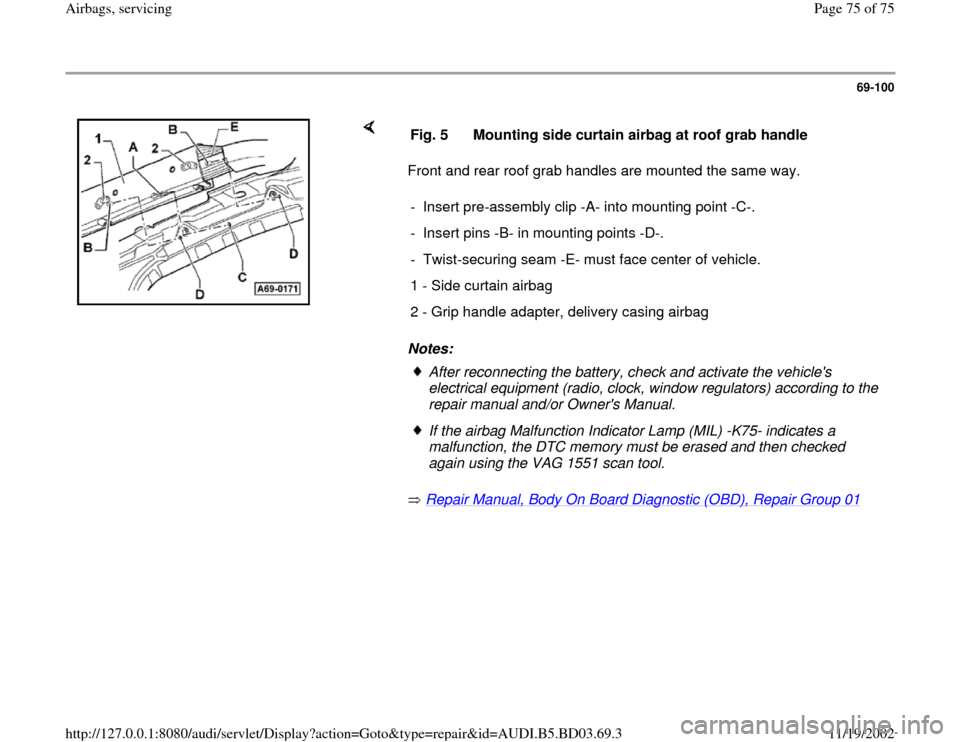
Front and rear roof grab handles are mounted the same way.
Notes:
Repair Manual, Body On Board Diagnostic (OBD), Repair Group 01
Fig. 5 Mounting side curtain airbag at roof grab handle
- Insert pre-assembly clip -A- into mounting point -C-.
- Insert pins -B- in mounting points -D-.
- Twist-securing seam -E- must face center of vehicle.
1 - Side curtain airbag
2 - Grip handle adapter, delivery casing airbag
After reconnecting the battery, check and activate the vehicle's
electrical equipment (radio, clock, window regulators) according to the
repair manual and/or Owner's Manual. If the airbag Malfunction Indicator Lamp (MIL) -K75- indicates a
malfunction, the DTC memory must be erased and then checked
again using the VAG 1551 scan tool.
Pa
ge 75 of 75 Airba
gs, servicin
g
11/19/2002 htt
p://127.0.0.1:8080/audi/servlet/Dis
play?action=Goto&t
yp
e=re
pair&id=AUDI.B5.BD03.69.3