1998 TOYOTA SUPRA oil
[x] Cancel search: oilPage 5 of 191

SUPRA (U)5
Indicator symbols on the instrument panel
Slip indicator light
SRS airbag warning light
*
1
Traction control system off indicator/warning light *
1
Seat belt reminder light
*
1
Open door warning light *
1
Low oil pressure warnig light *
1
Master warning light
*
1
Brake system warning light *
1
Discharge warning light *
1
Malfunction indicator lamp *
1
Snow mode indicator light
Anti-lock brake system warning light *
1
Rear light failure warning light *
1
Low engine oil level warning light *
1
Page 62 of 191

SUPRA (U)
62 (i) Take vehicle to
Toyota dealer.
If the indicator or Do this.
buzzer comes on...
(j) Close both side door and back door.
(k) Replace bulb.
(g) Stop and check.
(h) Add engine oil.
(f) Fill up tank.
Low fuel level
warning lightIf the indicator or Do this.
buzzer comes on...
(n) Remove key. Key reminder
buzzer
(l) Take vehicle to
Toyota dealer
immediately.
(m) Take vehicle to Toyota dealer.
(a) Master Warning Light
This light warns that another service re-
minder indicator (except seat belt reminder
light, low fuel level warning light, rear light
failure warning light, SRS airbag warning
light and ºTRAC OFFº indicator/warning
light) is on.
If it comes on while you are driving,
check the other service reminder indicator
that is on with reference to the following
description of the indicator.
(b) Brake System Warning Light
This light has the following functions:
Parking brake reminder
If this light is on, make sure the parking
brake is fully released. The light should
go off.
Low brake fluid level warning
If this light comes on and stays on while
you are driving, slow down and pull off
the road. Then stop the vehicle carefully.
Remember that stopping distance and ped-
al effort may be increased. There may be
a problem somewhere in the brake sys-
tem. Check the fluid level of the see-
through reservoir.
Page 64 of 191
SUPRA (U)
64
(g) Low Oil Pressure Warning Light
This light warns that the engine oil pres-
sure is too low.
If it flickers or stays on while you are
driving, pull off the road to a safe place
and stop the engine immediately. Call a
Toyota dealer or qualified repair shop for
assistance.
The light may occasionally flicker when
the engine is idling or it may come on
briefly after a hard stop. There is no
cause for concern if it then goes out when
the engine is accelerated slightly.
The light may come on when the oil level
is extremely low. It is not designed to
indicate low oil level, and the oil level
must be checked using the level dipstick.
NOTICE
Do not drive the vehicle with the
warning light on±even for one block.It may ruin the engine.
(h) Low Engine Oil Level Warning Light
The light warns that the engine oil level is
too low. Add oil as soon as possible. (For
instructions, see ºChecking the engine oil
levelº in Chapter 7- 2.) While driving on steep inclines or rough
roads which causes the vehicle to sub-
stantially sway or on curves, this light
may come on due to the movement of
engine oil in the engine.
NOTICE
Continued engine operation with low
engine oil will damage the engine.
(i) ºABSº Warning Light
This light warns that there is a problem
somewhere in your anti- lock brake sys-
tem.
If the light comes on while you are driv-
ing, have your vehicle checked by your
Toyota dealer as soon as possible.
The light will come on when the ignition
key is turned to the ºONº position. After
a few seconds, the light will go off.
When the ºABSº warning light is on (and
the brake system warning light is off), the
brake system operates conventionally but
anti- lock brake system is not assisting
brake performance so that the wheels can
lock- up during sudden braking or braking
on slippery road surfaces. (j) Open Door Warning Light
This light remains on until both side doors
and back door are completely closed.
(k) Rear Light Failure Warning Light
If this light comes on when the headlight
switch is turned on (at the first or second
clickstop), it indicates that one or more of
the tail lights are burned out.
If it comes on when the brake pedal is
depressed, one or more stop lights are
burned out or the stop light circuit is in
need of repair.
Have defective bulbs replaced as soon as
possible.
(l) SRS Airbag Warning Light
This light will come on when the igni-
tion key is turned to the ºACCº or
ºONº position. After about 6 seconds,
the light will go off. This means the
airbag system is operating properly.
The warning light system monitors the air-
bag sensor assembly, inflators, warning
light, interconnecting wiring and power
sources.
If either of the following conditions occurs,
this indicates a malfunction somewhere in
the parts monitored by the warning light
system. Contact your Toyota dealer as
soon as possible to service the vehicle.
Page 78 of 191
SUPRA (U)
78
TONE AND BALANCE
For details about your system's tone and
balance controls, see the description of
your own system.
Tone
How good an audio program sounds to
you is largely determined by the mix of
the treble, midrange, and bass levels. In
fact, different kinds of music and vocal
programs usually sound better with differ-
ent mixes of treble, midrange, and bass.
Balance
A good balance of the left and right stereo
channels and of the front and rear sound
levels is also important.
Keep in mind that if you are listening to
a stereo recording or broadcast, changing
the right/left balance will increase the vol-
ume of one group of sounds while de-
creasing the volume of another.
YOUR RADIO ANTENNA
To lower a manual antenna, carefully push
it down.
To lower a power antenna, turn off the
audio system by pushing ºPWR
VOLº or
ºPWR/VOLº, or turn the ignition key to
ºLOCKº.
On some models, the power antenna auto-
matically retracts when the radio mode is
switched off to turn on the cassette tape
player or compact disc player.
NOTICE
To prevent damage to the antenna,
make sure it is retracted before driv-ing your Toyota through an automatic
car wash.
YOUR CASSETTE PLAYER
When you insert a cassette, the exposed
tape should be to the right.
NOTICE
Do not oil any part of the player and
do not insert anything other than cas-sette tapes into the slot, or the tape player may be damaged.
YOUR COMPACT DISC PLAYER
When you insert a disc, gently push it in
with the label side up. (The player will
automatically eject a disc if the label side
is down.) The compact disc player will
play from track 1 through the end of the
disc. Then it will play from track 1 again.
NOTICE
Never try to disassemble or oil any
part of the compact disc player. Donot insert anything except a compact disc into the slot.
8 cm (3 in.) compact disc singles
Your compact disc player does not need
an adaptor to play compact disc singles.
Compact disc singles are about 8 cm (3
in.) in diameter- smaller than standard
discs.
After you eject a compact disc single, do
not insert a standard 12 cm (5 in.) disc
until ºDISCº disappears from the display.
NOTICE
Do not use an adaptor for compact
disc singles
'it could cause tracking
errors or interfere with the ejection of
compact discs.
Page 107 of 191
SUPRA (U)107
Part 2
INFORMATION
BEFORE DRIVING
YOUR TOYOTA �
Break- in period
�Fuel
�Operation in foreign countries
�Three- way catalytic converters
�Engine exhaust cautions
�Facts about engine oil
consumption
�Twin ground electrode
platinum- tipped spark plugs
�Brake system
�Brake pad wear limit indicators
�Luggage stowage precautions
�Limited- slip differential
�Your Toyota's identification
�Theft prevention labels
�Suspension and chassis
�Types of tires
Break- in period
Drive gently and avoid high speeds.
Your vehicle does not need an elaborate
break- in. But following a few simple tips
for the first 1600 km (1000 miles) can add
to the future economy and long life of
your vehicle:
� Do not drive over 88 km/h (55 mph).
� Do not run the engine over 4000 rpm.
Maintain engine speed between 2000
and 4000 rpm.
� Avoid full- throttle starts.
� Try to avoid hard stops during the first
300 km (200 miles).
� Do not drive slowly with the manual
transmission in a high gear.
� Do not drive for a long time at any
single speed, either fast or slow. Fuel
FUEL TYPE
Your new vehicle must use only un-
leaded gasoline.
To help prevent gas station mixups, your
Toyota has a new smaller fuel tank open-
ing. The special nozzle on pumps with
unleaded fuel will fit it, but the larger
standard nozzle on pumps with leaded gas
will not.
At a minimum, the gasoline you use
should meet the specifications of ASTM
D4814 in the U.S.A. and CGSB 3.5- M93
in Canada.
NOTICE
Do not use leaded gasoline. Use of
leaded gasoline will cause the three-way catalytic converter to lose its ef-
fectiveness and the emission control
system to function improperly. Also,this can increase maintenance costs.
Page 111 of 191
SUPRA (U)111
Engine exhaust cautions
CAUTION
�
Avoid inhaling the engine exhaust.
It contains carbon monoxide, which
is a colorless and odorless gas. It
can cause unconsciousness or even
death.
� Make sure the exhaust system has
no holes or loose connections. The
system should be checked from
time to time. If you hit something,
or notice a change in the sound of
the exhaust, have the system
checked immediately.
� Do not run the engine in a garage
or enclosed area except for the
time needed to drive the vehicle in
or out. The exhaust gases cannot
escape, making this a particularly
dangerous situation.
� Do not remain for a long time in a
parked vehicle with the engine run-
ning. If it is unavoidable, however,
do so only in an unconfined area
and adjust the heating or cooling
system to force outside air into the
vehicle.
�Keep the back door closed while
driving. An open or unsealed back
door may cause exhaust gases to
be drawn into the vehicle. If you
must drive with the back door open
to accommodate a large object,
close the windows, open all the
instrument panel vents and have
the heating or cooling system deliv-
er fresh air into the vehicle by turn-
ing the fan to high speed with the
air intake control button in the
OUTSIDE AIR mode.
� To allow proper operation of your
vehicle's ventilation system, keep
the inlet grilles in front of the wind-
shield clear of snow, leaves, or oth-
er obstructions.
� If you smell exhaust fumes in the
vehicle, drive with the windows
open and the back door closed.
Have the cause immediately located
and corrected.FUNCTIONS OF ENGINE OIL
Engine oil has the primary functions of
lubricating and cooling the inside of the
engine, and plays a major role in main-
taining the engine in proper working order.
ENGINE OIL CONSUMPTION
It is normal that an engine should con-
sume some engine oil during normal
engine operation. The causes of oil
consumption in a normal engine are as
follows.
� Oil is used to lubricate pistons, piston
rings and cylinders. A thin film of oil
is left on the cylinder wall when a pis-
ton moves downwards in the cylinder.
High negative pressure generated when
the vehicle is decelerating sucks some
of this oil into the combustion chamber.
This oil as well as some part of the oil
film left on the cylinder wall is burned
by the high temperature combustion
gases during the combustion process.
Facts about engine oil
consumption
Page 112 of 191
SUPRA (U)
11 2 �
Oil is also used to lubricate the stems
of the intake valves. Some of this oil
is sucked into the combustion chamber
together with the intake air and is
burned along with the fuel. High tem-
perature exhaust gases also burn the
oil used to lubricate the exhaust valve
stems.
The amount of engine oil consumed de-
pends on the viscosity of the oil, the
quality of the oil and the conditions the
vehicle is driven under.
More oil is consumed by high- speed driv-
ing and frequent acceleration and decel-
eration.
A new engine consumes more oil, since
its pistons, piston rings and cylinder walls
have not become conditioned.
When judging the amount of oil con-
sumption, note that the oil may become
diluted and make it difficult to judge
the true level accurately.
As an example, if a vehicle is used for
repeated short trips, and consumes a nor-
mal amount of oil, the dipstick may not
show any drop in the oil level at all, even
after 1000 km (600 miles) or more. This
is because the oil is gradually becoming
diluted with fuel or moisture, making it
appear that the oil level has not changed. The diluting ingredients evaporate out
when the vehicle is then driven at high
speeds, as on an expressway, making it
appear that oil is excessively consumed
after driving at high speeds.
IMPORTANCE OF ENGINE OIL LEVEL CHECK
One of the most important points in prop-
er vehicle maintenance is to keep the en-
gine oil at the optimum level so that oil
function will not be impaired. Therefore, it
is essential that the oil level be checked
regularly. Toyota recommends that the oil
level be checked every time you refuel
the vehicle.
NOTICE
Failure to check the oil level regularly
could lead to serious engine troubledue to insufficient oil.
For detailed information on oil level check,
see ºChecking the engine oil levelº in
Chapter 7- 2.
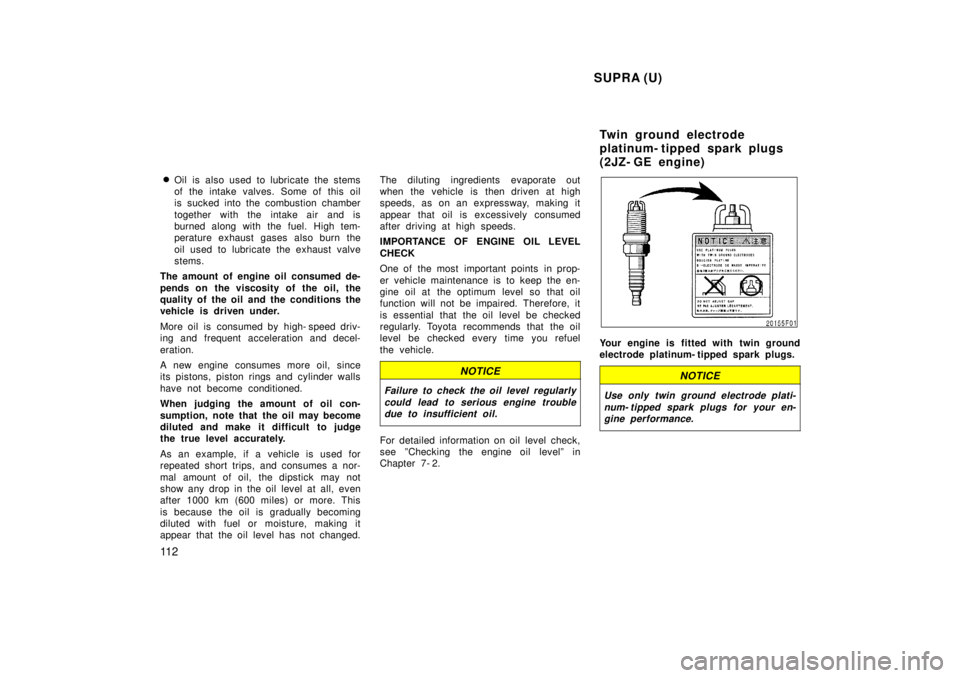
Your engine is fitted with twin ground
electrode platinum- tipped spark plugs.
NOTICE
Use only twin ground electrode plati-
num- tipped spark plugs for your en-gine performance.
Twin ground electrode
platinum- tipped spark plugs
(2JZ- GE engine)
Page 122 of 191
SUPRA (U)
122
Winter driving tips
Make sure you have ethylene- glycol an-
tifreeze in the radiator.
NOTICE
Do not use alcohol type antifreeze.
Check the condition of the battery and
cables.
Cold temperatures reduce the capacity of
any battery, so it must be in top shape
to provide enough power for winter start-
ing. Chapter 7- 3 tells you how to visually
inspect the battery. Your Toyota dealer
and most service stations will be pleased
to check the level of charge.
Make sure the engine oil viscosity is
suitable for the cold weather.
See Chapter 7- 2 for recommended viscos-
ity. Leaving a heavy summer oil in your
vehicle during winter months may cause
harder starting. If you are not sure about
which oil to use, call your Toyota dealer±
he will be pleased to help.
Keep the door locks from freezing.
Squirt lock de- icer or glycerine into the
locks to keep them from freezing. To open
a frozen lock, try heating the key before
inserting it.
Use a washer fluid containing an anti-
freeze solution.
This product is available at your Toyota
dealer and most auto parts stores. Follow
the manufacturer 's directions for how
much to mix with water.NOTICE
Do not use engine antifreeze or any
other substitute as washer fluid be-cause it may damage your vehicle's paint.
Do not use your parking brake when
there is a possibility it could freeze.
When parking, put the transmission into
ºPº (automatic) or into first or reverse
(manual) and block the front wheels. Do
not use the parking brake, or snow or
water accumulated in and around the
parking brake mechanism may freeze,
making it hard to release.
Keep ice and snow from accumulating
under the fenders.
Ice and snow built up under your fenders
can make steering difficult. During bad
winter driving, stop and check under the
fenders occasionally. Depending on where you are driving,
we recommend you carry some emer-
gency equipment.
Some of the things you might put in the
vehicle are tire chains, window scraper,
bag of sand or salt, flares, small shovel,
jumper cables, etc.