Page 3 of 204
1998 COROLLA(U)
3
1. Power rear view mirror control switch
2. Headlight and turn signal switch
3. Wiper and washer switches
4. Emergency flasher switch
5. Clock
6. Rear window defogger switch
7. Car audio
8. Air conditioning controls
9. Auxiliary box
10. Cup holder
11. Cigarette lighter
12. Ashtray
13. Ignition switch
14. Cruise control switch
15. Tilt steering lock release lever
16. Instrument panel light control knob
ProCarManuals.com
Page 34 of 204

34
NOTICE
Do not perform any of the following
changes without consulting your
Toyota dealer. Such changes can
interfere with proper operation of the
seat belt pretensioners in some
cas")
1998 COROLLA(U)
34
NOTICE
Do not perform any of the following
changes without consulting your
Toyota dealer. Such changes can
interfere with proper operation of the
seat belt pretensioners in some
cases.
�Installation of electronic items such
as a mobile two−way radio, cassette
tape player or compact disc player
�Repairs on or near the front seat
belt retractor assemblies
�Modification of the suspension sys-
tem
�Modification of the front end struc-
ture
�Attachment of a grille guard (bull
bar, kangaroo bar, etc.), snowplow,
winches or any other equipment to
the front end
�Repairs made on or near the front
fenders, front end structure or con-
sole
This front seat belt pretensioner system
has a service reminder indicator to inform
the driver of operating problems. If either
of the following conditions occurs, this
indicates a malfunction of the airbags or
pretensioners. Contact your Toyota dealer
as soon as possible to service the
vehicle.
�The light does not come on when the
ignition key is turned to the ”ACC” or
”ON” position, or remains on.
�The light comes on or flashes while
driving.
�If either front seat belt does not retract
or can not be pulled out due to a
malfunction or activation of the preten-
sioner.
�The front seat belt pretensioner assem-
bly or surrounding area has been dam-
aged.
�The front and side parts of the vehicle
(shaded in the illustration) were in-
volved in an accident not of the extent
to cause the seat belt pretensioners to
operate.
�The front seat belt pretensioner assem-
bly is scratched, cracked, or otherwise
damaged.
ProCarManuals.com
Page 41 of 204

41
This SRS airbag system has a service
reminder indicator to inform the driver of
operating problems. If either of the
following conditions occurs, this indicates
a malfunction of the")
1998 COROLLA(U)
41
This SRS airbag system has a service
reminder indicator to inform the driver of
operating problems. If either of the
following conditions occurs, this indicates
a malfunction of the airbags. Contact your
Toyota dealer as soon as possible to
service the vehicle.
�The light does not come on when the
ignition key is turned to the ”ACC” or
”ON” position, or remains on.
�The light comes on while driving.
In the following cases, contact your Toyota
dealer as soon as possible:
�The SRS airbags have been inflated.
�The front part of the vehicle (shaded
in the illustration) was involved in an
accident not of the extent to cause the
SRS airbags to inflate.
�The pad section of the steering wheel
or front passenger airbag cover
(shaded in the illustration) is scratched,
cracked, or otherwise damaged.
NOTICE
Do not disconnect the battery cables
before contacting your Toyota dealer.
SRS side airbags
The SRS (Supplemental Restraint Sys-
tem) side airbags are designed to pro-
vide further protection for the driver
and front passenger when added to the
primary protection provided by the seat
belts.
In response to a severe side impact, the
SRS side airbags work together with the
seat belt to help prevent or reduce injury
by inflating, in order to decrease the im-
pact mainly on the driver’s or front pas-
senger ’s chest. The SRS side airbag on
the passenger seat is activated even with
no passenger in the front seat.
ProCarManuals.com
Page 46 of 204

46
This SRS side airbag system has a
service reminder indicator to inform the
driver of operating problems. If either of
the following conditions occurs, this
indicates a malfunction o")
1998 COROLLA(U)
46
This SRS side airbag system has a
service reminder indicator to inform the
driver of operating problems. If either of
the following conditions occurs, this
indicates a malfunction of the airbags.
Contact your Toyota dealer as soon as
possible to service the vehicle.
�The light does not come on when the
ignition key is turned to the ”ACC” or
”ON” position, or remains on.
�The light comes on or flashes while
driving.
In the following cases, contact your Toyota
dealer as soon as possible:
�The SRS side airbags have been in-
flated.
�The portion of the doors (shaded in the
illustration) were involved in an acci-
dent that did not cause the SRS side
airbags to inflate.
�The surface of the seats with the side
airbag (shaded in the illustration) is
scratched, cracked, or otherwise damaged.
NOTICE
Do not disconnect the battery cables
before contacting your Toyota dealer.
Toyota strongly urges the use of child
restraint systems for children small
enough to use them.
The laws of all fifty states in the U.S.A.
and Canada now require the use of a
child restraint system.
Your vehicle conforms to SAE J1819.
If a child is too large for a child restraint
system, the child should sit in the rear
seat and must be restrained using the
vehicle’s seat belt. See ”Seat belts” for
details.
CAUTION
�For effective protection in automo-
bile accidents and sudden stops,
children must be properly re-
strained using a seat belt or child
restraint system depending on the
age and size of the child. Holding
a child in your arms is not a sub-
stitute for a child restraint system.
In an accident, the child can be
crushed against the windshield, or
between you and the vehicle’s inte-
rior.
Child restraint—
—Child restraint precautions
ProCarManuals.com
Page 87 of 204
1998 COROLLA(U)
95
Part 1
OPERATION OF
INSTRUMENTS
AND CONTROLS—
Chapter 1−7
Car audio system
and Air conditioning
system
Car audio system
�Reference
�Using your audio system:
some basics
�Using your audio system:
controls and features
�Car audio system operating hints
Air conditioning system
�Controls
�Air flow selector settings
�Operating tips
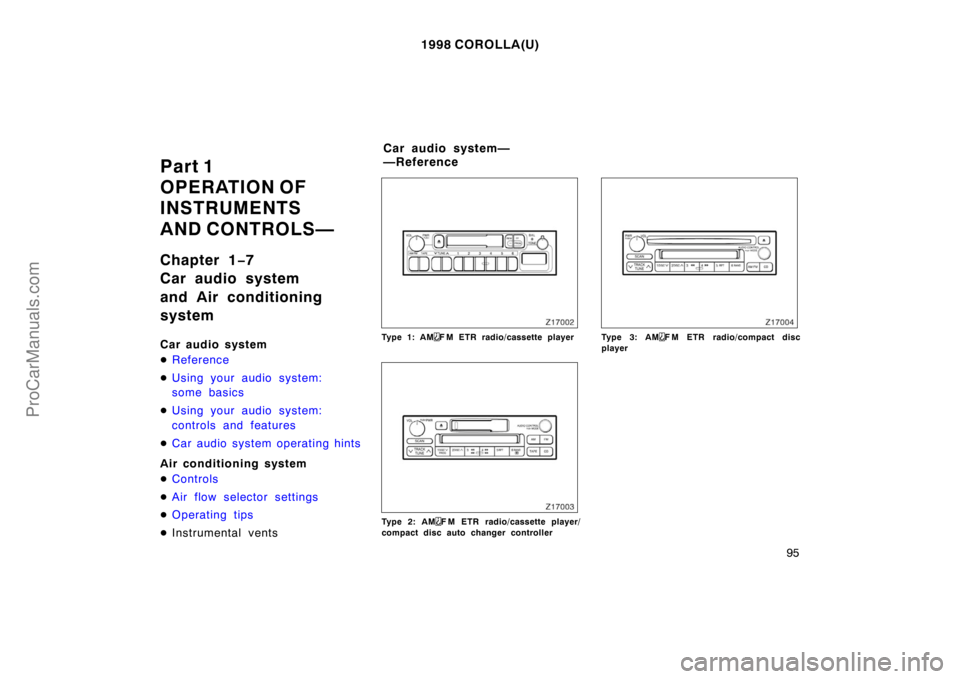
�Instrumental ventsType 1: AMF M ETR radio/cassette player
Type 2: AMF M ETR radio/cassette player/
compact disc auto changer controller
Type 3: AMF M ETR radio/compact disc
player
Car audio system—
—Reference
ProCarManuals.com
Page 105 of 204

11 3
Use high−quality cassettes.
�Low−quality cassette tapes can cause
many problems, including poor sound,
inconsistent playing speed, and
constant auto−reversing. They can als")
1998 COROLLA(U)
11 3
Use high−quality cassettes.
�Low−quality cassette tapes can cause
many problems, including poor sound,
inconsistent playing speed, and
constant auto−reversing. They can also
get stuck or tangled in the cassette
player.
�Do not use a cassette if it has been
damaged or tangled or if its label is
peeling off.
�Do not leave a cassette in the player
if you are not listening to it, especially
if it is hot outside.
�Store cassettes in their cases and out
of direct sunlight.
�Avoid using cassettes with a total play-
ing time longer than 100 minutes (50
minutes per side). The tape used in
these cassettes is thin and could get
stuck or tangled in the cassette player.
CARING FOR YOUR COMPACT DISC
PLAYER AND DISCS
�Use only compact discs labeled as
shown.
�Extremely high temperatures can keep
your compact disc player from working.
On hot days, use the air conditioning
to cool the vehicle interior before you
listen to a disc.
�Bumpy roads or other vibrations may
make your compact disc player skip.
�If moisture gets into your compact disc
player, you may not hear any sound
even though your compact disc player
appears to be working. Remove the
disc from the player and wait until it
dries.
�Handle compact discs carefully, espe-
cially when you are inserting them.
Hold them on the edge and do not
bend them. Avoid getting fingerprints
on them, particularly on the shiny side.
�Dirt, scrapes, warping, pin holes, or
other disc damage could cause the
player to skip or to repeat a section of
a track. (To see a pin hole, hold the
disc up to the light.)
�Remove discs from the compact disc
player when you are not listening
to them. Store them in their plastic
cases away from moisture, heat, and
direct sunlight.
To clean a compact disc: Wipe it with a
soft, lint−free cloth that has been damp-
ened with water. Wipe in a straight line
from the center to the edge of the disc
(not in circles). Dry it with another soft,
lint−free cloth. Do not use a conventional
record cleaner or anti−static device.
ProCarManuals.com
Page 107 of 204
1998 COROLLA(U)
11 5
1. Temperature Selector
2. Air Intake Selector
3. Air Flow Selector
4. ”A/C” Button
5. Fan Speed Selector
Air conditioning system—
—Controls
ProCarManuals.com
Page 108 of 204

11 6
Fan speed selector
Turn the knob to adjust the fan speed—to
the right to increase, to the left to de-
crease.
Temperature selector
Turn the knob to adjust the temperature—
to")
1998 COROLLA(U)
11 6
Fan speed selector
Turn the knob to adjust the fan speed—to
the right to increase, to the left to de-
crease.
Temperature selector
Turn the knob to adjust the temperature—
to the right to warm, to the left to cool.
Air flow selector
Turn the knob to select the vents used for
air flow.
1. Panel—Air flows mainly from the
instrument panel vents.
2. Bi−level—Air flows from both the floor
vents and the instrument panel vents.
3. Floor—Air flows mainly from the floor
vents.
4. Floor/Windshield—Air flows mainly
from the floor vents and windshield
vents.
5. Windshield—Air flows mainly from the
windshield vents.For details about air flow selector settings,
see the illustration after ”A/C” button.
Turning the air flow control knob to wind-
shield position turns on the defroster−
linked air conditioning. At this time, the
”A/C” button indicator comes on regard-
less of whether or not the ”A/C” button is
pressed in. This is to clean up the front
view more quickly.
When the ”A/C” button is not pressed in,
turning the air flow control knob to anoth-
er position turns off the air conditioning.
ProCarManuals.com

3
1. Power rear view mirror control switch
2. Headlight and turn signal switch
3. Wiper and washer switches
4. Emergency flasher switch
5. Clock
6. Rear window defogger switch
7. Car a")

11 5
1. Temperature Selector
2. Air Intake Selector
3. Air Flow Selector
4. ”A/C” Button
5. Fan Speed Selector
Air conditioning system—
—Controls
ProCarManuals.com")