Page 18 of 204

1998 COROLLA(U)
18
TESTING THE SYSTEM
1. Open all the windows.
2. Set the system as described above.
The doors should be locked with the
key or wireless remote control transmit-
ter. Be sure to wait until the indicator
light starts flashing.
3. Unlock any door from the inside. The
system should activate the alarm.
4. Cancel the system by unlocking any of
the doors with the key or wireless re-
mote control transmitter.
5. Repeat this operation for the other
doors, trunk and hood. When testing on
the hood, also check that the system
is activated when the battery terminal
is disconnected and then reconnected.
If the system does not work properly,
have it checked by your Toyota dealer.
Fuel tank cap
1. To open the fuel filler door, pull the
lever up.
When refueling, turn off the engine.
CAUTION
�Do not smoke, cause sparks or al-
low open flames when refueling.
The fumes are flammable.
�When opening the cap, do not re-
move the cap quickly. In hot weath-
er, fuel under pressure could cause
injury by spraying out of the filler
neck if the cap is suddenly re-
moved.
2. To remove the fuel tank cap, turn
the cap slowly counterclockwise,
then pause slightly before removing
it. After removing the cap, hang it
on the cap hanger.
It is not unusual to hear a slight swoosh
when the cap is opened. When installing,
turn the cap clockwise till you hear a
click.
If the cap is not tightened securely, the
malfunction indicator lamp comes on.
Make sure the cap is tightened securely.
ProCarManuals.com
Page 27 of 204

1998 COROLLA(U)
27
CAUTION
Persons should ride in their seats
properly wearing their seat belts
whenever the vehicle is moving.
Otherwise, they are much more likely
to suffer serious bodily injury or
death in the event of sudden braking
or a collision.
When using the seat belts, observe
the following:
�Use the belt for only one person at
a time. Do not use a single belt for
two or more people—even children.
�Avoid reclining the seatbacks too
much. The seat belts provide maxi-
mum protection when the seatbacks
are in the upright position. (Refer
to the seat adjustment instructions.)
�Be careful not to damage the belt
webbing or hardware. Take care that
they do not get caught or pinched
in the seat or doors.
�Inspect the belt system periodically.
Check for cuts, fraying, and loose
parts. Damaged parts should be re-
placed. Do not disassemble or
modify the system.
�Keep the belts clean and dry. If
they need cleaning, use a mild soap
solution or lukewarm water. Never
use bleach, dye, or abrasive clean-
ers—they may severely weaken the
belts.
�Replace the belt assembly (includ-
ing bolts) if it has been used in a
severe impact. The entire assembly
should be replaced even if damage
is not obvious.
Adjust the seat as needed (front seats
only) and sit up straight and well back
in the seat. To fasten your belt, pull it
out of the retractor and insert the tab
into the buckle.
You will hear a click when the tab locks
into the buckle.
The seat belt length automatically adjusts
to your size and the seat position.
The retractor will lock the belt during a
sudden stop or on impact. It also may
lock if you lean forward too quickly. A
slow, easy motion will allow the belt to
extend, and you can move around freely.
—Front and rear seat belts
ProCarManuals.com
Page 48 of 204

1998 COROLLA(U)
48
�Unless it is unavoidable, do not put
a forward−facing child restraint sys-
tem on the front seat.
�A for war d−facing child restraint sys-
tem should be put on the front seat
only when it is unavoidable. Always
move the seat as far back as pos-
sible, because the force of a de-
ploying airbag could cause death or
serious injury to the child. On ve-
hicles with side airbags, do not al-
low the child to lean against the
front door or around the front door
even if the child is seated in the
child restraint system. It is danger-
ous if the side airbag inflates, and
the impact could cause death or
serious injury to the child.
�After installing the child restraint
system, make sure it is secured in
place following the manufacturer ’s
instructions. If it is not restrained
securely, it may cause death or se-
rious injury to the child in the
event of a sudden stop or accident.
When not using the child restraint system,
keep it secured with the seat belt or place
it in the trunk or somewhere other than
the passenger compartment. This will pre-
vent it from injuring passengers in the
event of a sudden stop or accident.
Your vehicle has anchors for securing the
top strap of a child restraint system. The
anchor nuts are welded beneath the sheet
metal to permit installation of an anchor
bracket for a child restraint system.
To install an anchor bracket, use an 8 mm
30 m m 1.25 mm coarse thread metric
bolt and 15 mm (0.6 in.) spacer. Note that
the bolts accompanying many child re-
straint systems are not metric. You can
damage the anchor nuts on your vehicle
if you force bolts with different thread into
the anchor nuts.
For instructions about how to install the
anchor bracket, see ”Top strap anchors
and locations”.
If your child restraint system does not
provide any of the necessary parts, you
can purchase the following items from
your Toyota dealer.
* CRS installation kit
(Part No. 04731−22012)—contains 1 bolt,
3 types of spacers and 1 locking clip.
* Bolt (Part No. 91511−60830)
ProCarManuals.com
Page 60 of 204
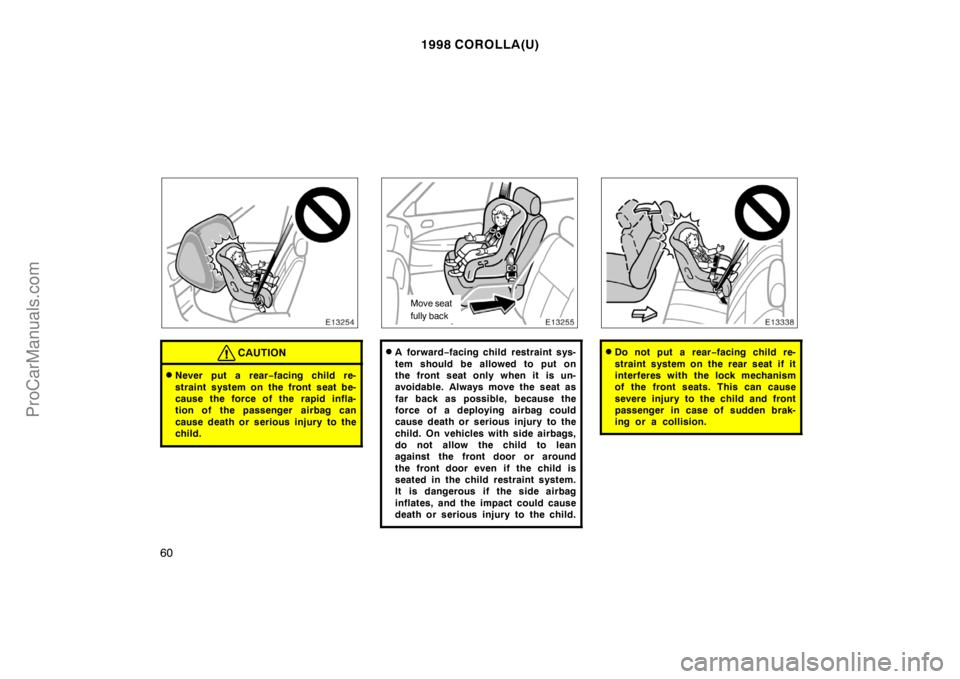
1998 COROLLA(U)
60
CAUTION
�Never put a rear−facing child re-
straint system on the front seat be-
cause the force of the rapid infla-
tion of the passenger airbag can
cause death or serious injury to the
child.
Move seat
fully back
�A for war d−facing child restraint sys-
tem should be allowed to put on
the front seat only when it is un-
avoidable. Always move the seat as
far back as possible, because the
force of a deploying airbag could
cause death or serious injury to the
child. On vehicles with side airbags,
do not allow the child to lean
against the front door or around
the front door even if the child is
seated in the child restraint system.
It is dangerous if the side airbag
inflates, and the impact could cause
death or serious injury to the child.�Do not put a rear−facing child re-
straint system on the rear seat if it
interferes with the lock mechanism
of the front seats. This can cause
severe injury to the child and front
passenger in case of sudden brak-
ing or a collision.
ProCarManuals.com
Page 71 of 204
1998 COROLLA(U)
71
NOTICE
To prevent the battery from being dis-
charged, do not leave the switch on
longer than necessary when the en-
gine is not running.
Instrument panel light control
To adjust the brightness of the instru-
ment panel lights, turn the knob.
Interior light
To turn on the interior light, slide the
switch.
The interior light switch has the following
positions:
”ON”—Keeps the light on all the time.
”OFF”—Turns the light off.
”DOOR”—Turns the light on when any of
the door is opened. The light remains on
for a certain time after all the doors are
closed. When all the doors are locked or
the ignition switch is turned to ”ACC” or
”ON” after all the doors are closed, the
light fades out.
ProCarManuals.com
Page 72 of 204
1998 COROLLA(U)
72
Ignition switch light
For easy access to the ignition switch,
the ignition switch light comes on when
any of the doors are opened.
The light remains on for a certain time
after all the doors are closed. When all
the doors are locked or the ignition switch
is turned to ”ACC” or ”ON” after all the
doors are closed, the light fades out.
Personal light
To turn on the personal light, push the
switch. To turn it off, push the switch
once again.Ty p e A
Ty p e B
Windshield wipers and
washer
ProCarManuals.com
Page 75 of 204

1998 COROLLA(U)
83
Part 1
OPERATION OF
INSTRUMENTS
AND CONTROLS—
Chapter 1−6
Ignition switch,
Transmission and
Parking brake
�Ignition switch with steering lock
�Automatic transmission
�Manual transmission
�P ar k ing br ak e
�Cruise control”START”—Starter motor on. The key
will return to the ”ON” position when
released.
For starting tips, see Part 3.
”ON”—Engine on and all accessories
on.
This is the normal driving position.
”ACC”—Accessories such as the radio
operate, but the engine is off.
If you leave the key in the ”ACC” or
”LOCK” position and open the driver’s
door, a buzzer will remind you to remove
the key.
”LOCK”—Engine is off and the steering
wheel is locked. The key can be re-
moved only at this position.You must push in the key to turn the key
from ”ACC” to the ”LOCK” position. On
vehicles with an automatic transmission,
the selector lever must be put in the ”P”
position before pushing the key.
When starting the engine, the key may
seem stuck at the ”LOCK” position. To
free it, first be sure the key is pushed all
the way in, and then rock the steering
wheel slightly while turning the key gently.
CAUTION
For manual transmission:
Never remove the key when the ve-
hicle is moving, as this will lock the
steering wheel and result in loss of
steering control.
NOTICE
Do not leave the key in the ”ON”
position if the engine is not running.
The battery will discharge and the
ignition could be damaged.
Ignition switch with steering
lock
ProCarManuals.com
Page 114 of 204
1998 COROLLA(U)
122
ASHTRAY
To use the ashtray, open out.
When finished with your cigarette, thor-
oughly extinguish it in the ashtray to pre-
vent other cigarette butts from catching
fire. After using the ashtray, push it back
in completely.
To remove the ashtray, press down on the
lock spring plate and pull out.
CAUTION
To reduce the chance of injury in
case of an accident or sudden stop
while driving, always push the ash-
tray back in completely after use.
Glovebox
To use the glovebox, do this.
To open: Pull the lever.
CAUTION
To reduce the chance of injury in
case of an accident or a sudden stop,
always keep the glovebox door closed
while driving.
Auxiliary boxes
Type A
Type B
ProCarManuals.com


