1998 OPEL FRONTERA check engine
[x] Cancel search: check enginePage 2181 of 6000
7A–27 AUTOMATIC TRANSMISSION (4L30–E)
Changing Transmission Fluid
There is no need to change the transmission fluid unless
the transmission is used under one or more of the
following heavy duty conditions.
A. Repeated short trips
B. Driving on rough roads
C. Driving on dusty roads
D. Towing a trailer
If the vehicle is used under these conditions, change the
fluid every 20,000 miles (32,000 km.)
More over, the remaining life percentage of ATF can be
estimated by using Tech 2 as an auxiliary tool to judge the
right time for ATF replacement.
The remaining life percentage is calculated from ATF’S
heat history. When it is close to 0%, ATF replacement is
recommended.
1. Place a large drain pan under the oil pan.
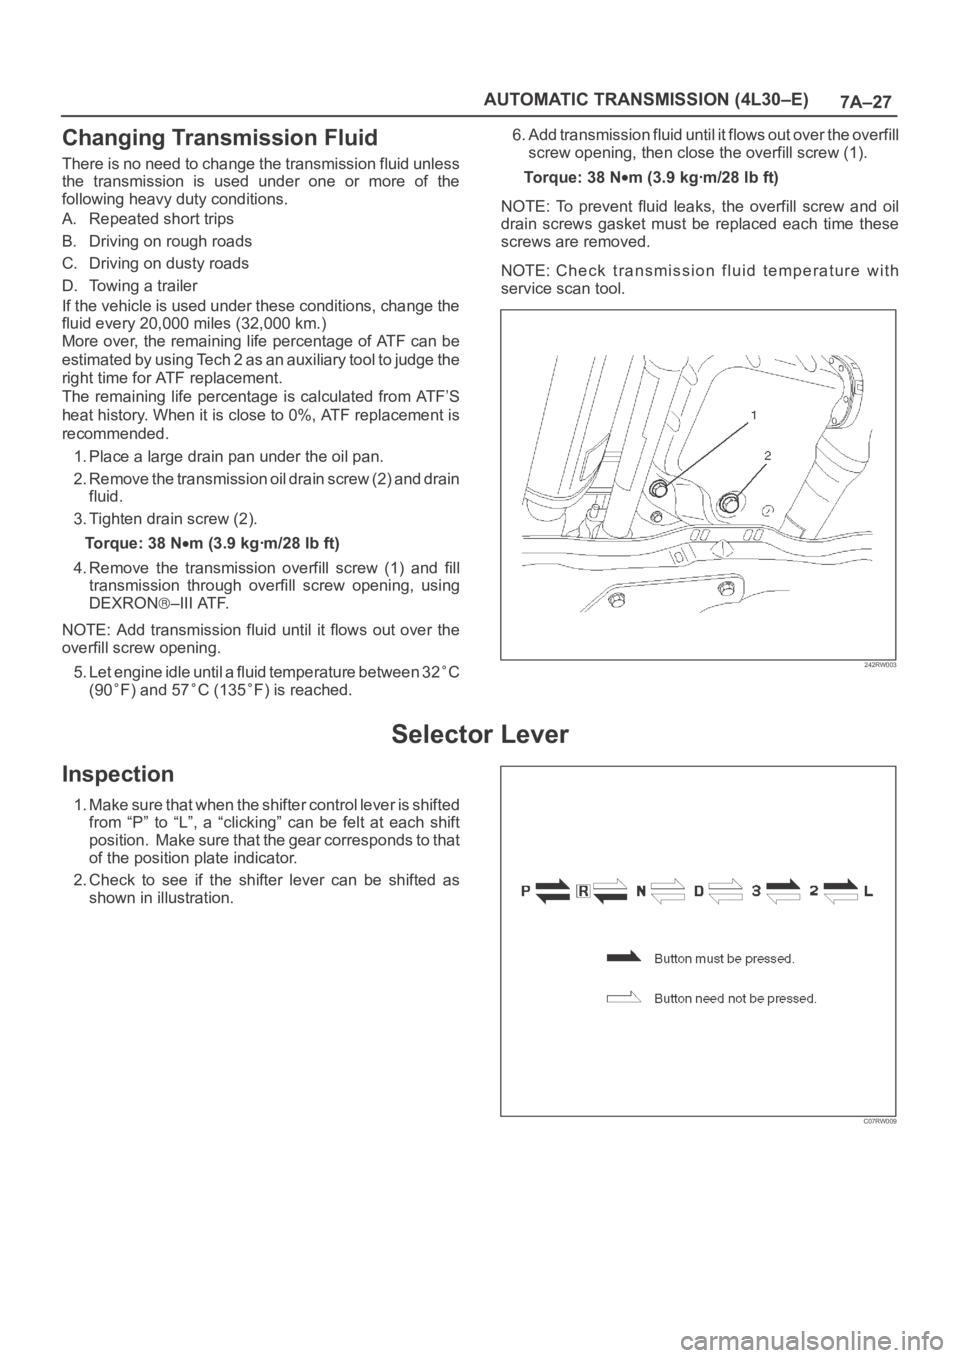
2. Remove the transmission oil drain screw (2) and drain
fluid.
3. Tighten drain screw (2).
Torque: 38 N
m (3.9 kgꞏm/28 lb ft)
4. Remove the transmission overfill screw (1) and fill
transmission through overfill screw opening, using
DEXRON
–III ATF.
NOTE: Add transmission fluid until it flows out over the
overfill screw opening.
5. Let engine idle until a fluid temperature between 32
C
(90
F) and 57C (135F) is reached.6. Add transmission fluid until it flows out over the overfill
screw opening, then close the overfill screw (1).
To r q u e : 3 8 N
m (3.9 kgꞏm/28 lb ft)
NOTE: To prevent fluid leaks, the overfill screw and oil
drain screws gasket must be replaced each time these
screws are removed.
NOTE: Check transmission fluid temperature with
service scan tool.
242RW003
Selector Lever
Inspection
1. Make sure that when the shifter control lever is shifted
from “P” to “L”, a “clicking” can be felt at each shift
position. Make sure that the gear corresponds to that
of the position plate indicator.
2. Check to see if the shifter lever can be shifted as
shown in illustration.
C07RW009
Page 2255 of 6000
7A1–10
TRANSMISSION CONTROL SYSTEM (4L30–E)
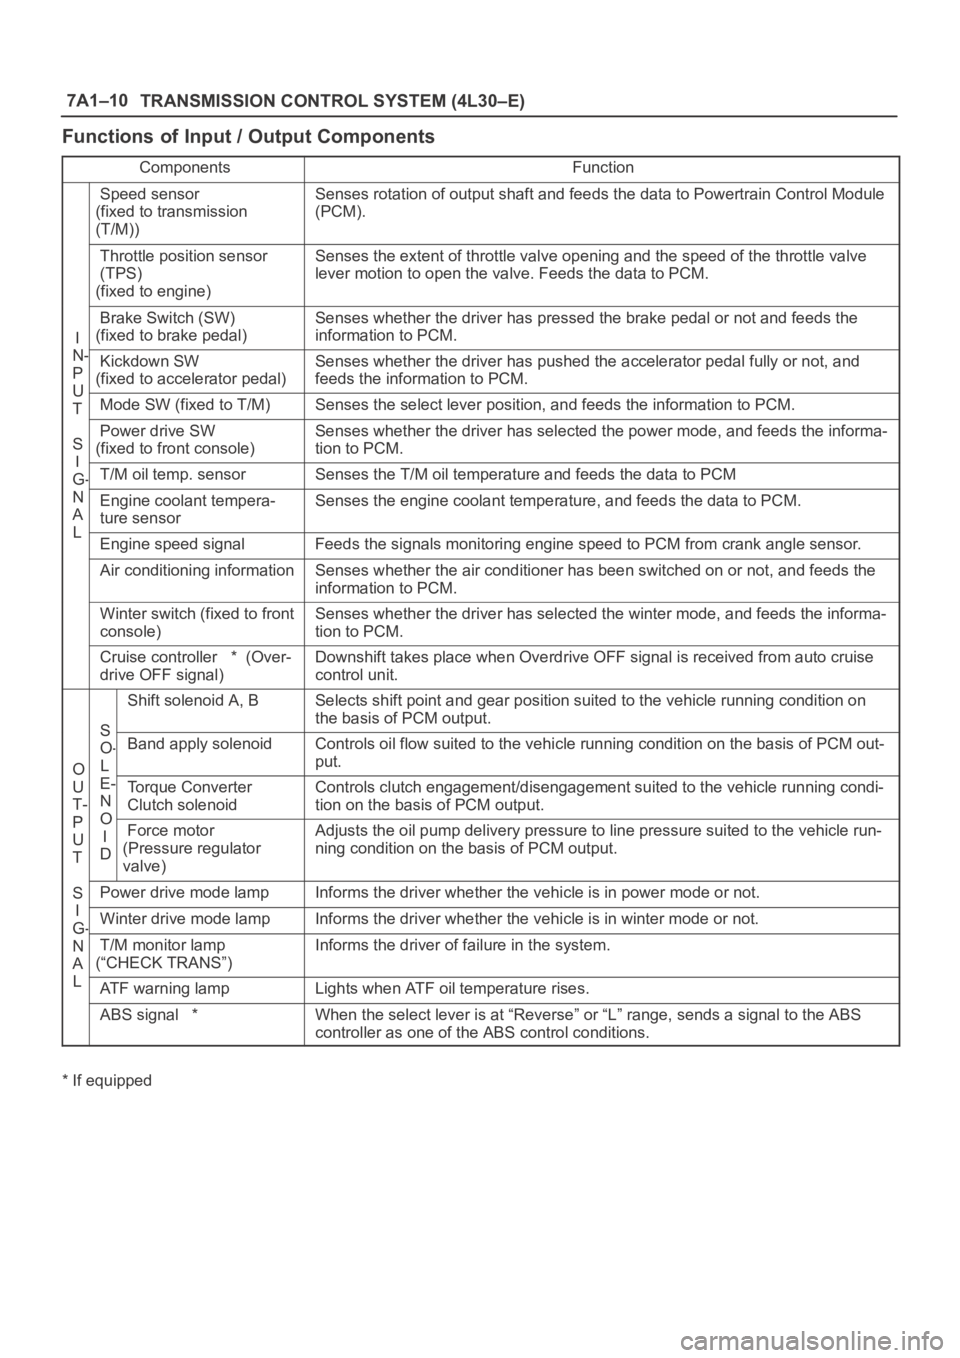
Functions of Input / Output Components
ComponentsFunction
Speed sensor
(fixed to transmission
(T/M))Senses rotation of output shaft and feeds the data to Powertrain Control Module
(PCM).
Throttle position sensor
(TPS)
(fixed to engine)Senses the extent of throttle valve opening and the speed of the throttle valve
lever motion to open the valve. Feeds the data to PCM.
I
N
Brake Switch (SW)
(fixed to brake pedal)Senses whether the driver has pressed the brake pedal or not and feeds the
information to PCM.
N-
P
U
Kickdown SW
(fixed to accelerator pedal)Senses whether the driver has pushed the accelerator pedal fully or not, and
feeds the information to PCM.
U
TMode SW (fixed to T/M)Senses the select lever position, and feeds the information to PCM.
S
I
Power drive SW
(fixed to front console)Senses whether the driver has selected the power mode, and feeds the informa-
tion to PCM.
I
G-T/M oil temp. sensorSenses the T/M oil temperature and feeds the data to PCM
N
A
L
Engine coolant tempera-
ture sensorSenses the engine coolant temperature, and feeds the data to PCM.
LEngine speed signalFeeds the signals monitoring engine speed to PCM from crank angle sensor.
Air conditioning informationSenses whether the air conditioner has been switched on or not, and feeds the
information to PCM.
Winter switch (fixed to front
console)Senses whether the driver has selected the winter mode, and feeds the informa-
tion to PCM.
Cruise controller * (Over-
drive OFF signal)Downshift takes place when Overdrive OFF signal is received from auto cruise
control unit.
S
Shift solenoid A, BSelects shift point and gear position suited to the vehicle running condition on
the basis of PCM output.
O
S
O-
L
Band apply solenoidControls oil flow suited to the vehicle running condition on the basis of PCM out-
put.
O
U
T-
P
E-
N
O
Torque Converter
Clutch solenoidControls clutch engagement/disengagement suited to the vehicle running condi-
tion on the basis of PCM output.
P
U
T
O
I
DForce motor
(Pressure regulator
valve)Adjusts the oil pump delivery pressure to line pressure suited to the vehicle run-
ning condition on the basis of PCM output.
S
I
Power drive mode lampInforms the driver whether the vehicle is in power mode or not.
I
G-Winter drive mode lampInforms the driver whether the vehicle is in winter mode or not.G
N
A
L
T/M monitor lamp
(“CHECK TRANS”)Informs the driver of failure in the system.
LATF warning lampLights when ATF oil temperature rises.
ABS signal *When the select lever is at “Reverse” or “L” range, sends a signal to the ABS
controller as one of the ABS control conditions.
* If equipped
Page 2256 of 6000
TRANSMISSION CONTROL SYSTEM (4L30–E)7A1–11
Diagnosis
Electronic Diagnosis
How To Diagnose The Problem
1. To avoid incorrect diagnostics, this book needs to be
followed accurately. Unless stated, do not jump
directly to a section that could contain the solution.
Some important information may be missed.
2. The sections in CAPITALS and bold are the main
sections that can be found in the contents.
3. The GOTO “SECTION” means to continue to check
going to the “section”.
4. The GOTHROUGH “SECTION” means to go
through the “section” and then to go back to the place
the GOTHROUGH was written.
5. BASIC ELECTRIC CIRCUITS:
You should understand the basic theory of electricity.
This includes the meaning of voltage, amps, ohms,
and what happens in a circuit with an open or shorted
wire. You should also be able to read and understand
wiring diagrams.
Check Trans Indicator
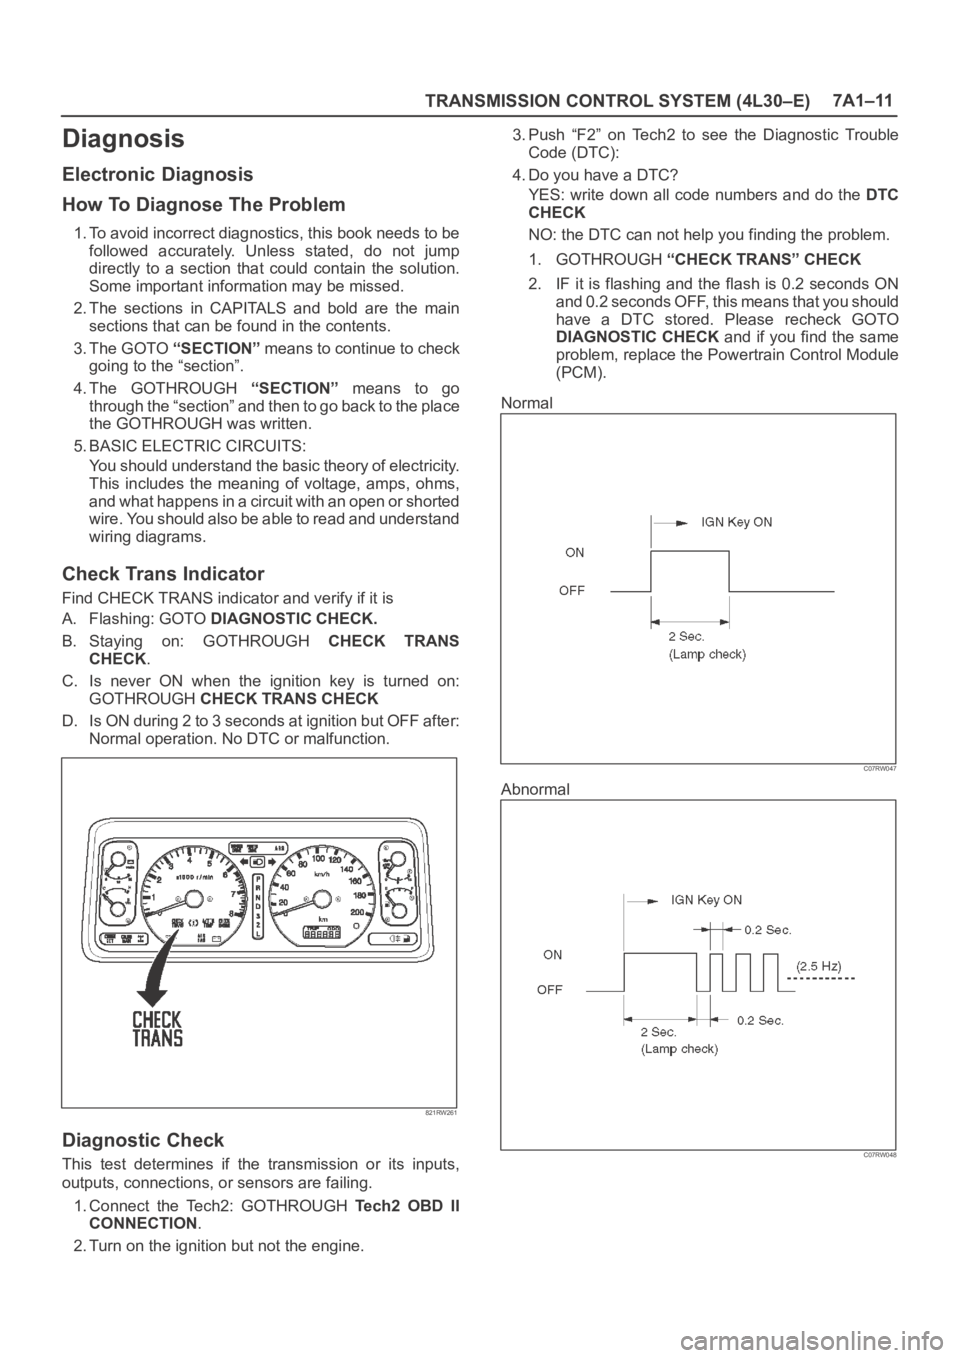
Find CHECK TRANS indicator and verify if it is
A. Flashing: GOTO DIAGNOSTIC CHECK.
B. Staying on: GOTHROUGH CHECK TRANS
CHECK.
C. Is never ON when the ignition key is turned on:
GOTHROUGH CHECK TRANS CHECK
D. Is ON during 2 to 3 seconds at ignition but OFF after:
Normal operation. No DTC or malfunction.
821RW261
Diagnostic Check
This test determines if the transmission or its inputs,
outputs, connections, or sensors are failing.
1. Connect the Tech2: GOTHROUGH Te c h 2 O B D I I
CONNECTION.
2. Turn on the ignition but not the engine.3. Push “F2” on Tech2 to see the Diagnostic Trouble
Code (DTC):
4. Do you have a DTC?
YES: write down all code numbers and do the DTC
CHECK
NO: the DTC can not help you finding the problem.
1. GOTHROUGH “CHECK TRANS” CHECK
2. IF it is flashing and the flash is 0.2 seconds ON
and 0.2 seconds OFF, this means that you should
have a DTC stored. Please recheck GOTO
DIAGNOSTIC CHECK and if you find the same
problem, replace the Powertrain Control Module
(PCM).
Normal
C07RW047
Abnormal
C07RW048
Page 2257 of 6000
7A1–12
TRANSMISSION CONTROL SYSTEM (4L30–E)
“Check Trans” Check
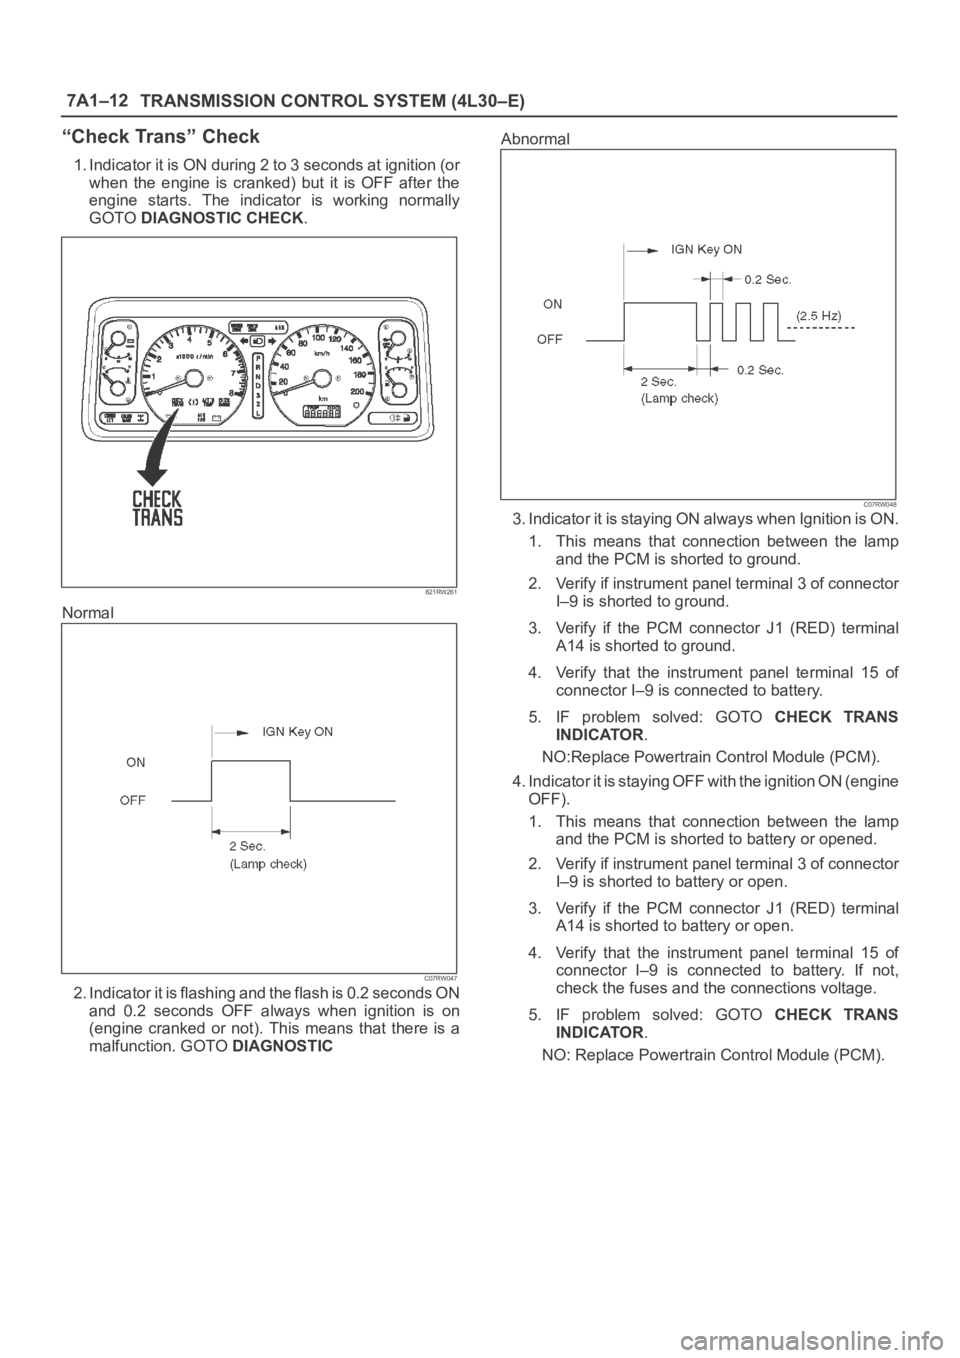
1. Indicator it is ON during 2 to 3 seconds at ignition (or
when the engine is cranked) but it is OFF after the
engine starts. The indicator is working normally
GOTO DIAGNOSTIC CHECK.
821RW261
Normal
C07RW047
2. Indicator it is flashing and the flash is 0.2 seconds ON
and 0.2 seconds OFF always when ignition is on
(engine cranked or not). This means that there is a
malfunction. GOTO DIAGNOSTICAbnormal
C07RW048
3. Indicator it is staying ON always when Ignition is ON.
1. This means that connection between the lamp
and the PCM is shorted to ground.
2. Verify if instrument panel terminal 3 of connector
I–9 is shorted to ground.
3. Verify if the PCM connector J1 (RED) terminal
A14 is shorted to ground.
4. Verify that the instrument panel terminal 15 of
connector I–9 is connected to battery.
5. IF problem solved: GOTO CHECK TRANS
INDICATOR.
NO:Replace Powertrain Control Module (PCM).
4. Indicator it is staying OFF with the ignition ON (engine
OFF).
1. This means that connection between the lamp
and the PCM is shorted to battery or opened.
2. Verify if instrument panel terminal 3 of connector
I–9 is shorted to battery or open.
3. Verify if the PCM connector J1 (RED) terminal
A14 is shorted to battery or open.
4. Verify that the instrument panel terminal 15 of
connector I–9 is connected to battery. If not,
check the fuses and the connections voltage.
5. IF problem solved: GOTO CHECK TRANS
INDICATOR.
NO: Replace Powertrain Control Module (PCM).
Page 2265 of 6000
7A1–20
TRANSMISSION CONTROL SYSTEM (4L30–E)
821RW263
810RT022
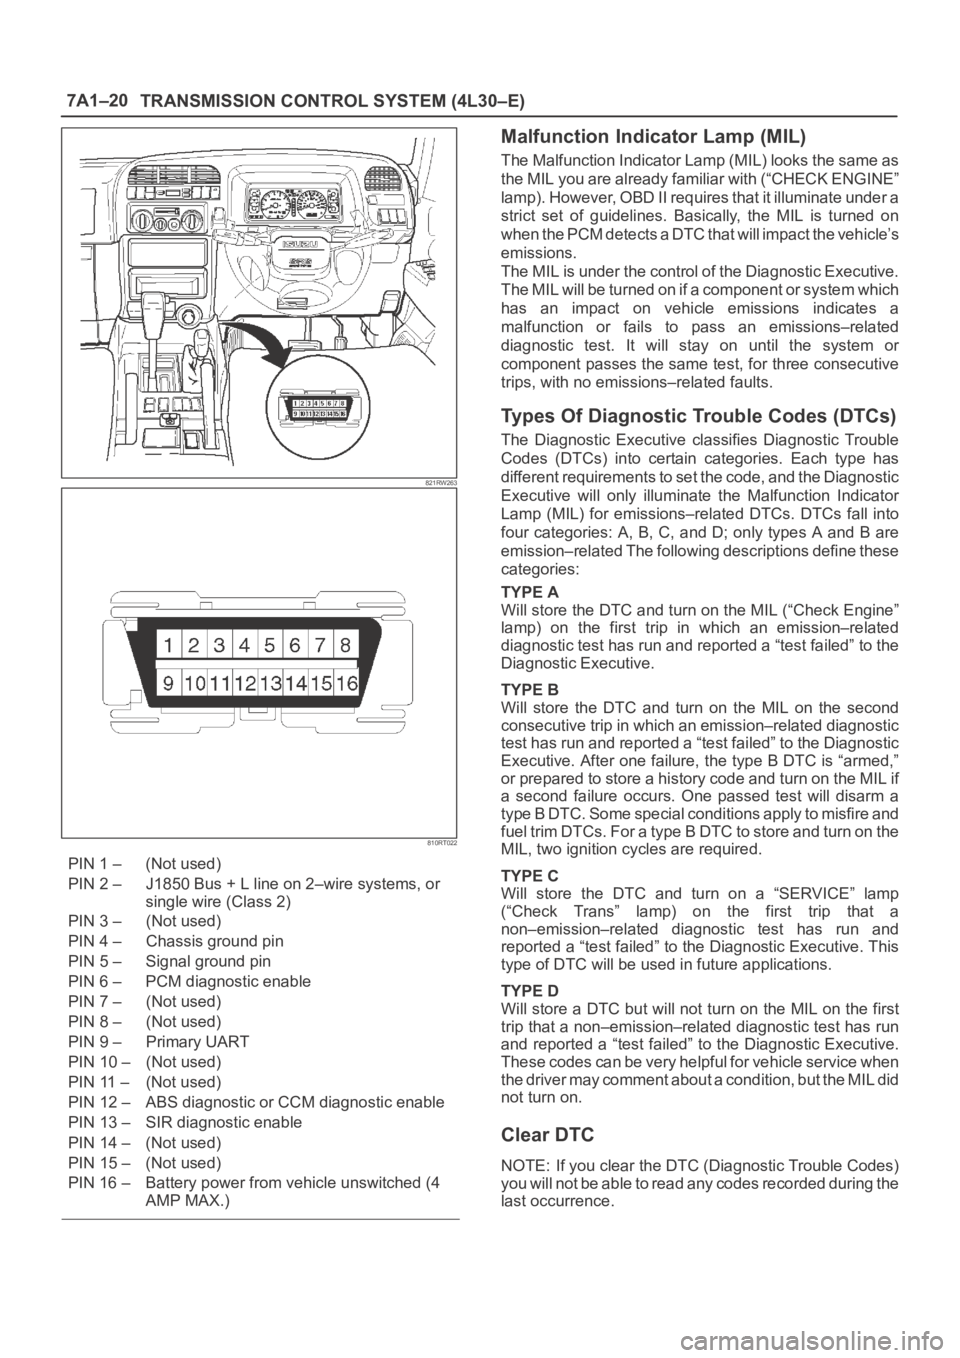
PIN 1 – (Not used)
PIN 2 – J1850 Bus + L line on 2–wire systems, or
single wire (Class 2)
PIN 3 – (Not used)
PIN 4 – Chassis ground pin
PIN 5 – Signal ground pin
PIN 6 – PCM diagnostic enable
PIN 7 – (Not used)
PIN 8 – (Not used)
PIN 9 – Primary UART
PIN 10 – (Not used)
PIN 11 – (Not used)
PIN 12 – ABS diagnostic or CCM diagnostic enable
PIN 13 – SIR diagnostic enable
PIN 14 – (Not used)
PIN 15 – (Not used)
PIN 16 – Battery power from vehicle unswitched (4
AMP MAX.)
Malfunction Indicator Lamp (MIL)
The Malfunction Indicator Lamp (MIL) looks the same as
the MIL you are already familiar with (“CHECK ENGINE”
lamp). However, OBD II requires that it illuminate under a
strict set of guidelines. Basically, the MIL is turned on
when the PCM detects a DTC that will impact the vehicle’s
emissions.
The MIL is under the control of the Diagnostic Executive.
The MIL will be turned on if a component or system which
has an impact on vehicle emissions indicates a
malfunction or fails to pass an emissions–related
diagnostic test. It will stay on until the system or
component passes the same test, for three consecutive
trips, with no emissions–related faults.
Types Of Diagnostic Trouble Codes (DTCs)
The Diagnostic Executive classifies Diagnostic Trouble
Codes (DTCs) into certain categories. Each type has
different requirements to set the code, and the Diagnostic
Executive will only illuminate the Malfunction Indicator
Lamp (MIL) for emissions–related DTCs. DTCs fall into
four categories: A, B, C, and D; only types A and B are
emission–related The following descriptions define these
categories:
TYPE A
Will store the DTC and turn on the MIL (“Check Engine”
lamp) on the first trip in which an emission–related
diagnostic test has run and reported a “test failed” to the
Diagnostic Executive.
TYPE B
Will store the DTC and turn on the MIL on the second
consecutive trip in which an emission–related diagnostic
test has run and reported a “test failed” to the Diagnostic
Executive. After one failure, the type B DTC is “armed,”
or prepared to store a history code and turn on the MIL if
a second failure occurs. One passed test will disarm a
type B DTC. Some special conditions apply to misfire and
fuel trim DTCs. For a type B DTC to store and turn on the
MIL, two ignition cycles are required.
TYPE C
Will store the DTC and turn on a “SERVICE” lamp
(“Check Trans” lamp) on the first trip that a
non–emission–related diagnostic test has run and
reported a “test failed” to the Diagnostic Executive. This
type of DTC will be used in future applications.
TYPE D
Will store a DTC but will not turn on the MIL on the first
trip that a non–emission–related diagnostic test has run
and reported a “test failed” to the Diagnostic Executive.
These codes can be very helpful for vehicle service when
the driver may comment about a condition, but the MIL did
not turn on.
Clear DTC
NOTE: If you clear the DTC (Diagnostic Trouble Codes)
you will not be able to read any codes recorded during the
last occurrence.
Page 2267 of 6000
7A1–22
TRANSMISSION CONTROL SYSTEM (4L30–E)
connection or loose wiring. Terminals and grounds should
always be the prime suspect. Intermittents rarely occur
inside sophisticated electronic components such as the
PCM.
Use the DTC information to understand which wires and
sensors are involved.
When an intermittent problem is encountered, check
suspect circuits for:
1. Poor terminal to wire connection.
2. Terminals not fully seated in the connector body
(backed out).
3. Improperly formed or damaged terminals.
4. Loose, dirty, or corroded ground connections:
HINT: Any time you have an intermittent in more than
one circuit, check whether the circuits share a
common ground connection.
5. Pinched or damaged wires.
6. Electro–Magnetic Interference (EMI):
HINT: Check that all wires are properly routed away
from spark plug wires, distributor wires, coil, and
generator. Also check for improperly installed
electrical options, such as lights, 2–way radios, etc.Use the F3 SNAPSHOT mode of the Tech2 to help isolate
the cause of an intermittent fault. The snapshot mode will
record information before and after the problem occurs.
Set the snapshot to “trigger” on the suspect DTC. If you
notice the reported symptom during the test drive, trigger
the snapshot manually.
After the snapshot has been triggered, command the
Tech2 to play back the flow of data recorded from each of
the various sensors. Signs of an intermittent fault in a
sensor circuit are sudden unexplainable jump in data
values out of the normal range.
Transmission And PCM Identification
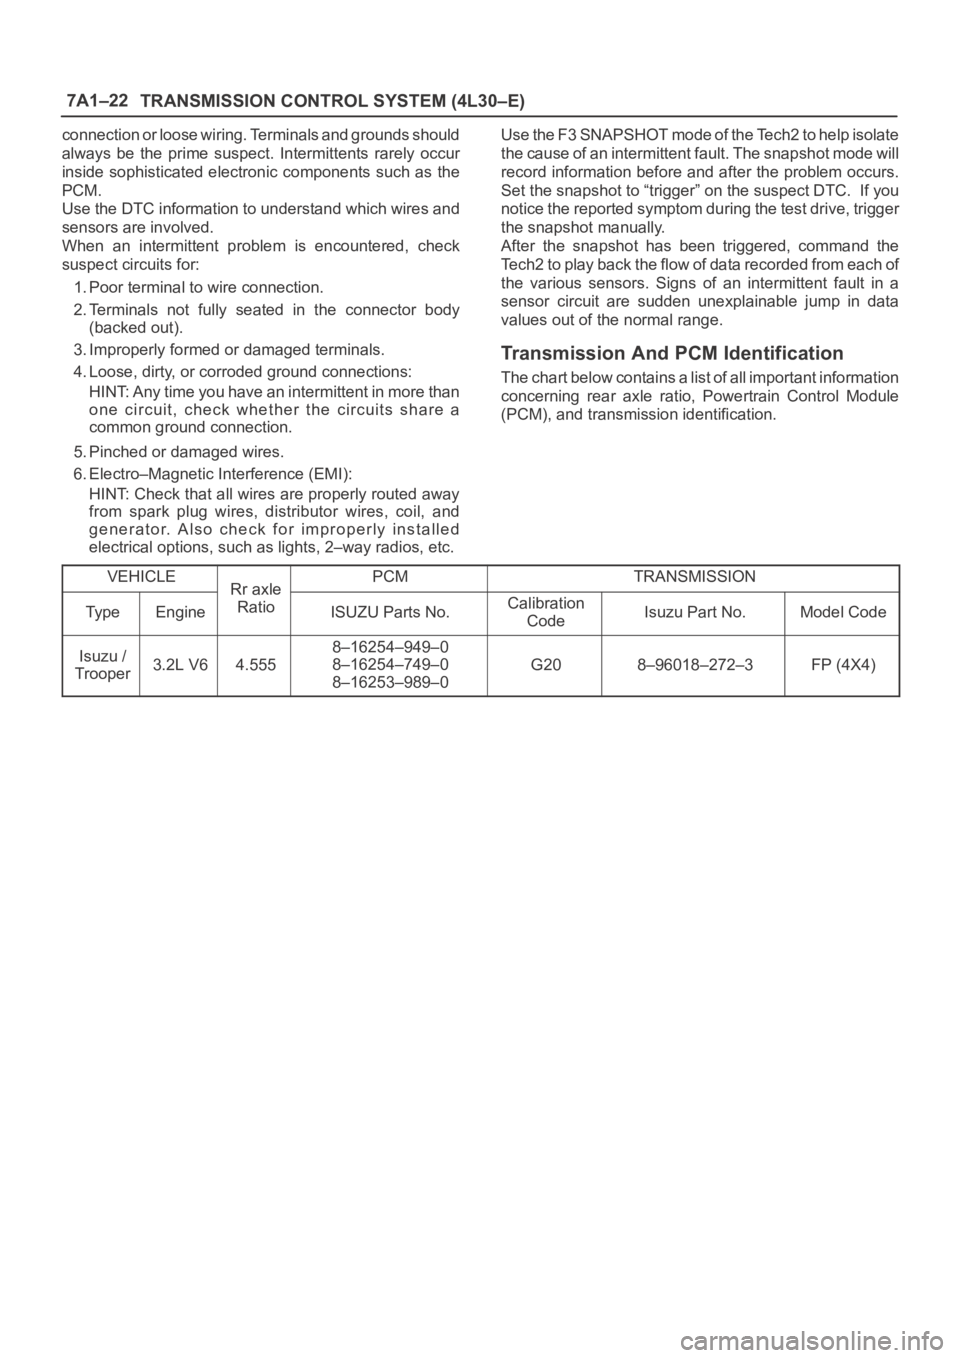
The chart below contains a list of all important information
concerning rear axle ratio, Powertrain Control Module
(PCM), and transmission identification.
VEHICLE
Rr axlePCMTRANSMISSION
Ty p eEngine
Rr axle
RatioISUZU Parts No.Calibration
CodeIsuzu Part No.Model Code
Isuzu /
Trooper3.2L V64.555
8–16254–949–0
8–16254–749–0
8–16253–989–0
G208–96018–272–3FP (4X4)
Page 2271 of 6000
7A1–26
TRANSMISSION CONTROL SYSTEM (4L30–E)
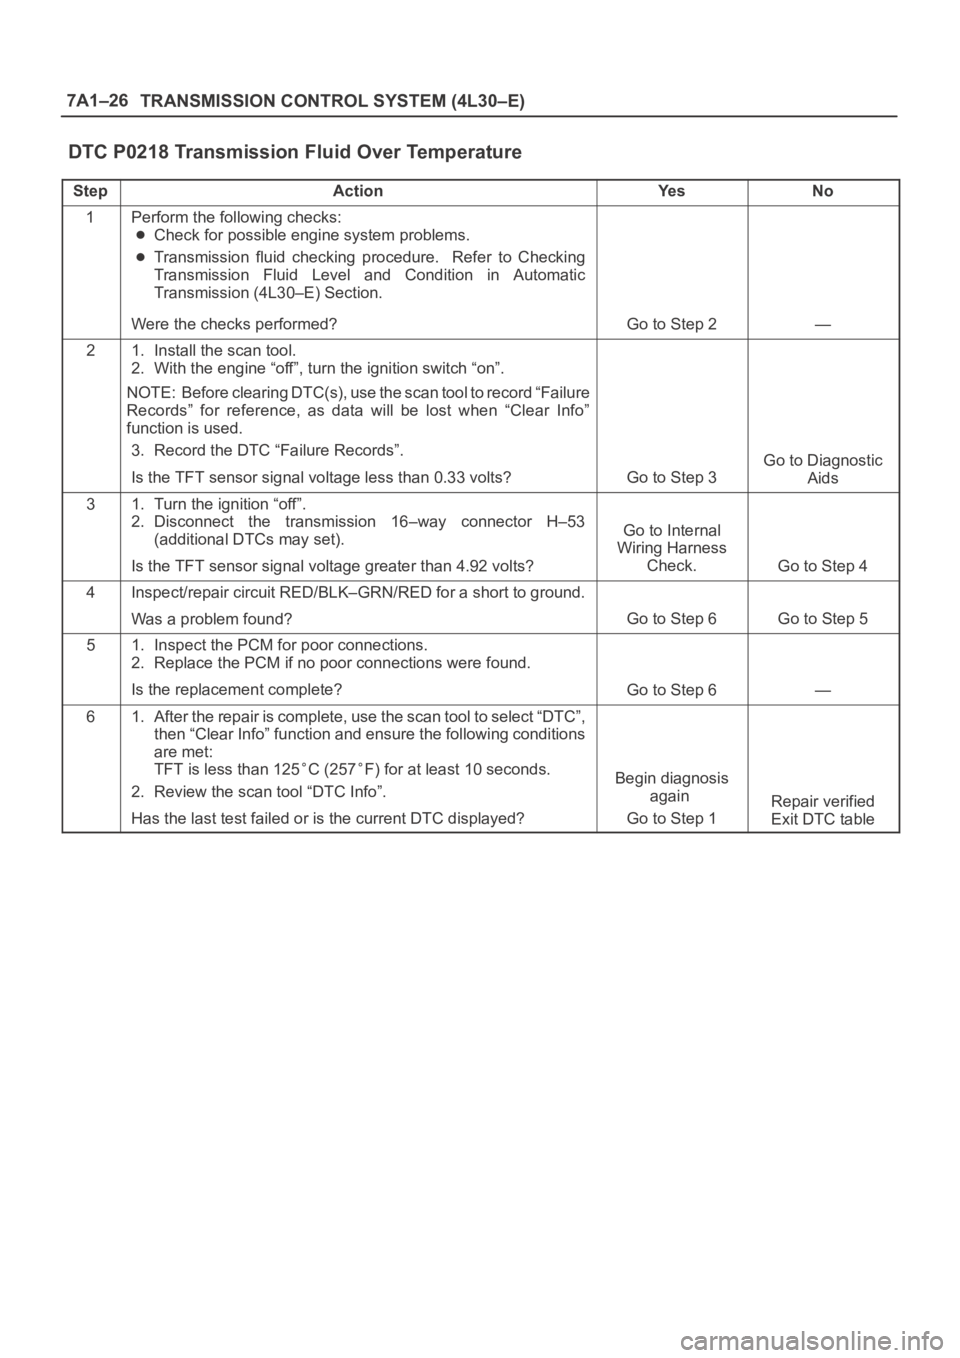
DTC P0218 Transmission Fluid Over Temperature
StepActionYe sNo
1Perform the following checks:
Check for possible engine system problems.
Transmission fluid checking procedure. Refer to Checking
Transmission Fluid Level and Condition in Automatic
Transmission (4L30–E) Section.
Were the checks performed?
Go to Step 2—
21. Install the scan tool.
2. With the engine “off”, turn the ignition switch “on”.
NOTE: Before clearing DTC(s), use the scan tool to record “Failure
Records” for reference, as data will be lost when “Clear Info”
function is used.
3. Record the DTC “Failure Records”.
Is the TFT sensor signal voltage less than 0.33 volts?
Go to Step 3
Go to Diagnostic
Aids
31. Turn the ignition “off”.
2. Disconnect the transmission 16–way connector H–53
(additional DTCs may set).
Is the TFT sensor signal voltage greater than 4.92 volts?
Go to Internal
Wiring Harness
Check.
Go to Step 4
4Inspect/repair circuit RED/BLK–GRN/RED for a short to ground.
Was a problem found?
Go to Step 6Go to Step 5
51. Inspect the PCM for poor connections.
2. Replace the PCM if no poor connections were found.
Is the replacement complete?
Go to Step 6—
61. After the repair is complete, use the scan tool to select “DTC”,
then “Clear Info” function and ensure the following conditions
are met:
TFT is less than 125
C (257F) for at least 10 seconds.
2. Review the scan tool “DTC Info”.
Has the last test failed or is the current DTC displayed?Begin diagnosis
again
Go to Step 1
Repair verified
Exit DTC table
Page 2272 of 6000
TRANSMISSION CONTROL SYSTEM (4L30–E)7A1–27
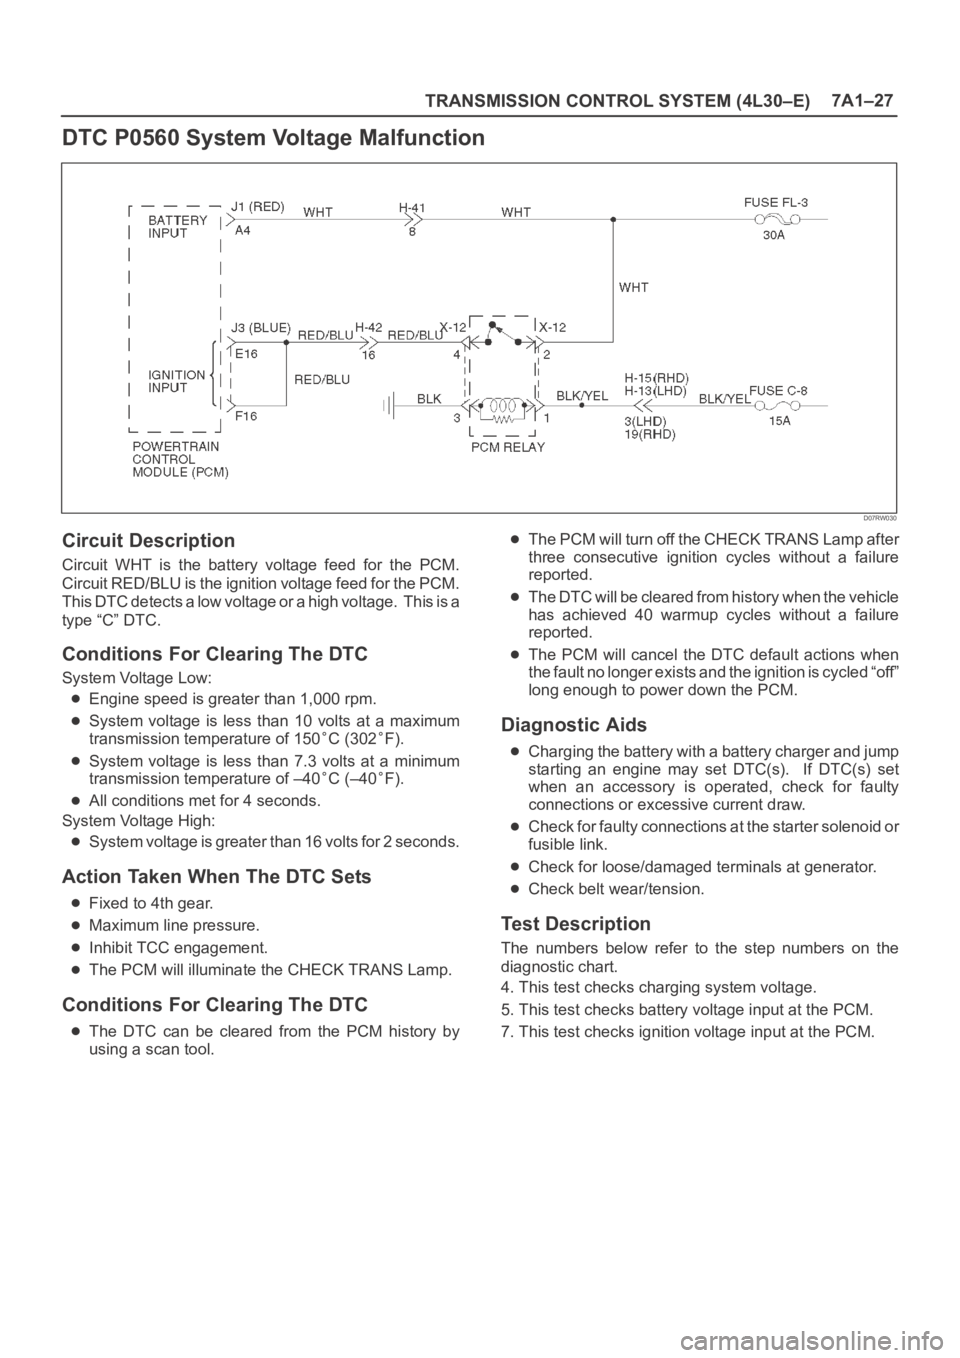
DTC P0560 System Voltage Malfunction
D07RW030
Circuit Description
Circuit WHT is the battery voltage feed for the PCM.
Circuit RED/BLU is the ignition voltage feed for the PCM.
This DTC detects a low voltage or a high voltage. This is a
type “C” DTC.
Conditions For Clearing The DTC
System Voltage Low:
Engine speed is greater than 1,000 rpm.
System voltage is less than 10 volts at a maximum
transmission temperature of 150
C (302F).
System voltage is less than 7.3 volts at a minimum
transmission temperature of –40
C (–40F).
All conditions met for 4 seconds.
System Voltage High:
System voltage is greater than 16 volts for 2 seconds.
Action Taken When The DTC Sets
Fixed to 4th gear.
Maximum line pressure.
Inhibit TCC engagement.
The PCM will illuminate the CHECK TRANS Lamp.
Conditions For Clearing The DTC
The DTC can be cleared from the PCM history by
using a scan tool.
The PCM will turn off the CHECK TRANS Lamp after
three consecutive ignition cycles without a failure
reported.
The DTC will be cleared from history when the vehicle
has achieved 40 warmup cycles without a failure
reported.
The PCM will cancel the DTC default actions when
the fault no longer exists and the ignition is cycled “off”
long enough to power down the PCM.
Diagnostic Aids
Charging the battery with a battery charger and jump
starting an engine may set DTC(s). If DTC(s) set
when an accessory is operated, check for faulty
connections or excessive current draw.
Check for faulty connections at the starter solenoid or
fusible link.
Check for loose/damaged terminals at generator.
Check belt wear/tension.
Test Description
The numbers below refer to the step numbers on the
diagnostic chart.
4. This test checks charging system voltage.
5. This test checks battery voltage input at the PCM.
7. This test checks ignition voltage input at the PCM.