1998 OPEL FRONTERA light
[x] Cancel search: lightPage 5739 of 6000

7A–50
AUTOMATIC TRANSMISSION (4L30–E)
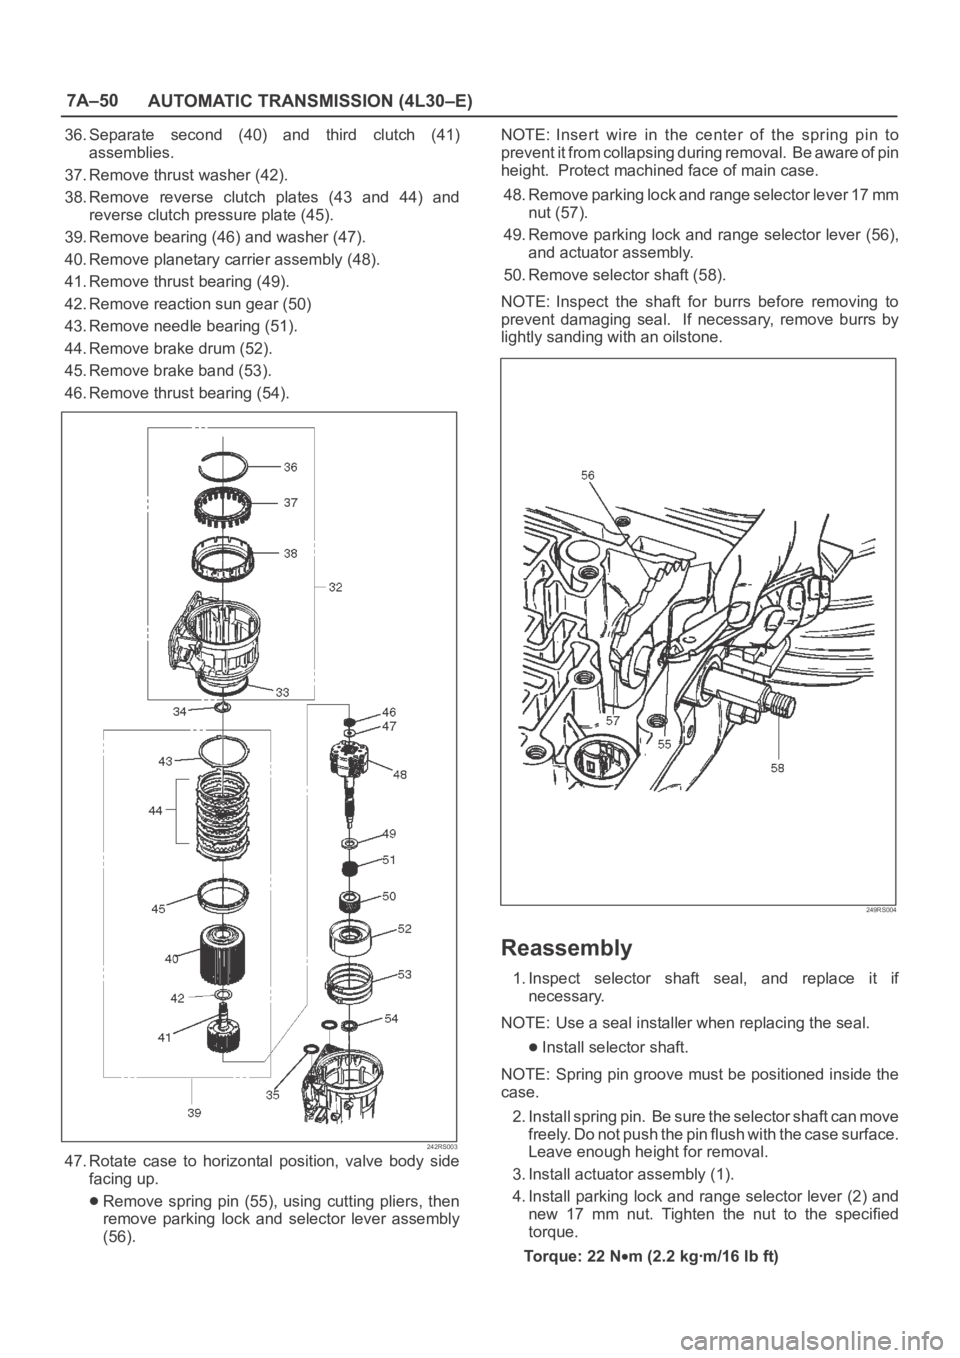
36. Separate second (40) and third clutch (41)
assemblies.
37. Remove thrust washer (42).
38. Remove reverse clutch plates (43 and 44) and
reverse clutch pressure plate (45).
39. Remove bearing (46) and washer (47).
40. Remove planetary carrier assembly (48).
41. Remove thrust bearing (49).
42. Remove reaction sun gear (50)
43. Remove needle bearing (51).
44. Remove brake drum (52).
45. Remove brake band (53).
46. Remove thrust bearing (54).
242RS003
47. Rotate case to horizontal position, valve body side
facing up.
Remove spring pin (55), using cutting pliers, then
remove parking lock and selector lever assembly
(56).NOTE: Insert wire in the center of the spring pin to
prevent it from collapsing during removal. Be aware of pin
height. Protect machined face of main case.
48. Remove parking lock and range selector lever 17 mm
nut (57).
49. Remove parking lock and range selector lever (56),
and actuator assembly.
50. Remove selector shaft (58).
NOTE: Inspect the shaft for burrs before removing to
prevent damaging seal. If necessary, remove burrs by
lightly sanding with an oilstone.
249RS004
Reassembly
1. Inspect selector shaft seal, and replace it if
necessary.
NOTE: Use a seal installer when replacing the seal.
Install selector shaft.
NOTE: Spring pin groove must be positioned inside the
case.
2. Install spring pin. Be sure the selector shaft can move
freely. Do not push the pin flush with the case surface.
Leave enough height for removal.
3. Install actuator assembly (1).
4. Install parking lock and range selector lever (2) and
new 17 mm nut. Tighten the nut to the specified
torque.
To r q u e : 2 2 N
m (2.2 kgꞏm/16 lb ft)
Page 5789 of 6000

7A–8 AUTOMATIC TRANSMISSION (AW30-40LE)
Winter mode control • The TCM controls the vehicle start smoothly on low frictional road like
snow road by executing this control.
Activate condition:
1. Excluding "2", "L" range
2. Vehicle speed is less than 11 km/h
3. Transmission oil temperature is less than 115
C
4. Throttle opening is less than 8%
5. Excluding winter mode
Cancel condition:
1. When winter mode switch is pushed again
2. When either "2" or "L" is detected
3. Ignition switch "OFF"
4. Vehicle speed is more than 34 km/h for 1 second or mode continuously
5. Transmission oil temperature is more than 130
C
Fail-safe function • When trouble occurs to vehicle sensor and each solenoid, TCM
automatically exer ts fail-safe control not to spoil driveability.
• This control is exer ted when sensor or actuator is in trouble, while TCM
works normally.
Diagnosis function • If there is an abnormality in vehicle sensors, each solenoid (S1-S3, STH),
or throttle position sensor, "CHECK TRANS" lamp is actuated to warn the
drive. But when the abnormality items have been restored to normal, the
light does not blink.
• Faulty parts are memorized in TCM. If self-diagnosis star t signal is
inputted, "CHECK TRANS" lamp is blinked and results of diagnosis are
indicated. A history of faults remains recorded even when IGN switch is off.
TECH 2 • Output of control data in the TCM
• Actuator (Solenoid) operation check
• Erasure of trouble code
Page 5790 of 6000

AUTOMATIC TRANSMISSION (AW30-40LE) 7A–9
MAJOR INPUT/OUTPUT COMPONENTS
Component Function
Input
Vehicle speed sensor (Speedometer) Detects the vehicle speed (Back-up sensor of output
revolution sensor).
Output revolution sensor (Transmission) Detects the vehicle speed.
Input revolution sensor (Transmission) Detects the input revolution (O/D direct clutch drum
revolution).
Engine revolution sensor Detects the engine revolution.
Throttle position sensor Detects the throttle opening rate.
Neutral start switch Detects the select lever position.
Pattern select switch Detects whether the driver has selected "NORMAL",
"POWER", or "WINTER" mode.
Overdrive off switch Detects whether the driver has selected O/D.
Brake lamp switch Detects whether the driver has pressed the brake pedal or
not.
Oil temperature sensor Detects the oil temperature.
Diagnostic star t switch Star ts self-diagnosis and displays a code for faulty part if
any.
Input/Output
Data link connector When connected with Tech2 or tester, can communicate
the data for function check, etc.
Output
Shift solenoid S1, S2 Selects shift point and gear position suited to the vehicle
running condition on the basis of TCM output.
Lock-up control solenoid SL Control the lock-up clutch suited to the vehicle running
condition on the basis of TCM output.
Pressure control solenoid STH Adjusts throttle pressure by energizing current of linear
pressure control solenoid to prevent the shift shock and to
obtain shift smoothly.
"CHECK TRANS" lamp When trouble has occurred to throttle position sensor,
vehicle speed sensor, or solenoid, "CHECK TRANS" lamp
is blinked to warn the driver. If also displays the trouble
code.
A/T OIL TEMP warning lamp Lights when ATF oil temperature rises. (Turned on at
greater than 146
C . Turned off at less than 126C.
Power mode lamp Informs the driver whether the vehicle is in power mode or
not.
Winter mode lamp Informs the driver whether the vehicle is in winter mode or
not.
Computer
Transmission Control Module (TCM) Based on the signal from each switch and sensors, judges
necessary shift point and lock-up operation, and send
signal to each solenoid.
Page 5799 of 6000

7A–18 AUTOMATIC TRANSMISSION (AW30-40LE)
901RW176
F07RW033
740RY00013
740RY00014
901RY00014
TECH2 CONNECTION
The Tech2 scan tool is used to electrically diagnose the
automatic transmission system and to check the system. The
Tech2 enhances the diagnosis efficiency though all the
troubleshooting can be done without the Tech2.
The Tech2 is a portable, compact, and light tester. When it is
connected to the diagnosis connector of the vehicle, you can
perform a variety of diagnoses and tests by communicating
with the Transmission Control Module (TCM) of the vehicle.
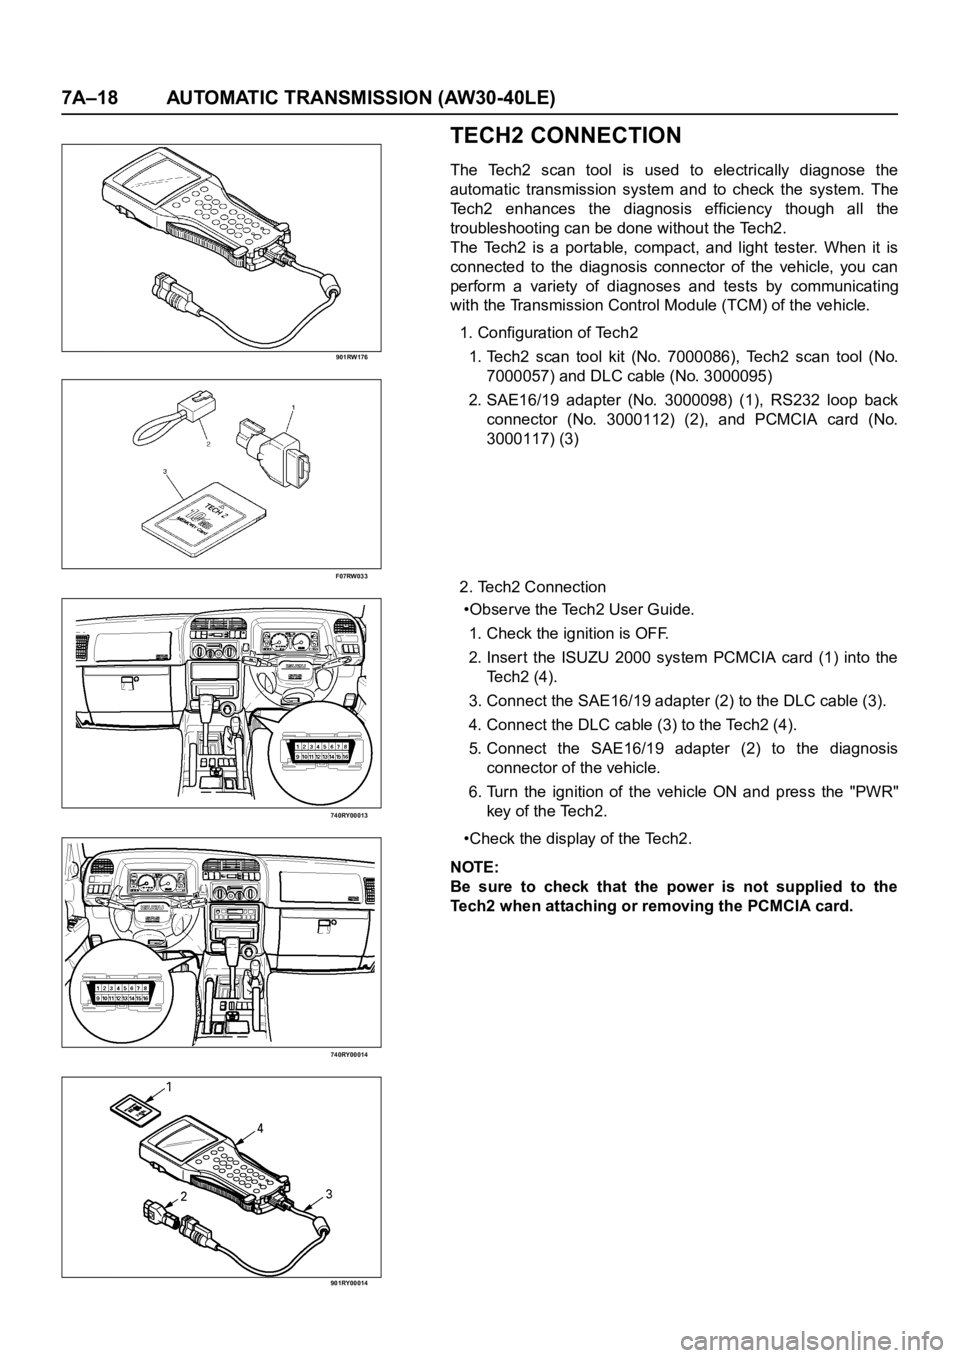
1. Configuration of Tech2
1. Tech2 scan tool kit (No. 7000086), Tech2 scan tool (No.
7000057) and DLC cable (No. 3000095)
2. SAE16/19 adapter (No. 3000098) (1), RS232 loop back
connector (No. 3000112) (2), and PCMCIA card (No.
3000117) (3)
2. Tech2 Connection
•Observe the Tech2 User Guide.
1. Check the ignition is OFF.
2. Inser t the ISUZU 2000 system PCMCIA card (1) into the
Te c h 2 ( 4 ) .
3. Connect the SAE16/19 adapter (2) to the DLC cable (3).
4. Connect the DLC cable (3) to the Tech2 (4).
5. Connect the SAE16/19 adapter (2) to the diagnosis
connector of the vehicle.
6. Turn the ignition of the vehicle ON and press the "PWR"
key of the Tech2.
•Check the display of the Tech2.
NOTE:
Be sure to check that the power is not supplied to the
Tech2 when attaching or removing the PCMCIA card.
Page 5801 of 6000

7A–20 AUTOMATIC TRANSMISSION (AW30-40LE)
Once the test vehicle has been identified an “Application
(Power train) Menu" screen appears. Please select the
appropriate application.
The following table shows, which functions are used for
the available equipment versions.
Diagnostic Trouble Codes
The purpose of the “Diagnostic Trouble Codes" mode is
to display stored TCM trouble codes.
When “Diagnostic Trouble Codes" is selected an
“Application Menu" screen appears.
Clear DTC Information
The purpose of the “Clear DTC Information" mode is to
command the clearing of stored TCM trouble codes.
When “Clear DTC Information" is selected, a “Clear
DTC Information", warning screen appears. This screen
informs you that by cleaning DTC's, “all stored DTC
information in controller will be erased".
Do you want to clear DTC's (Yes/No).
Press either the Yes or No key when answering.
After clearing codes, confirm system operation by test
driving the vehicle.
Allow the vehicle to shift through all four forward gears in
a manner which attempts to repeat the failure condition.
NOTE: When the trouble has not been repaired and thetrouble code cannot be erased, check the vehicle again.
DTC Information
When “DTC Information" is selected, an “Application
Menu" appears with a list of DTC information function
keys addressing DTC specifics and their origins.
Function key selections may vary for particular vehicle
and/or system.
Data Display
The purpose of the “Data Display" mode is to
continuously monitor data parameters.
The current actual values of all impor tant sensors and
signals in the system are display through F1 mode.
When “Data Display" is selected an “Application Menu"
appears.
See “TRANSMISSION DATA" and “TCC DATA” on next
page.
Snapshot
When “Snapshot" is selected an “Application Menu"
appears.
When “Transmission Snapshot" application is selected
from the “Application Menu", a “Snapshot Menu"
appears, displaying several options. “Snapshot" options
may vary from one system to another.
“Snapshot" allows a recording of all vehicle parameters.
There parameters may then be replayed at a future
point in time.
This action allows you to focus on making the condition
occur, rather than trying to view all of the data in
anticipation of the fault. The snapshot will collect
parameter information around a trigger point that you
select.
When a snapshot is taken. It is recorded onto the
PCMCIA memory card. When the Tech2 is powered
down. Snapshots are not lost.
Actuator Tests
The purpose of “Actuator Tests" mode is to check for
correct operation of electronic system actuators.
Lamps
You can operate the lamps by pressing the ON and OFF
buttons.
Preconditions: P or N position
Solenoid
Solenoid S1(1-2/3-4), S2(2-3) and TCC Solenoid
(Torque Converter Clutch)
You can operate the solenoids by pressing the ON and
OFF buttons.
Preconditions: P or N position, no vehicle speed, no
engine speed
Pressure Control Solenoid (PCS)
You can operate the PC Solenoid by pressing the ON
and OFF buttons. ON will command a maximum current
of 1000 mA and OFF a minimum of 200 mA.
Preconditions: P or N position, no vehicle speed, engine
running F0: Diagnostic Trouble Codes
F0: Read DTC Info Ordered By Priority
F1: Clear DTC Information
F2: DTC Information
F0: History
F1: MIL SVS or Message Requested
F2: Last Test Failed
F3: Test Failed Since Code Cleared
F4: Not Ran Since Code Cleared
F5: Failed This Ignition
F1: Data Display
F0: Transmission Data
F1: TCC Data
F2: Snapshot
F3: Actuator Tests
F0: Lamps
F0: Check Light Test
F1: Power Lamp Test
F2: Winter Lamp Test
F3: AT Oil Temperature Lamp Test
F1: Solenoids
F0: Solenoid 2-3 Test
F1: Solenoid 1-2/3-4 Test
F2: TCC Solenoid Test
F3: Pressure Control Solenoid (PCS)
Page 5802 of 6000

AUTOMATIC TRANSMISSION (AW30-40LE) 7A–21
TRANSMISSION DATA
Item Unit Enigne running at idle
Current Gear1
Lock Up Inactive, Active Inactive
Selector PositionPar k
AT Output Speed (Automatic Transmission) RPM 0 RPM
Output Speed (Meter Signal Side) RPM 0 RPM
AT Input Speed (Automatic Transmission) RPM 0 RPM
Engine Speed RPM 695
745 RPM
Vehicle Speed (Output Side) km/h 0 km/h
Throttle Position % 0 %
Throttle Position Sensor V 0.25
0.45V
AT Oil Temperature (Automatic Transmission)
C, F70 80C (158 176F)
Shift Pattern
Desired PCS Pressure (Pressure Control Solenoid) kPa
PCS Desired Current (Pressure Control Solenoid) mA
PCS Actual Current (Pressure Control Solenoid) mA
Overdrive Off Switch Off, On
Brake Switch Open 0V, Closed 12V Closed 12V
Winter Switch Open, Closed 0V Open
Power Switch Open, Closed 0V Open
Diagnostic Request Open, Closed Open
Winter Lamp Inactive 12V, Active 0V Inactive 12V
Power Lamp Inactive 12V, Active 0V Inactive 12V
Check Light Inactive 12V, Active 0V Inactive 12V
AT Oil Temperature Lamp (Automatic Transmission) Inactive 12V, Active 0V Inactive 12V
Solenoid 2-3 Inactive 0V, Active 12V Inactive 0V
Solenoid 1-2/3-4 Inactive 0V, Active 12V Active 12V
TCC Solenoid (Torque Conver ter Clutch) Inactive 0V, Active 12V Inactive 0V
Page 5804 of 6000

AUTOMATIC TRANSMISSION (AW30-40LE) 7A–23
INTERMITTENT CONDITIONS
If the Tech2 displays a code as intermittent, or if after a
test drive a code does not reappear, the problem is most
likely a faulty electrical connection or loose wiring.
Terminals should always be the prime suspect.
Intermittent rarely occur in sophisticated electronic
components such as the Transmission Control Module
(TCM).
When an intermittent problem is encountered, check
suspect circuits for:
• Poor terminal to wire connection.
• Terminals not fully seated in the connector body
(backed out).
• Improperly formed or damaged terminals.
• Loose, dirty, or corroded ground connections.
HINT: Any time you have an intermittent in more than
one circuit, check whether the circuits share a
common ground connection.
• Pinched or damaged wires.
• Electro-Magnetic Interference (EMI)
HINT: Check that all wires are properly routed away
from spark plug wires, distributor wires, coil,
and generator. Also check for improperly
installed electrical options, such as lights, 2-
way radios, etc.
Use the F2: SNAPSHOT mode of the Tech2 to help
isolate the cause of an intermittent fault. The snapshot
mode will record information before and after the
problem occurs. Set the snapshot to "trigger" on the
suspect code (or codes) or, if you notice the repor ted
symptom during test drive, trigger the snapshot
manually.
After the snapshot has been triggered, command the
Tech2 to play back the flow of data recorded from each
of the various sensors. Signs of an intermittent fault in a
sensor circuit are a sudden unexplainable jump in data
values out of the normal range.
Page 5858 of 6000

AUTOMATIC TRANSMISSION (AW30-40LE) 7A–77
310RW020
F07RY00017
F07RY00018
BRAKE SIGNAL INSPECTION
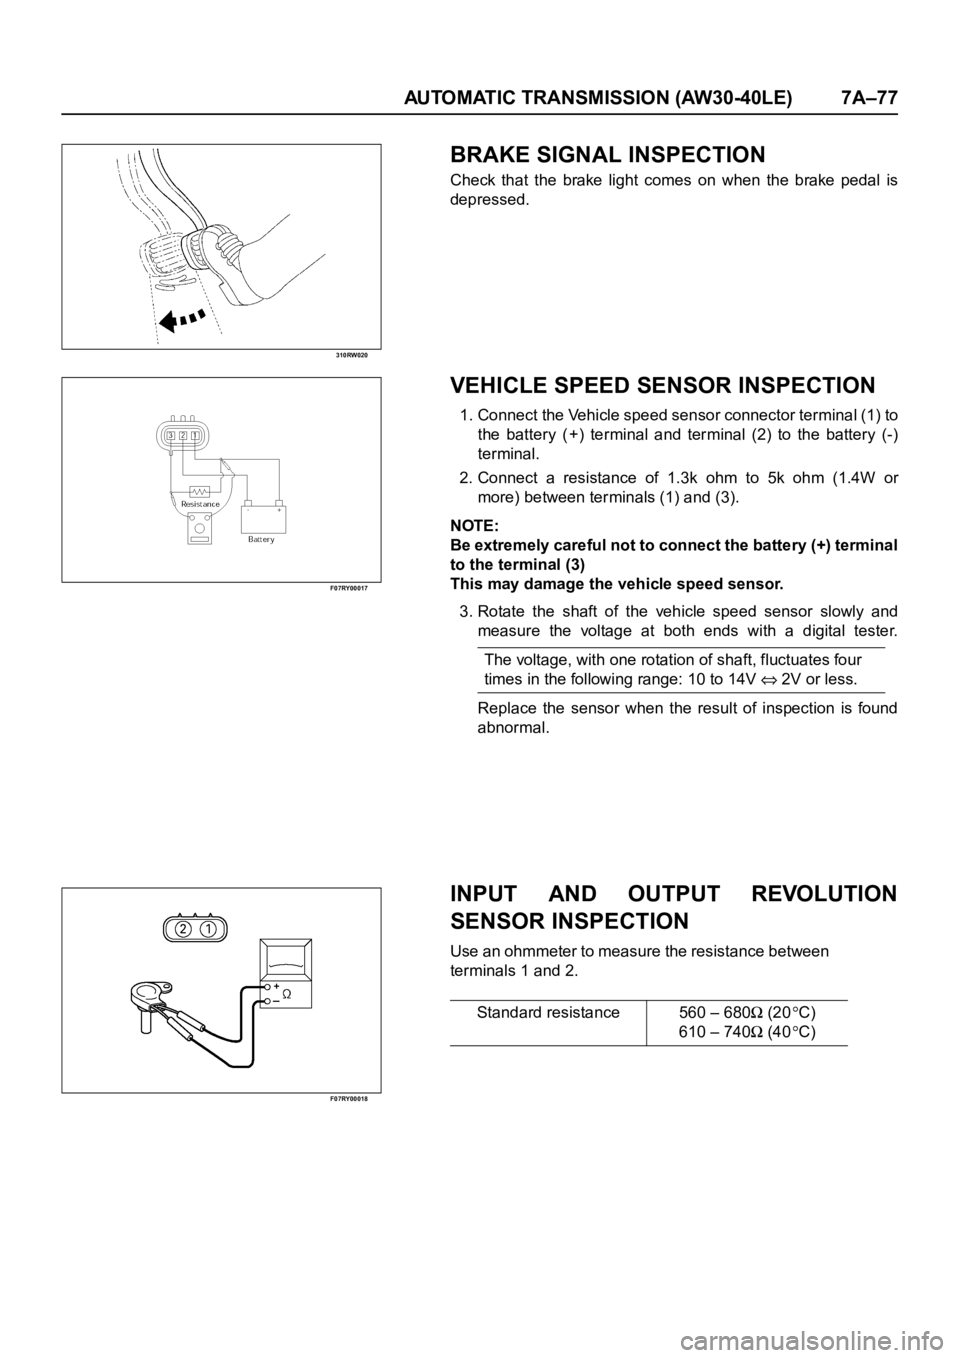
Check that the brake light comes on when the brake pedal is
depressed.
VEHICLE SPEED SENSOR INSPECTION
1. Connect the Vehicle speed sensor connector terminal (1) to
the battery ( +) terminal and terminal (2) to the battery (-)
terminal.
2. Connect a resistance of 1.3k ohm to 5k ohm (1.4W or
more) between terminals (1) and (3).
NOTE:
Be extremely careful not to connect the battery (+) terminal
to the terminal (3)
This may damage the vehicle speed sensor.
3. Rotate the shaft of the vehicle speed sensor slowly and
measure the voltage at both ends with a digital tester.
Replace the sensor when the result of inspection is found
abnormal.
INPUT AND OUTPUT REVOLUTION
SENSOR INSPECTION
Use an ohmmeter to measure the resistance between
terminals 1 and 2.The voltage, with one rotation of shaft, fluctuates four
times in the following range: 10 to 14V
2V or less.
Standard resistance 560 – 680
(20C)
610 – 740
(40C)