1998 OPEL FRONTERA horn
[x] Cancel search: hornPage 2994 of 6000

WIRING SYSTEM 8D–401
STEP OPERATION ITEM TO BE CHECKEDITEM OF
REMARKS
MALFUNCTION
Be sure to lock door
with locking knob.
Activate alarm
device.
All doors are
unlocked.
With key set at unlock
position, check to see
if alarm stops.
All doors are
locked.
Activate alarm
device.
Activate alarm
device.
Only left rear door
is unlocked. Check to see if engine hood,
tailgate and doors are closed and
locked.
Check to see if indicator light
remains lit off.
Check to see if indicator light
flashes.
Check to see if dome light and
courtesy light illuminate.
Check to see if indicator light
changes from flashing to steadily
on.
Check to see if indicator light
turns off in about 10 seconds.
Check to see if alarm operates
(with headlight flashing, and horn
blaring intermittently.)
Check to see if alarm stops.
Check to see if indicator light
turns on.
Check to see if indicator light
goes off after about 10 seconds.
Check to see if alarm does not
operate.
Check to see if indicator light
turns on.
Check to see if indicator light
goes off after about 10 seconds.
Check to see if alarm starts. Turn starter key to “ON” position.
Open windows fully.
Pull out starter key after turning it
back to “OFF” position.
Unlock left front door with locking
knob.
Open left front door. (And get out
of the vehicle.)
Close left front door.
Lock left front door.
Wait about 10 seconds
Unlock left front door with locking
knob.
Insert key into key cylinder of left
front door and turn it in unlock
direction.
Lock left front door.
Wait for about 10 seconds.
Unlock left front door with key.
Lock left front door with key.
Wait for about 10 seconds.
Unlock left rear door with locking
knob.K
A
B
C
D
E
B
C
F
B
C
D 1
2
3
4
5
6
7
8
9
10
11
12
13
14
15
16
Page 2998 of 6000

WIRING SYSTEM 8D–405
TERMINAL
CONNECTIONCHECK
OPERATIONCIRCUIT
NO. ITEM CONDITION
1 FRT door switch–LH, RH ContinuityOpen door Continuity
Close door No continuity
2 RR door switch–LH, RH ContinuityOpen door Continuity
Close door No continuity
3— — – –
4 Door lock key switch–LH, RH Continuity Lock with key Continuity
5 FRT door lock switch–LH, RH Continuity Lock Continuity
6 Tailgate switch ContinuityOpen tailgate Continuity
Close tailgate No continuity
8 Anti–theft horn Voltage – Approx. 12V
10 Battery Voltage – Approx. 12V
11 Door switch ContinuityUnlock with locking knob Continuity
Lock with locking knob No continuity
12 Engine hood switch ContinuityOpen engine hood Continuity
Close engine hood No continuity
13 Detect switch ContinuityUnlock with key Continuity
Lock with key No continuity
14 Door lock key switch Continuity Unlock Continuity
15 FRT door lock switch–LH, RH Continuity Unlock Continuity
16 Tamper switch Continuity – No continuity
17 Ground Continuity – Continuity
18 Starter switch Voltage Starter switch “ACC” Approx. 12V
19 Indicator light Voltage – Approx. 12V
20 Dome light Voltage Dome light “DOOR” position Approx. 12V
21 Anti-theft relay Voltage – Approx. 12V
22 Starter relay VoltageMode switch “P” or “N” Approx. 12V
Clutch pedal depressed Approx. 12V
Check the anti–theft & keyless entry control unit harness side connector B–20 by using a circuit tester.
Page 3001 of 6000

8D–408 WIRING SYSTEM
Step Action Yes No
The control unit makes lock/unlock response once with interval of
one second.
Is the response complete?
The control unit makes lock/unlock response three times with
interval of one second.
Is the response complete? 12
13Finished
Finished—
—
Step Action Yes No
1. Open the driver’s side door.
2. Turn the starter switch off.
Is the action complete?
Turn the starter switch to ACC position and then off three times
within five seconds after step 1.
Is the action complete within five seconds?
Close the door and then open it two times within ten seconds after
step 2.
Is the action complete within ten seconds?
1. Turn the starter switch to ACC position and then off.
2. Close the door and then open it.
NOTE: This step must be performed within ten seconds after step
3.
Is the action complete?
The control unit makes lock/unlock response twice as many the
number of registered ID code with interval of two seconds. (In case
of no registered code, the response is made ten times.)
Is the response complete? 1
2
3
4
5Go to Step 2
Go to Step 3
Go to Step 4
Go to Step 5
Finished—
Finished
Finished
Finished
—
This procedure checks how many kinds of ID code are
registered.
Step Action Yes No
Open the driver’s side door.
Is the action complete?
Lock the door and then unlock it three times within ten seconds
after step 1.
Is the action complete within five seconds?
Close the door and then open it two times within ten seconds after
step 2.
Is the action complete within ten seconds? 1
2
3Go to Step 2
Go to Step 3
Go to Step 4—
Finished
Finished Anti–theft horn, as an answer back function for the
transmitter operation, changes from available into
unavailing or from unavailing into available by this
procedure.
Page 3340 of 6000
SECURITY AND LOCKS8H–1
BODY AND ACCESSORIES
SECURITY AND LOCKS
CONTENTS
Service Precaution 8H–2. . . . . . . . . . . . . . . . . . . . . .
Front Door Lock Assembly 8H–2. . . . . . . . . . . . . . .
Front Door Lock Assembly and
Associated Parts 8H–2. . . . . . . . . . . . . . . . . . . . . .
Removal 8H–2. . . . . . . . . . . . . . . . . . . . . . . . . . . . .
Installation 8H–3. . . . . . . . . . . . . . . . . . . . . . . . . . . .
Front Outside Handle and Door Lock Cylinder 8H–4
Front Outside Handle, Door Lock Cylinder
and Associated Parts 8H–4. . . . . . . . . . . . . . . . . .
Removal 8H–4. . . . . . . . . . . . . . . . . . . . . . . . . . . . .
Installation 8H–5. . . . . . . . . . . . . . . . . . . . . . . . . . . .
Rear Door Lock Assembly 8H–7. . . . . . . . . . . . . . . .
Rear Door Lock Assembly and Associated
Parts 8H–7. . . . . . . . . . . . . . . . . . . . . . . . . . . . . . . .
Removal 8H–7. . . . . . . . . . . . . . . . . . . . . . . . . . . . .
Installation 8H–8. . . . . . . . . . . . . . . . . . . . . . . . . . . .
Rear Outside Handle 8H–9. . . . . . . . . . . . . . . . . . . .
Rear Outside Handle and Associated Parts 8H–9
Removal 8H–9. . . . . . . . . . . . . . . . . . . . . . . . . . . . .
Installation 8H–10. . . . . . . . . . . . . . . . . . . . . . . . . . . .
Rear Door Inside Lock Knob Link 8H–10. . . . . . . . . .
Removal 8H–10. . . . . . . . . . . . . . . . . . . . . . . . . . . . .
Installation 8H–10. . . . . . . . . . . . . . . . . . . . . . . . . . . .
Door Inside Lock Knob 8H–11. . . . . . . . . . . . . . . . . . .
Removal 8H–11. . . . . . . . . . . . . . . . . . . . . . . . . . . . .
Installation 8H–11. . . . . . . . . . . . . . . . . . . . . . . . . . . .
Door Inside Handle 8H–11. . . . . . . . . . . . . . . . . . . . . .
Removal and Installation 8H–11. . . . . . . . . . . . . . .
Tailgate Lock Assembly (LH) 8H–12. . . . . . . . . . . . . .
Tailgate Lock Assembly (LH) and
Associated Parts 8H–12. . . . . . . . . . . . . . . . . . . . . .
Removal 8H–12. . . . . . . . . . . . . . . . . . . . . . . . . . . . .
Installation 8H–13. . . . . . . . . . . . . . . . . . . . . . . . . . . .
Tailgate Lock Assembly (RH) 8H–14. . . . . . . . . . . . .
Tailgate Lock Assembly (RH) and
Associated Parts 8H–14. . . . . . . . . . . . . . . . . . . . . .
Removal 8H–14. . . . . . . . . . . . . . . . . . . . . . . . . . . . .
Installation 8H–15. . . . . . . . . . . . . . . . . . . . . . . . . . . .
Tailgate Inside Lock Knob 8H–15. . . . . . . . . . . . . . . .
Removal 8H–15. . . . . . . . . . . . . . . . . . . . . . . . . . . . . Installation 8H–15. . . . . . . . . . . . . . . . . . . . . . . . . . . .
Tailgate Inside Handle 8H–16. . . . . . . . . . . . . . . . . . .
Parts Location 8H–16. . . . . . . . . . . . . . . . . . . . . . . .
Removal and Installation 8H–16. . . . . . . . . . . . . . .
Tailgate Outside Handle and/or Tailgate
Lock Cylinder 8H–17. . . . . . . . . . . . . . . . . . . . . . . . . .
Tailgate Outside Handle and/or Tailgate
Lock Cylinder and Associated Parts 8H–17. . . . .
Removal 8H–17. . . . . . . . . . . . . . . . . . . . . . . . . . . . .
Installation 8H–18. . . . . . . . . . . . . . . . . . . . . . . . . . . .
Key 8H–19. . . . . . . . . . . . . . . . . . . . . . . . . . . . . . . . . . . .
Key Coding 8H–19. . . . . . . . . . . . . . . . . . . . . . . . . . .
Key Styles 8H–19. . . . . . . . . . . . . . . . . . . . . . . . . . . . . .
Power Door Lock System 8H–20. . . . . . . . . . . . . . . .
General Description 8H–20
. . . . . . . . . . . . . . . . . . . . . .
Front Door Lock Actuator Removal 8H–20. . . . . .
Front Door Lock Actuator Installation 8H–20. . . . .
Rear Door Lock Actuator Removal 8H–20. . . . . . .
Rear Door Lock Actuator Installation 8H–21. . . . .
Tailgate Lock Actuator Removal 8H–21. . . . . . . . .
Tailgate Lock Actuator Installation 8H–21. . . . . . .
Anti-theft System 8H–22. . . . . . . . . . . . . . . . . . . . . . . .
General Description 8H–22. . . . . . . . . . . . . . . . . . . . . .
Anti-theft & Keyless Entry Control Unit
Removal 8H–22. . . . . . . . . . . . . . . . . . . . . . . . . . . . .
Anti-theft & Keyless Entry Control Unit
Installation 8H–22. . . . . . . . . . . . . . . . . . . . . . . . . . .
Anti-theft Indicator Removal 8H–22. . . . . . . . . . . . .
Anti-theft Indicator Installation 8H–23. . . . . . . . . . .
Anti-theft Horn Removal 8H–23. . . . . . . . . . . . . . . .
Anti-Theft Horn Installation 8H–23. . . . . . . . . . . . . .
Engine Hood Switch Removal 8H–23. . . . . . . . . . .
Engine Hood Switch Installation 8H–23. . . . . . . . .
Keyless Entry System 8H–24. . . . . . . . . . . . . . . . . . . .
ID Code Registration 8H–24. . . . . . . . . . . . . . . . . . .
Answer Back (Anti–theft Horn Operation)
Change Mode 8H–26. . . . . . . . . . . . . . . . . . . . . . . .
Anti–theft & Keyless Entry Control
Unit/Transmitter Replacement 8H–27. . . . . . . . . .
Main Data and Specifications 8H–28. . . . . . . . . . . . .
Page 3361 of 6000
8H–22SECURITY AND LOCKS
Anti-theft System
General Description
The circuit consists of the starter switch, anti-theft &
keyless entry control unit, anti-theft horn, front door and
tailgate key switch (detect and tamper switch), door lock
(& power window) switch, door lock actuator for each
door, engine hood switch, clutch start switch (M/T),
ANTI-THEFT indicator light and mode switch (A/T).
The system operates as follows: After locking the starter
switch and removing the starter key (this sets the alarm),
if the door is unlocked in any way other than with the
proper key, the headlights start flashing, the horn sounds,
and the starter circuit is disabled. (However, the engine
hood and all the doors must be locked and closed.)
Once the system has been placed in the warning or alarm
condition, it can be released only when the starter switch
is shifted from “OFF” to “ACC” by the starter key, or when
the lock of the front door or the tailgate is released (to
activate the detect switch) by the starter key.
Anti-theft & Keyless Entry Control
Unit Removal
1. Disconnect the battery ground cable.
2. Remove the front console assembly.
Refer to the Instrument Panel Assembly in Body
Structure section.
3. Remove the lower cluster assembly.
Refer to the Instrument Panel Assembly in Body
Structure section.
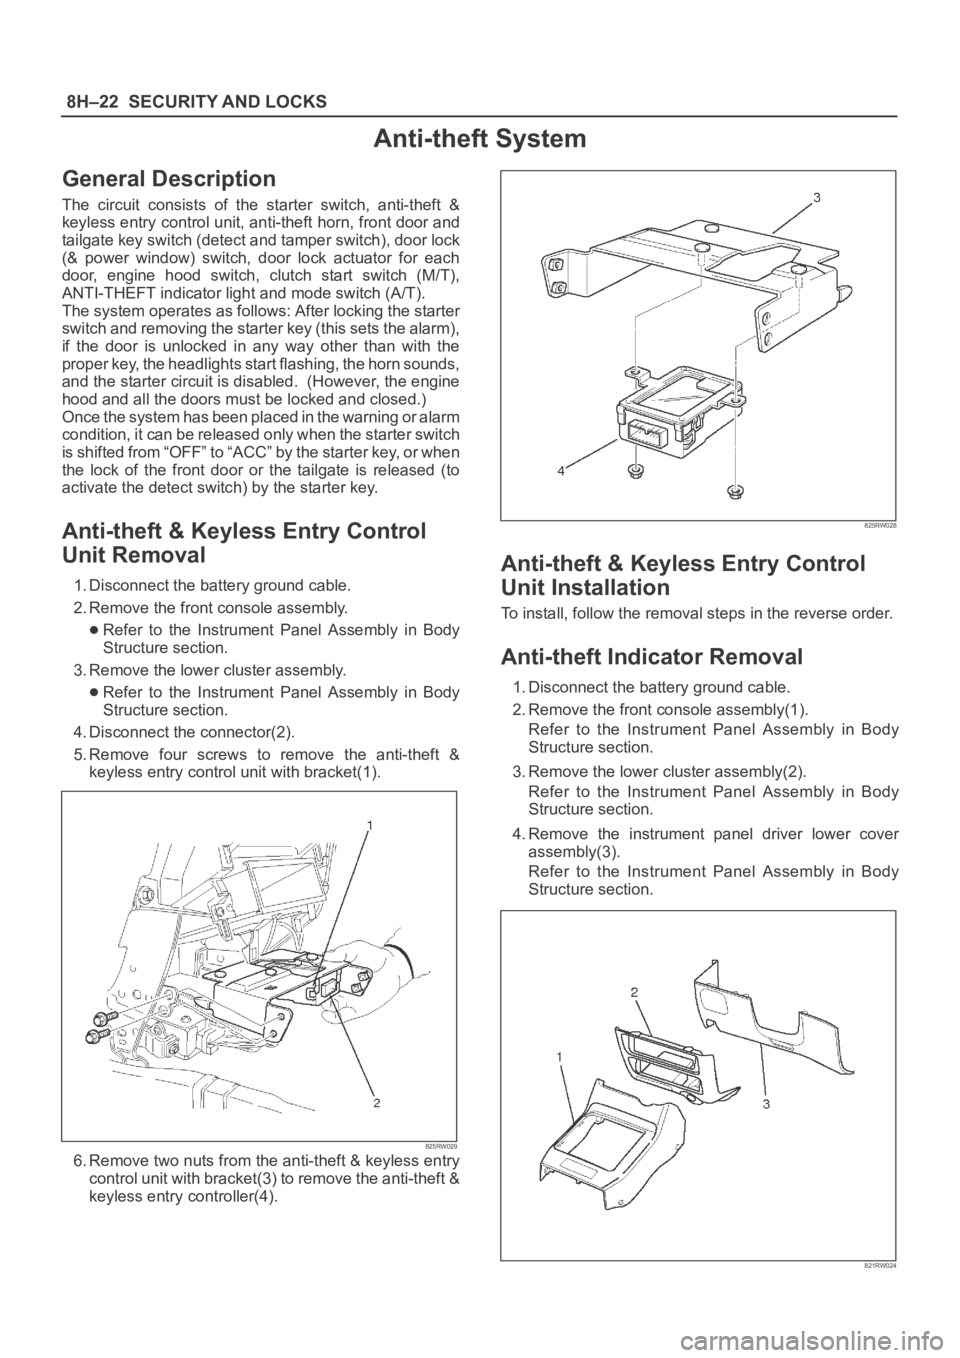
4. Disconnect the connector(2).
5. Remove four screws to remove the anti-theft &
keyless entry control unit with bracket(1).
825RW029
6. Remove two nuts from the anti-theft & keyless entry
control unit with bracket(3) to remove the anti-theft &
keyless entry controller(4).
825RW028
Anti-theft & Keyless Entry Control
Unit Installation
To install, follow the removal steps in the reverse order.
Anti-theft Indicator Removal
1. Disconnect the battery ground cable.
2. Remove the front console assembly(1).
Refer to the Instrument Panel Assembly in Body
Structure section.
3. Remove the lower cluster assembly(2).
Refer to the Instrument Panel Assembly in Body
Structure section.
4. Remove the instrument panel driver lower cover
assembly(3).
Refer to the Instrument Panel Assembly in Body
Structure section.
821RW024
Page 3362 of 6000
SECURITY AND LOCKS8H–23
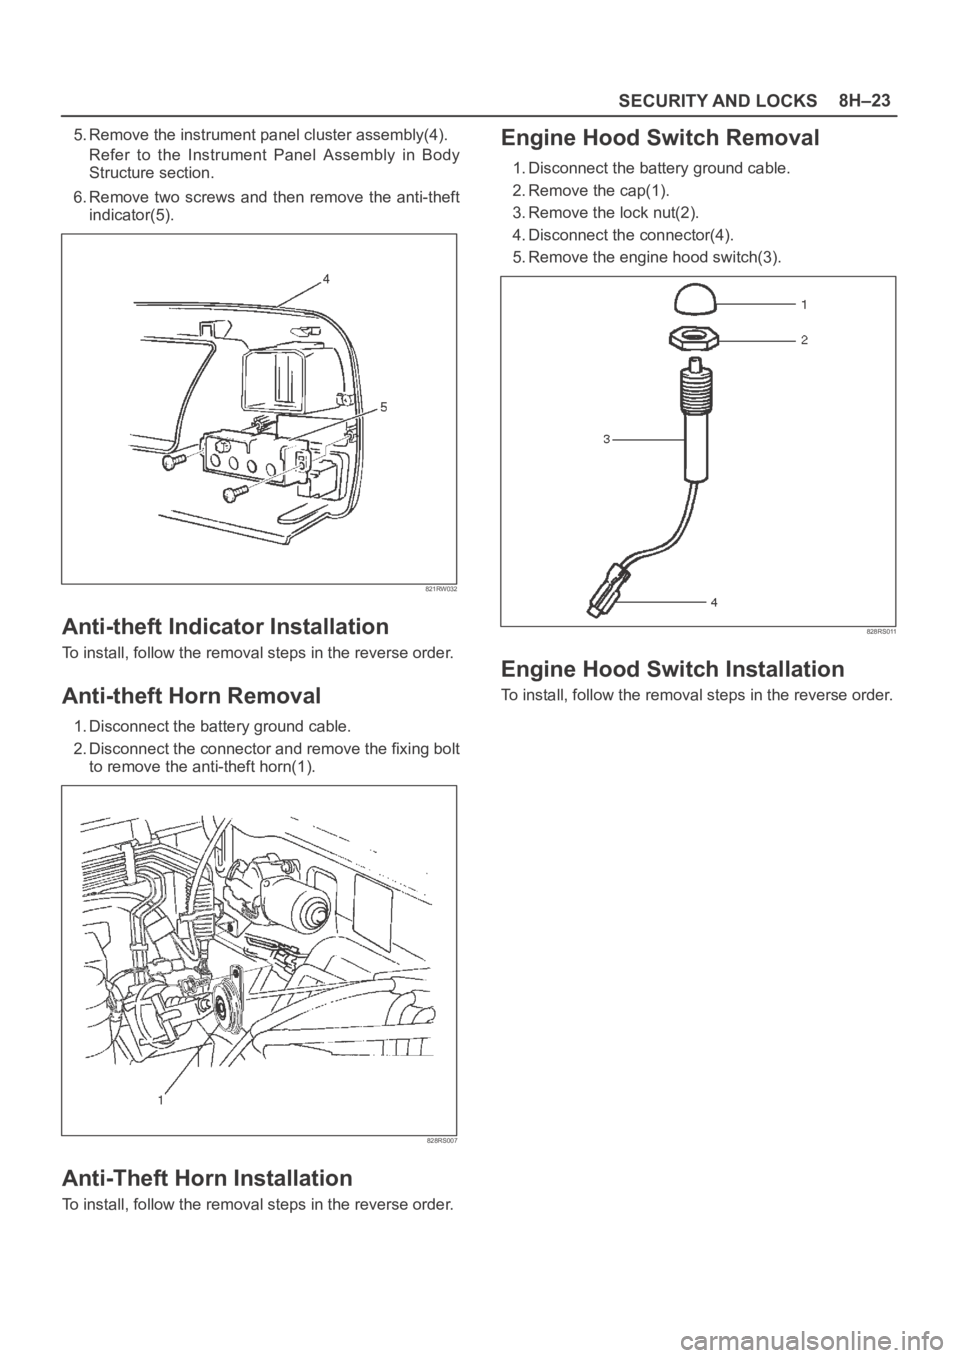
5. Remove the instrument panel cluster assembly(4).
Refer to the Instrument Panel Assembly in Body
Structure section.
6. Remove two screws and then remove the anti-theft
indicator(5).
821RW032
Anti-theft Indicator Installation
To install, follow the removal steps in the reverse order.
Anti-theft Horn Removal
1. Disconnect the battery ground cable.
2. Disconnect the connector and remove the fixing bolt
to remove the anti-theft horn(1).
828RS007
Anti-Theft Horn Installation
To install, follow the removal steps in the reverse order.
Engine Hood Switch Removal
1. Disconnect the battery ground cable.
2. Remove the cap(1).
3. Remove the lock nut(2).
4. Disconnect the connector(4).
5. Remove the engine hood switch(3).
828RS011
Engine Hood Switch Installation
To install, follow the removal steps in the reverse order.
Page 3365 of 6000
8H–26SECURITY AND LOCKS
StepNo Ye s Action
12The control unit makes lock/unlock response once with interval of
one second.
Is the response complete?
Finished—
13The control unit makes lock/unlock response three times with
interval of one second.
Is the response complete?
Finished—
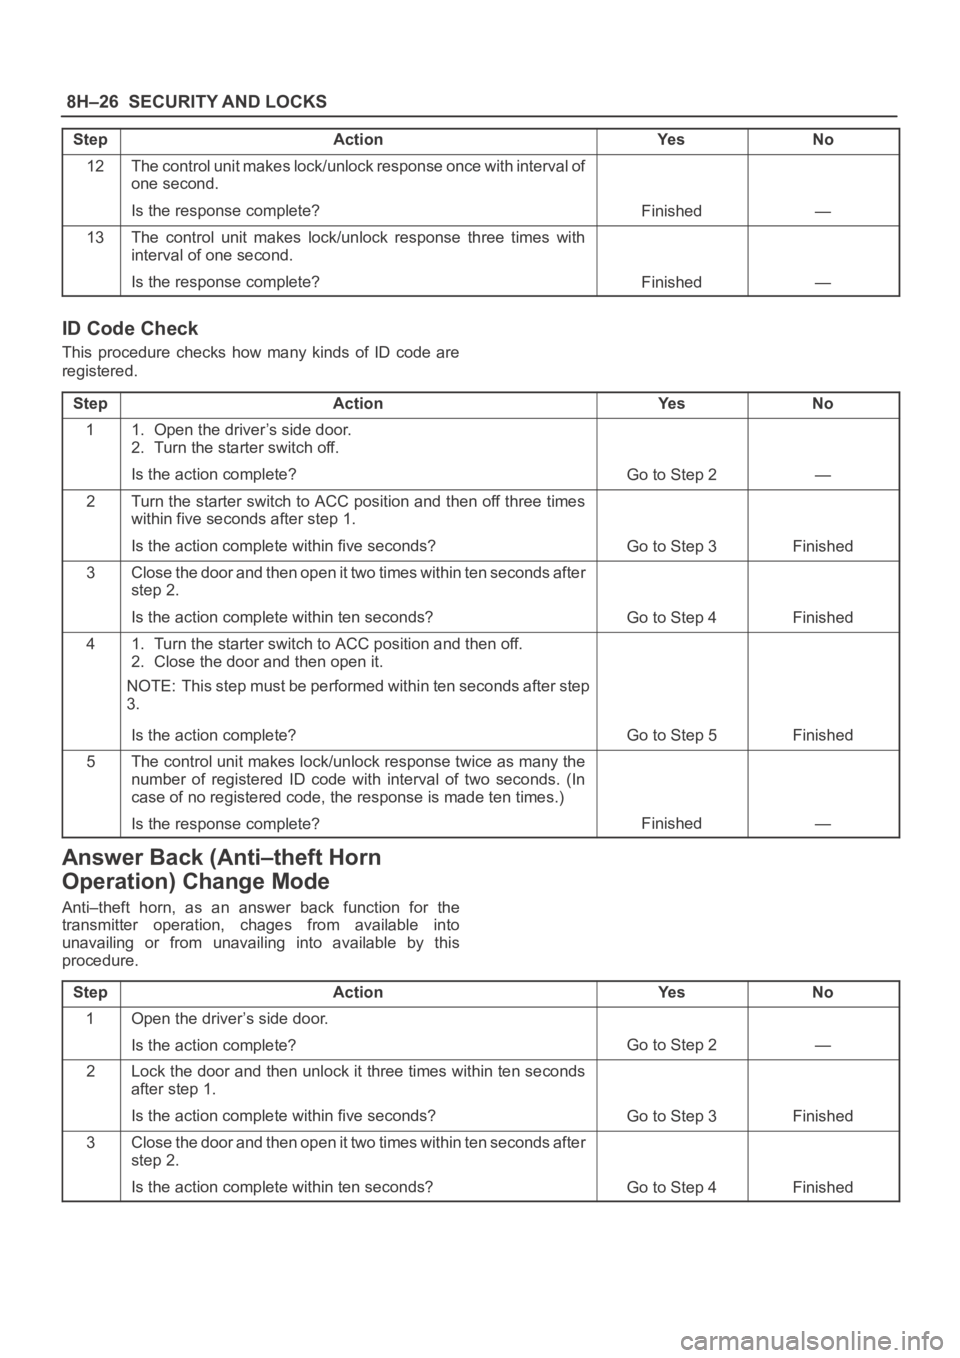
ID Code Check
This procedure checks how many kinds of ID code are
registered.
Step
ActionYe sNo
11. Open the driver’s side door.
2. Turn the starter switch off.
Is the action complete?
Go to Step 2—
2Turn the starter switch to ACC position and then off three times
within five seconds after step 1.
Is the action complete within five seconds?
Go to Step 3Finished
3Close the door and then open it two times within ten seconds after
step 2.
Is the action complete within ten seconds?
Go to Step 4Finished
41. Turn the starter switch to ACC position and then off.
2. Close the door and then open it.
NOTE: This step must be performed within ten seconds after step
3.
Is the action complete?
Go to Step 5Finished
5The control unit makes lock/unlock response twice as many the
number of registered ID code with interval of two seconds. (In
case of no registered code, the response is made ten times.)
Is the response complete?
Finished—
Answer Back (Anti–theft Horn
Operation) Change Mode
Anti–theft horn, as an answer back function for the
transmitter operation, chages from available into
unavailing or from unavailing into available by this
procedure.
Step
ActionYe sNo
1Open the driver’s side door.
Is the action complete?
Go to Step 2—
2Lock the door and then unlock it three times within ten seconds
after step 1.
Is the action complete within five seconds?
Go to Step 3Finished
3Close the door and then open it two times within ten seconds after
step 2.
Is the action complete within ten seconds?
Go to Step 4Finished
Page 3438 of 6000
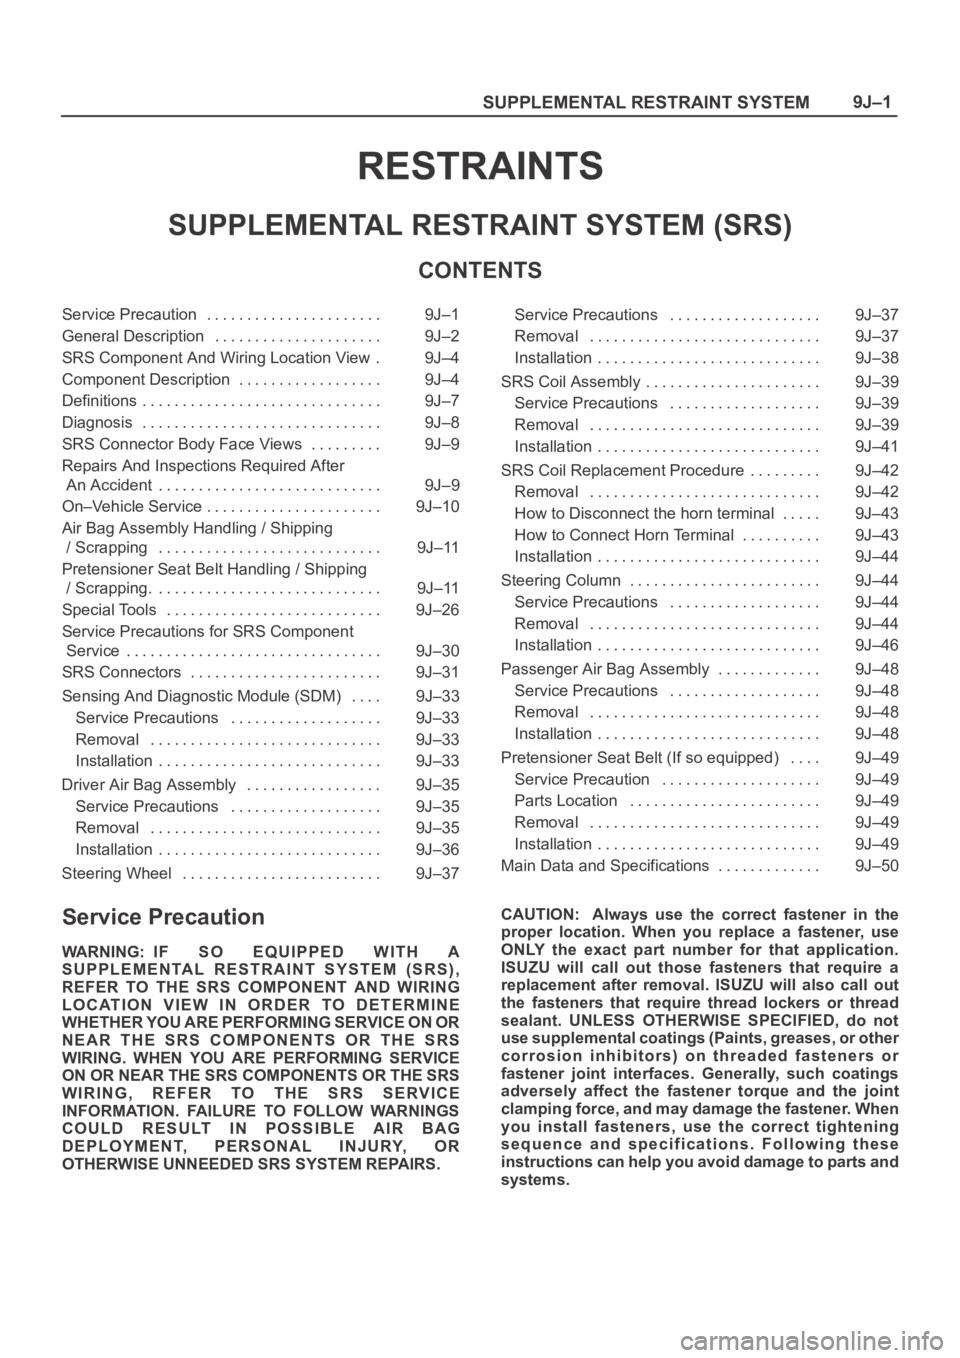
SUPPLEMENTAL RESTRAINT SYSTEM9J–1
RESTRAINTS
SUPPLEMENTAL RESTRAINT SYSTEM (SRS)
CONTENTS
Service Precaution 9J–1. . . . . . . . . . . . . . . . . . . . . .
General Description 9J–2. . . . . . . . . . . . . . . . . . . . .
SRS Component And Wiring Location View 9J–4.
Component Description 9J–4. . . . . . . . . . . . . . . . . .
Definitions 9J–7. . . . . . . . . . . . . . . . . . . . . . . . . . . . . .
Diagnosis 9J–8. . . . . . . . . . . . . . . . . . . . . . . . . . . . . .
SRS Connector Body Face Views 9J–9. . . . . . . . .
Repairs And Inspections Required After
An Accident 9J–9. . . . . . . . . . . . . . . . . . . . . . . . . . . .
On–Vehicle Service 9J–10. . . . . . . . . . . . . . . . . . . . . .
Air Bag Assembly Handling / Shipping
/ Scrapping 9J–11. . . . . . . . . . . . . . . . . . . . . . . . . . . .
Pretensioner Seat Belt Handling / Shipping
/ Scrapping. 9J–11. . . . . . . . . . . . . . . . . . . . . . . . . . . .
Special Tools 9J–26. . . . . . . . . . . . . . . . . . . . . . . . . . .
Service Precautions for SRS Component
Service 9J–30. . . . . . . . . . . . . . . . . . . . . . . . . . . . . . . .
SRS Connectors 9J–31. . . . . . . . . . . . . . . . . . . . . . . .
Sensing And Diagnostic Module (SDM) 9J–33. . . .
Service Precautions 9J–33. . . . . . . . . . . . . . . . . . .
Removal 9J–33. . . . . . . . . . . . . . . . . . . . . . . . . . . . .
Installation 9J–33. . . . . . . . . . . . . . . . . . . . . . . . . . . .
Driver Air Bag Assembly 9J–35. . . . . . . . . . . . . . . . .
Service Precautions 9J–35. . . . . . . . . . . . . . . . . . .
Removal 9J–35. . . . . . . . . . . . . . . . . . . . . . . . . . . . .
Installation 9J–36. . . . . . . . . . . . . . . . . . . . . . . . . . . .
Steering Wheel 9J–37. . . . . . . . . . . . . . . . . . . . . . . . . Service Precautions 9J–37. . . . . . . . . . . . . . . . . . .
Removal 9J–37. . . . . . . . . . . . . . . . . . . . . . . . . . . . .
Installation 9J–38. . . . . . . . . . . . . . . . . . . . . . . . . . . .
SRS Coil Assembly 9J–39. . . . . . . . . . . . . . . . . . . . . .
Service Precautions 9J–39. . . . . . . . . . . . . . . . . . .
Removal 9J–39. . . . . . . . . . . . . . . . . . . . . . . . . . . . .
Installation 9J–41. . . . . . . . . . . . . . . . . . . . . . . . . . . .
SRS Coil Replacement Procedure 9J–42. . . . . . . . .
Removal 9J–42. . . . . . . . . . . . . . . . . . . . . . . . . . . . .
How to Disconnect the horn terminal 9J–43. . . . .
How to Connect Horn Terminal 9J–43. . . . . . . . . .
Installation 9J–44. . . . . . . . . . . . . . . . . . . . . . . . . . . .
Steering Column 9J–44. . . . . . . . . . . . . . . . . . . . . . . .
Service Precautions 9J–44. . . . . . . . . . . . . . . . . . .
Removal 9J–44. . . . . . . . . . . . . . . . . . . . . . . . . . . . .
Installation 9J–46. . . . . . . . . . . . . . . . . . . . . . . . . . . .
Passenger Air Bag Assembly 9J–48. . . . . . . . . . . . .
Service Precautions 9J–48. . . . . . . . . . . . . . . . . . .
Removal 9J–48. . . . . . . . . . . . . . . . . . . . . . . . . . . . .
Installation 9J–48. . . . . . . . . . . . . . . . . . . . . . . . . . . .
Pretensioner Seat Belt (If so equipped) 9J–49. . . .
Service Precaution 9J–49. . . . . . . . . . . . . . . . . . . .
Parts Location 9J–49. . . . . . . . . . . . . . . . . . . . . . . .
Removal 9J–49. . . . . . . . . . . . . . . . . . . . . . . . . . . . .
Installation 9J–49. . . . . . . . . . . . . . . . . . . . . . . . . . . .
Main Data and Specifications 9J–50. . . . . . . . . . . . .
Service Precaution
WARNING: IF SO EQUIPPED WITH A
SUPPLEMENTAL RESTRAINT SYSTEM (SRS),
REFER TO THE SRS COMPONENT AND WIRING
LOCATION VIEW IN ORDER TO DETERMINE
WHETHER YOU ARE PERFORMING SERVICE ON OR
NEAR THE SRS COMPONENTS OR THE SRS
WIRING. WHEN YOU ARE PERFORMING SERVICE
ON OR NEAR THE SRS COMPONENTS OR THE SRS
WIRING, REFER TO THE SRS SERVICE
INFORMATION. FAILURE TO FOLLOW WARNINGS
COULD RESULT IN POSSIBLE AIR BAG
DEPLOYMENT, PERSONAL INJURY, OR
OTHERWISE UNNEEDED SRS SYSTEM REPAIRS.CAUTION: Always use the correct fastener in the
proper location. When you replace a fastener, use
ONLY the exact part number for that application.
ISUZU will call out those fasteners that require a
replacement after removal. ISUZU will also call out
the fasteners that require thread lockers or thread
sealant. UNLESS OTHERWISE SPECIFIED, do not
use supplemental coatings (Paints, greases, or other
corrosion inhibitors) on threaded fasteners or
fastener joint interfaces. Generally, such coatings
adversely affect the fastener torque and the joint
clamping force, and may damage the fastener. When
you install fasteners, use the correct tightening
sequence and specifications. Following these
instructions can help you avoid damage to parts and
systems.