1998 OPEL FRONTERA sensor
[x] Cancel search: sensorPage 1285 of 6000
6E–168
ENGINE DRIVEABILITY AND EMISSIONS
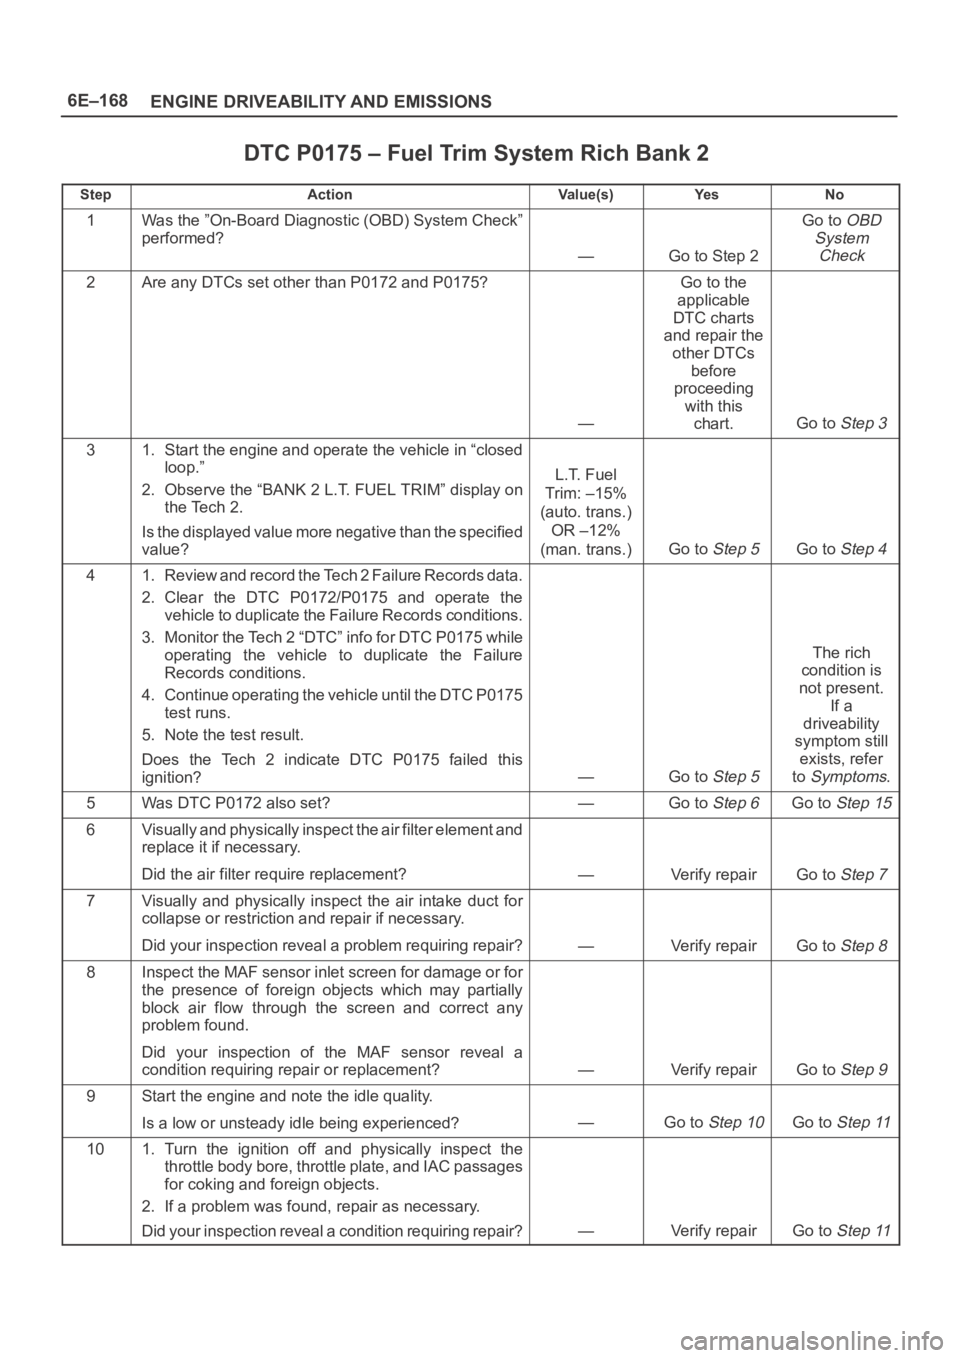
DTC P0175 – Fuel Trim System Rich Bank 2
StepActionVa l u e ( s )Ye sNo
1Was the ”On-Board Diagnostic (OBD) System Check”
performed?
—Go to Step 2
Go to OBD
System
Check
2Are any DTCs set other than P0172 and P0175?
—
Go to the
applicable
DTC charts
and repair the
other DTCs
before
proceeding
with this
chart.
Go to Step 3
31. Start the engine and operate the vehicle in “closed
loop.”
2. Observe the “BANK 2 L.T. FUEL TRIM” display on
the Tech 2.
Is the displayed value more negative than the specified
value?
L.T. Fuel
Trim: –15%
(auto. trans.)
OR –12%
(man. trans.)
Go to Step 5Go to Step 4
41. Review and record the Tech 2 Failure Records data.
2. Clear the DTC P0172/P0175 and operate the
vehicle to duplicate the Failure Records conditions.
3. Monitor the Tech 2 “DTC” info for DTC P0175 while
operating the vehicle to duplicate the Failure
Records conditions.
4. Continue operating the vehicle until the DTC P0175
test runs.
5. Note the test result.
Does the Tech 2 indicate DTC P0175 failed this
ignition?
—Go to Step 5
The rich
condition is
not present.
If a
driveability
symptom still
exists, refer
to
Symptoms.
5Was DTC P0172 also set?—Go to Step 6Go to Step 15
6V i s u a l l y a n d p h y s i c a l l y i n s p e c t t h e a i r f i l t e r e l e m e n t a n d
replace it if necessary.
Did the air filter require replacement?
—Verify repairGo to Step 7
7Visually and physically inspect the air intake duct for
collapse or restriction and repair if necessary.
Did your inspection reveal a problem requiring repair?
—Verify repairGo to Step 8
8Inspect the MAF sensor inlet screen for damage or for
the presence of foreign objects which may partially
block air flow through the screen and correct any
problem found.
Did your inspection of the MAF sensor reveal a
condition requiring repair or replacement?
—Verify repairGo to Step 9
9Start the engine and note the idle quality.
Is a low or unsteady idle being experienced?
—Go to Step 10Go to Step 11
101. Turn the ignition off and physically inspect the
throttle body bore, throttle plate, and IAC passages
for coking and foreign objects.
2. If a problem was found, repair as necessary.
Did your inspection reveal a condition requiring repair?
—Verify repairGo to Step 11
Page 1286 of 6000
6E–169 ENGINE DRIVEABILITY AND EMISSIONS
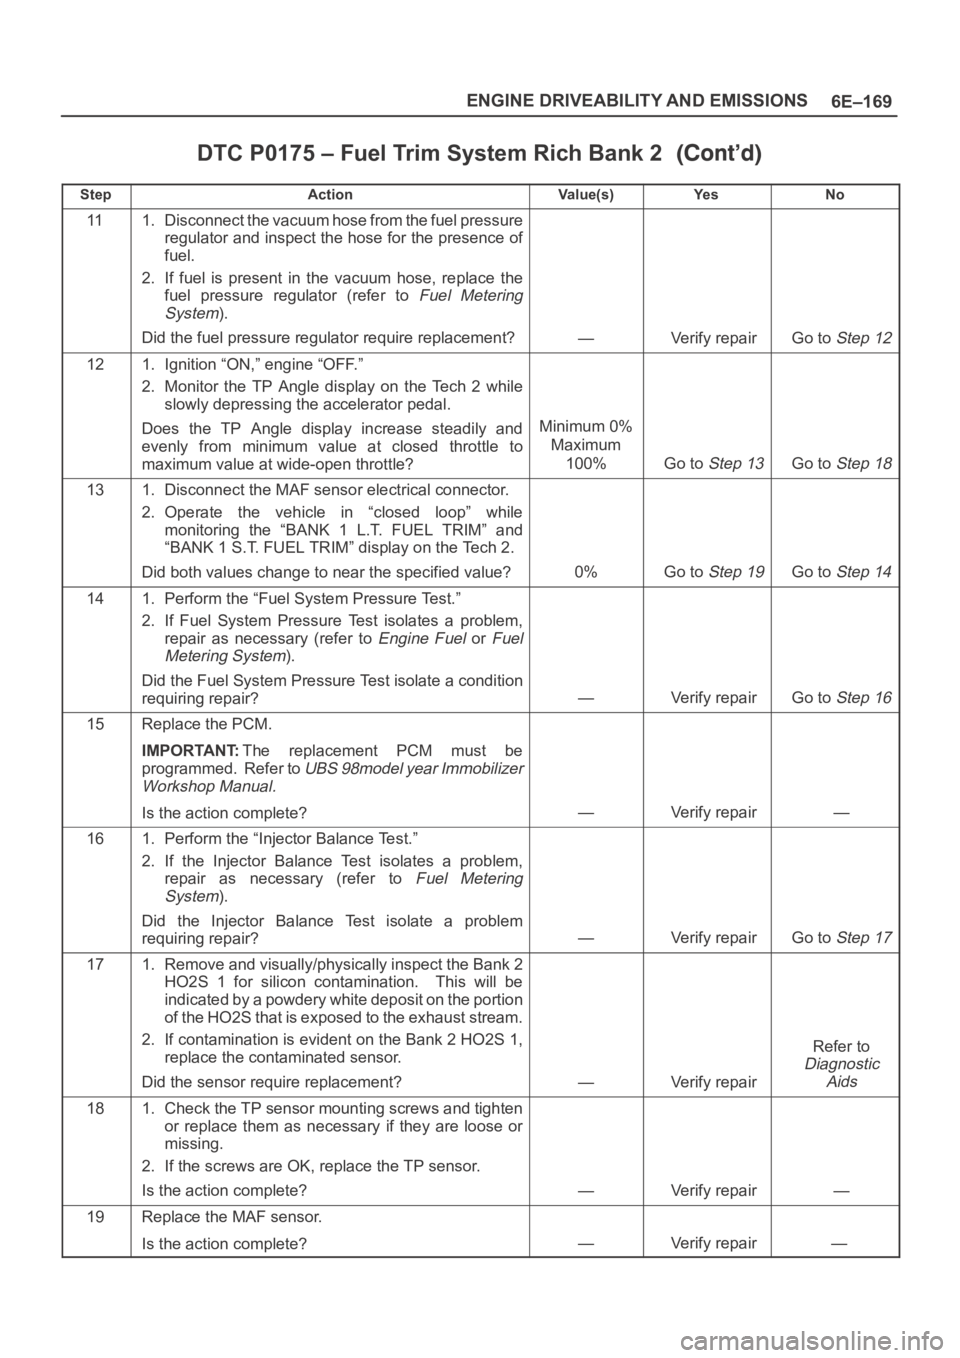
DTC P0175 – Fuel Trim System Rich Bank 2
StepNo Ye s Va l u e ( s ) Action
111. Disconnect the vacuum hose from the fuel pressure
regulator and inspect the hose for the presence of
fuel.
2. If fuel is present in the vacuum hose, replace the
fuel pressure regulator (refer to
Fuel Metering
System
).
Did the fuel pressure regulator require replacement?
—Verify repairGo to Step 12
121. Ignition “ON,” engine “OFF.”
2. Monitor the TP Angle display on the Tech 2 while
slowly depressing the accelerator pedal.
Does the TP Angle display increase steadily and
evenly from minimum value at closed throttle to
maximum value at wide-open throttle?
Minimum 0%
Maximum
100%
Go to Step 13Go to Step 18
131. Disconnect the MAF sensor electrical connector.
2. Operate the vehicle in “closed loop” while
monitoring the “BANK 1 L.T. FUEL TRIM” and
“BANK 1 S.T. FUEL TRIM” display on the Tech 2.
Did both values change to near the specified value?
0%Go to Step 19Go to Step 14
141. Perform the “Fuel System Pressure Test.”
2. If Fuel System Pressure Test isolates a problem,
repair as necessary (refer to
Engine Fuel or Fuel
Metering System
).
Did the Fuel System Pressure Test isolate a condition
requiring repair?
—Verify repairGo to Step 16
15Replace the PCM.
IMPORTANT:The replacement PCM must be
programmed. Refer to
UBS 98model year Immobilizer
Workshop Manual.
Is the action complete?—Verify repair—
161. Perform the “Injector Balance Test.”
2. If the Injector Balance Test isolates a problem,
repair as necessary (refer to
Fuel Metering
System
).
Did the Injector Balance Test isolate a problem
requiring repair?
—Verify repairGo to Step 17
171. Remove and visually/physically inspect the Bank 2
HO2S 1 for silicon contamination. This will be
indicated by a powdery white deposit on the portion
of the HO2S that is exposed to the exhaust stream.
2. If contamination is evident on the Bank 2 HO2S 1,
replace the contaminated sensor.
Did the sensor require replacement?
—Verify repair
Refer to
Diagnostic
Aids
181. Check the TP sensor mounting screws and tighten
or replace them as necessary if they are loose or
missing.
2. If the screws are OK, replace the TP sensor.
Is the action complete?
—Verify repair—
19Replace the MAF sensor.
Is the action complete?
—Verify repair—
Page 1305 of 6000
6E–188
ENGINE DRIVEABILITY AND EMISSIONS
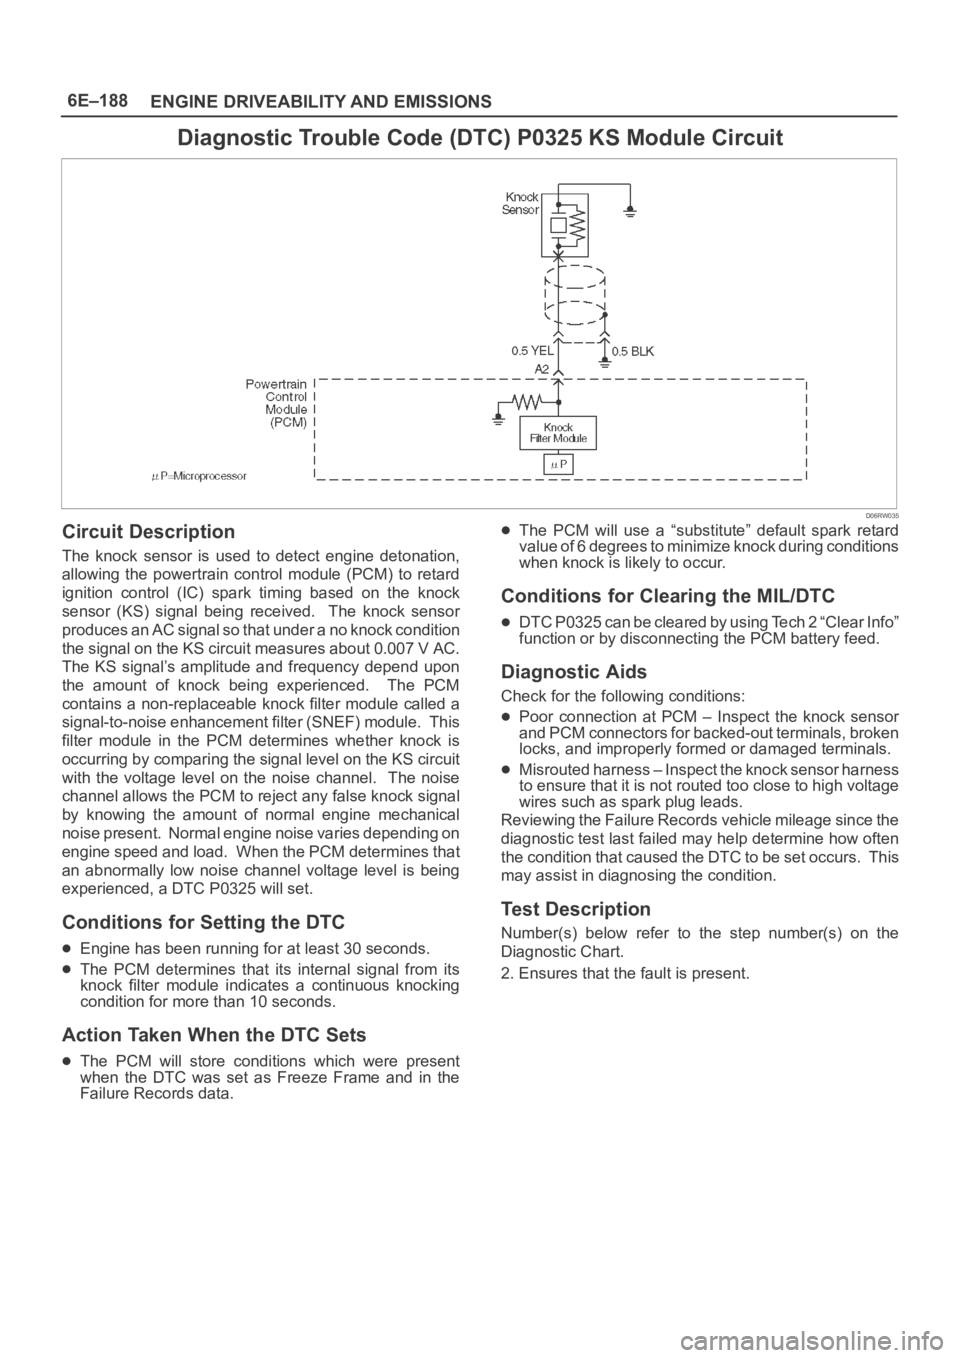
Diagnostic Trouble Code (DTC) P0325 KS Module Circuit
D06RW035
Circuit Description
The knock sensor is used to detect engine detonation,
allowing the powertrain control module (PCM) to retard
ignition control (IC) spark timing based on the knock
sensor (KS) signal being received. The knock sensor
produces an AC signal so that under a no knock condition
the signal on the KS circuit measures about 0.007 V AC.
The KS signal’s amplitude and frequency depend upon
the amount of knock being experienced. The PCM
contains a non-replaceable knock filter module called a
signal-to-noise enhancement filter (SNEF) module. This
filter module in the PCM determines whether knock is
occurring by comparing the signal level on the KS circuit
with the voltage level on the noise channel. The noise
channel allows the PCM to reject any false knock signal
by knowing the amount of normal engine mechanical
noise present. Normal engine noise varies depending on
engine speed and load. When the PCM determines that
an abnormally low noise channel voltage level is being
experienced, a DTC P0325 will set.
Conditions for Setting the DTC
Engine has been running for at least 30 seconds.
The PCM determines that its internal signal from its
knock filter module indicates a continuous knocking
condition for more than 10 seconds.
Action Taken When the DTC Sets
The PCM will store conditions which were present
when the DTC was set as Freeze Frame and in the
Failure Records data.
The PCM will use a “substitute” default spark retard
value of 6 degrees to minimize knock during conditions
when knock is likely to occur.
Conditions for Clearing the MIL/DTC
DTC P0325 can be cleared by using Tech 2 “Clear Info”
function or by disconnecting the PCM battery feed.
Diagnostic Aids
Check for the following conditions:
Poor connection at PCM – Inspect the knock sensor
and PCM connectors for backed-out terminals, broken
locks, and improperly formed or damaged terminals.
Misrouted harness – Inspect the knock sensor harness
to ensure that it is not routed too close to high voltage
wires such as spark plug leads.
Reviewing the Failure Records vehicle mileage since the
diagnostic test last failed may help determine how often
the condition that caused the DTC to be set occurs. This
may assist in diagnosing the condition.
Test Description
Number(s) below refer to the step number(s) on the
Diagnostic Chart.
2. Ensures that the fault is present.
Page 1307 of 6000
6E–190
ENGINE DRIVEABILITY AND EMISSIONS
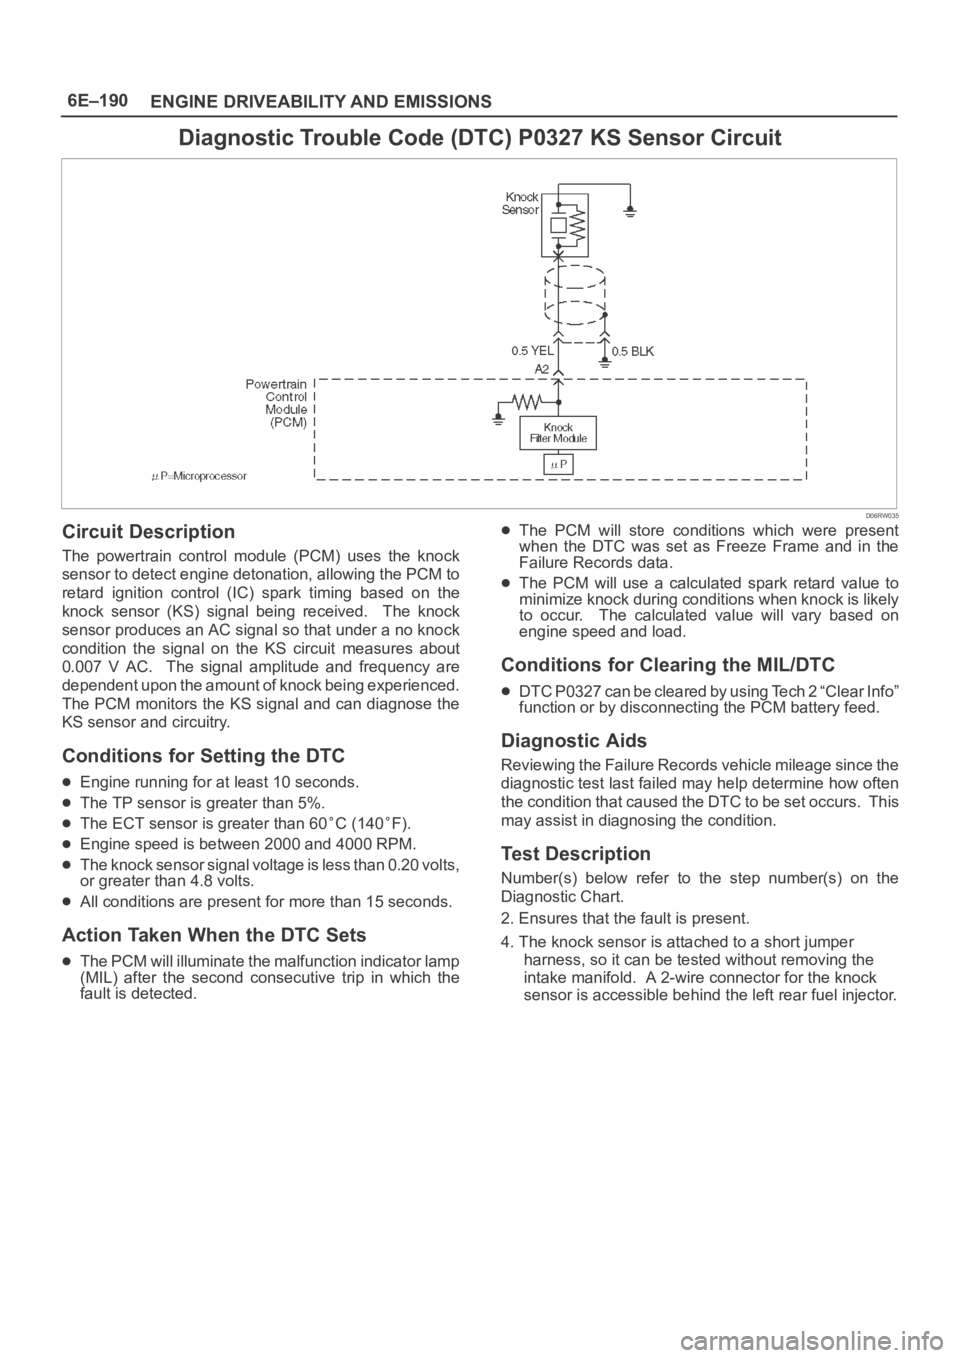
Diagnostic Trouble Code (DTC) P0327 KS Sensor Circuit
D06RW035
Circuit Description
The powertrain control module (PCM) uses the knock
sensor to detect engine detonation, allowing the PCM to
retard ignition control (IC) spark timing based on the
knock sensor (KS) signal being received. The knock
sensor produces an AC signal so that under a no knock
condition the signal on the KS circuit measures about
0.007 V AC. The signal amplitude and frequency are
dependent upon the amount of knock being experienced.
The PCM monitors the KS signal and can diagnose the
KS sensor and circuitry.
Conditions for Setting the DTC
Engine running for at least 10 seconds.
The TP sensor is greater than 5%.
The ECT sensor is greater than 60C (140F).
Engine speed is between 2000 and 4000 RPM.
The knock sensor signal voltage is less than 0.20 volts,
or greater than 4.8 volts.
All conditions are present for more than 15 seconds.
Action Taken When the DTC Sets
The PCM will illuminate the malfunction indicator lamp
(MIL) after the second consecutive trip in which the
fault is detected.
The PCM will store conditions which were present
when the DTC was set as Freeze Frame and in the
Failure Records data.
The PCM will use a calculated spark retard value to
minimize knock during conditions when knock is likely
to occur. The calculated value will vary based on
engine speed and load.
Conditions for Clearing the MIL/DTC
DTC P0327 can be cleared by using Tech 2 “Clear Info”
function or by disconnecting the PCM battery feed.
Diagnostic Aids
Reviewing the Failure Records vehicle mileage since the
diagnostic test last failed may help determine how often
the condition that caused the DTC to be set occurs. This
may assist in diagnosing the condition.
Test Description
Number(s) below refer to the step number(s) on the
Diagnostic Chart.
2. Ensures that the fault is present.
4. The knock sensor is attached to a short jumper
harness, so it can be tested without removing the
intake manifold. A 2-wire connector for the knock
sensor is accessible behind the left rear fuel injector.
Page 1308 of 6000
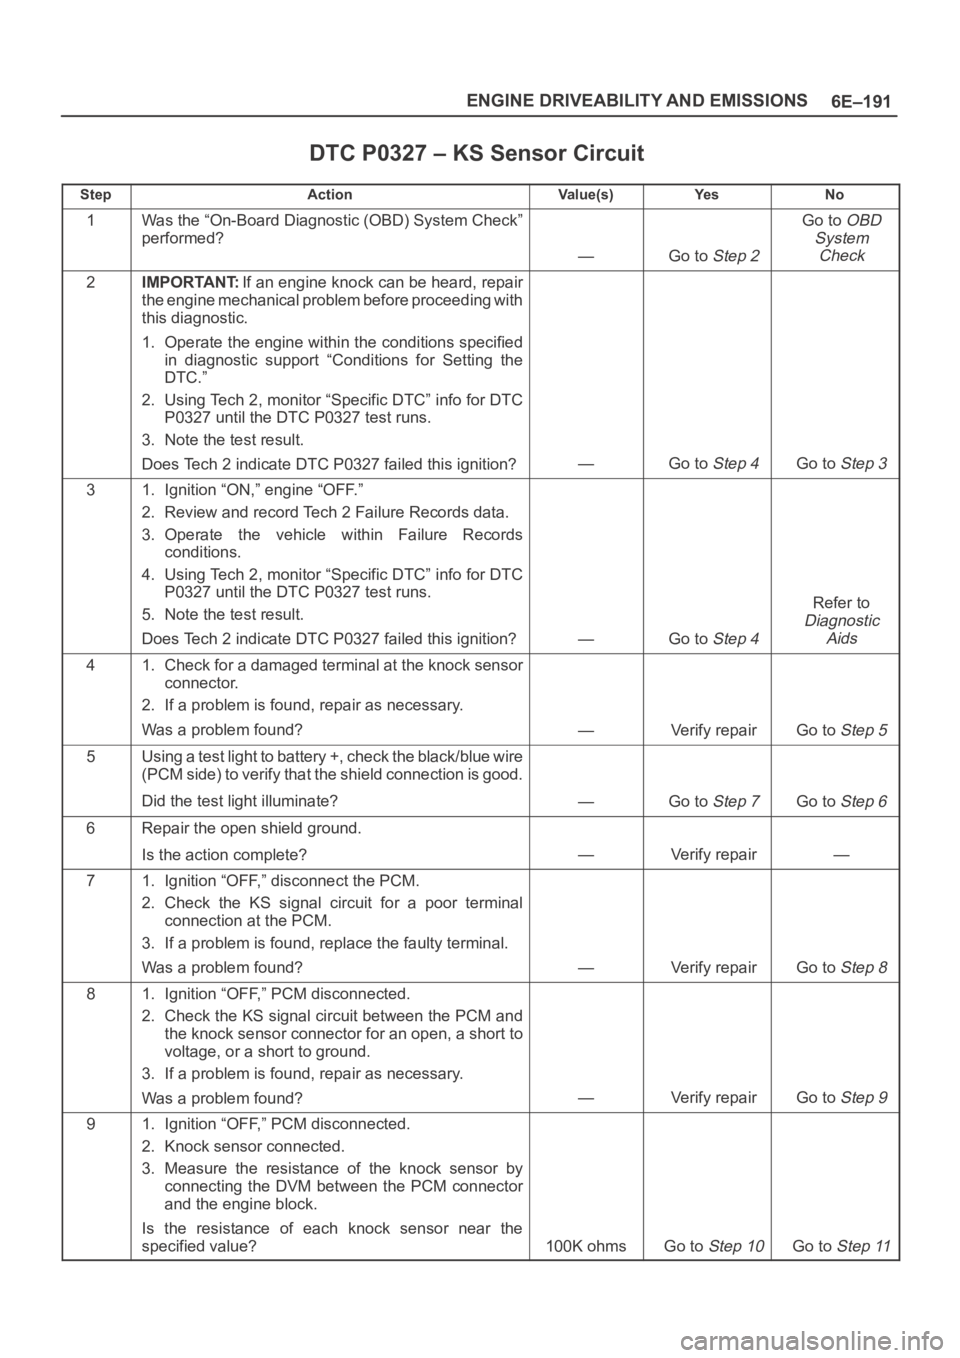
6E–191 ENGINE DRIVEABILITY AND EMISSIONS
DTC P0327 – KS Sensor Circuit
StepActionVa l u e ( s )Ye sNo
1Was the “On-Board Diagnostic (OBD) System Check”
performed?
—Go to Step 2
Go to OBD
System
Check
2IMPORTANT:If an engine knock can be heard, repair
the engine mechanical problem before proceeding with
this diagnostic.
1. Operate the engine within the conditions specified
in diagnostic support “Conditions for Setting the
DTC.”
2. Using Tech 2, monitor “Specific DTC” info for DTC
P0327 until the DTC P0327 test runs.
3. Note the test result.
Does Tech 2 indicate DTC P0327 failed this ignition?
—Go to Step 4Go to Step 3
31. Ignition “ON,” engine “OFF.”
2. Review and record Tech 2 Failure Records data.
3. Operate the vehicle within Failure Records
conditions.
4. Using Tech 2, monitor “Specific DTC” info for DTC
P0327 until the DTC P0327 test runs.
5. Note the test result.
Does Tech 2 indicate DTC P0327 failed this ignition?
—Go to Step 4
Refer to
Diagnostic
Aids
41. Check for a damaged terminal at the knock sensor
connector.
2. If a problem is found, repair as necessary.
Was a problem found?
—Verify repairGo to Step 5
5Using a test light to battery +, check the black/blue wire
(PCM side) to verify that the shield connection is good.
Did the test light illuminate?
—Go to Step 7Go to Step 6
6Repair the open shield ground.
Is the action complete?
—Verify repair—
71. Ignition “OFF,” disconnect the PCM.
2. Check the KS signal circuit for a poor terminal
connection at the PCM.
3. If a problem is found, replace the faulty terminal.
Was a problem found?
—Verify repairGo to Step 8
81. Ignition “OFF,” PCM disconnected.
2. Check the KS signal circuit between the PCM and
the knock sensor connector for an open, a short to
voltage, or a short to ground.
3. If a problem is found, repair as necessary.
Was a problem found?
—Verify repairGo to Step 9
91. Ignition “OFF,” PCM disconnected.
2. Knock sensor connected.
3. Measure the resistance of the knock sensor by
connecting the DVM between the PCM connector
and the engine block.
Is the resistance of each knock sensor near the
specified value?
100K ohmsGo to Step 10Go to Step 11
Page 1309 of 6000
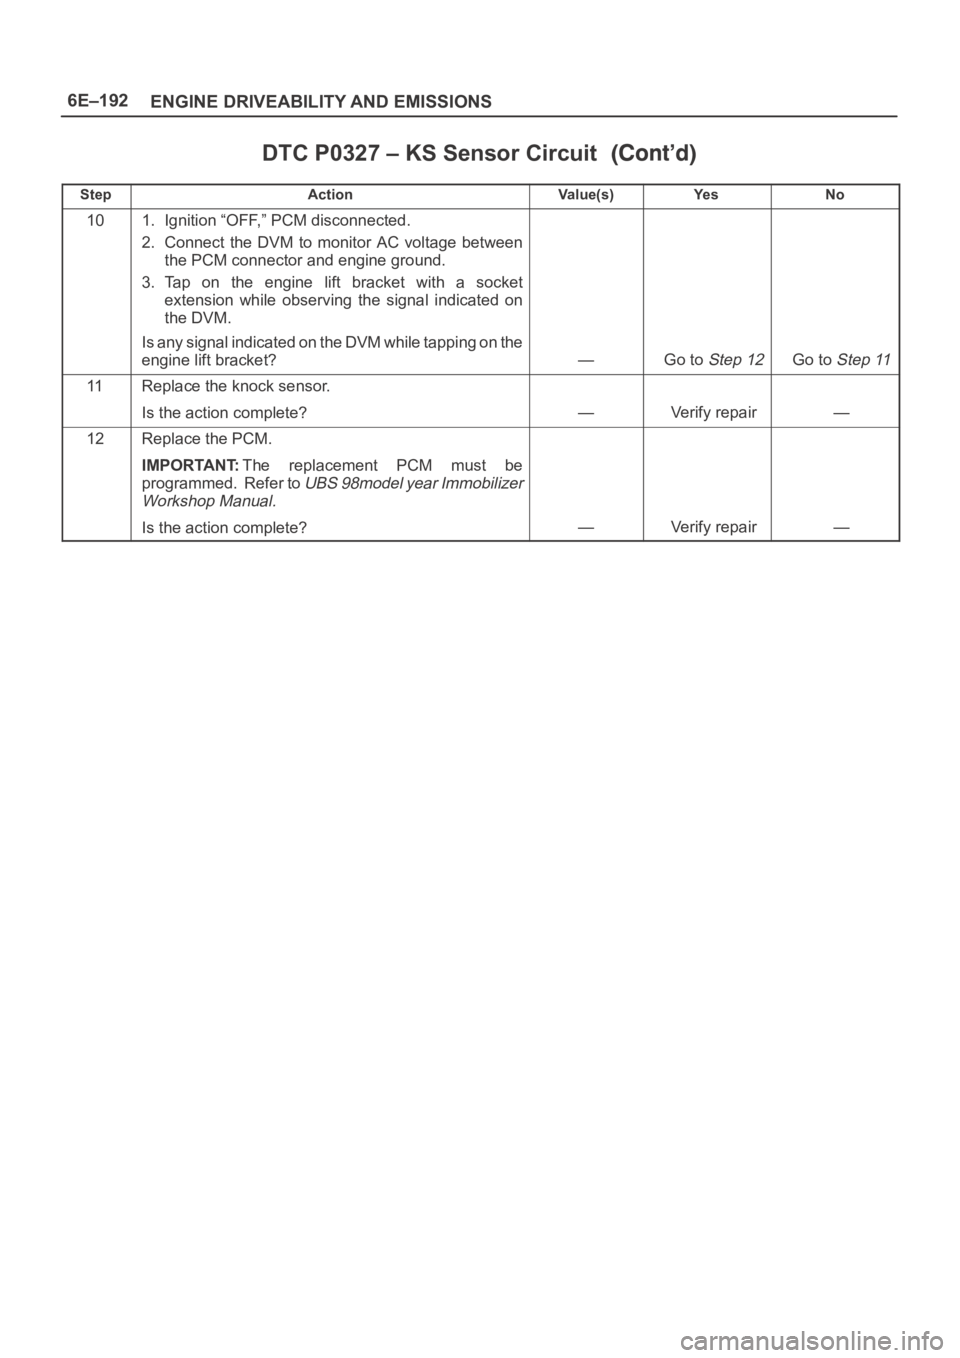
6E–192
ENGINE DRIVEABILITY AND EMISSIONS
DTC P0327 – KS Sensor Circuit
StepNo Ye s Va l u e ( s ) Action
101. Ignition “OFF,” PCM disconnected.
2. Connect the DVM to monitor AC voltage between
the PCM connector and engine ground.
3. Tap on the engine lift bracket with a socket
extension while observing the signal indicated on
the DVM.
Is any signal indicated on the DVM while tapping on the
engine lift bracket?
—Go to Step 12Go to Step 11
11Replace the knock sensor.
Is the action complete?
—Verify repair—
12Replace the PCM.
IMPORTANT:The replacement PCM must be
programmed. Refer to
UBS 98model year Immobilizer
Workshop Manual.
Is the action complete?—Verify repair—
Page 1310 of 6000
6E–193 ENGINE DRIVEABILITY AND EMISSIONS
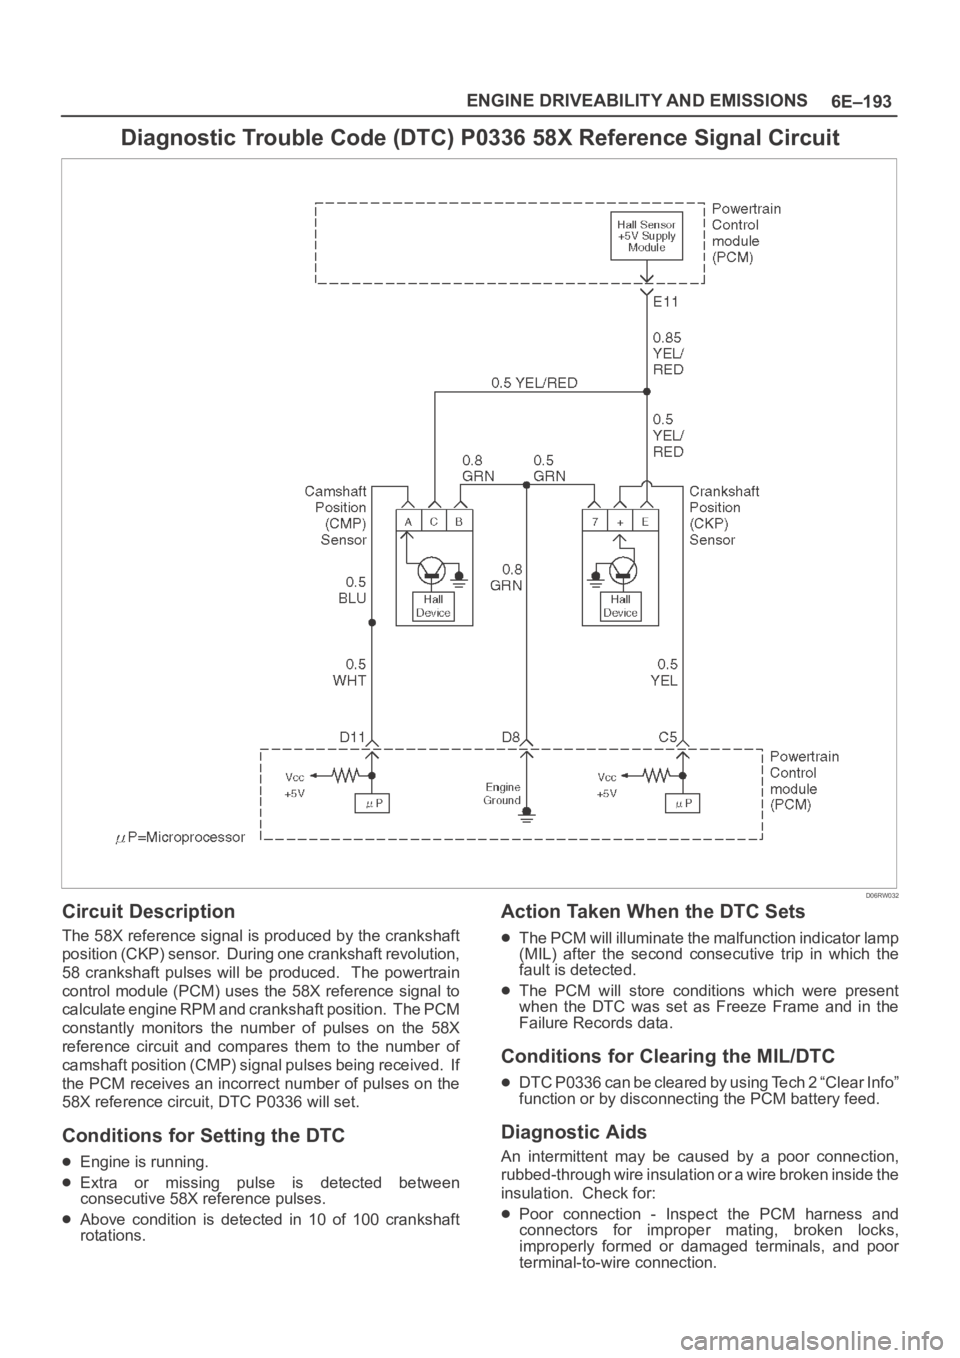
Diagnostic Trouble Code (DTC) P0336 58X Reference Signal Circuit
D06RW032
Circuit Description
The 58X reference signal is produced by the crankshaft
position (CKP) sensor. During one crankshaft revolution,
58 crankshaft pulses will be produced. The powertrain
control module (PCM) uses the 58X reference signal to
calculate engine RPM and crankshaft position. The PCM
constantly monitors the number of pulses on the 58X
reference circuit and compares them to the number of
camshaft position (CMP) signal pulses being received. If
the PCM receives an incorrect number of pulses on the
58X reference circuit, DTC P0336 will set.
Conditions for Setting the DTC
Engine is running.
Extra or missing pulse is detected between
consecutive 58X reference pulses.
Above condition is detected in 10 of 100 crankshaft
rotations.
Action Taken When the DTC Sets
The PCM will illuminate the malfunction indicator lamp
(MIL) after the second consecutive trip in which the
fault is detected.
The PCM will store conditions which were present
when the DTC was set as Freeze Frame and in the
Failure Records data.
Conditions for Clearing the MIL/DTC
DTC P0336 can be cleared by using Tech 2 “Clear Info”
function or by disconnecting the PCM battery feed.
Diagnostic Aids
An intermittent may be caused by a poor connection,
rubbed-through wire insulation or a wire broken inside the
insulation. Check for:
Poor connection - Inspect the PCM harness and
connectors for improper mating, broken locks,
improperly formed or damaged terminals, and poor
terminal-to-wire connection.
Page 1311 of 6000
6E–194
ENGINE DRIVEABILITY AND EMISSIONS
Damaged harness – Inspect the wiring harness for
damage. If the harness appears to be OK, disconnect
the PCM, turn the ignition on and observe a voltmeter
connected to the 58X reference circuit at the PCM
harness connector while moving connectors and
wiring harnesses related to the ICM. A change in
voltage will indicate the location of the fault.Reviewing the Failure Records vehicle mileage since the
diagnostic test last failed may help determine how often
the condition that caused the DTC to be set occurs. This
may assist in diagnosing the condition.
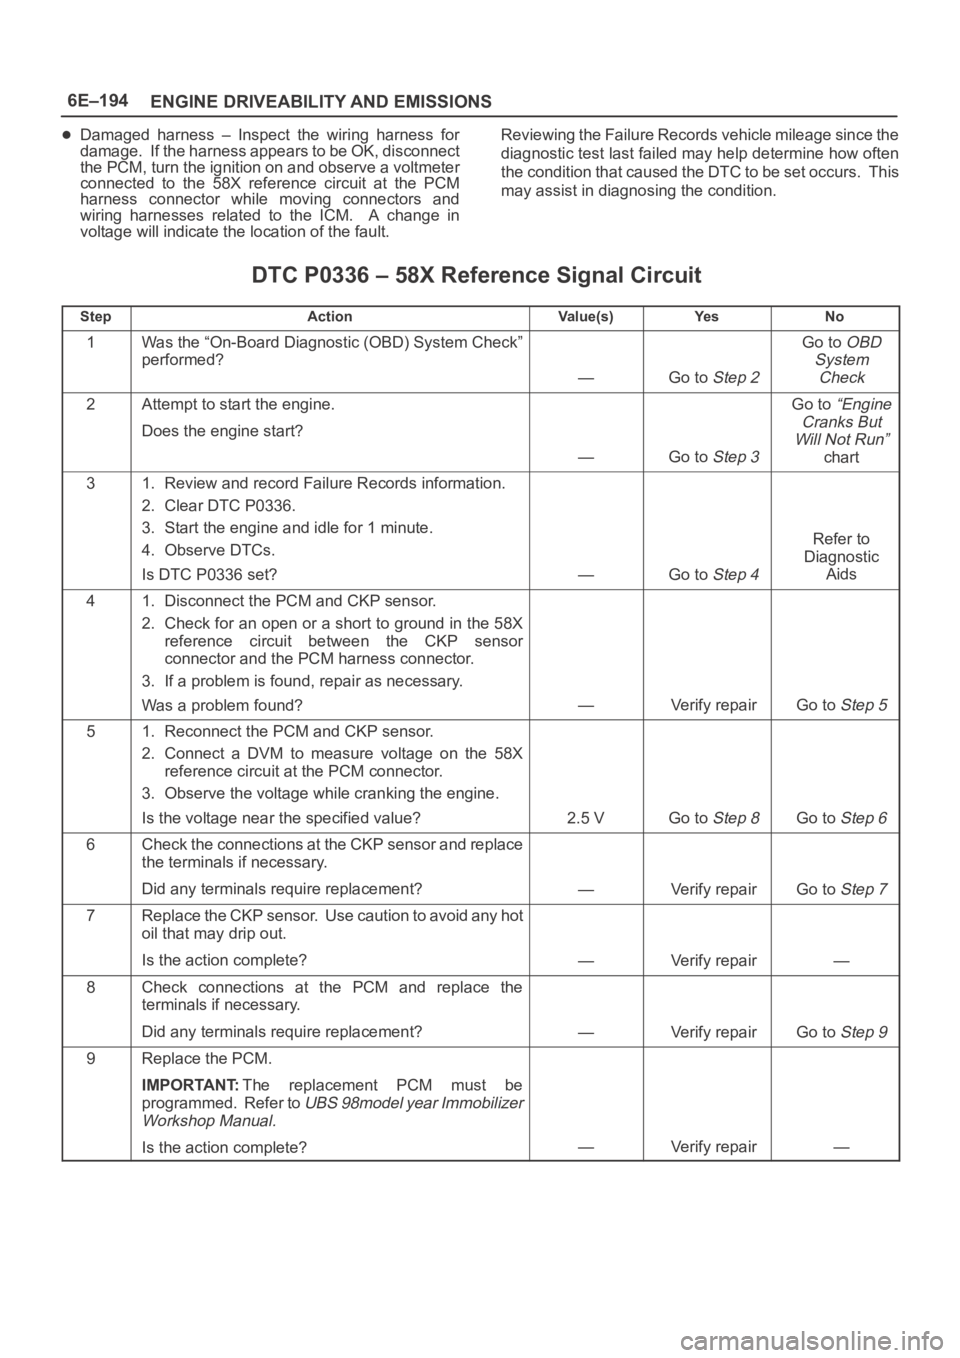
DTC P0336 – 58X Reference Signal Circuit
StepActionVa l u e ( s )Ye sNo
1Was the “On-Board Diagnostic (OBD) System Check”
performed?
—Go to Step 2
Go to OBD
System
Check
2Attempt to start the engine.
Does the engine start?
—Go to Step 3
Go to “Engine
Cranks But
Will Not Run”
chart
31. Review and record Failure Records information.
2. Clear DTC P0336.
3. Start the engine and idle for 1 minute.
4. Observe DTCs.
Is DTC P0336 set?
—Go to Step 4
Refer to
Diagnostic
Aids
41. Disconnect the PCM and CKP sensor.
2. Check for an open or a short to ground in the 58X
reference circuit between the CKP sensor
connector and the PCM harness connector.
3. If a problem is found, repair as necessary.
Was a problem found?
—Verify repairGo to Step 5
51. Reconnect the PCM and CKP sensor.
2. Connect a DVM to measure voltage on the 58X
reference circuit at the PCM connector.
3. Observe the voltage while cranking the engine.
Is the voltage near the specified value?
2.5 VGo to Step 8Go to Step 6
6Check the connections at the CKP sensor and replace
the terminals if necessary.
Did any terminals require replacement?
—Verify repairGo to Step 7
7Replace the CKP sensor. Use caution to avoid any hot
oil that may drip out.
Is the action complete?
—Verify repair—
8Check connections at the PCM and replace the
terminals if necessary.
Did any terminals require replacement?
—Verify repairGo to Step 9
9Replace the PCM.
IMPORTANT:The replacement PCM must be
programmed. Refer to
UBS 98model year Immobilizer
Workshop Manual.
Is the action complete?—Verify repair—