1998 OPEL FRONTERA fuse
[x] Cancel search: fusePage 3457 of 6000
SUPPLEMENTAL RESTRAINT SYSTEM 9J–20
13. Wash your hands with mild soap and water afterward.
NOTE: The remaining steps are to be followed in the
unlikely event that the air bag assembly did not deploy
after following the above procedures.
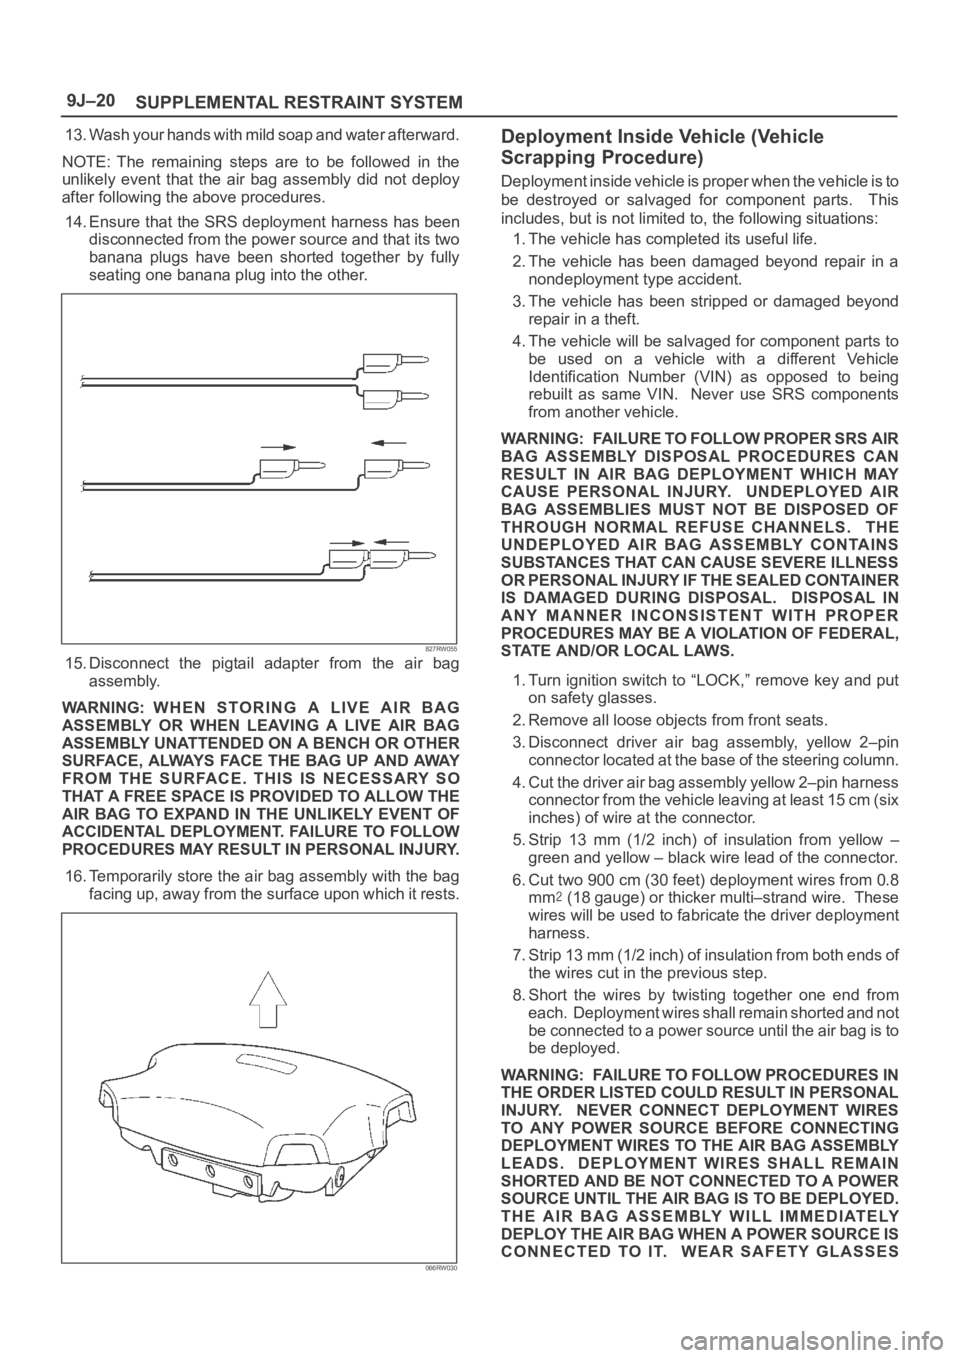
14. Ensure that the SRS deployment harness has been
disconnected from the power source and that its two
banana plugs have been shorted together by fully
seating one banana plug into the other.
827RW055
15. Disconnect the pigtail adapter from the air bag
assembly.
WARNING: WHEN STORING A LIVE AIR BAG
ASSEMBLY OR WHEN LEAVING A LIVE AIR BAG
ASSEMBLY UNATTENDED ON A BENCH OR OTHER
SURFACE, ALWAYS FACE THE BAG UP AND AWAY
FROM THE SURFACE. THIS IS NECESSARY SO
THAT A FREE SPACE IS PROVIDED TO ALLOW THE
AIR BAG TO EXPAND IN THE UNLIKELY EVENT OF
ACCIDENTAL DEPLOYMENT. FAILURE TO FOLLOW
PROCEDURES MAY RESULT IN PERSONAL INJURY.
16. Temporarily store the air bag assembly with the bag
facing up, away from the surface upon which it rests.
066RW030
Deployment Inside Vehicle (Vehicle
Scrapping Procedure)
Deployment inside vehicle is proper when the vehicle is to
be destroyed or salvaged for component parts. This
includes, but is not limited to, the following situations:
1. The vehicle has completed its useful life.
2. The vehicle has been damaged beyond repair in a
nondeployment type accident.
3. The vehicle has been stripped or damaged beyond
repair in a theft.
4. The vehicle will be salvaged for component parts to
be used on a vehicle with a different Vehicle
Identification Number (VIN) as opposed to being
rebuilt as same VIN. Never use SRS components
from another vehicle.
WARNING: FAILURE TO FOLLOW PROPER SRS AIR
BAG ASSEMBLY DISPOSAL PROCEDURES CAN
RESULT IN AIR BAG DEPLOYMENT WHICH MAY
CAUSE PERSONAL INJURY. UNDEPLOYED AIR
BAG ASSEMBLIES MUST NOT BE DISPOSED OF
THROUGH NORMAL REFUSE CHANNELS. THE
UNDEPLOYED AIR BAG ASSEMBLY CONTAINS
SUBSTANCES THAT CAN CAUSE SEVERE ILLNESS
OR PERSONAL INJURY IF THE SEALED CONTAINER
IS DAMAGED DURING DISPOSAL. DISPOSAL IN
ANY MANNER INCONSISTENT WITH PROPER
PROCEDURES MAY BE A VIOLATION OF FEDERAL,
STATE AND/OR LOCAL LAWS.
1. Turn ignition switch to “LOCK,” remove key and put
on safety glasses.
2. Remove all loose objects from front seats.
3. Disconnect driver air bag assembly, yellow 2–pin
connector located at the base of the steering column.
4. Cut the driver air bag assembly yellow 2–pin harness
connector from the vehicle leaving at least 15 cm (six
inches) of wire at the connector.
5. Strip 13 mm (1/2 inch) of insulation from yellow –
green and yellow – black wire lead of the connector.
6. Cut two 900 cm (30 feet) deployment wires from 0.8
mm
(18 gauge) or thicker multi–strand wire. These
wires will be used to fabricate the driver deployment
harness.
7. Strip 13 mm (1/2 inch) of insulation from both ends of
the wires cut in the previous step.
8. Short the wires by twisting together one end from
each. Deployment wires shall remain shorted and not
be connected to a power source until the air bag is to
be deployed.
WARNING: FAILURE TO FOLLOW PROCEDURES IN
THE ORDER LISTED COULD RESULT IN PERSONAL
INJURY. NEVER CONNECT DEPLOYMENT WIRES
TO ANY POWER SOURCE BEFORE CONNECTING
DEPLOYMENT WIRES TO THE AIR BAG ASSEMBLY
LEADS. DEPLOYMENT WIRES SHALL REMAIN
SHORTED AND BE NOT CONNECTED TO A POWER
SOURCE UNTIL THE AIR BAG IS TO BE DEPLOYED.
THE AIR BAG ASSEMBLY WILL IMMEDIATELY
DEPLOY THE AIR BAG WHEN A POWER SOURCE IS
CONNECTED TO IT. WEAR SAFETY GLASSES
Page 3461 of 6000
SUPPLEMENTAL RESTRAINT SYSTEM 9J–24
NOTE: Ensure that the pigtail adapter is firmly seated into
the pretensioner seat belt assembly connector. Failure to
fully seat the connectors may leave the shorting bar
located in the pretensioner seat belt assembly connector
functioning (shorted) and may result in nondeployment of
the pretensioner seat belt assembly.
13. Separate the two banana plugs on the SRS
deployment harness.
NOTE: When the pretensioner seat belt deploys, the
rapid gas expansion will create a substantial noise. Notify
all people in the immediate area that you intend to deploy
the pretensioner seat belt.
WARNING: DEPLOYMENT HARNESS SHALL
REMAIN SHORTED AND NOT BE CONNECTED TO A
POWER SOURCE UNTIL THE PRETENSIONER SEAT
BELT IS TO BE DEPLOYED. THE PRETENSIONER
SEAT BELT ASSEMBLY WILL IMMEDIATELY
DEPLOY THE PRETENSIONER SEAT BELT WHEN A
POWER SOURCE IS CONNECTED TO IT.
CONNECTING THE DEPLOYMENT HARNESS TO
THE POWER SOURCE SHOULD ALWAYS BE THE
LAST STEP IN THE PRETENSIONER SEAT BELT
ASSEMBLY DEPLOYMENT PROCEDURE. FAILURE
TO FOLLOW PROCEDURES IN THE ORDER LISTED
MAY RESULT IN PERSONAL INJURY.
14. Connect the SRS deployment harness wires to the
power source to immediately deploy the pretensioner
seat belt. Recommended application: 12 volts
minimum, 2 amps minimum. A vehicle battery is
suggested.
15. Disconnect the SRS deployment harness from the
power source.
16. Short the two SRS deployment harness leads
together by fully seating one banana plug into the
other.
17. In the unlikely event that the pretensioner seat belt
assembly did not deploy after following these
procedures, proceed immediately with Steps 21
through 24. If the pretensioner seat belt assembly did
deploy, proceed with Steps 15 through 20.
18.
WARNING: SAFETY PRECAUTIONS MUST BE
OBSERVED WHEN HANDING A DEPLOYED
PRETENSIONER SEAT BELT ASSEMBLY. AFTER
DEPLOYMENT, THE METAL SURFACES OF THE
PRETENSIONER SEAT BELT ASSEMBLY WILL BE
VERY HOT. ALLOW THE INFLATOR MODULE TO
COOL BEFORE HANDLING ANY METAL PORTION
OF IT. DO NOT PLACE THE DEPLOYED
PRETENSIONER SEAT BELT ASSEMBLY NEAR ANY
FLAMMABLE OBJECTS. FAILURE TO FOLLOW
PROCEDURES MAY RESULT IN FIRE OR PERSONAL
INJURY.
AFTER A DRIVER PRETENSIONER SEAT BELT
ASSEMBLY HAS BEEN DEPLOYED, THE METAL
CANISTER AND SURROUNDING AREAS OF THE
DRIVER PRETENSIONER SEAT BELT ASSEMBLY
WILL BE VERY HOT. DO NOT TOUCH THE METAL
AREAS OF THE PRETENSIONER SEAT BELT
ASSEMBLY FOR ABOUT TEN MINUTES AFTER
DEPLOYMENT. IF THE DEPLOYED PRETENSIONERSEAT BELT ASSEMBLY MUST BE MOVED BEFORE
IT IS COOL, WEAR GLOVES AND HANDLE BY THE
PRETENSIONER SEAT BELT OR TRIM COVER.
19. Disconnect the pigtail adapter from the pretensioner
seat belt assembly as soon after deployment as
possible. This will prevent damage to the pigtail
adapter or SRS deployment harness due to possible
contact with the hot pretensioner seat belt assembly
canister. The pigtail adapter can be reused. They
should, however, be inspected for damage after each
deployment and replaced if necessary.
20. Dispose of the deployed pretensioner seat belt
assembly through normal refuse channels after it has
cooled for at least 30 minutes.
21. Wash your hands with mild soap and water afterward.
NOTE: The remaining steps are to be followed in the
unlikely event that the pretensioner seat belt assembly
did not deploy after following these procedures.
22. Ensure that the SRS deployment harness has been
disconnected from the power source and that its two
banana plugs have been shorted together by fully
seating one banana plug into the other.
23. Disconnect the pigtail adapter from the pretensioner
seat belt assembly.
24. Remove the undeployed pretensioner seat belt from
the special tool.
WARNING: W H E N S TO R I N G A L I V E
PRETENSIONER SEAT BELT ASSEMBLY OR WHEN
LEAVING A LIVE INFLATOR MODULE UNATTENDED
ON A BENCH OR OTHER SURFACE, ALWAYS PUT
THE PRETENSIONER SEAT BELT HORIZONTAL
PLACE. THIS IS NECESSARY SO THAT A FREE
SPACE IS PROVIDED TO ALLOW THE
PRETENSIONER SEAT BELT TO SHRINK IN THE
UNLIKELY EVENT OF ACCIDENTAL DEPLOYMENT.
FAILURE TO FOLLOW PROCEDURES MAY RESULT
IN PERSONAL INJURY.
25.Temporarily store the pretensioner seat belt
assembly with its deployment device facing up, away
from the surface upon which it rests.
Deployment Inside Vehicle (Pretensioner
Seat Belt Vehicle Scrapping Procedure)
Deployment inside vehicle is proper when the vehicle is to
be destroyed. This includes, but is not limited to, the
following situations:
1. The vehicle has completed its useful life.
2. The vehicle has been damaged beyond repair in a
nondeployment type accident.
3. The vehicle has been stripped or damaged beyond
repair in a theft.
NOTE: The vehicle will be salvaged for component parts
to be used on a vehicle with a different Vehicle
Identification Number (VIN) as opposed to being rebuilt
as same VIN. Never use pretensioner seat belt
components from another vehicle.
WARNING: FAILURE TO FOLLOW PROCEDURES IN
THE ORDER LISTED COULD RESULT IN PERSONAL
INJURY. NEVER CONNECT DEPLOYMENT WIRES
Page 3467 of 6000
SUPPLEMENTAL RESTRAINT SYSTEM 9J–30
Service Precautions for SRS
Component Service
CAUTION: When fasteners are removed, always
reinstall them at the same location from which they
were removed. If a fastener needs to be replaced, use
the correct part number fastener for that application.
If the correct part number fastener is not available, a
fastener of equal size and strength (or stronger) may
be used. fasteners that are not reused, and those
requiring thread locking compound will be called
out. The correct torque value must be used when
installing fasteners that require it. If the above
conditions are not followed, parts or system damage
could result.
WARNING: WHEN PERFORMING SERVICE ON OR
AROUND SRS COMPONENTS OR SRS WIRING,
FOLLOW THE PROCEDURES LISTED BELOW TO
TEMPORARILY DISABLE THE SRS. FAILURE TO
FOLLOW PROCEDURES COULD RESULT IN
POSSIBLE AIR BAG DEPLOYMENT, PERSONAL
INJURY OR OTHERWISE UNNEEDED SRS REPAIRS.
The SDM in Driver–Passenger SRS can maintain
sufficient voltage to cause a deployment for up to 15
seconds after the ignition switch is turned “OFF,” the
battery is disconnected, or the fuse powering the SDM is
removed.
Many of the service procedures require removal of the
“C–21” fuse, and disconnection of the air bag assembly
from the deployment loop to avoid an accidental
deployment. If the air bag assembly is disconnected from
the deployment loop as noted in the “Disabling the SRS”
procedure that follows, service can begin immediately
without waiting for the 15 second time period to expire.
Disabling The SRS
Removal
Turn the ignition switch to “OFF” and turn the steering
wheel so that the vehicle’s wheels are pointing straight
ahead.
1. Remove SRS fuse “C–21” from left dash side lower
fuse block or disconnect battery.
2. Disconnect yellow 2–pin connector at the base of
steering column.
3 . R e m o v e g l o v e b o x a s s e m b l y ; R e f e r t o “ P a s s e n g e r a i r
bag assembly replacement” in this section.
4. Disconnect passenger air bag assembly yellow 2–pin
connector behind the glove box assembly.
CAUTION: W i t h t h e “ C – 2 1 ” f u s e r e m o v e d a n d
ignition switch “ON,” the “AIR BAG” warning lamp
will be “ON.” This is normal operation and does not
indicate an SRS malfunction.
Enabling The SRS
Installation
Turn ignition switch to “LOCK” and remove key.
1. Connect yellow 2–pin connector passenger air bag
assembly.2. Install glove box assembly. Refer to “Passenger Air
Bag Assembly Replacement” in this section.
3. Connect yellow 2–pin connector at the base of the
steering column.
4. Install “AIR BAG” fuse “C–21” to left dash side lower
fuse block or connect battery.
Turn ignition switch to “ON” and verify that the “AIR BAG”
warning lamp turn on 3.5 seconds and then turns “OFF.” If
it does not operate as described, perform the “SRS
Diagnostic System Check” in this section.
Handling / Installation / Diagnosis
1. Air bag assembly should not be subjected to
temperatures above 93
C (200F).
2. Air bag assembly, and SDM should not be used if they
have been dropped from a height of 100 centimeters
(3.28 feet) or more.
3. When a SDM is replaced, it must be oriented with the
arrow on the SDM pointing toward the front of the
vehicle. It is very important for the SDM to be located
flat on the mounting surface, parallel to the vehicle
datum line. It is important that the SDM mounting
surface is free of any dirt or other foreign material.
4. Do not apply power to the SRS unless all components
are connected or a diagnostic chart requests it, as
this will set a diagnostic trouble code.
5. The “SRS Diagnostic System Check” must be the
starting point of any SRS diagnostics. The “SRS
Diagnostic System Check” will verify proper “AIR
BAG” warning lamp operation and will lead you to the
correct chart to diagnose any SRS malfunctions.
Bypassing these procedures may result in extended
diagnostic time, incorrect diagnosis, and incorrect
parts replacements.
Inspections Required After An Accident
CAUTION: C e r t a i n S R S c o m p o n e n t s m u s t b e
replaced after a frontal crash involving air bag
deployment.
In all types of accidents regardless of “Air Bag”
deployment, visually inspect all of the following
components and replace as required:
— Driver air bag assembly
— Passenger air bag assembly
— Driver pretensioner assembly
— Passenger pretensioner assembly
— Steering wheel
— SRS coil assembly
— Steering column
— Knee bolster and instrument panel mounting
attachments
— Driver seat and belt
— Passenger seat and belt
—SDM
SDM always should be checked according to “SDM
Replacement Guidelines.”
Page 3491 of 6000
RESTRAINT CONTROL SYSTEM 9J1–4
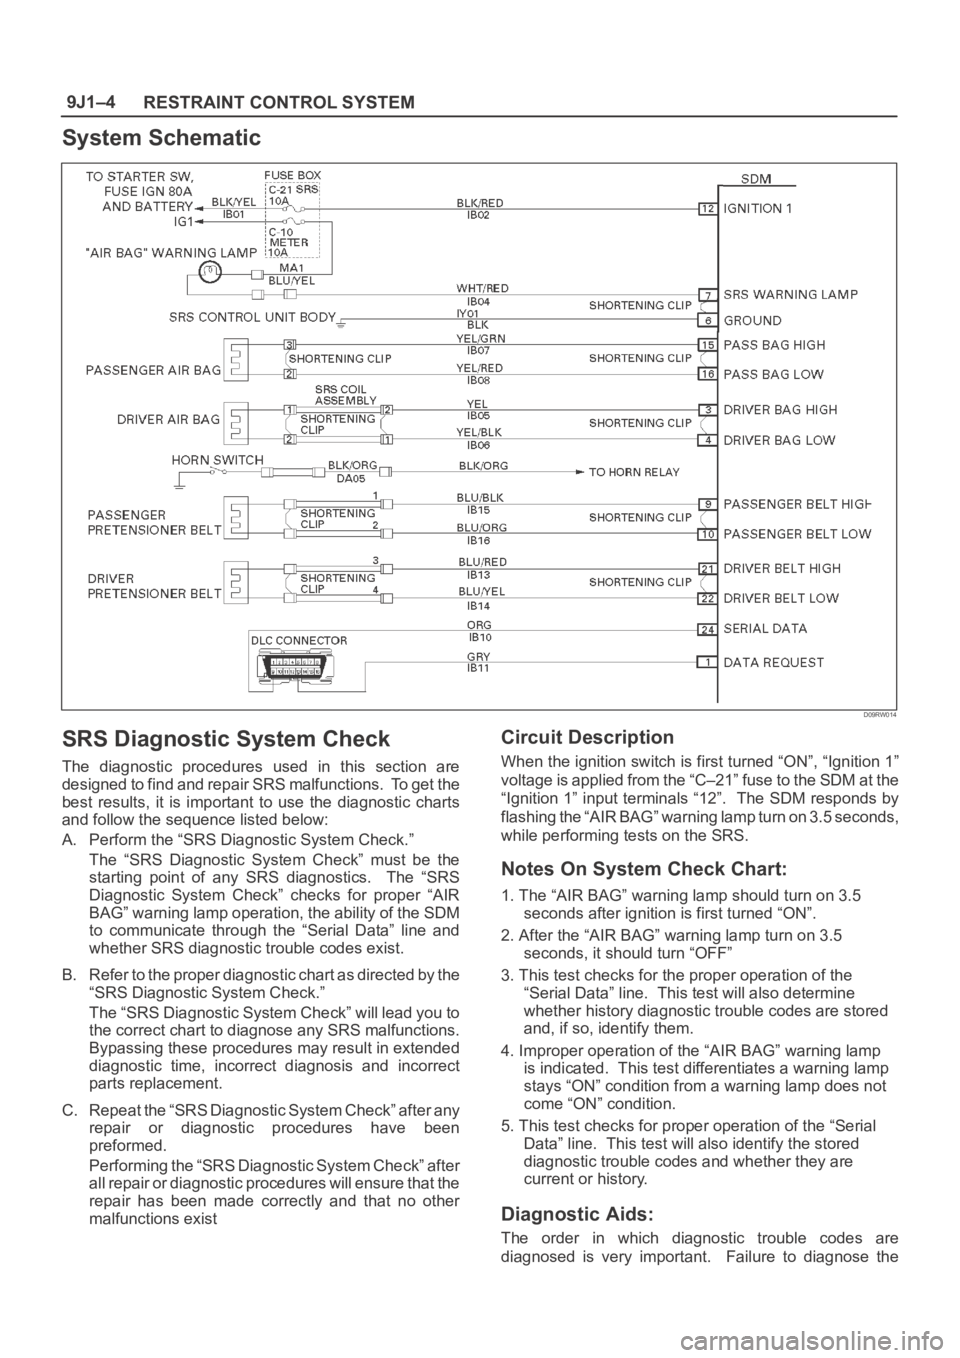
System Schematic
D09RW014
SRS Diagnostic System Check
The diagnostic procedures used in this section are
designed to find and repair SRS malfunctions. To get the
best results, it is important to use the diagnostic charts
and follow the sequence listed below:
A. Perform the “SRS Diagnostic System Check.”
The “SRS Diagnostic System Check” must be the
starting point of any SRS diagnostics. The “SRS
Diagnostic System Check” checks for proper “AIR
BAG” warning lamp operation, the ability of the SDM
to communicate through the “Serial Data” line and
whether SRS diagnostic trouble codes exist.
B. Refer to the proper diagnostic chart as directed by the
“SRS Diagnostic System Check.”
The “SRS Diagnostic System Check” will lead you to
the correct chart to diagnose any SRS malfunctions.
Bypassing these procedures may result in extended
diagnostic time, incorrect diagnosis and incorrect
parts replacement.
C. Repeat the “SRS Diagnostic System Check” after any
repair or diagnostic procedures have been
preformed.
Performing the “SRS Diagnostic System Check” after
all repair or diagnostic procedures will ensure that the
repair has been made correctly and that no other
malfunctions exist
Circuit Description
When the ignition switch is first turned “ON”, “Ignition 1”
voltage is applied from the “C–21” fuse to the SDM at the
“Ignition 1” input terminals “12”. The SDM responds by
flashing the “AIR BAG” warning lamp turn on 3.5 seconds,
while performing tests on the SRS.
Notes On System Check Chart:
1. The “AIR BAG” warning lamp should turn on 3.5
seconds after ignition is first turned “ON”.
2. After the “AIR BAG” warning lamp turn on 3.5
seconds, it should turn “OFF”
3. This test checks for the proper operation of the
“Serial Data” line. This test will also determine
whether history diagnostic trouble codes are stored
and, if so, identify them.
4. Improper operation of the “AIR BAG” warning lamp
is indicated. This test differentiates a warning lamp
stays “ON” condition from a warning lamp does not
come “ON” condition.
5. This test checks for proper operation of the “Serial
Data” line. This test will also identify the stored
diagnostic trouble codes and whether they are
current or history.
Diagnostic Aids:
The order in which diagnostic trouble codes are
diagnosed is very important. Failure to diagnose the
Page 3495 of 6000
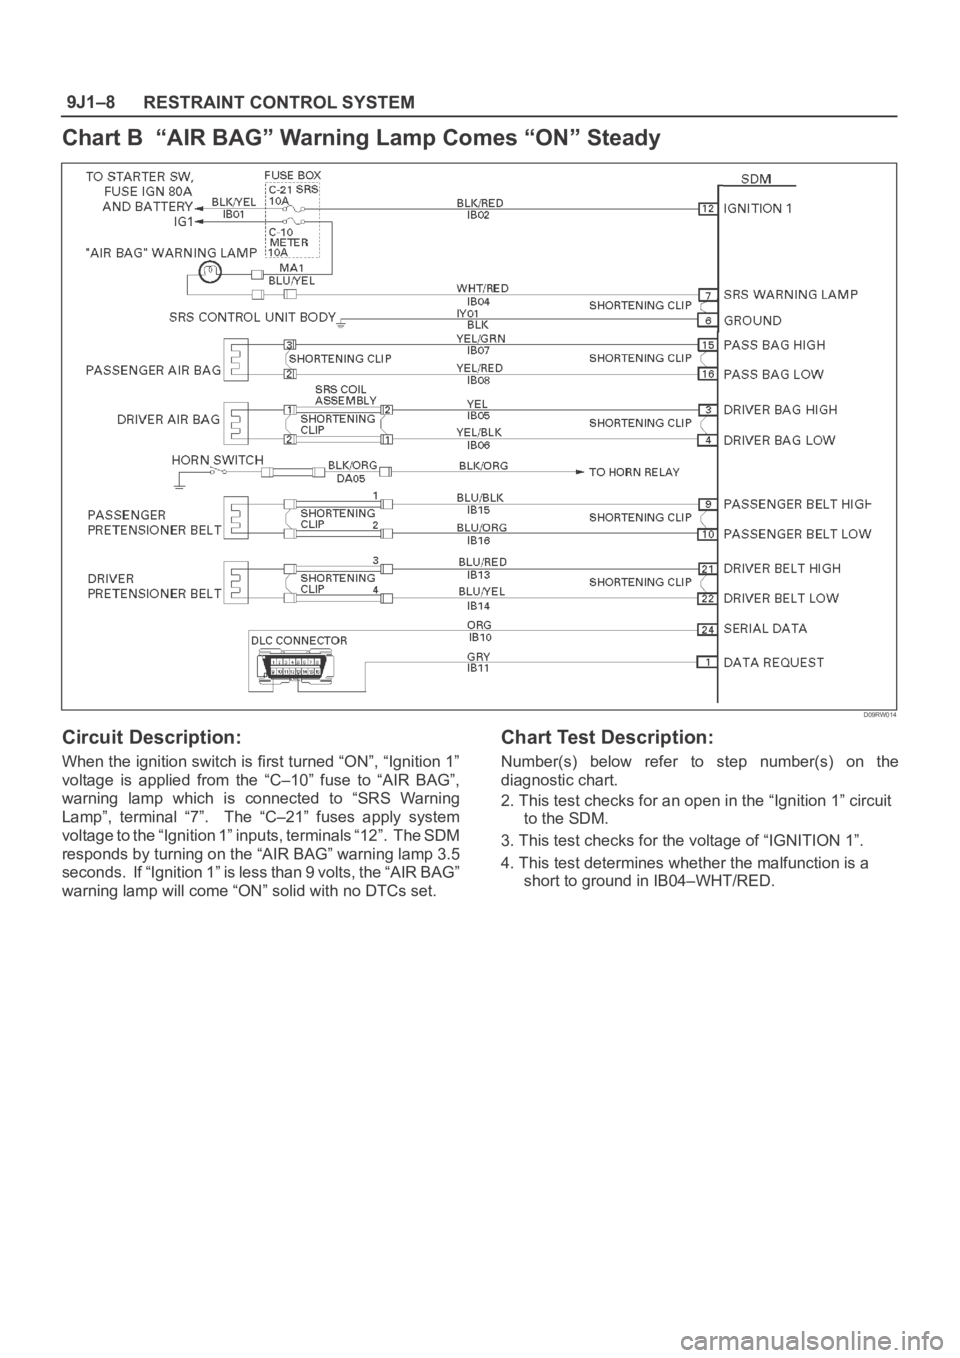
RESTRAINT CONTROL SYSTEM 9J1–8
Chart B “AIR BAG” Warning Lamp Comes “ON” Steady
D09RW014
Circuit Description:
When the ignition switch is first turned “ON”, “Ignition 1”
voltage is applied from the “C–10” fuse to “AIR BAG”,
warning lamp which is connected to “SRS Warning
Lamp”, terminal “7”. The “C–21” fuses apply system
voltage to the “Ignition 1” inputs, terminals “12”. The SDM
responds by turning on the “AIR BAG” warning lamp 3.5
seconds. If “Ignition 1” is less than 9 volts, the “AIR BAG”
warning lamp will come “ON” solid with no DTCs set.
Chart Test Description:
Number(s) below refer to step number(s) on the
diagnostic chart.
2. This test checks for an open in the “Ignition 1” circuit
to the SDM.
3. This test checks for the voltage of “IGNITION 1”.
4. This test determines whether the malfunction is a
short to ground in IB04–WHT/RED.
Page 3497 of 6000
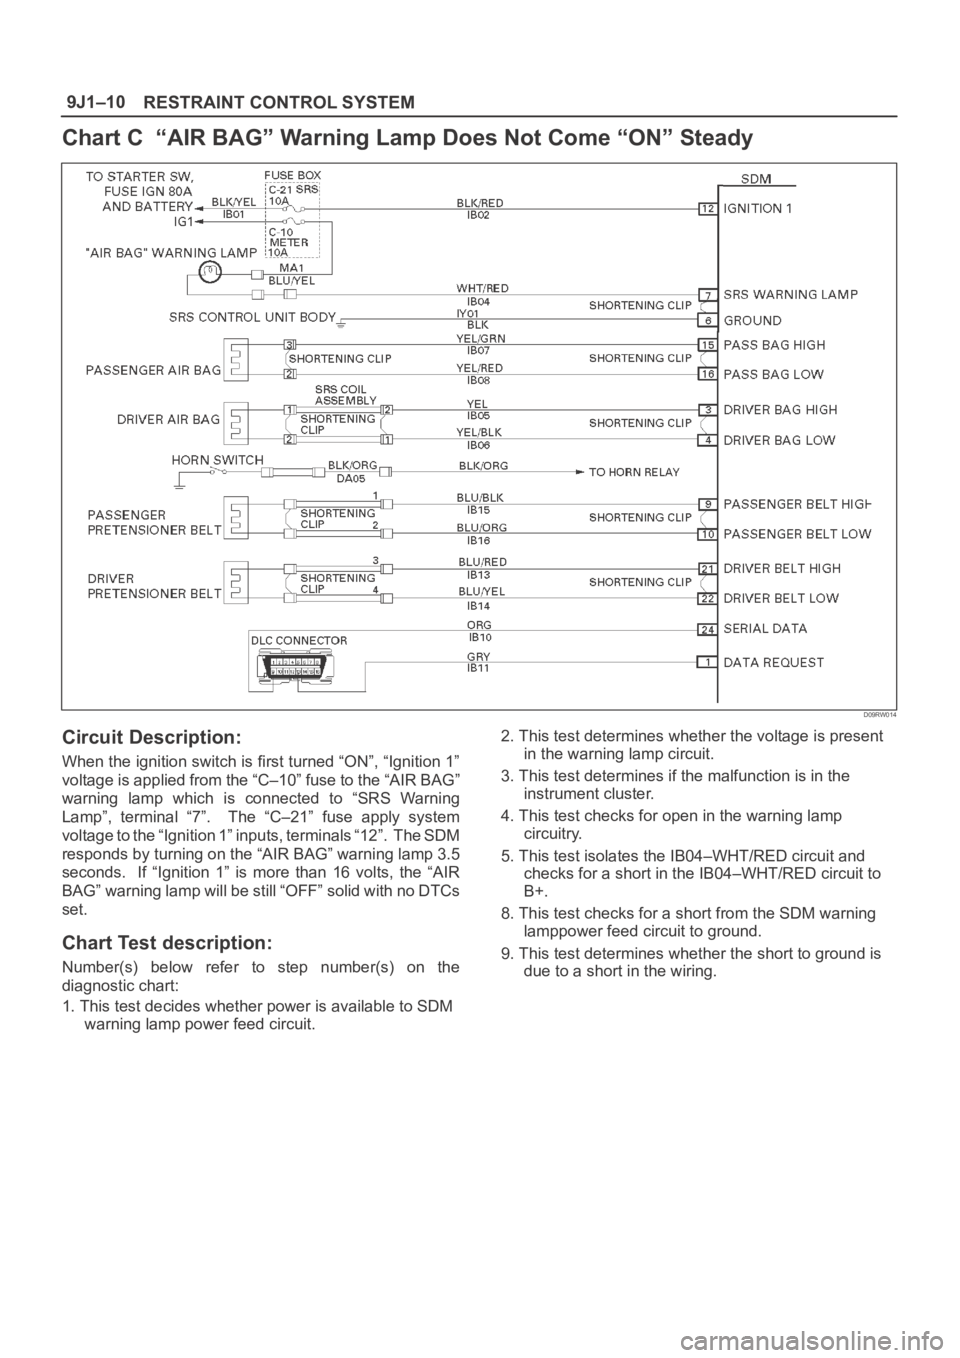
RESTRAINT CONTROL SYSTEM 9J1–10
Chart C “AIR BAG” Warning Lamp Does Not Come “ON” Steady
D09RW014
Circuit Description:
When the ignition switch is first turned “ON”, “Ignition 1”
voltage is applied from the “C–10” fuse to the “AIR BAG”
warning lamp which is connected to “SRS Warning
Lamp”, terminal “7”. The “C–21” fuse apply system
voltage to the “Ignition 1” inputs, terminals “12”. The SDM
responds by turning on the “AIR BAG” warning lamp 3.5
seconds. If “Ignition 1” is more than 16 volts, the “AIR
BAG” warning lamp will be still “OFF” solid with no DTCs
set.
Chart Test description:
Number(s) below refer to step number(s) on the
diagnostic chart:
1. This test decides whether power is available to SDM
warning lamp power feed circuit.2. This test determines whether the voltage is present
in the warning lamp circuit.
3. This test determines if the malfunction is in the
instrument cluster.
4. This test checks for open in the warning lamp
circuitry.
5. This test isolates the IB04–WHT/RED circuit and
checks for a short in the IB04–WHT/RED circuit to
B+.
8. This test checks for a short from the SDM warning
lamppower feed circuit to ground.
9. This test determines whether the short to ground is
due to a short in the wiring.
Page 3498 of 6000
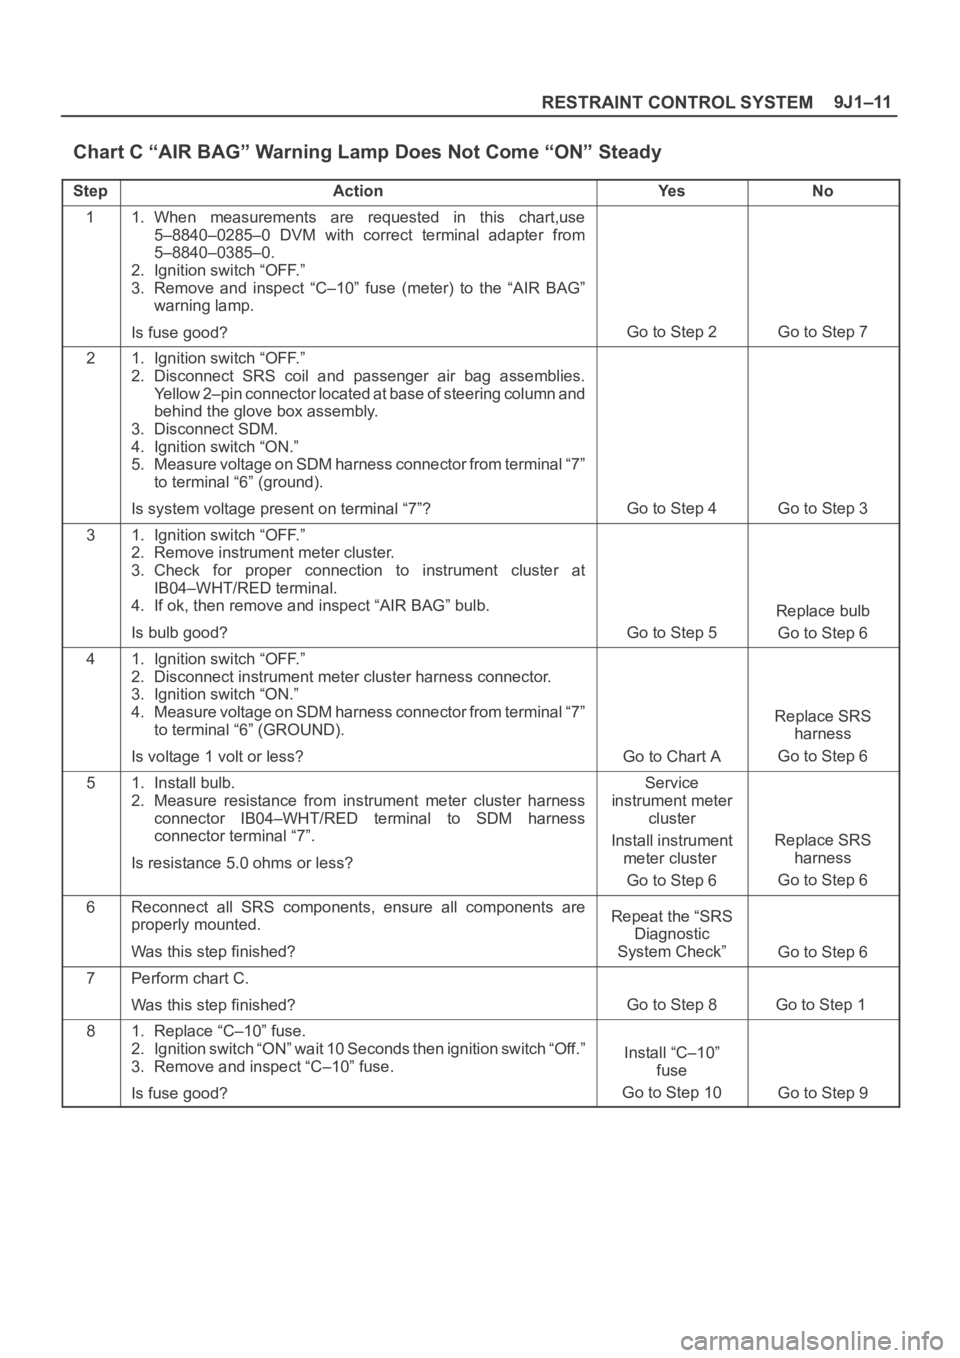
9J1–11
RESTRAINT CONTROL SYSTEM
Chart C “AIR BAG” Warning Lamp Does Not Come “ON” Steady
StepActionYe sNo
11. When measurements are requested in this chart,use
5–8840–0285–0 DVM with correct terminal adapter from
5–8840–0385–0.
2. Ignition switch “OFF.”
3. Remove and inspect “C–10” fuse (meter) to the “AIR BAG”
warning lamp.
Is fuse good?
Go to Step 2Go to Step 7
21. Ignition switch “OFF.”
2. Disconnect SRS coil and passenger air bag assemblies.
Yellow 2–pin connector located at base of steering column and
behind the glove box assembly.
3. Disconnect SDM.
4. Ignition switch “ON.”
5. Measure voltage on SDM harness connector from terminal “7”
to terminal “6” (ground).
Is system voltage present on terminal “7”?
Go to Step 4Go to Step 3
31. Ignition switch “OFF.”
2. Remove instrument meter cluster.
3. Check for proper connection to instrument cluster at
IB04–WHT/RED terminal.
4. If ok, then remove and inspect “AIR BAG” bulb.
Is bulb good?
Go to Step 5
Replace bulb
Go to Step 6
41. Ignition switch “OFF.”
2. Disconnect instrument meter cluster harness connector.
3. Ignition switch “ON.”
4. Measure voltage on SDM harness connector from terminal “7”
to terminal “6” (GROUND).
Is voltage 1 volt or less?
Go to Chart A
Replace SRS
harness
Go to Step 6
51. Install bulb.
2. Measure resistance from instrument meter cluster harness
connector IB04–WHT/RED terminal to SDM harness
connector terminal “7”.
Is resistance 5.0 ohms or less?Service
instrument meter
cluster
Install instrument
meter cluster
Go to Step 6
Replace SRS
harness
Go to Step 6
6Reconnect all SRS components, ensure all components are
properly mounted.
Was this step finished?Repeat the “SRS
Diagnostic
System Check”
Go to Step 6
7Perform chart C.
Was this step finished?
Go to Step 8Go to Step 1
81. Replace “C–10” fuse.
2. Ignition switch “ON” wait 10 Seconds then ignition switch “Off.”
3. Remove and inspect “C–10” fuse.
Is fuse good?
Install “C–10”
fuse
Go to Step 10
Go to Step 9
Page 3499 of 6000
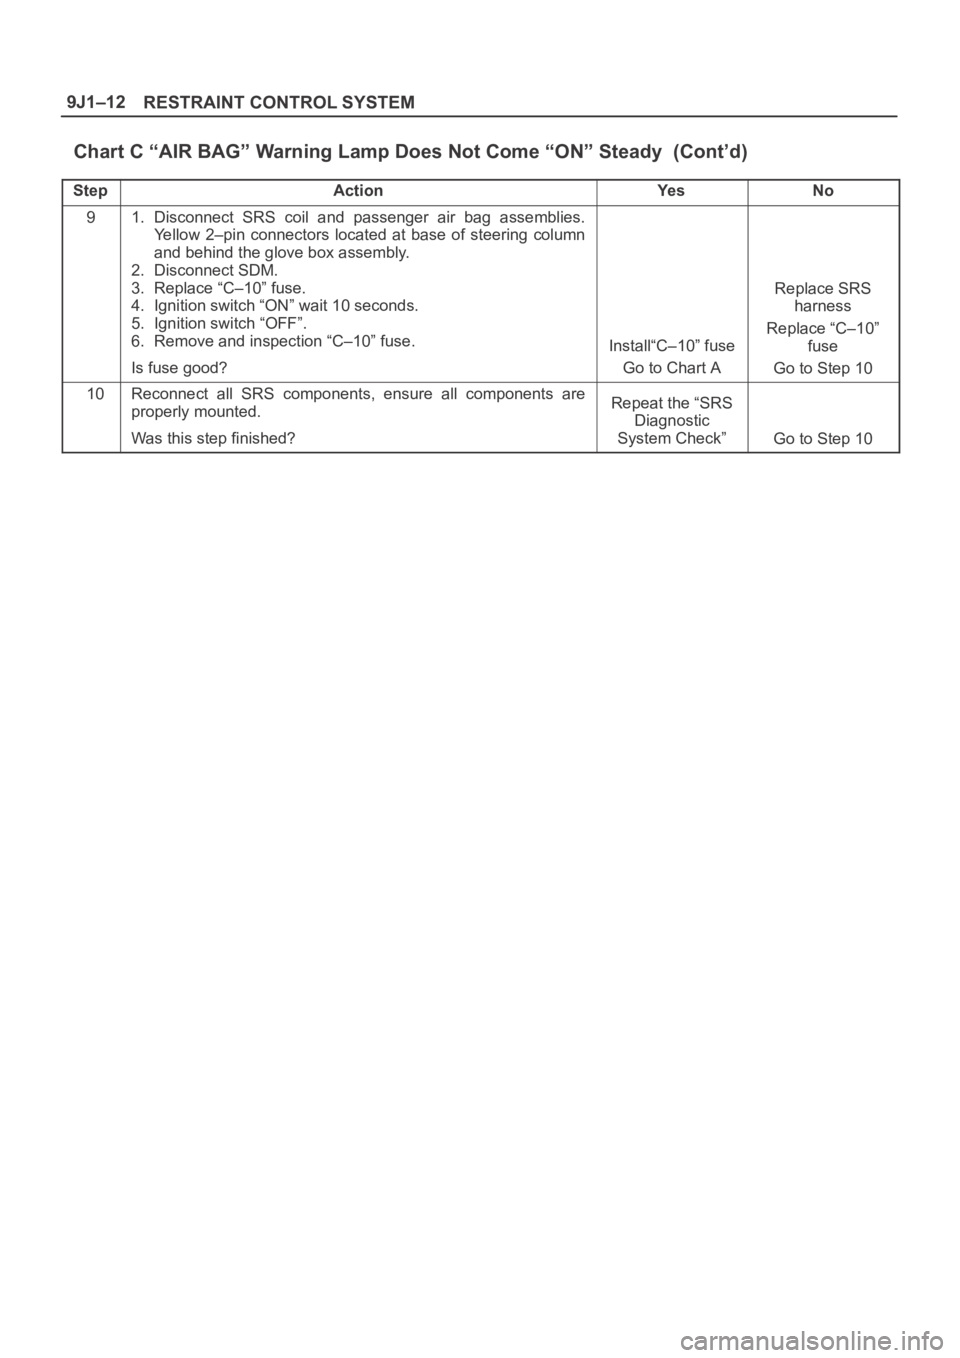
RESTRAINT CONTROL SYSTEM 9J1–12
Chart C “AIR BAG” Warning Lamp Does Not Come “ON” Steady (Cont’d)
StepNo Ye s Action
91. Disconnect SRS coil and passenger air bag assemblies.
Yellow 2–pin connectors located at base of steering column
and behind the glove box assembly.
2. Disconnect SDM.
3. Replace “C–10” fuse.
4. Ignition switch “ON” wait 10 seconds.
5. Ignition switch “OFF”.
6. Remove and inspection “C–10” fuse.
Is fuse good?
Install“C–10” fuse
Go to Chart A
Replace SRS
harness
Replace “C–10”
fuse
Go to Step 10
10Reconnect all SRS components, ensure all components are
properly mounted.
Was this step finished?Repeat the “SRS
Diagnostic
System Check”
Go to Step 10